Dell Deployment Guide Does Not Support Deploying a Windows Cluster with Windows Admin Center
Summary: Windows Admin Center has a cluster Deployment feature which Dell does not support. This article describes how setup before setting the cluster up.
This article applies to
This article does not apply to
This article is not tied to any specific product.
Not all product versions are identified in this article.
Instructions
Windows Admin Center has a cluster Deployment feature. Dell does not support this feature.
Make all nodes match and then make the networks match.
Basic Unconverged:
Two Storage NICs Unclustered each have an IP subnet and gateway with unique subnets.
Management team
Use the Guide for PowerShell steps.
You must set all IP addresses and several other settings. This results in basic functions to get the user back.
Once all steps are done, create the pool and cluster.
Complete these steps but do the above steps first.
Do not forget to enter your names and your sizes!
Also, do not forget there should be some networking setup for each node before you run these.
Make all nodes match and then make the networks match.
Basic Unconverged:
Two Storage NICs Unclustered each have an IP subnet and gateway with unique subnets.
- Separate vLANs
- RDMA enabled Setup, QOS if needed
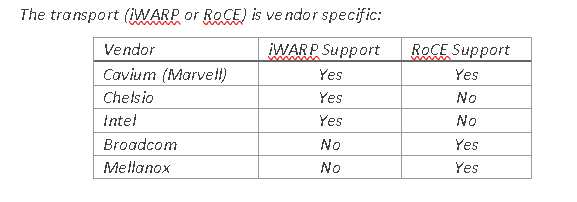
- Ensure the Storage NICs get the right PowerShell to enable RoCE or iWARP.
Figure1: Vendor-Specific Transport
- Clear up any old setups before deploying a pool.
- Name the NICs and give them an IP address.
$S1Nic = Get-netadapter -name "slot1 port1"
$S2Nic = Get-Netadapter  -name "slot2 port2"
$S1vlan = "12"
$S1vlan= "21"

Set-NetAdapter -Name $S1Nic -VlanID $S1vlan -Confirm:$false
Set-NetAdapter -Name $S2Nic -VlanID $S2vlan -Confirm:$false
Management team
Use the Guide for PowerShell steps.
$MgmtNicName = Management
$MgmtNic1= get-netadapter -name Nic1
$MgmtNic1 = Get-netadapter2 -name Nic2
$mgmtvlan = "31"
Install-WindowsFeature -Name Hyper-V,Failover-Clustering,Data-Center-Bridging,BitLocker -IncludeManagementTools -IncludeAllSubFeature -Confirm:$false

New-VMSwitch -Name $VMSwitchName -AllowManagementOS 0 -NetAdapterName $MgmtNic1 ,$MgmtNic2 -MinimumBandwidthMode Weight -Verbose -Confirm:$false

Add-VMNetworkAdapter -ManagementOS -name $MgmtNicName -SwitchName $VMSwitchName –StaticMacAddress $RMAC -Confirm:$false
   Set-VmNetworkadapterVlan -name $mgmtNicName -managementOS -access -vlanid $mgmtvlan
You must set all IP addresses and several other settings. This results in basic functions to get the user back.
#Enable Jumbo Frames
    Set-NetAdapterAdvancedProperty -Name $S1Nic,$S2Nic -DisplayName "Jumbo Packet" -DisplayValue "9014" -Confirm:$false

#Set RDMA
    If((Get-NetAdapter $S1Nic,$S2Nic | Select InterfaceDescription) -imatch "QLogic"){
        Set-NetAdapterAdvancedProperty -Name $S1Nic -DisplayName 'NetworkDirect Technology' -DisplayValue 'iWarp' -Confirm:$false
        Set-NetAdapterAdvancedProperty -Name $S2Nic -DisplayName 'NetworkDirect Technology' -DisplayValue 'iWarp' -Confirm:$false
    }
    If((Get-NetAdapter $S1Nic,$S2Nic | Select InterfaceDescription) -imatch "Mellanox"){
        Set-NetAdapterAdvancedProperty -Name $S1Nic -DisplayName 'DcbxMode' -DisplayValue 'Host In Charge' -Confirm:$false
        Set-NetAdapterAdvancedProperty -Name $S2Nic -DisplayName 'DcbxMode' -DisplayValue 'Host In Charge' -Confirm:$false
    }
Once all steps are done, create the pool and cluster.
Complete these steps but do the above steps first.
New-Cluster –Name MyCLuster1  –Node MYNODE1,MYNODE2 –NoStorage

Enable-ClusterStorageSpacesDirect –CimSession  MyCLuster1

1..(Get-ClusterNode).count| % {New-Volume -FriendlyName Volume$_ -FileSystem CSVFS_ReFS -StoragePoolFriendlyName $(Get-StoragePool -IsPrimordial $false).FriendlyName -StorageTierSizes 1GB -StorageTierFriendlyNames Performance}
Do not forget to enter your names and your sizes!
Also, do not forget there should be some networking setup for each node before you run these.
Affected Products
Storage Spaces Direct R440 Ready Node, Storage Spaces Direct R640 Ready Node, Storage Spaces Direct R740xd Ready Node, Storage Spaces Direct R740xd2 Ready node, Microsoft Windows Server 2019, Microsoft Windows Server 2022
, Microsoft Windows Server 2025, PowerEdge XR2, Poweredge C4140, PowerEdge C6420, PowerEdge C6520, PowerEdge C6525, PowerEdge C6615, PowerEdge C6620, PowerEdge FC640, PowerEdge M640, PowerEdge M640 (for PE VRTX), PowerEdge MX740C, PowerEdge MX750c, PowerEdge MX760c, PowerEdge MX840C, PowerEdge R240, PowerEdge R250, PowerEdge R260, PowerEdge R340, PowerEdge R350, PowerEdge R360, PowerEdge R440, PowerEdge R450, PowerEdge R470, PowerEdge R540, PowerEdge R550, PowerEdge R640, PowerEdge R6415, PowerEdge R650, PowerEdge R650xs, PowerEdge R6515, PowerEdge R6525, PowerEdge R660, PowerEdge R660xs, PowerEdge R6615, PowerEdge R6625, PowerEdge R670, PowerEdge R740, PowerEdge R740XD, PowerEdge R740XD2, PowerEdge R7415, PowerEdge R7425, PowerEdge R750, PowerEdge R750XA, PowerEdge R750xs, PowerEdge R7515, PowerEdge R7525, PowerEdge R760, PowerEdge R760XA, PowerEdge R760xd2, PowerEdge R760xs, PowerEdge R7615, PowerEdge R7625, PowerEdge R770, PowerEdge R7715, PowerEdge R7725, PowerEdge R840, PowerEdge R860, PowerEdge R940, PowerEdge R940xa, PowerEdge R960, PowerEdge T140, PowerEdge T150, PowerEdge T160, PowerEdge T340, PowerEdge T350, PowerEdge T360, PowerEdge T440, PowerEdge T550, PowerEdge T560, PowerEdge T640, PowerEdge XR11, PowerEdge XR12, PowerEdge XR5610, PowerEdge XR7620
...
Article Properties
Article Number: 000210175
Article Type: How To
Last Modified: 02 Jan 2025
Version: 4
Find answers to your questions from other Dell users
Support Services
Check if your device is covered by Support Services.