PowerEdge: How to Install and Manage VMware ESXi on PowerEdge Servers
Summary: This guide covers the basic steps of installing and configuring VMware ESXi on Dell Servers. This article also covers upgrading, downgrading, and combining VMware licenses, as well as installing VMware drivers, Dell tools, and generating VMware support bundles. ...
This article applies to
This article does not apply to
This article is not tied to any specific product.
Not all product versions are identified in this article.
Instructions
How to Install and Manage VMware ESXi on PowerEdge Servers.
Table of Contents:
- Installing ESXi using a Dell Customized ISO
- Installing and Assigning Licenses
- VMware Drivers and Firmware HCL
- Installing and connecting to OMSA
- Installing RACADM
- Using the DCUI Console
- Generating VMware support bundles
- Uninstalling/Removing VIB packages
Installing ESXiI using a Dell Customized ISO
Follow these steps to install ESXi using a custom Dell ISO:
-
Download the custom Dell ISO
- Download the latest version of the custom Dell ISO from Broadcom's VMware Download Page
- See the steps to find the required ISO from this article: VMware vSphere: How to Download and Use Dell Customized VMware ESXi Images for PowerEdge Servers
Note: Log in with a Broadcom username and password is required in order to download the files.- If an older version is required, download it from the Dell support site. PowerEdge: How to find the older versions of Dell Customized ISOs for VMware
- Download the latest version of the custom Dell ISO from Broadcom's VMware Download Page
Booting the ISO
Follow these steps to boot the ISO:
-
Mount the ISO
- If iDRAC Enterprise is available, mount the ISO on the host using iDRAC Enterprise. See more info on this process here: PowerEdge: How to use the Virtual Media Function on iDRAC6, iDRAC7, iDRAC8, and iDRAC9
- Optionally, create a bootable USB using the ISO following the steps here: PowerEdge: How to create a bootable USB drive for OS Installation
-
Boot the media
- If booting the ISO directly using the IDRAC Virtual Console, boot the media by pressing F11 during boot and then select the Virtual CD/DVD from the onetime boot menu, or using the IDRAC next boot option.
- If booting from USB, with the USB drive connected to one of the USB ports select the USB drive from the onetime boot menu.
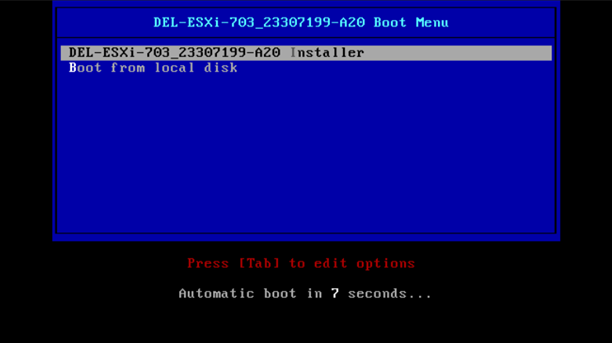
- Once the media is loaded, the ESXI boot screen shows the options to boot the installer or boot the local disk. The installer boots automatically if no selection is made.
Installing ESXi
Follow these steps to install ESXi:
-
Load the installer components
- The Bumblebee screen loads the installer components.
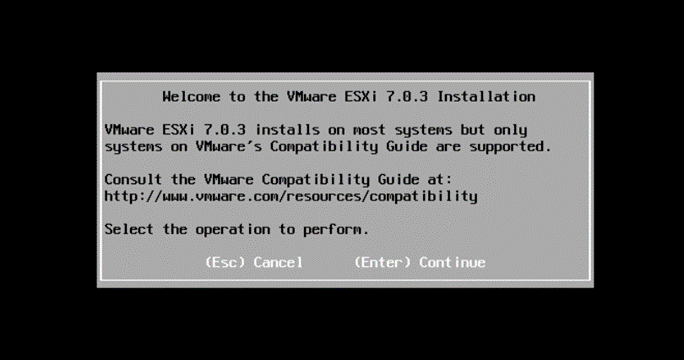
- After the boot has finished, the main welcome screen is seen.
-
- Press the F11 key to accept the user license.
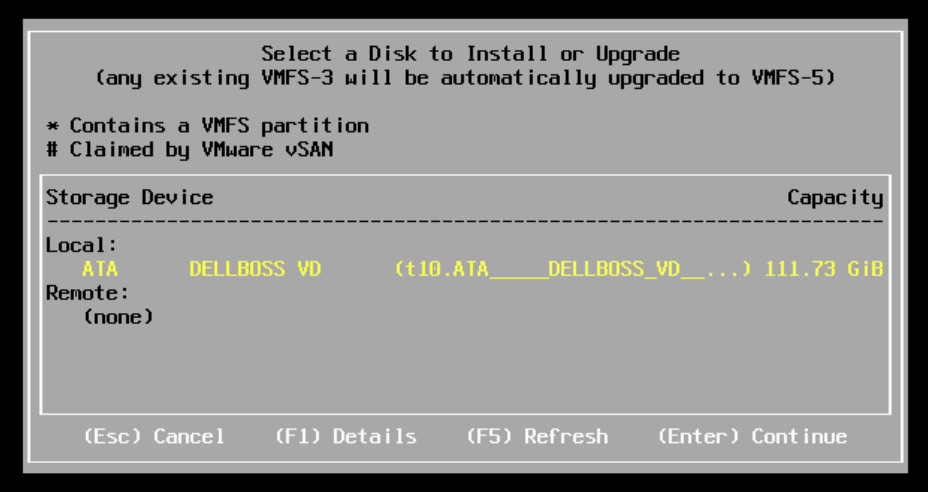
- Select the disk to install the OS onto.
-
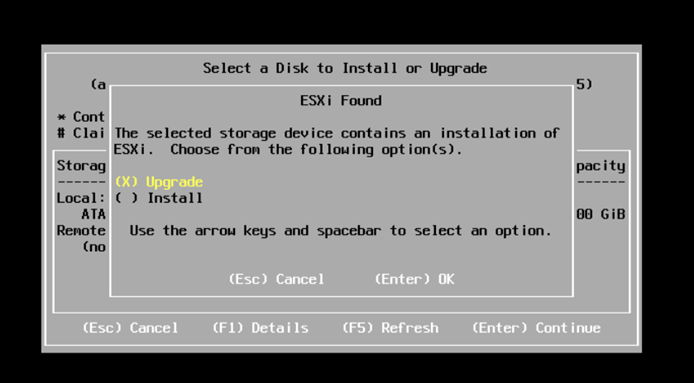
- Choose to install or upgrade the existing installation.
-
- Select the keyboard layout.
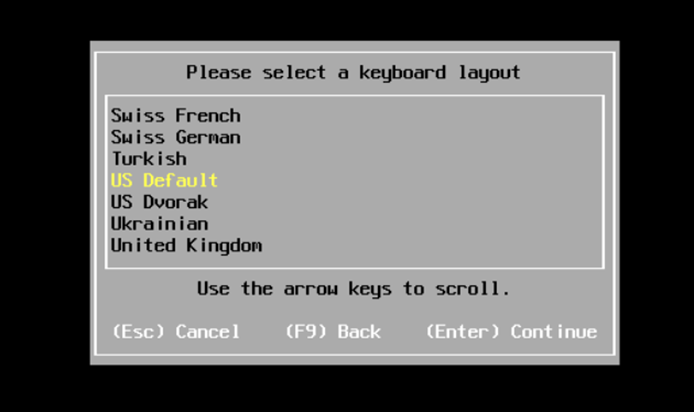
-
- Set the root password
Caution: Do not forget this password or ESXi has to be reinstalled.
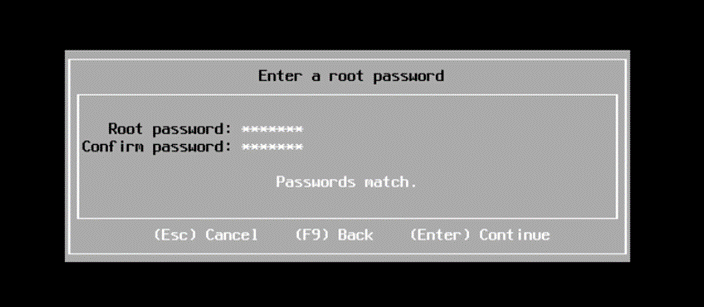
-
- Verify that the install disk is correct and choose to Install (F11) or go back to make changes (F9)
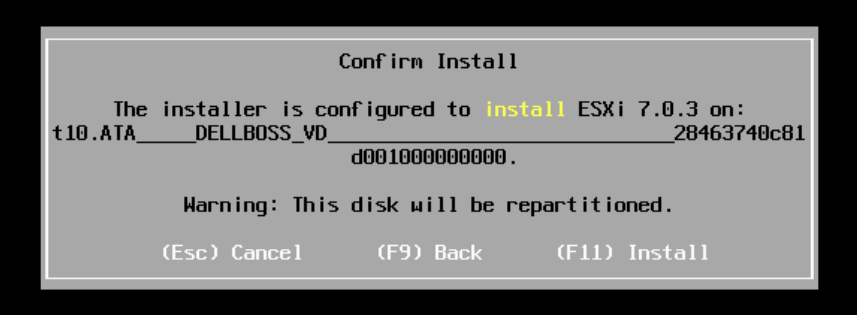
-
- Once the install process has completed, a prompt to reboot the server is shown where it then proceeds with a first-time boot of the OS to begin configuration such as assigning a Management IP address.
Installing and Assigning Licenses
Install the license using the host web client, or if it is managed by vCenter the license can be applied using vCenter licenses section.
-
Installing the license using the Hosts Web Client:
- To add the license to a single host, log in to the host web client by going to the hosts management IP in a web browser and login.
- The host login would use the hosts root user and password set during install:
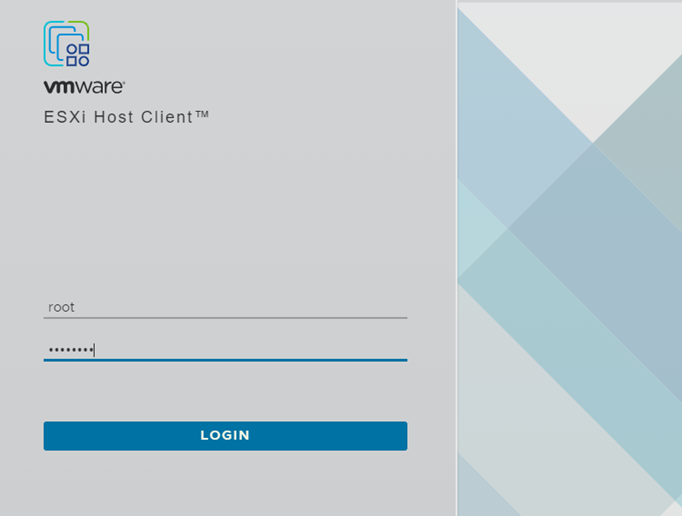
-
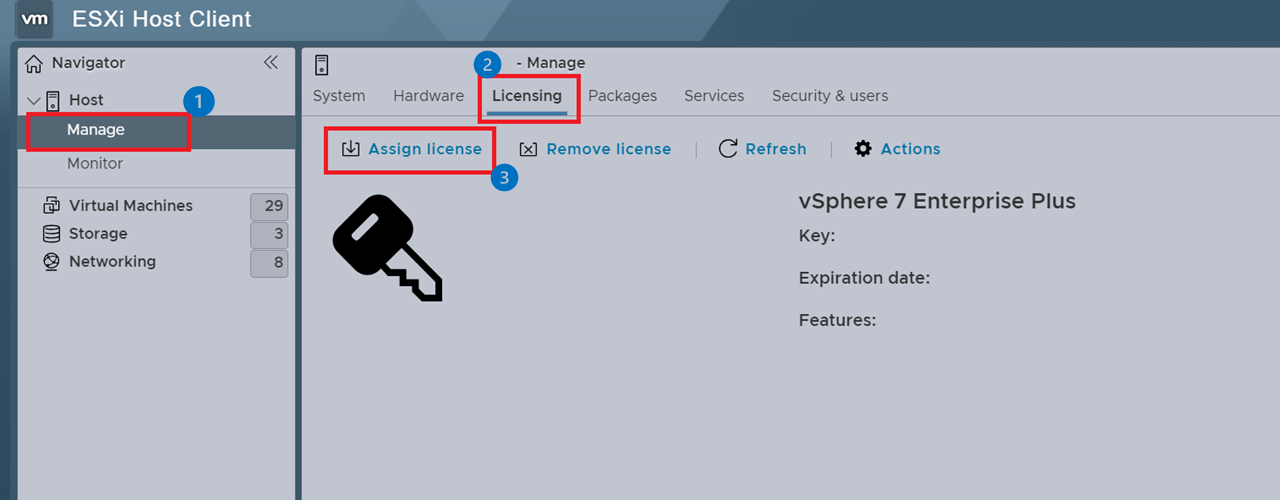
- Select Manage on the left navigation panel and then select the Licensing tab
- Once on the Licensing Page, click Assign License and put in the license key to assign it to the host.
-
Installing the license using vCenter:
- Log in to vCenter using the vCenter SSO login

-
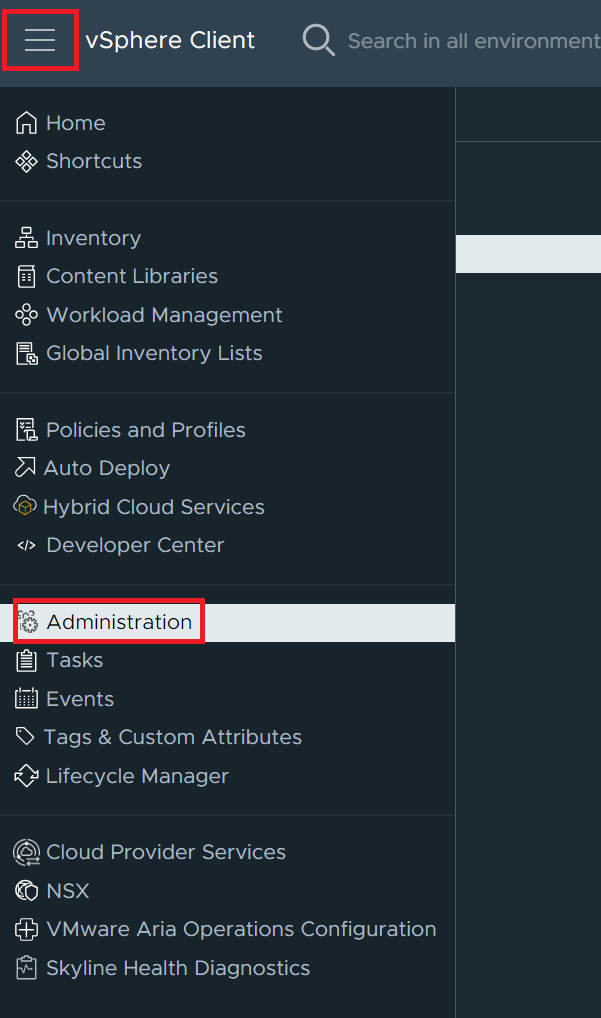
- Select the Menu button and choose Administration.
-
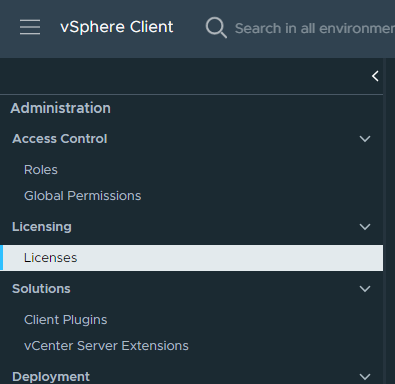
- Choose the Licenses option under the Licensing section.
-
- Click the ADD option in the upper left to start the New License wizard.

-
- Enter the license key into the New License dialog box and then click Next.

-
- Assign a name to the license (for example, ESXi License).
- Once back on the Licenses page click the Assets tab and go to the product required to assign the license to, for this instance it would be the HOSTS tab.
- Select the host from the list to assign the license to.
- Click ASSIGN LICENSE and select the license to assign using the name assigned when adding the license.


Understanding License basics
-
Downgrade or Upgrade Licenses:
- VMware licenses are not version locked, they can be upgraded or downgraded as needed.
- The link below provides additional info on how to downgrade or upgrade a license from the Broadcom account portal.
-
Combining Licenses:
- VMware licenses can also be combined to be easier to manage. For example, instead of having multiple ESXi host licenses, combine them into a single license that can be applied to multiple hosts.
- The host licenses assign by CPUs, so if the ESXi license is for a host with two CPUs, a license with at least 2 CPUs included is required. If there are three licenses that contain two CPUs each, combine them into a single license that covers six CPUs. Each time a license is assigned to a host, it subtracts the used CPUs from the total in the license.
- Some licenses are sold only as a single CPU license, a server with two CPUs installed would require a single license that can support two CPUs. It is not possible to assign a single CPU licenses to a host with more than one CPU as it cannot cover the host on its own. The licenses must be combined into a single license that supports at least 2 CPUs.
- The below link can help to guide on the process of combining licenses from the online Broadcom account portal:
VMware Drivers and Firmware HCL
The Dell VMware drivers are integrated to the Dell Custom ISOs. Sometimes an upgrade of a specific driver is required and you do not want to do a full upgrade of the OS and all the drivers. In this scenario, download the drivers manually by finding the version needed from the VMware HCL. Then download the driver from the new Broadcom download page previously mentioned.
-
Find the I/O Device Info:
- Use a Dell SupportAssist Collection (TSR) pulled from the IDRAC to help verify information such as the installed firmware and Device IDs for the component to find drivers for.
- For assistance exporting a TSR, see the guide Export a SupportAssist Collection Using an iDRAC9.
- For this example, an updated driver for an X710 Network Adapter installed in the server is required.
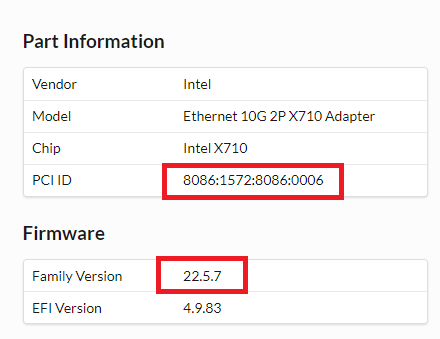
- With the NIC selected in the TSR view the Part Information section that provides the PCI IDs and the firmware version required in order to find the driver.
-
- In the image above, see the FW version installed,
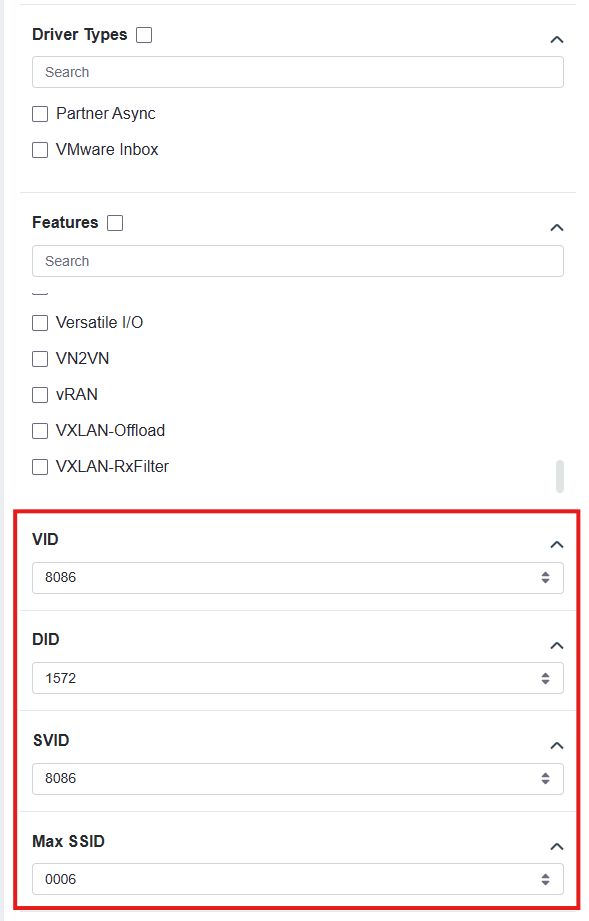
22.5.7,and the device IDs of8086:1572:8086:0006 - Next go to the VMware HCL
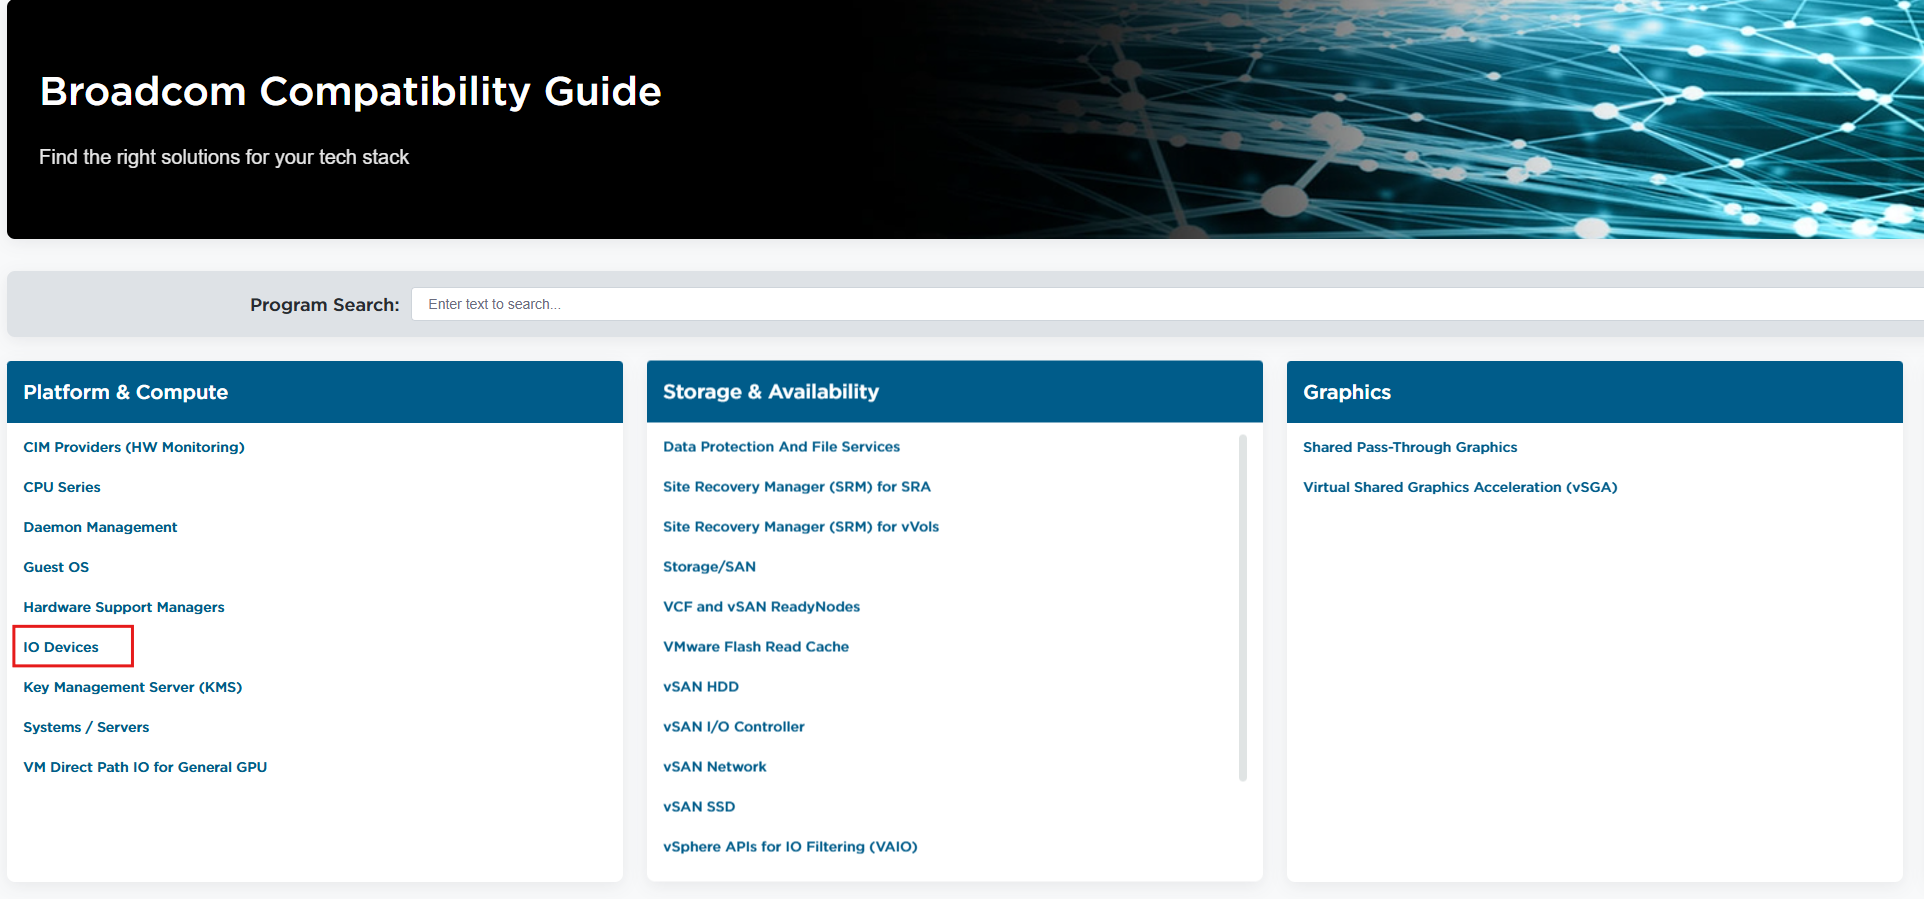
and select I/O Devices from the list under Platform and Compute and then on the left side scroll down to use the drop downs to select the device IDs needed and then scroll back to the top to click View Results.
- In the image above, see the FW version installed,
-
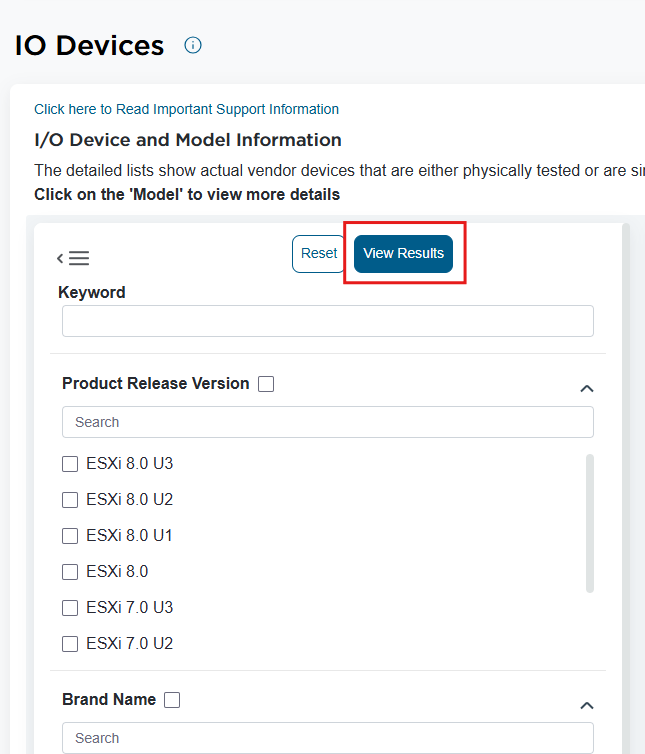
- Once the IDs have been set, scroll back up to the top to click the View Results button.
-
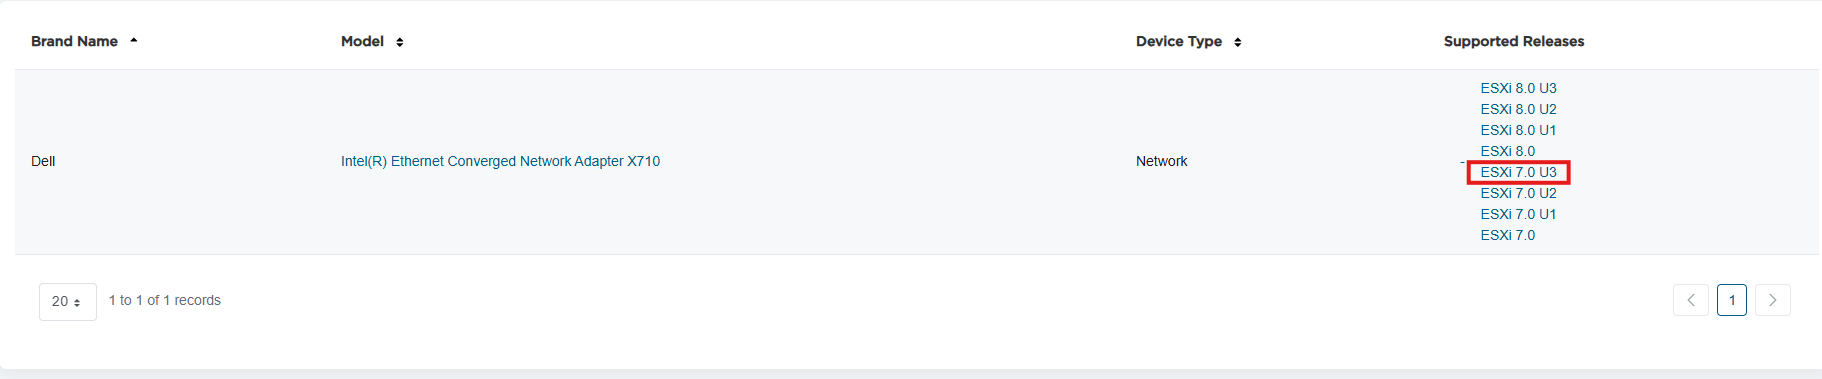
- The results are shown below indicating that it found one entry that matched the adapter IDs requested.
- Select the ESXi version that drivers are needed for, in this example its ESXi 7.0U3. It is also possible to filter for the release version in the search options
-
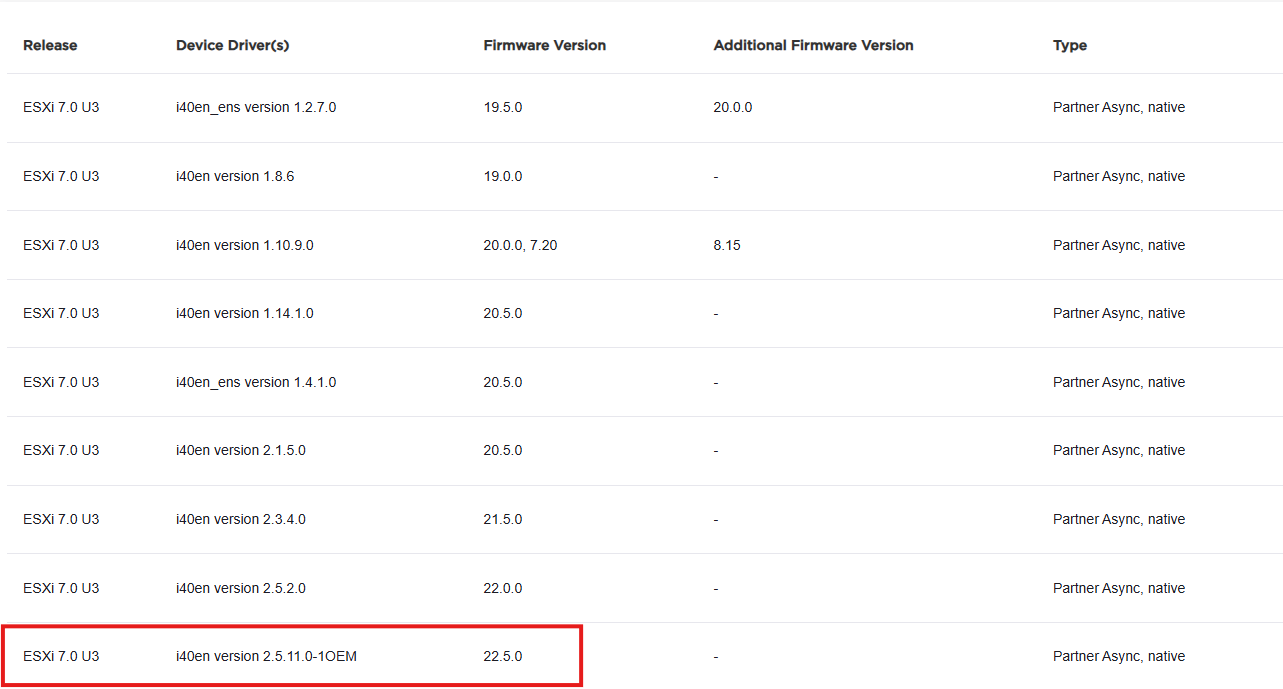
- Next see a list of the driver versions and the minimum firmware version required for each.
-
Note: If the minimum version required shows firmware newer than that installed the device's firmware must be upgraded before installing the driver.
- For our current example, firmware version
22.5.7is installed allowing install of any driver that lists at least22.5.7or older for its requirement. - Given the firmware version and drivers requirements install the latest driver listed:
i40enversion2.5.11.0-10EM. - Next go to Broadcom's VMware ESXi driver portal, VMware Driver Download Page
- For our current example, firmware version
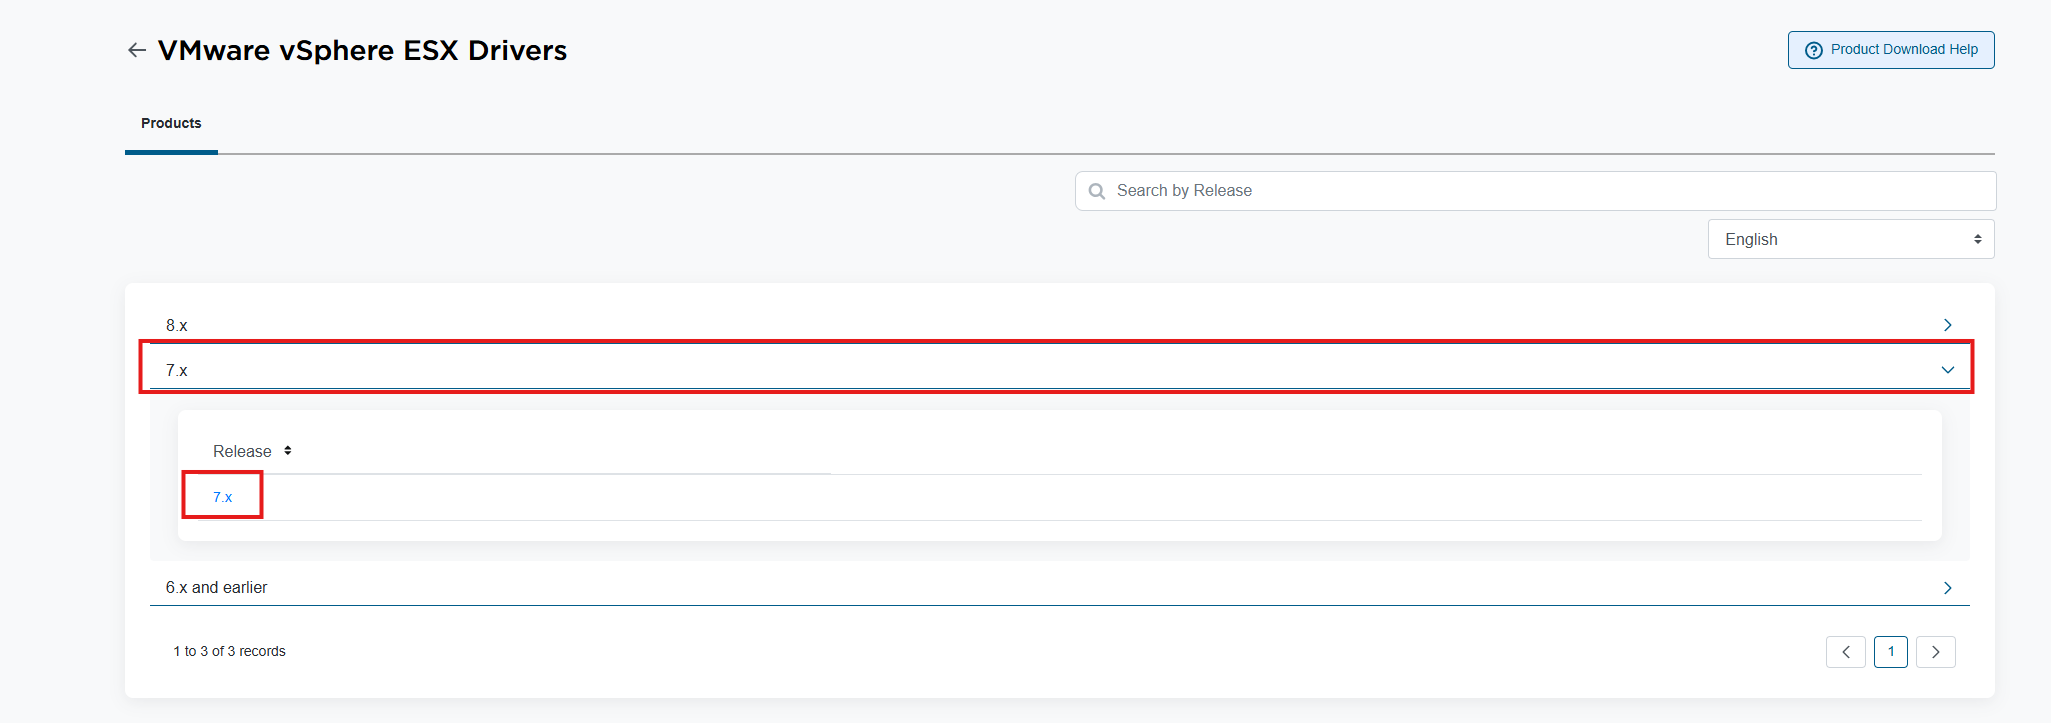
Note: Log in with a Broadcom username and password in order to download the files.
-
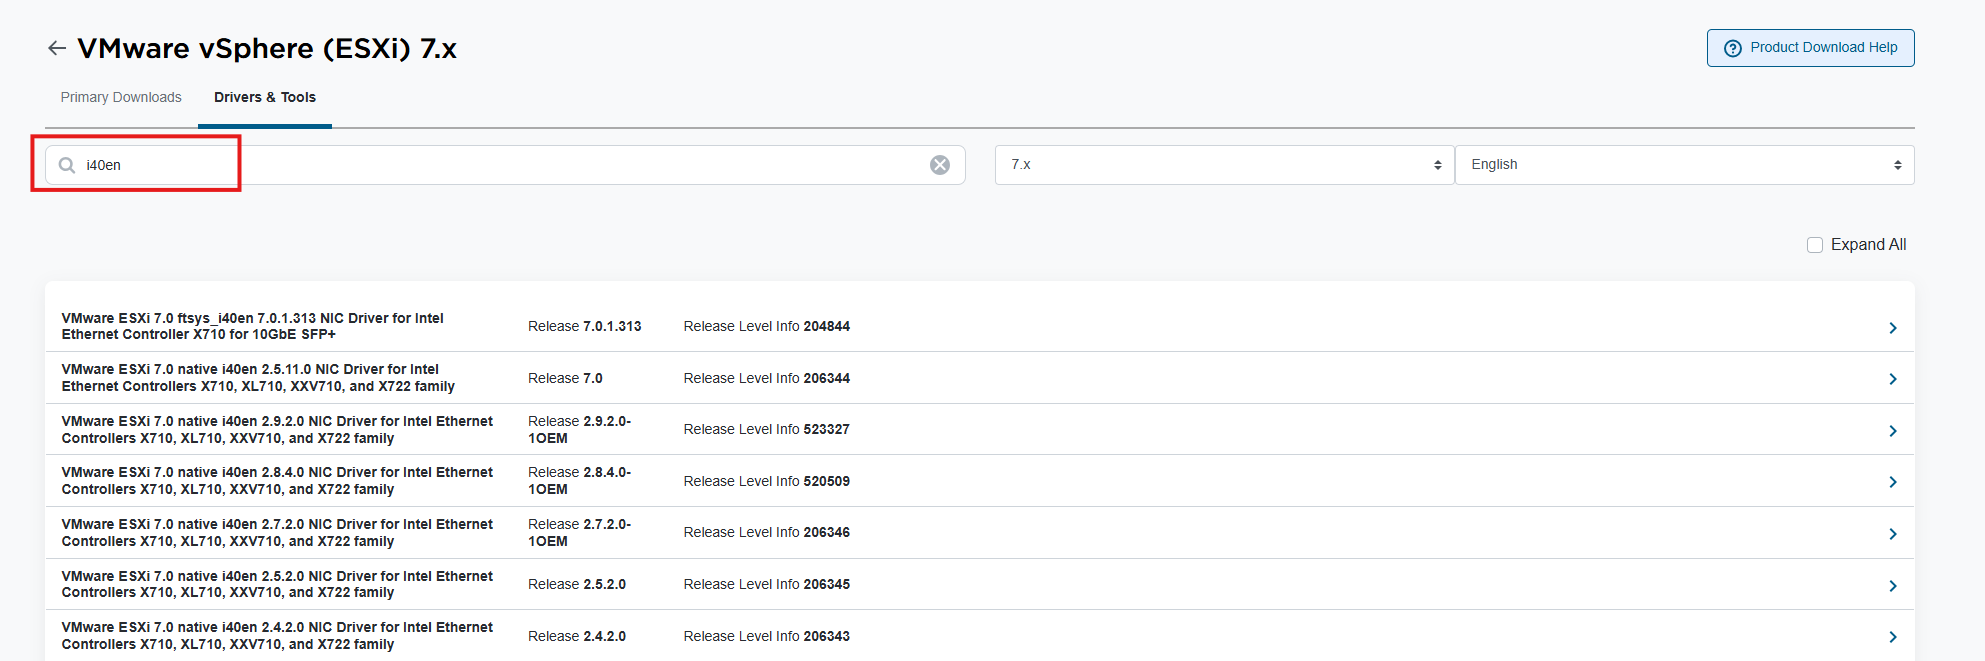
- In the search field, filter using the driver name which for this example would be
i40en.
- In the search field, filter using the driver name which for this example would be
-
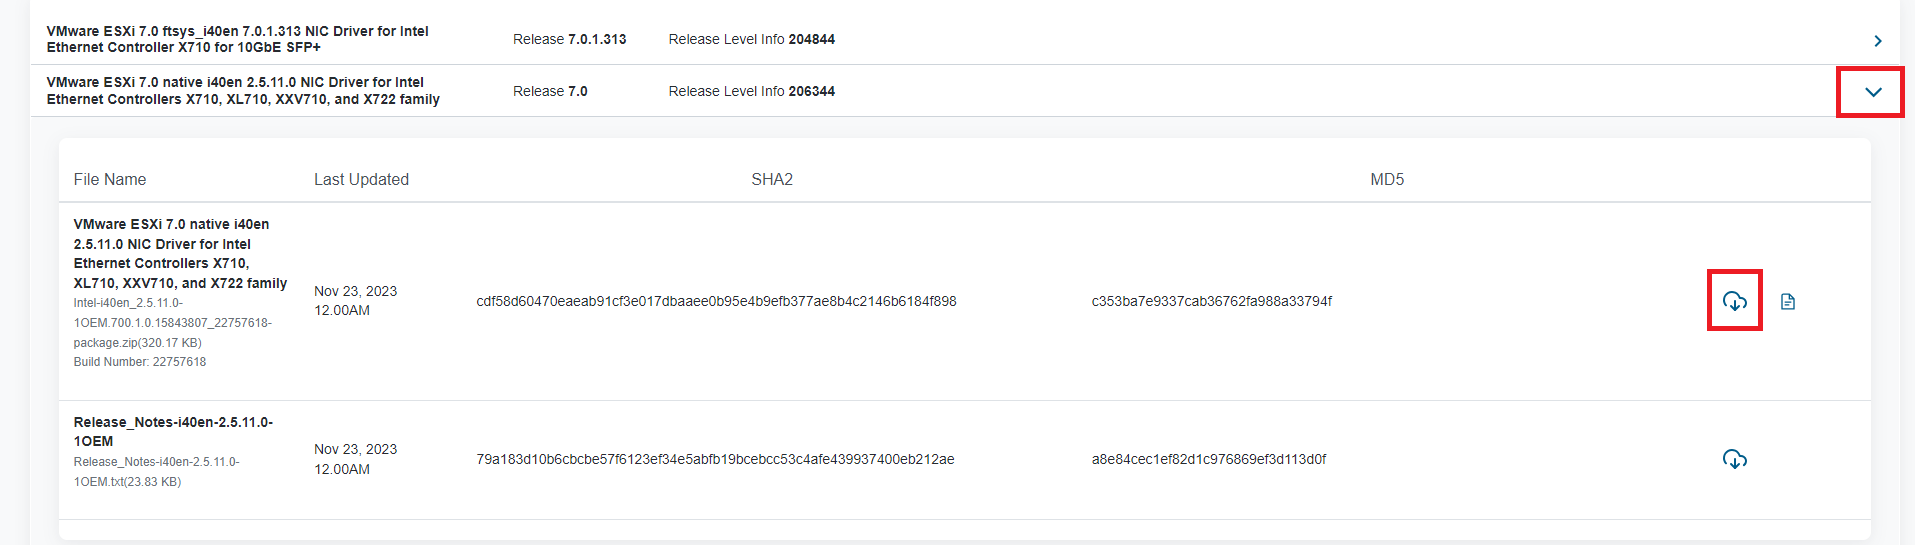
- Once the required driver version is found, click it to open up its download option, and then click the download button:
-
- Once it is downloaded, the .zip file contains another .zip file inside it. That inner .zip file must be extracted and then copied over to the host. The command fails to install the double-zipped file.
- The driver can be installed manually over SSH shell using the command below:
esxcli software vib install -d /tmp/bundlefilename.zip
Note: When running the install command, provide the full path to the file even if running from the same location.
Installing and connecting to OMSA
-
To install OMSA in ESXi:
- Use the Hosts Web interface or command line (CLI) to install the OMSA VIB. (Similar to the process of install a driver)
- Install OMSA on a client system or access another system with OMSA already installed.
- Connect to the ESXi host management IP from OMSA on the client system.
- For more detailed instructions, follow the information provided here: How to Install OpenManage Server Administrator on VMware to Collect Logs
Installing RACADM
-
Download the RACADM iDRAC Tools VIB:
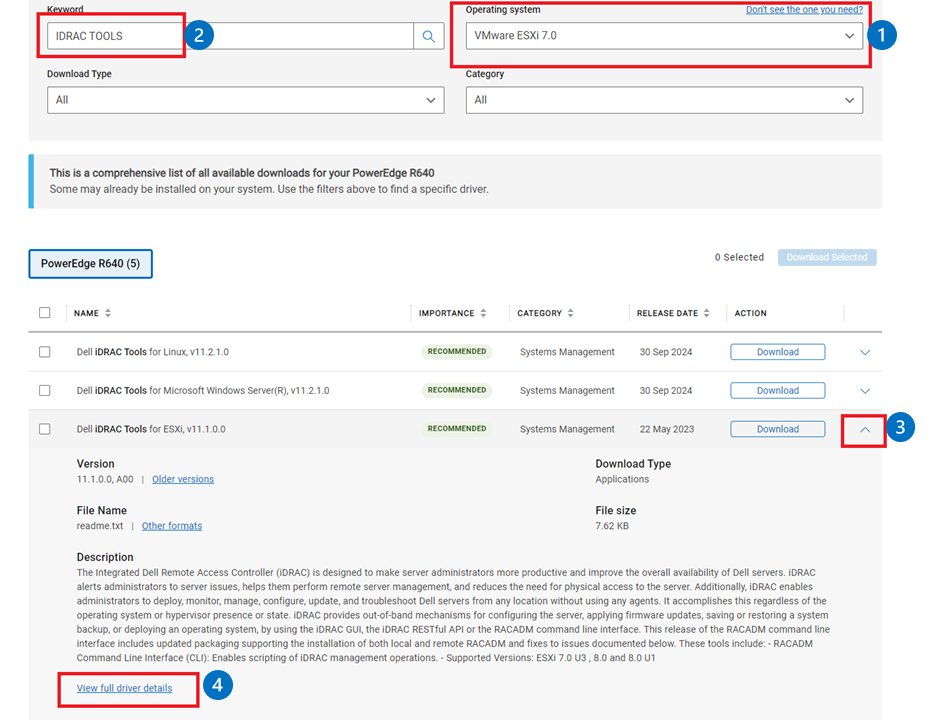
- On the Support Site, provide your service tag or server model and then select the version of ESXi installed.
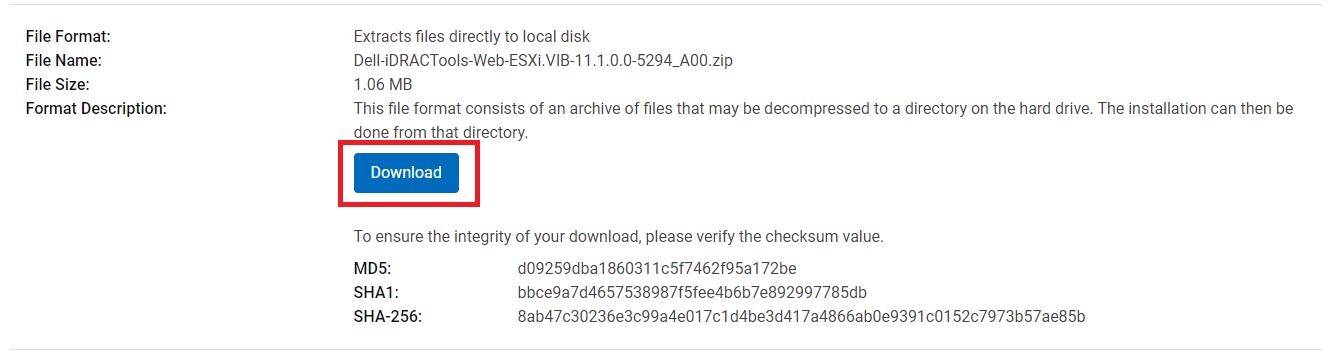
- From the download list, filter for iDRAC Tools and then expand the version needed and click View full driver details.
-
Install racadm on the host:
- Copy the .zip file to a folder on the host such as
/tmp - SSH into the host and run the install command:
esxcli software vib install -d /tmp/DellEMC-iDRACTools-Web-ESX70i.VIB-10.2.0.0-4631_A00.zip
Note: The-dis used to specify it is a.zipfile, if the file was a.vibfile specify-vinstead.- Once installed, run racadm commands. The racadm files are located in the
/opt/dell/racadmfolder.
- Copy the .zip file to a folder on the host such as
Using the DCUI Console
The Direct Console User Interface (DCUI) is the main console screen seen when connecting to the system monitor or IDRAC Virtual Console. It allows for basic configuration options, such as setting up the management IP, or changing the root password. It is also possible to trigger a reboot or shutdown from here as well.

-
DCUI Configuration Section:
- Press the F2 key to prompt for login to the DCUI. Once logged in see the System Configuration options as seen in the image below.

-
- From the configuration options, configure the network settings, or enable options under the Troubleshooting Options section.
-
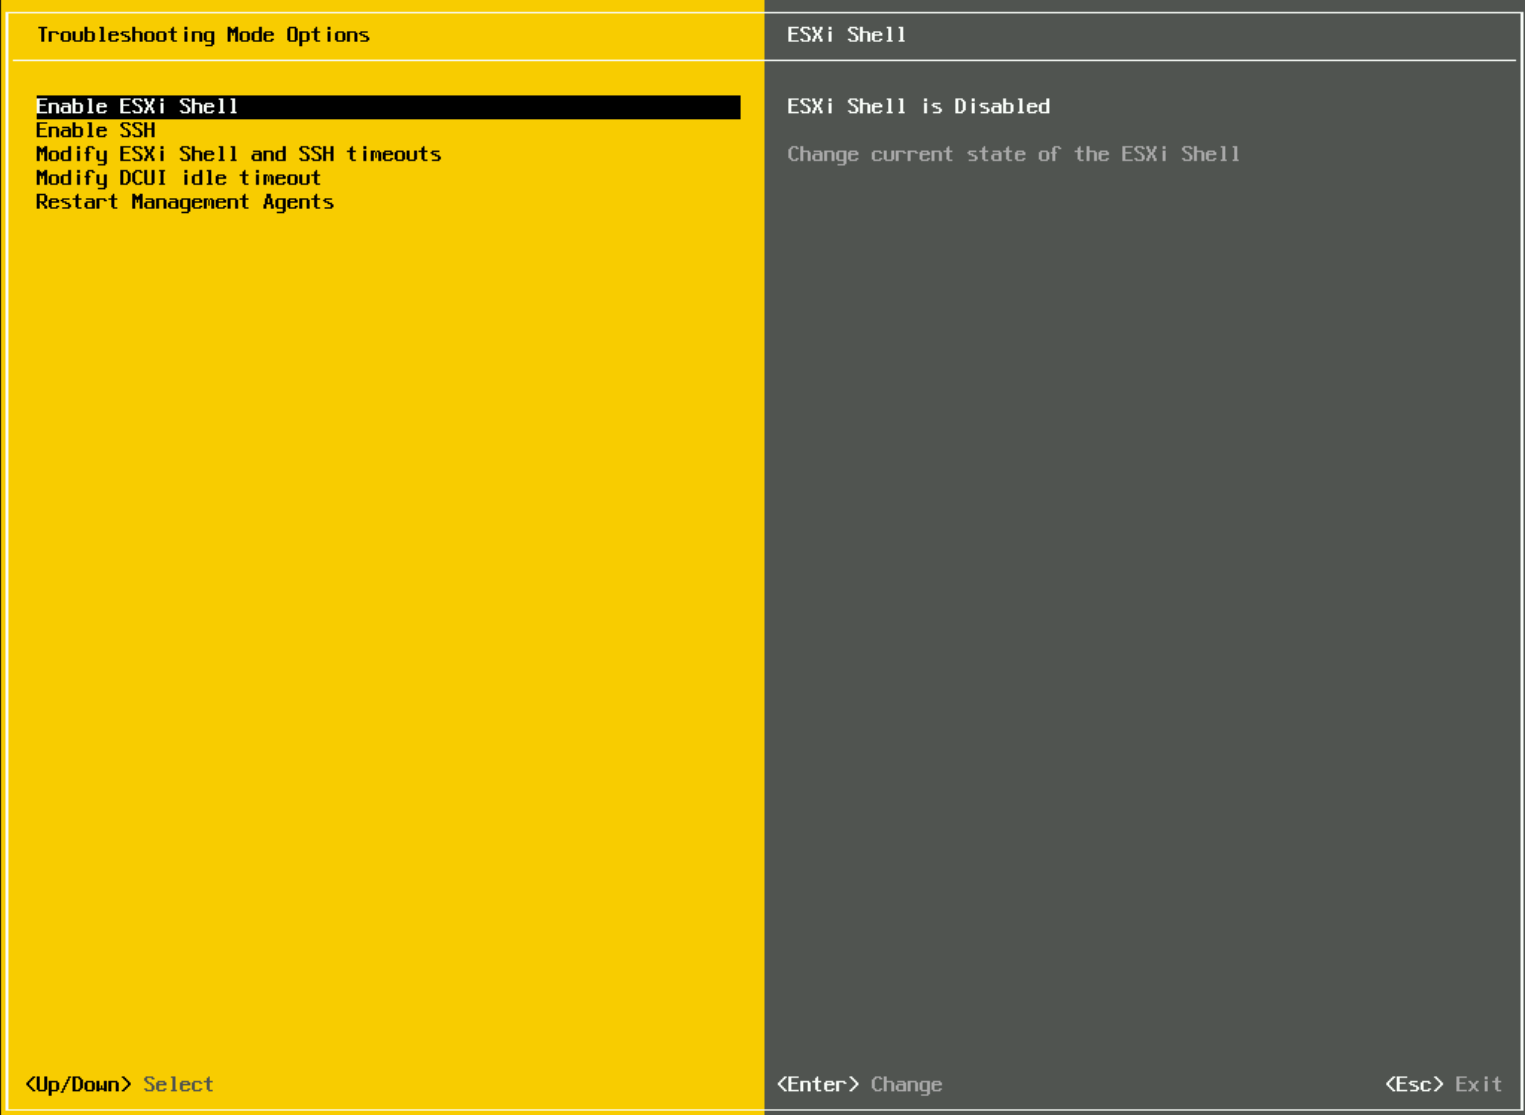
Troubleshooting Options:
-
- Enable ESXi Shell - This enables the local ESXi console shell. If enabled, access the shell console by pressing
ALT + F1.
- Enable ESXi Shell - This enables the local ESXi console shell. If enabled, access the shell console by pressing
Note: Switch back to the main DCUI screen by pressing Alt + F2.
-
- Enable SSH - This allows remote access to the shell from SSH connections.
- Restart Management Agents - This restarts the network services, this can help restore connection if network issues are seen.
-
Configure the management network:
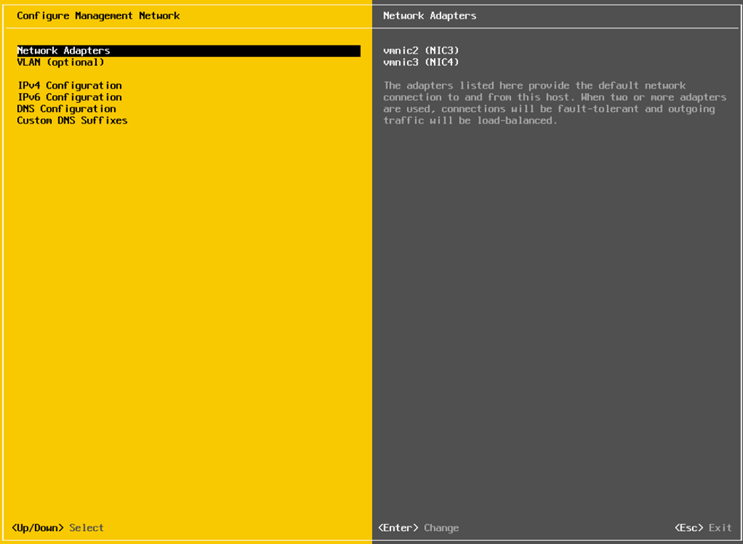
- From the main DCUI screen Select Configure Management Network, from here choose different options to configure the network.
-
- Network Adapters - From here select which Network Adapters the Management vSwitch uses for connection.
- VLAN - Allows a user to specify a VLAN for the Management Network to use.
- IPv4 Configuration - Choose either DHCP or specify static
IPv4settings. - IPV6 Configuration - Choose either DHCP or specify static
IPv6settings. - DNS Configuration - Choose to obtain automatically (DHCP) or provide a static
IPv4address for the DNS Servers. - Custom DNS Suffixes - Specify the DNS Domain Name
Generating VMware support bundles
Generate a VMware support bundle from either the host directly or from vCenter.
Follow the steps below to generate a support bundle:
-
Generate the support bundle from the host:
- Access the hosts login page by entering the hosts management IP address in a web browser.
- Log in using the hosts
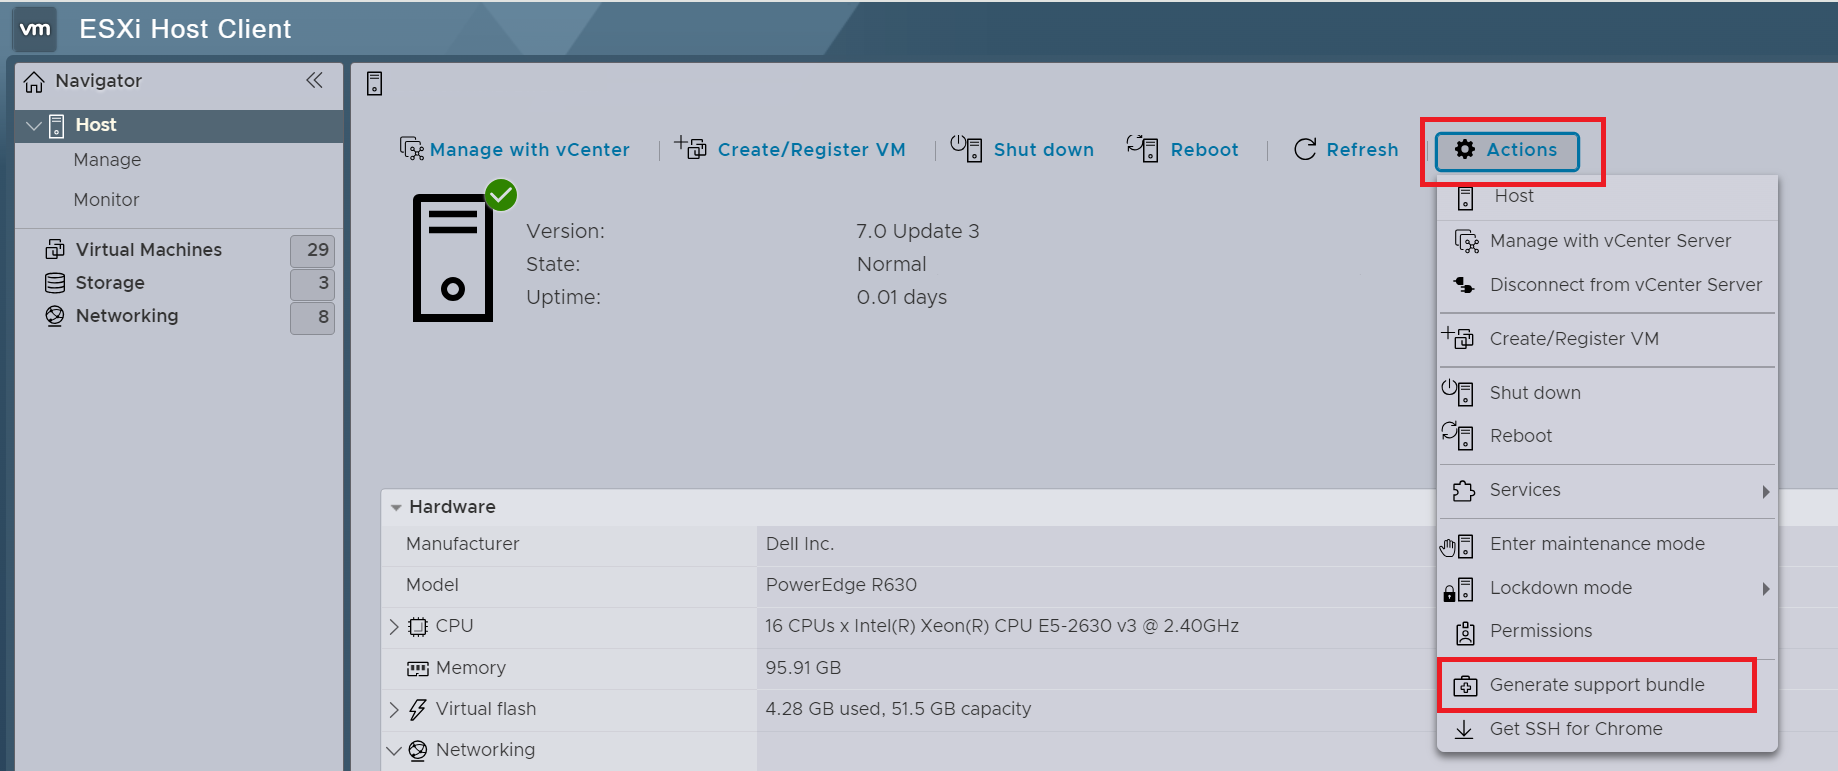
rootuser andpassword. - On the Hosts page, click the actions drop down and select Generate support bundle.
-
- The bundle begins to generate and download using the web browser's default download location.
-
Generate the support bundle from vCenter:
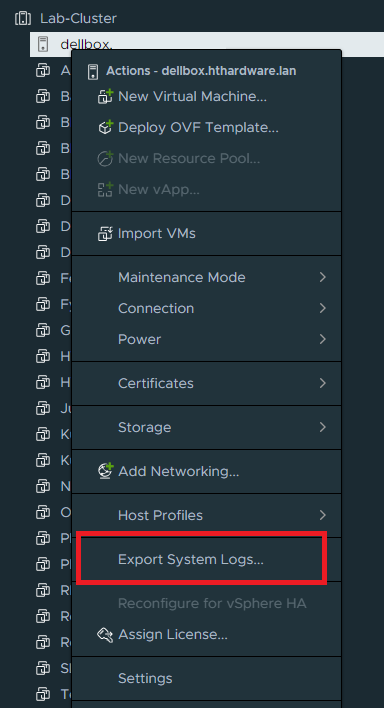
- From vCenter Inventory on, the left select the host and right-click it to open the options menu and Select Export System Logs.
-
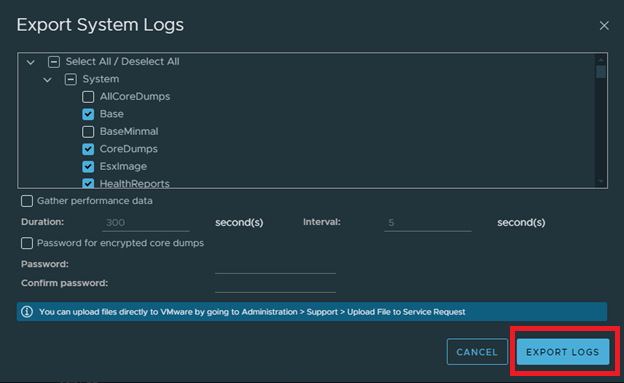
- Select the components to collect or leave the default options checked.
-
- Click Export Logs.
Uninstalling/Removing VIB packages
- Follow these steps to uninstall or remove VIB packages:
- Using grep with the list command filter the list of installed VIB packages to confirm the VIB name
- SSH into the host and run the command:
# esxcli software vib list | grep -i DEL
dell-shared-perc8              06.806.92.00-1OEM.700.1.0.15843807     BCM      VMwareCertified   2022-04-08
dcism                          4.3.0.0.2781-DEL.700.0.0.15843807      DEL      VMwareAccepted    2023-01-18
dell-configuration-vib         7.0.0-A00                              DEL      PartnerSupported  2022-04-08
dell-system-update             2.0.0.0.751-DEL.700.0.3                DEL      PartnerSupported  2023-01-18
dellemc-fac-dcui               7.0.3-A00                              DEL      PartnerSupported  2022-04-08
dellemc-osname-idrac           7.0.0-A00                              DEL      PartnerSupported  2022-04-08
openmanage                     10.1.0.0.4634-DEL.700.0.0.15843807     DEL      VMwareAccepted    2024-05-11
racadm                         10.2.0.0.4631-DEL.700.0.0.15843807     DEL      PartnerSupported  2024-05-11
lsuv2-oem-dell-plugin          1.0.0-1vmw.703.0.20.19193900           VMware   VMwareCertified   2022-04-08
-
- From the list, see the name of the VIB on the left column.
- Uninstall the VIB package
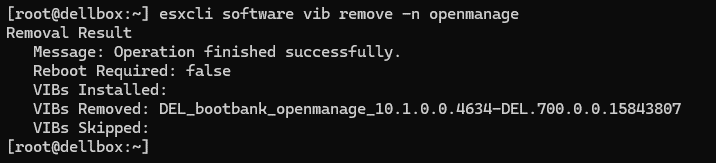
- Use the name pulled from the list with the remove command:
esxcli software vib remove -n openmanage
Additional Information
How To Install VMware ESXi 8 On Your PowerEdge Server.
Duration: 00:03:15 (hh:mm:ss)
When available, closed caption (subtitles) language settings can be chosen using the CC icon on this video player.
Affected Products
VMware ESXi 7.x, VMware ESXi 8.x, VMware OEM Products with ProSupportProducts
PowerEdge C6420, PowerEdge C6520, PowerEdge C6525, PowerEdge C6615, PowerEdge C6620, PowerEdge M640, PowerEdge MX740C, PowerEdge MX750c, PowerEdge MX760c, PowerEdge MX840C, PowerEdge R440, PowerEdge R450, PowerEdge R540, PowerEdge R550
, PowerEdge R640, PowerEdge R6415, PowerEdge R650, PowerEdge R650xs, PowerEdge R660, PowerEdge R660xs, PowerEdge R6615, PowerEdge R6625, PowerEdge R670, PowerEdge R740, PowerEdge R740XD, PowerEdge R740XD2, PowerEdge R7415, PowerEdge R7425, PowerEdge R750, PowerEdge R750XA, PowerEdge R750xs, PowerEdge R7515, PowerEdge R7525, PowerEdge R760, PowerEdge R760XA, PowerEdge R760xd2, PowerEdge R760xs, PowerEdge R7615, PowerEdge R7625, PowerEdge R770, PowerEdge R840, PowerEdge R860, PowerEdge R940, PowerEdge R960, PowerEdge T440, PowerEdge T550, PowerEdge T560, PowerEdge T640
...
Article Properties
Article Number: 000231616
Article Type: How To
Last Modified: 01 Oct 2025
Version: 16
Find answers to your questions from other Dell users
Support Services
Check if your device is covered by Support Services.