PowerEdge: How to Configure the MX7000 Management Network
Summary: This article provides information about how to perform the initial Out-Of-Box (OOB) Network configuration of the MX7000.
This article applies to
This article does not apply to
This article is not tied to any specific product.
Not all product versions are identified in this article.
Instructions
How to Configure the Management Network of the MX7000 Chassis
Table of Contents:
- Viewing Current Network Settings using the LCD
- Configuring the Static IP address using the LCD
- Configuring the DHCP IP address using the LCD
- Configuring the Management Network from OME-M Web UI
Viewing Current Network Settings using the LCD
To see the network information from the Main men:
- Press the Settings button
- Press the Network Settings button to show the IP information in the next menu.
- Swipe up the screen to view the rest. Here you see:
- IPv4 address and state (DHCP, Static or Disabled)
- IPv6 address and state (Auto-configured, Static, or Disabled)
- MM DNS name
- MAC address
- VLAN ID
- To get more information about IPv4, press the IPv4 button (Figure-1 item 5) to show the detailed info (Figure-1 item 6). Here you see:
- IPv4 address and state (DHCP, Static or Disabled)
- Subnet mask
- Gateway address

Figure 1: View Network Settings
Configuring the Static IP address using the LCD
Note: The default setting of the IPv4 network is DHCP. You may configure the setting between Static IP, DHCP, or Disable the IPv4 interface.
To configure the Static IP address:
- From the selected home screen, tap Settings.
- Tap Network Settings.
- Select IPv4, and tap Edit.
- The Change IP settings from DHCP to Static? screen is displayed.
- Tap Yes.
- Update the IPv4 octet, and tap Next.
- For each octet of the IPv4 address, you are presented with a 3-digit numeric dial. Due to the already limited screen space, the dial for each digit is small so for an effective selection try to slide the dial with a lighter touch.
- Edit the Mask octet, and tap Next.
- Edit the Gateway octet, and tap Save.
The Success screen is displayed.

Figure 2: Configure IPv4 network settings.
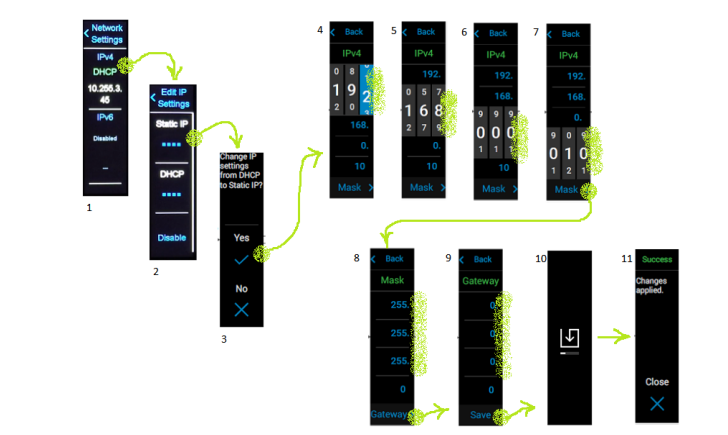
Figure 3: Configure IPv4 Setting to Static.
Configuring the DHCP IP address using the LCD
To configure the DHCP IP address:
- From the selected home screen, tap Settings.
- Tap Network Settings.
- Select IPv6 and, tap Edit.
- The Change IP settings from DHCP to Static? screen is displayed.
- Tap Yes.
- The network IP address is automatically updated in the enclosure.
The Success screen is displayed.

Figure 4: Configure IPv4 setting to DHCP.
For more information you can see the MX7000 MM Deployment Guide: https://dl.dell.com/manuals/common/dellemc_mx7000_lcd_network_settings.pdf
Configuring the Management Network from OME-M Web UI
You can configure the network settings for the management modules that are inserted into an MX7000 chassis.
- LAN or NIC interface
- IPv4
- IPv6
- DNS Information
- Management VLAN
To configure the Management Network from OME-M:
- Click Devices > Chassis > View Details > Settings > Network.
- The Network configuration section is expanded. See figure 7.
- In the General Settings section, you can enable or disable NIC, Register with DNS, and Auto Negotiation. By default, the Enable NIC check box is selected.
- You can enable Register with DNS, and then enter the DNS Name of the chassis that you want to register with a DNS server.
- You can access OME-Modular using the existing FQDN even after the Register with DNS option is disabled in the application. This is because the earlier option remains in the Network cache or the DNS Server cache that is based on the configured Time to live (TTL).
Note: If the Register with DNS option is enabled, you cannot modify the Enable VLAN option. - Enter the DNS Name. The DNS name can have a maximum of 58 characters. The first character must be an alphanumeric character (a-z, A-Z, 0-9), followed by numeric characters or a hyphen (-).
- Enable or disable the Auto Config DNS Domain Name option and turn the Auto Negotiation on or off.
- Enable the Auto Config DNS Domain Name check box to use DHCPv4, DHCPv6, or Router Advertisement to obtain the domain name.
- If the Auto Config DNS Domain Name is disabled, enter the DNS Domain Name.
Note: You can enable Auto Config DNS Domain Name only if IPv4 DHCP or IPv6 Auto Negotiation is enabled. - In the IPv4 Settings section, configure the following:
- Enable IPv4
- Enable DHCP
- IP Address
- Subnet Mask
- Gateway
- Use DHCP to Obtain DNS Server Addresses
- Static Preferred DNS Server
- Static Alternate DNS Server
- In the IPv6 Settings section, configure the following:
- Enable IPv6
- Enable Autoconfiguration
- Address Generation Mode
- IPv6 Address
- Prefix Length
- Gateway
- Static Preferred DNS Server
- Static Alternate DNS Server
- Enable or disable the VLAN for the chassis. You can configure the VLAN settings only if the Register with DNS check box is cleared.
- You can change from a VLAN network to a non-VLAN network, or move from a non-VLAN network to a VLAN network, only if Register with DNS check box is cleared.
- By default, the IPv4 settings are enabled and the DNS registration is disabled with a default name. You can modify the name using any local interfaces such as OpenManage Mobile.
- Click Apply to save the chassis network settings.

Figure 5: Click Devices -> Chassis
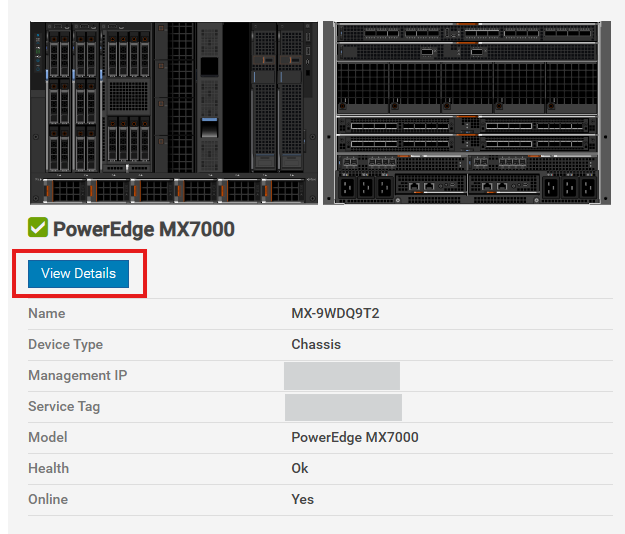
Figure 6: Select View Details.

Figure 7: Configure Network Settings.
For additional information, see: PowerEdge MX7000 Chassis User's Guide
Additional Information
For additional information, see the MX7000 Installation and Service Manual
Affected Products
Dell OpenManage Enterprise-Modular, PowerEdge MX7000Article Properties
Article Number: 000297960
Article Type: How To
Last Modified: 07 Apr 2025
Version: 5
Find answers to your questions from other Dell users
Support Services
Check if your device is covered by Support Services.