XtremIO X2: How to Suspend/Resume Native Replication sessions on an X2 array
Résumé: Instruction on how to Suspend and or Resume a Native Replication Session on an X2 array as noted in the XtremIO User guide under Managing Remote Protection Session.
Cet article concerne
Cet article ne concerne pas
Cet article n’est associé à aucun produit spécifique.
Toutes les versions du produit ne sont pas identifiées dans cet article.
Instructions
To Suspend a Native Replication session:
1. From the Data Protection menu, select the Sessions option to open the Sessions window.
2. Click Remote to display the list of defined Remote Protections Sessions.
3. Click to select the session.
Note: Verify that the selected session’s status is Active
4. Click Manage > Suspend
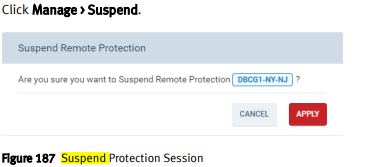
5. Click Apply
To Suspend a session from a selected Sessions Context:
1. From the Data Protection menu, select the Sessions option to open the Sessions window
2. Click Remote to display the list of defined Remote Protection Sessions.
3. Double-click a session to open the Session’s Details window.
Note: Verify that the displayed status is Active.
4. Click Manage > Suspend.
5. Click Apply
Resuming a Remote Protection Session:
Note: You can resume a suspended session.
You can resume a session from the Sessions window context or from a selected session context.
1. From the Data Protection menu, select the Sessions option to open the Sessions window
2. Click Remote to display the list of defined Remote Protection Sessions.
3. Click to select a session.
Note: Verify that the selected session’s status is Suspended.
4. Click Manage > Resume
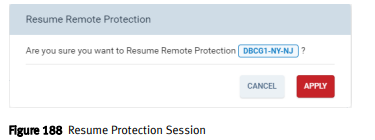
5. Click Apply
To resume a session from a selected Sessions context:
1. From the Data Protection menu, select the Sessions option to open the Sessions window
2. Click Remote to display the list of defined Remote Protection Sessions.
3. Double-click a session to open the Session’s Details window.
Note: Verify that the displayed status is Suspended.
4. Click Manage > Resume.
5. Click Apply.
1. From the Data Protection menu, select the Sessions option to open the Sessions window.
2. Click Remote to display the list of defined Remote Protections Sessions.
3. Click to select the session.
Note: Verify that the selected session’s status is Active
4. Click Manage > Suspend
5. Click Apply
To Suspend a session from a selected Sessions Context:
1. From the Data Protection menu, select the Sessions option to open the Sessions window
2. Click Remote to display the list of defined Remote Protection Sessions.
3. Double-click a session to open the Session’s Details window.
Note: Verify that the displayed status is Active.
4. Click Manage > Suspend.
5. Click Apply
Resuming a Remote Protection Session:
Note: You can resume a suspended session.
You can resume a session from the Sessions window context or from a selected session context.
1. From the Data Protection menu, select the Sessions option to open the Sessions window
2. Click Remote to display the list of defined Remote Protection Sessions.
3. Click to select a session.
Note: Verify that the selected session’s status is Suspended.
4. Click Manage > Resume
5. Click Apply
To resume a session from a selected Sessions context:
1. From the Data Protection menu, select the Sessions option to open the Sessions window
2. Click Remote to display the list of defined Remote Protection Sessions.
3. Double-click a session to open the Session’s Details window.
Note: Verify that the displayed status is Suspended.
4. Click Manage > Resume.
5. Click Apply.
Informations supplémentaires
For these instructions and more related to Native Replication, please see the Dell EMC XtremIO Storage Array User Guide "Managing Local Data Protection"
Produits concernés
XtremIO HW X2-R, XtremIO HW X2-S, XtremIO HW X2-T, XtremIO X2Propriétés de l’article
Numéro d’article: 000204396
Type d’article: How To
Dernière modification: 15 May 2026
Version: 5
Trouvez des réponses à vos questions auprès d’autres utilisateurs Dell
Services de support
Vérifiez si votre appareil est couvert par les services de support.