Comment définir manuellement l’option de ligne de démarrage du noyau nomodeset sous Linux
Résumé: Résolvez les problèmes de démarrage liés à la carte graphique avec Linux. Apprenez à définir l’option de démarrage GRUB « nomodeset » Ubuntu et à utiliser la ligne de démarrage « nomodeset » du noyau pour un démarrage plus fluide. ...
Cet article concerne
Cet article ne concerne pas
Cet article n’est associé à aucun produit spécifique.
Toutes les versions du produit ne sont pas identifiées dans cet article.
Symptômes
YGeneric Le support Ubuntu Canonical (certains supports OEM Dell) ou d’autres supports Linux ne démarrent pas à partir de l’environnement en direct ou du programme d’installation comme d’habitude et l’ordinateur peut cesser de répondre ou se bloquer.
La première étape de dépannage qui peut résoudre votre problème de démarrage et vous permettre d’installer Ubuntu consiste à désactiver les fonctionnalités graphiques Intel en définissant l’option nomodeset avant le démarrage.
Vous pouvez effectuer un démarrage ponctuel, comme indiqué dans la Solution 1, ou le rendre permanent, comme indiqué dans la Solution 2.
Cause
Remarque : La Solution 1 est adaptée pour démarrer à partir d’un support USB ou d’installation. La Solution 2 peut être rendue permanente si votre système d’exploitation se bloque ou cesse de répondre après l’installation.
Résolution
Solution 1
- Une fois le support connecté, allumez l’ordinateur.
- Recherchez l’écran du chargeur de démarrage GNU GRUB .
- Lorsque l’option Ubuntu s’affiche comme indiqué, appuyez sur la touche E de votre clavier.

- Dans l’éditeur, utilisez les touches fléchées pour localiser la fin de la ligne qui commence par ce qui suit. Chaque chargeur d’amorçage peut dire quelque chose de légèrement différent.
linux /boot/vmlinuz***
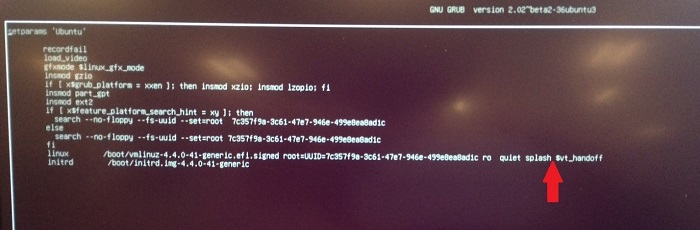
- Saisissez l’option de ligne suivante à la fin de la ligne.
nomodeset
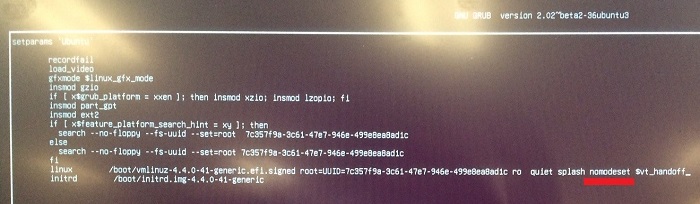
- Appuyez sur les touches CTRL+X pour démarrer le programme d’installation normal ou l’environnement en direct.
Solution 2
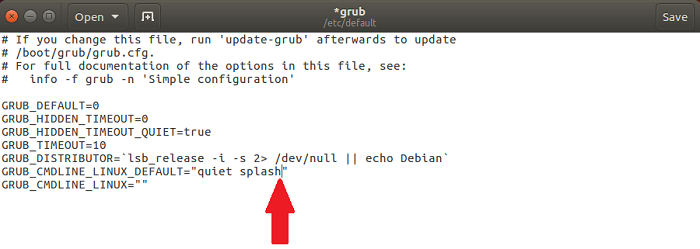
- Ouvrez un terminal et saisissez la commande suivante :
sudo gedit /etc/default/grub - Entrez votre mot de passe si vous y êtes invité.
- Déplacez le curseur sur la ligne qui ressemble à ce qui suit :
GRUB_CMDLINE_LINUX_DEFAULT="quiet splash"
- Modifiez cette ligne pour qu’elle corresponde à ce qui suit :
GRUB_CMDLINE_LINUX_DEFAULT="quiet splash nomodeset"
(vous pouvez également supprimer les variables silencieuses ou de démarrage pour résoudre les problèmes d’absence de démarrage)
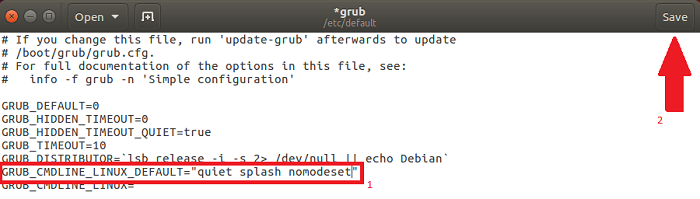
- Cliquez sur Enregistrer.
- Fermez la fenêtre.
- Dans le terminal, saisissez ce qui suit et appuyez sur Entrée :
sudo update-grub2 - Une fois l’opération terminée, vous devriez pouvoir redémarrer votre ordinateur avec la modification apportée.
Informations supplémentaires
 Hors garantie ? Aucun problème. Consultez le site Web Dell.com/support, puis saisissez votre numéro de série Dell et consultez nos offres.
Remarque : les offres sont uniquement disponibles pour les clients qui possèdent un ordinateur personnel aux États-Unis, au Canada, au Royaume-Uni, en France, en Allemagne et en Chine. Serveur et stockage non applicable.
Propriétés de l’article
Numéro d’article: 000123893
Type d’article: Solution
Dernière modification: 16 juin 2026
Version: 10
Trouvez des réponses à vos questions auprès d’autres utilisateurs Dell
Services de support
Vérifiez si votre appareil est couvert par les services de support.