NetWorker: NMC에 대해 인증 기관에서 서명한 인증서를 가져오거나 교체하는 방법
요약: 이 가이드에서는 NMC(NetWorker Management Console) 서버에서 기본 NetWorker 자체 서명 인증서를 CA 서명 인증서로 교체하는 방법을 설명합니다.
이 문서는 다음에 적용됩니다.
이 문서는 다음에 적용되지 않습니다.
이 문서는 특정 제품과 관련이 없습니다.
모든 제품 버전이 이 문서에 나와 있는 것은 아닙니다.
지침
이 가이드에서는 NMC(NetWorker Management Console)의 기본 NetWorker 자체 서명 인증서를 CA 서명 인증서로 교체하는 방법을 설명합니다. 이 KB는 Windows 및 Linux NMC 서버 모두에 대한 가이드를 제공합니다.
AUTHC(NetWorker Server Authentication Service) 및 NWUI(NetWorker Web User Interface) 자체 서명 인증서를 CA 서명 인증서로 교체하는 프로세스는 다음 운영 체제별 문서에 자세히 설명되어 있습니다.
- NetWorker: "AUTHC" 및 "NWUI"에 대해 인증 기관에서 서명한 인증서를 가져오거나 교체하는 방법(Linux)
- NetWorker: "AUTHC" 및 "NWUI"에 대해 인증 기관에서 서명한 인증서를 가져오거나 교체하는 방법(Windows)
관련 인증서:
-
<server>.csr파일로 교체합니다. NetWorker Management Console 서버 인증서 서명 요청 -
<server>.key파일로 교체합니다. NetWorker Management Console 서버 개인 키 -
<server>.crt파일로 교체합니다. NetWorker Management Console 서버 CA 서명 인증서 -
<CA>.crt파일로 교체합니다. CA 루트 인증서 -
<ICA>.crt파일로 교체합니다. CA 중간 인증서(사용 가능한 경우 선택 사항)
참고: 여기서 <server>는 NMC 서버의 간단한 이름입니다.
시작하기 전:
이 프로세스는 OpenSSL 유틸리티를 사용합니다. 이 유틸리티는 Linux 운영 체제에서 기본적으로 제공되지만 Windows 시스템에는 포함되지 않습니다. OpenSSL 설치에 대해서는 시스템 관리자에게 문의하십시오. 필요한 OpenSSL 버전은 설치된 NetWorker 버전에 따라 다릅니다.
- NetWorker 19.9~19.11에는 openssl 버전 1.1.1n이 필요합니다.
- NetWorker 19.12.0.0(Linux만 해당)은 openssl 버전 3.0.14를 지원합니다.
- NetWorker 19.12.0.2(Windows만 해당)는 openssl 버전 3.0.14를 지원합니다.
경고: 잘못된 버전의 OpenSSL을 사용하는 경우 NMC의 GSTD 프로세스가 NetWorker를 시작하지 못합니다. cakey.pem을 교체한 후 NMC GST 서비스가 시작된 다음 즉시 종료됩니다.
OpenSSL 버전은 다음과 같이 식별할 수 있습니다.
Linux:
# openssl versionWindows:
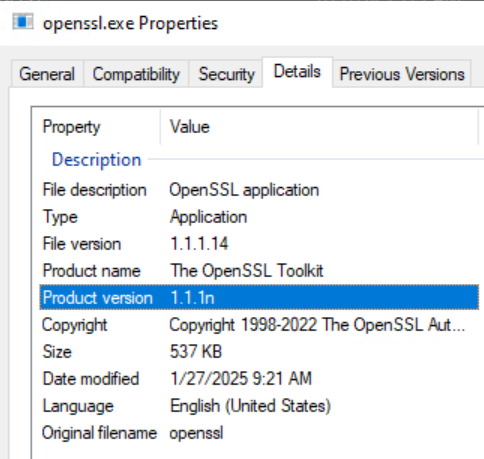
- Windows 파일 탐색기에서 openssl.exe 위치로 이동합니다. 이 경로는 OpenSSL이 설치된 방식에 따라 다를 수 있습니다.
- openssl.exe 파일을 열고Details 탭으로 이동합니다. Product Version 필드에 OpenSSL 버전의 세부 정보가 나와 있습니다.
또는 openssl.exe 파일 경로가 시스템 PATH 변수에 포함되어 있다면 관리자 권한 명령 프롬프트에서 'openssl version' 명령을 실행할 수 있습니다. 만약에 openssl.exe 가 포함된 디렉토리가 시스템 PATH에 포함되어 있지 않은 경우, 디렉토리 변경(cd) 명령을 통해 openssl.exe.
CA에 제공할 개인 키 및 CSR(Certificate Signing Request) 파일을 생성합니다.
- NMC 서버에서 openssl 명령줄 유틸리티를 사용하여 NetWorker 서버의 개인 키 파일(
<server>.key) 및 CSR 파일(<server>.csr)을 생성합니다.
Linux:
# openssl req -new -newkey rsa:4096 -nodes -out /tmp/<server>.csr -keyout /tmp/<server>.key
Windows:
set openssl="<Full system path to the openssl.exe file>"
%openssl% req -new -newkey rsa:4096 -nodes -out "C:\tmp\<server>.csr" -keyout "C:\tmp\<server>.key"
CSR 및 키 파일은 다음과 같은 경우 원하는 위치에 배치할 수 있습니다.
C:\tmp 없습니다.
- CSR 파일(
<server>.csr)을 CA에 전송하여 CA 서명 인증서 파일(<server>.crt)를 제공해야 합니다. CA는 CA 서명 인증서 파일(<server>.crt), 루트 인증서(<CA>.crt) 및 모든 중간 CA 인증서(<ICA>.crt)를 제공해야 합니다.
Linux NMC(NetWorker Management Console) 서버:
- CA 서명 인증서를 개별 키 파일 또는 PFX 형식의 단일 파일로 가져옵니다.
- CA 서명 인증서가 단일 PFX 파일에 있는 경우 OpenSSL 툴과 마찬가지로 개인 키와 CA 서명 인증서를 추출할 수 있습니다(Windows에 OpenSSL이 설치되어 있지 않을 수 있으며 별도로 설치할 수 있음).
참고: 이 과정을 수행할 때에는 인증서 및 키 파일의 파일 이름을 포함하여
.crt 및 .key 파일을 전체 파일 경로로 교체해야 합니다.
- PFX 파일에서 개인 키 및 CA 서명 인증서를 추출합니다.
개인 키:
# openssl pkcs12 -in <file>.pfx -out <server>.key -nodes -nocerts
CA 인증서:
# openssl pkcs12 -in <file>.pfx -out <server>.crt -nokeys
-
-
- 의 무결성 확인
server.key및server.crt.
- 의 무결성 확인
-
참고: 출력에 이 두 출력의 동일한 체크섬 해시가 표시되는지 확인합니다. 차이가 있는 경우 문제가 있습니다. 동일한 경우 다음 단계로 이동합니다.
개인 키:
# openssl pkey -in <server>.key -pubout -outform pem | sha256sum
CA 인증서:
# openssl x509 -in <server>.crt -pubkey -noout -outform pem | sha256sum
-
-
- 개인 키, CA에서 서명한 서버 인증서, 루트 CA(및 중간 인증서)를 PEM 형식으로 변환합니다.
-
개인 키:
# openssl rsa -in <server>.key -outform pem -out server.key.pem
CA 서명 서버 인증서:
# openssl x509 -in <server>.crt -outform pem -out server.crt.pem
루트 CA 인증서:
# openssl x509 -in CA.crt -outform pem -out CA.crt.pem
중간 CA 인증서(사용 가능한 경우):
# openssl x509 -in ICA.crt -outform pem -out ICA.crt.pem
- 결합
server.key.pem, 루트CA.crt, 중간 인증서(해당하는 경우) 및 서명된 서버 인증서를 NMC용cakey.pem파일에 결합합니다.
# cat server.key.pem CA.crt.pem ICA.crt.pem server.crt.pem > cakey.pem
- NMC 서버의
gst서비스를 시작합니다.
# systemctl stop gst
- 기존
cakey.pem파일의 복제본을 만든 후 기본 파일을 2단계의 D에서 만든 파일로 교체합니다.
# cp /opt/lgtonmc/etc/cakey.pem /opt/lgtonmc/etc/cakey.pem_orig
# cp cakey.pem /opt/lgtonmc/etc/cakey.pem
참고: 이
cakey.pem 파일은 포트 9001에 해당합니다. 이 파일을 2,D단계에서 만든 결합된 파일로 바꾸면 자체 서명된 인증서가 CA 서명된 인증서로 바뀝니다.
- NMC 서버의
server.crt및server.key파일의 복제본을 만든 후 원본 파일을 서명된server.crt및server.key파일로 교체합니다.
# cp /opt/lgtonmc/apache/conf/server.crt /opt/lgtonmc/apache/conf/server.crt_orig
# cp <server>.crt  /opt/lgtonmc/apache/conf/server.crt
# cp /opt/lgtonmc/apache/conf/server.key /opt/lgtonmc/apache/conf/server.key_orig
# cp <server>.key /opt/lgtonmc/apache/conf/server.key
참고: 위의 파일을 교체하는 것은 포트 9000에 해당합니다. 위의 파일을 교체한 후 포트 9000에 대한 자체 서명 인증서가 CA 서명 인증서로 대체됩니다.
- NMC 서버의
gst서비스를 시작합니다.
# systemctl start gst
- NMC 서버의
/opt/lgtonmc/logs/gstd.raw모든 오류에 대해.
NetWorker: nsr_render_log 사용하여 .raw 로그 파일을 렌더링하는 방법
참고: 문제가 발견되면 백업 복제본으로 되돌릴 수 있습니다. copy 명령을 사용하여 원본을 덮어쓰면 파일에 올바른 소유권과 사용 권한이 유지됩니다. 이러한 파일은 기본 NMC 서비스 계정(
nsrnmc)이 소유해야 하며 600 사용 권한을 가져야 합니다.
확인:
NMC 서버의 gst 서비스가 실행 중입니다. NMC 서버에서 다음을 실행합니다.
openssl s_client -connect localhost:9001 -showcerts 2>/dev/null </dev/null
openssl s_client -connect localhost:9000 -showcerts 2>/dev/null </dev/null
예:
nve:~ # openssl s_client -connect localhost:9001 -showcerts 2>/dev/null </dev/null
CONNECTED(00000003)
---
Certificate chain
 0 s:/C=CA/ST=Ontario/L=Toronto/O=Dell Technologies/OU=DPD/CN=nve.networker.lan
   i:/C=CA/ST=Ontario/L=Toronto/O=Dell Technologies/OU=DPD/CN=dc.networker.lan
...
...

nve:~ # openssl s_client -connect localhost:9000 -showcerts 2>/dev/null </dev/null
CONNECTED(00000003)
---
Certificate chain
 0 s:/C=CA/ST=Ontario/L=Toronto/O=Dell Technologies/OU=DPD/CN=nve.networker.lan
   i:/C=CA/ST=Ontario/L=Toronto/O=Dell Technologies/OU=DPD/CN=dc.networker.lan
...
...
nve:~ #
Windows NMC(NetWorker Management Console) 서버:
- CA 서명 인증서를 개별 키 파일 또는 PFX 형식의 단일 파일로 가져옵니다.
- CA 서명 인증서가 단일 PFX 파일에 있는 경우 OpenSSL 툴과 마찬가지로 개인 키와 CA 서명 인증서를 추출할 수 있습니다(Windows에는 일반적으로 OpenSSL이 설치되지 않으며 별도로 설치할 수 있음).
참고: 이 과정을 수행할 때에는 인증서 및 키 파일의 파일 이름을 포함하여
.crt 및 .key 파일을 전체 파일 경로로 교체해야 합니다.
- PFX 파일에서 개인 키 및 CA 서명 인증서를 추출합니다.
개인 키:
%openssl% pkcs12 -in <file>.pfx -out <server>.key -nodes -nocerts
CA 인증서:
%openssl% pkcs12 -in <file>.pfx -out <server>.crt -nokeys
-
-
- 의 무결성 확인
server.key및server.crt.
- 의 무결성 확인
-
참고: 출력에 이 두 출력의 동일한 체크섬 해시가 표시되는지 확인합니다. 차이가 있는 경우 문제가 있습니다. 동일한 경우 다음 단계로 이동합니다.
개인 키:
%openssl% pkey -in <server>.key -pubout -outform pem | %openssl% dgst -sha256
CA 인증서:
%openssl% x509 -in <server>.crt -pubkey -noout -outform pem | %openssl% dgst -sha256
-
-
- 개인 키, CA에서 서명한 서버 인증서, 루트 CA(및 중간 인증서)를 PEM 형식으로 변환합니다.
-
개인 키:
%openssl% rsa -in <server>.key -outform pem -out C:\tmp\server.key.pem
CA 서명 서버 인증서:
%openssl% x509 -in <server>.crt -outform pem -out C:\tmp\server.crt.pem
- 결합
server.key.pem및sever.crt.pem파일을 NMC용cakey.pem파일에 결합합니다. 이를 위해 다음 PowerShell 명령을 사용하는 것이 좋습니다.
PS C:\tmp> Get-Content server.key.pem,server.crt.pem | Out-File cakey.pem -Encoding ascii
참고: 만약
-Encoding ascii 파일이 설정되지 않은 경우 다음 문제가 관찰될 수 있습니다. NetWorker: 인증서를 교체한 후 Windows NMC 서버가 GSTD 서비스를 시작하지 못함
- NMC 서버의
gst서비스를 시작합니다.
net stop gstd
- 원본
cakey.pem파일을 복사한 후, CA 서명된cakey.pem파일을 원본 위치에 배치합니다.
copy "C:\Program Files\EMC NetWorker\Management\GST\etc\cakey.pem" "C:\Program Files\EMC NetWorker\Management\GST\etc\cakey.pem_orig"
copy C:\tmp\cakey.pem "C:\Program Files\EMC NetWorker\Management\GST\etc\cakey.pem"
참고: 원본 파일을 덮어쓸지 묻는 메시지가 표시됩니다. 원본의 복사본이 있으므로 인증서를 덮어씁니다. 원본을 덮어쓰면 파일 소유권과 사용 권한이 유지됩니다. 이
cakey.pem 파일은 포트 9001에 해당합니다. 이 파일을 2,D단계에서 만든 결합된 파일로 바꾸면 자체 서명된 인증서가 CA 서명된 인증서로 바뀝니다.
- NMC 서버의
server.crt및server.key파일의 복제본을 만든 후 원본 파일을 서명된server.crt및server.key파일로 교체합니다.
copy "C:\Program Files\EMC NetWorker\Management\GST\apache\conf\server.crt" "C:\Program Files\EMC NetWorker\Management\GST\apache\conf\server.crt_orig"
copy "C:\Program Files\EMC NetWorker\Management\GST\apache\conf\server.key" "C:\Program Files\EMC NetWorker\Management\GST\apache\conf\server.key_orig"
copy <server>.crt "C:\Program Files\EMC NetWorker\Management\GST\apache\conf\server.crt"
copy <server>.key "C:\Program Files\EMC NetWorker\Management\GST\apache\conf\server.key"
참고: 위의 파일을 교체하는 것은 포트 9000에 해당합니다. 위의 파일을 교체한 후 포트 9000에 대한 자체 서명 인증서가 CA 서명 인증서로 대체됩니다.
- NMC 서버의
gst서비스를 시작합니다.
net start gstd
- NMC 서버의
C:\Program Files\EMC NetWorker\Management\GST\logs\gstd.raw모든 오류에 대해.
NetWorker: nsr_render_log 사용하여 .raw 로그 파일을 렌더링하는 방법
참고: 문제가 발견되면 백업 복제본으로 되돌릴 수 있습니다. copy 명령을 사용하여 원본을 덮어쓰면 파일에 올바른 소유권과 사용 권한이 유지됩니다. 이러한 파일은 기본 NMC 서비스 계정(
nsrnmc)이 소유해야 하며 600 사용 권한을 가져야 합니다.
확인:
NMC 서버의 gst 서비스가 실행 중입니다. NMC 서버의 PowerShell에서 다음을 실행하여 PORT를 교체합니다. 포트 9000에 대해 한 번, 포트 9001에 대해 한 번 실행합니다.
param(
    [string]$Server = "localhost",
    [int]$Port = PORT
)

$tcp = [System.Net.Sockets.TcpClient]::new()
$tcp.Connect($Server, $Port)

# Accept any certificate so we can inspect it (this is inspection only)
$ssl = [System.Net.Security.SslStream]::new(
    $tcp.GetStream(),
    $false,
    { param($sender, $cert, $chain, $errors) $true }
)

try {
    # SNI/target host is the $Server value
    $ssl.AuthenticateAsClient($Server)

    $remoteCert = [System.Security.Cryptography.X509Certificates.X509Certificate2]::new($ssl.RemoteCertificate)

    # Some keys use CNG and PublicKey.Key can be $null; fall back safely
    $keySize = try { $remoteCert.PublicKey.Key.KeySize } catch { $null }
    if (-not $keySize) { $keySize = ($remoteCert.PublicKey.EncodedKeyValue.RawData.Length * 8) }

    "=== Certificate (from $($Server):$Port) ==="
    "Subject                 : $($remoteCert.Subject)"
    "Issuer                  : $($remoteCert.Issuer)"
    "NotBefore               : $($remoteCert.NotBefore)"
    "NotAfter                : $($remoteCert.NotAfter)"
    "Public Key              : $($remoteCert.PublicKey.Oid.FriendlyName) ($keySize-bit)"
    "Signature Algorithm     : $($remoteCert.SignatureAlgorithm.FriendlyName)"
}
finally {
    $ssl.Dispose()
    $tcp.Dispose()
}
예:
PS C:\Users\Administrator.NETWORKER> param(
>>     [string]$Server = "localhost",
>>     [int]$Port = 9001
>> )
PS C:\Users\Administrator.NETWORKER>
PS C:\Users\Administrator.NETWORKER> $tcp = [System.Net.Sockets.TcpClient]::new()
PS C:\Users\Administrator.NETWORKER> $tcp.Connect($Server, $Port)
PS C:\Users\Administrator.NETWORKER>
PS C:\Users\Administrator.NETWORKER> # Accept any certificate so we can inspect it (this is inspection only)
PS C:\Users\Administrator.NETWORKER> $ssl = [System.Net.Security.SslStream]::new(
>>     $tcp.GetStream(),
>>     $false,
>>     { param($sender, $cert, $chain, $errors) $true }
>> )
PS C:\Users\Administrator.NETWORKER>
PS C:\Users\Administrator.NETWORKER> try {
>>     # SNI/target host is the $Server value
>>     $ssl.AuthenticateAsClient($Server)
>>
>>     $remoteCert = [System.Security.Cryptography.X509Certificates.X509Certificate2]::new($ssl.RemoteCertificate)
>>
>>     # Some keys use CNG and PublicKey.Key can be $null; fall back safely
>>     $keySize = try { $remoteCert.PublicKey.Key.KeySize } catch { $null }
>>     if (-not $keySize) { $keySize = ($remoteCert.PublicKey.EncodedKeyValue.RawData.Length * 8) }
>>
>>     "=== Certificate (from $($Server):$Port) ==="
>>     "Subject                 : $($remoteCert.Subject)"
>>     "Issuer                  : $($remoteCert.Issuer)"
>>     "NotBefore               : $($remoteCert.NotBefore)"
>>     "NotAfter                : $($remoteCert.NotAfter)"
>>     "Public Key              : $($remoteCert.PublicKey.Oid.FriendlyName) ($keySize-bit)"
>>     "Signature Algorithm     : $($remoteCert.SignatureAlgorithm.FriendlyName)"
>> }
>> finally {
>>     $ssl.Dispose()
>>     $tcp.Dispose()
>> }
=== Certificate (from localhost:9001) ===
Subject                 : CN=win-srvr02.networker.lan, OU=DPD, O=Dell Technologies, L=Toronto, S=Ontario, C=CA
Issuer                  : CN=dc.networker.lan, OU=DPD, O=Dell Technologies, L=Toronto, S=Ontario, C=CA
NotBefore               : 03/09/2026 15:42:43
NotAfter                : 06/11/2028 15:42:43
Public Key              : RSA (2048-bit)
Signature Algorithm     : sha256RSA

PS C:\Users\Administrator.NETWORKER> param(
>>     [string]$Server = "localhost",
>>     [int]$Port = 9000
>> )
PS C:\Users\Administrator.NETWORKER>
PS C:\Users\Administrator.NETWORKER> $tcp = [System.Net.Sockets.TcpClient]::new()
PS C:\Users\Administrator.NETWORKER> $tcp.Connect($Server, $Port)
PS C:\Users\Administrator.NETWORKER>
PS C:\Users\Administrator.NETWORKER> # Accept any certificate so we can inspect it (this is inspection only)
PS C:\Users\Administrator.NETWORKER> $ssl = [System.Net.Security.SslStream]::new(
>>     $tcp.GetStream(),
>>     $false,
>>     { param($sender, $cert, $chain, $errors) $true }
>> )
PS C:\Users\Administrator.NETWORKER>
PS C:\Users\Administrator.NETWORKER> try {
>>     # SNI/target host is the $Server value
>>     $ssl.AuthenticateAsClient($Server)
>>
>>     $remoteCert = [System.Security.Cryptography.X509Certificates.X509Certificate2]::new($ssl.RemoteCertificate)
>>
>>     # Some keys use CNG and PublicKey.Key can be $null; fall back safely
>>     $keySize = try { $remoteCert.PublicKey.Key.KeySize } catch { $null }
>>     if (-not $keySize) { $keySize = ($remoteCert.PublicKey.EncodedKeyValue.RawData.Length * 8) }
>>
>>     "=== Certificate (from $($Server):$Port) ==="
>>     "Subject                 : $($remoteCert.Subject)"
>>     "Issuer                  : $($remoteCert.Issuer)"
>>     "NotBefore               : $($remoteCert.NotBefore)"
>>     "NotAfter                : $($remoteCert.NotAfter)"
>>     "Public Key              : $($remoteCert.PublicKey.Oid.FriendlyName) ($keySize-bit)"
>>     "Signature Algorithm     : $($remoteCert.SignatureAlgorithm.FriendlyName)"
>> }
>> finally {
>>     $ssl.Dispose()
>>     $tcp.Dispose()
>> }
=== Certificate (from localhost:9000) ===
Subject                 : CN=win-srvr02.networker.lan, OU=DPD, O=Dell Technologies, L=Toronto, S=Ontario, C=CA
Issuer                  : CN=dc.networker.lan, OU=DPD, O=Dell Technologies, L=Toronto, S=Ontario, C=CA
NotBefore               : 03/09/2026 15:42:43
NotAfter                : 06/11/2028 15:42:43
Public Key              : RSA (2048-bit)
Signature Algorithm     : sha256RSA
추가 정보
NMC의 자체 서명 인증서가 CA 서명 인증서로 교체된 후에도 NMC 시작 관리자에서 NMC 서버에 연결하는 동안 다음 경고가 표시될 수 있습니다.
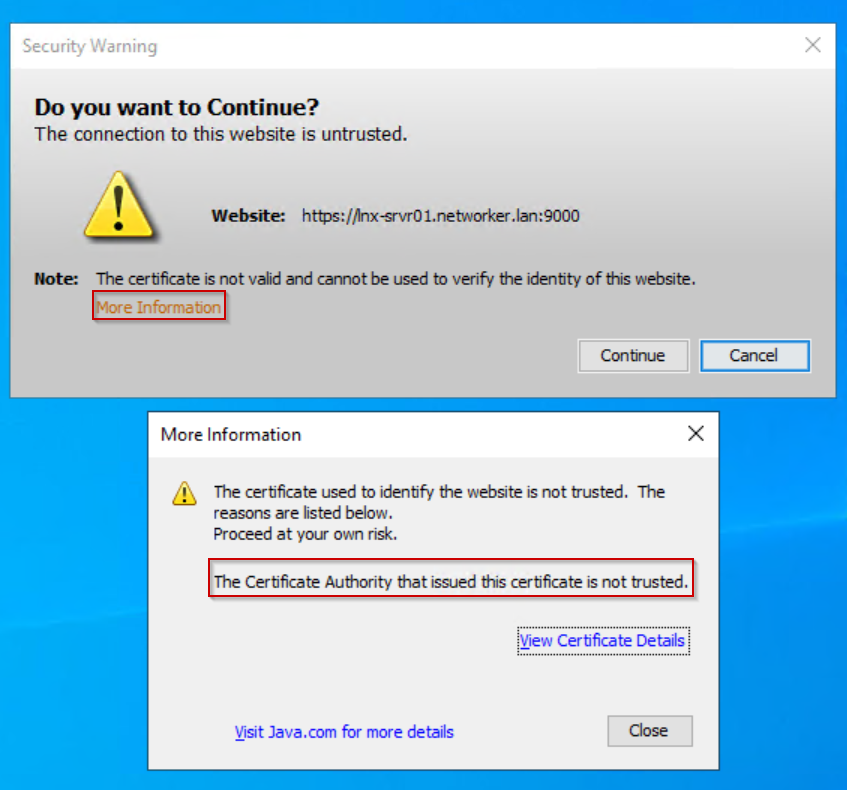
"View Certificate Details"를 클릭합니다. 인증서 세부 정보는 CA 서명 인증서가 사용되었음을 확인합니다.
서명된 인증서가 NMC 클라이언트의 신뢰할 수 있는 루트 인증서에서 누락되었기 때문에 경고가 표시됩니다.
참고: NMC 클라이언트는 NMC에 액세스하는 데 사용되는 모든 호스트입니다.
이 경고는 무시할 수 있습니다. 필요에 따라 NMC 서버의 CA 서명 인증서를 NMC 클라이언트의 신뢰할 수 있는 루트 인증서로 가져올 수도 있습니다.
- NMC 서버의 CA 서명 인증서(
<server>.crt)을 선택한 폴더에 있는 NMC 클라이언트 호스트에서 선택합니다. - CA 서명 인증서 속성을 엽니다.
- Install Certificate를 클릭합니다.
- Local Machine을 선택합니다.
- Place all certificates in the following store를 선택합니다.
- Browse를 클릭합니다.
- Trusted Root Certification Authorities를 선택한 다음 Ok를를 클릭합니다.
- Next를 클릭합니다.
- Finish를 클릭합니다.
- 가져오기에 실패했거나 성공했음을 알리는 메시지가 나타나면 OK를 클릭합니다.
- CA 서명 인증서 속성에서 Ok를를 클릭합니다.
다음 NMC 실행 중에는 보안 경고가 나타나지 않습니다.
해당 제품
NetWorker, NetWorker Management Console제품
NetWorker Family문서 속성
문서 번호: 000269947
문서 유형: How To
마지막 수정 시간: 10 3월 2026
버전: 9
다른 Dell 사용자에게 질문에 대한 답변 찾기
지원 서비스
디바이스에 지원 서비스가 적용되는지 확인하십시오.