使用 SSH (SSH) 登录远程 Data Domain 而不提供密码
Summary: 本文列出了配置和使用安全外壳 (SSH) 客户端连接到 Data Domain 系统的步骤,方法是使用 SSH 密钥登录而无需提供密码。
Instructions
SSH 是一种网络协议,允许使用两个联网设备之间的安全通道交换数据。SSH 旨在取代 Telnet 协议,因为 Telnet 无法保护数据免受“中间人”攻击。SSH 使用的加密在不安全的网络(如互联网)上提供机密性和数据完整性。
出于方便、便于管理以及集成到其他产品(如 Data Protection Advisor (DPA))中,可能需要以编程方式访问 Data Domain,而无需管理员每次都提供密码,或者将密码不安全地存储在某个文本文件中。这就是 SSH 密钥身份验证发挥作用的地方。
SSH 要求
- 安装了 SSH 客户端(如 OpenSSH 或 PuTTY)的计算机
- 使用 TCP 端口 22 的 IP 网络连接
- SSH 服务器已启用并侦听 TCP 端口 22(这是 Data Domain 系统的默认端口)
- 使用用户名和密码测试最初通过 SSH 连接到远程 DD:
- 在远程系统上运行 SSH 客户端软件。
- 配置 SSH 客户端以使用 Data Domain 系统主机名或 IP 地址进行连接。
- 如果使用 PuTTY,请保留默认端口 (22),然后单击 Open。
- 如果是首次连接,则会显示如下所示的消息:
The server's host key is not cached in the registry. You have no guarantee that the server is the computer you think it is. The server's rsa2 key fingerprint is: ssh-rsa 1024 7b:e5:6f:a7:f4:f9:81:62:5c:e3:1f:bf:8b:57:6c:5a If you trust this host, hit Yes to add the key to PuTTY's cache and carry on connecting. If you want to carry on connecting just once, without adding the key to the cache, hit No. If you do not trust this host, hit Cancel to abandon the connection.
单击 Yes
- 登录系统。如果是首次连接到 Data Domain 系统,并且
sysadmin用户密码未更改:- 用户名是
sysadmin - 密码是系统序列号。
- 用户名是
将系统配置为不使用密码登录:在 Linux 或 UNIX 系统上
"dsa" 不起作用,仅 "rsa" 键入键起作用。
-
生成 SSH 密钥。
建议的密钥类型为"rsa"并且是唯一可与 DDOS 6.0 及更高版本配合使用的:# ssh-keygen -t rsa Generating public/private rsa key pair. Enter file in which to save the key (/root/.ssh/id_rsa): Enter passphrase (empty for no passphrase): Enter same passphrase again: Your identification has been saved in /root/.ssh/id_rsa. Your public key has been saved in /root/.ssh/id_rsa.pub.
"dsa"类型键也适用于 DDOS 5.7 或更低版本。但是,不再建议使用此密钥类型:# ssh-keygen -t dsa
Generating public/private dsa key pair. Enter file in which to save the key (/root/.ssh/id_dsa): Enter passphrase (empty for no passphrase): Enter same passphrase again: Your identification has been saved in /root/.ssh/id_dsa.
DDOS 命令参考中提到要使用“
d”选项而不是“-t dsa”的输出。任何一个都适用于 DDOS,但”d”不适用于许多 Linux 发行版。运行脚本时,使用空白密码选项可绕过 Data Domain 密码要求。
记下“
ssh-keygen”命令输出中新 SSH 密钥的位置。它存储在用户的$HOME目录如下.ssh/作为名为id_rsa.pub。 -
将生成的密钥添加到 Data Domain 系统访问列表:
# ssh -l sysadmin 168.192.2.3 "adminaccess add ssh-keys" < ~/.ssh/id_rsa.pub
The authenticity of host '168.192.2.3(168.291.2.3)' can't be established. RSA key fingerprint is f6:36:6e:32:e1:2d:d9:77:40:7e:0e:f8:5f:32:8d:0a. Are you sure you want to continue connecting (yes/no)? yes Warning: Permanently added '168.192.2.3' (RSA) to the list of known hosts. Data Domain OS 0.31.0.0-152384 Password: sysadmin_password
-
测试功能:
# ssh sysadmin@168.192.2.3 "df -h"

Data Domain OS Resource Size GiB Used GiB Avail GiB Use% Cleanable GiB* ------------------ -------- -------- --------- ---- -------------- /backup: pre-comp - 50.0 - - - /backup: post-comp 4922.3 2.7 4919.7 0% 0.0 /ddvar 78.7 0.5 74.2 1% - ------------------ -------- -------- --------- ---- -------------- * Estimated based on last cleaning of 2010/02/02 06:00:59.
您还可以将文件中系统命令的整个脚本传递给设备。这是通过运行命令以指向包含命令列表的特定文件来实现的:
# ssh sysadmin@DDR < FULL_LOCAL_PATH_TO_SCRIPT_TO_RUN_ON_REMOTE_DD
这允许操作者在远程主机上创建命令列表,然后通过 SSH 一次性运行所有这些命令。
将系统配置为不使用密码登录:Windows 系统 (PuTTY)
-
在 Windows 系统上安装 SSH PuTTY 工具(PuTTY、PuTTYgen 和 Pageant)。
-
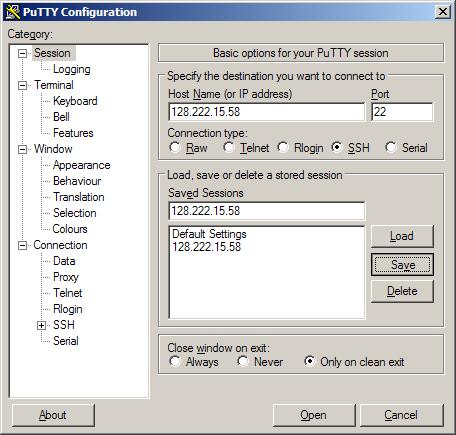
创建 PuTTY 会话。
- 使用 PuTTY 配置工具启动 PuTTY。
- 使用 Data Domain 系统 IP 地址保存会话。
- 在 PuTTY Configuration 对话框中,选择 Category > Session。
- 选择 SSH 按钮。
- 在 Host Name 字段和 Saved Sessions 字段中输入 Data Domain 系统 IP 地址。例如:168.192.2.3
- 单击 Save。
-
输入 自动登录 用户名。
- 在 PuTTY 配置 对话框中,选择 类别>连接>数据。
- 在 Auto-Login username字段中输入管理员用户名。例如:
sysadmin - 单击 Save。
-
创建 PuTTY 密钥。
- 启动 PuTTYgen,PuTTY 密钥生成器工具:
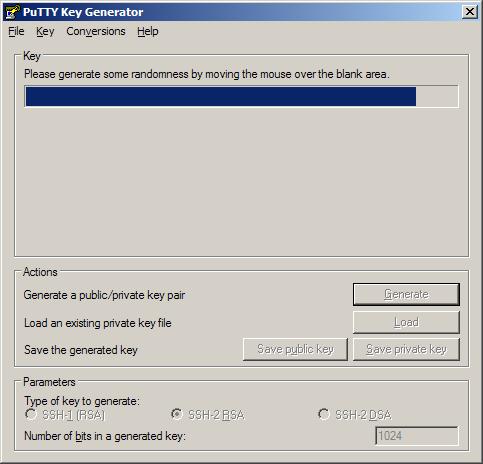
- 使用 PuTTY 密钥生成器工具生成公钥和私钥。
- 通过将光标移动到 “Key ”字段中的空白区域来生成一些随机性。
用于粘贴到 OpenSSH 中的 公 钥authorized_keys文件填充随机字符。
Key fingerprint字段将填充参考值。 - 在Key comment字段中创建Key identifier,并键入可识别的Key name,例如:
admin_name@company.com - 将 Key passphrase 和 Confirm passphrase 字段留空。
在运行脚本时,使用 空白密码 选项可绕过 Data Domain 系统密码要求。 - 单击 Save public key。
- 单击 Save private key。
记下保存的密钥文件的路径。
密钥文件名示例:DataDomain_private_key.ppk
- 通过将光标移动到 “Key ”字段中的空白区域来生成一些随机性。
- 复制随机生成的 PuTTY 密钥。
在 “公钥 ”字段中选择要粘贴到 OpenSSH 中的所有文本authorized_keys file。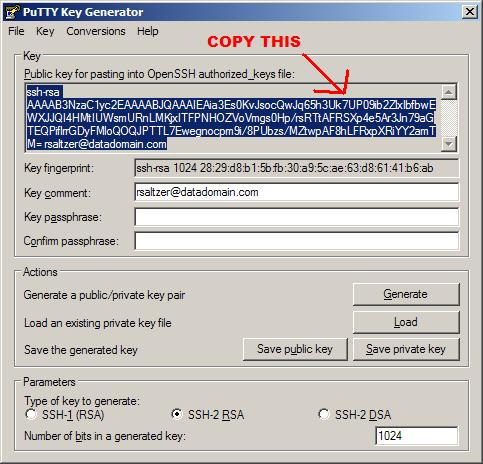
- 启动 PuTTYgen,PuTTY 密钥生成器工具:
-
在 Data Domain 系统命令行中添加密钥。
- 打开 Data Domain 系统命令提示符。
- 添加 管理 SSH 访问密钥。
在命令行中键入:adminaccess add ssh-keys
- 粘贴 PuTTYgen 字段中随机生成的密钥。
右键单击“粘贴”>选项。 - 完成命令;按
CTRL+D。
-
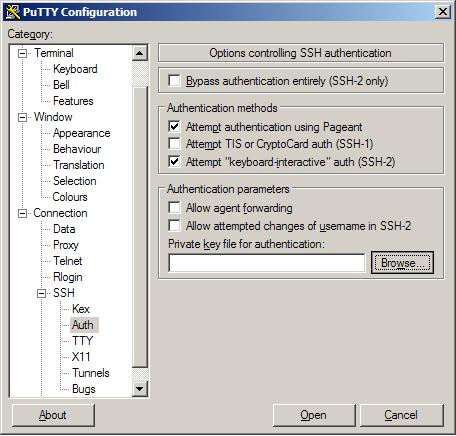
将密钥附加到 PuTTY。
- 在 PuTTY 配置工具中,选择 连接>SSH>身份验证。
- 勾选复选框 Attempt authentication using Pageant。
- 勾选复选框 Attempt keyboard-interactive auth (SSH-2)
- 在身份验证字段的 私钥 文件中,单击 浏览。
- 浏览到在步骤 3 中生成并保存的 PuTTY 密钥 。例如:
DataDomain_private_key.ppk - 保存设置,单击 Save。
-
打开会话。
- 在 PuTTY 配置 对话框中,选择 类别>会话。
- 单击打开。
此时将打开 Windows 命令行 。此时将打开 PuTTY 会话。
使用用户名sysadmin Data Domain OS Authenticating使用公钥:admin_name@company.com Last login: Thu Feb 4 10:51:10 EST 2010 from 168.192.2.3 on pts/2 Last login: Thu Feb 4 18:56:14 2010 from 168.192.2.3 Welcome to Data Domain OS 0.31.0.0-152384 ----------------------------------------- #