Live Optics, Unity: Performing a Unity Profile
Summary: Live Optics supports the profiling of several hardware storage arrays, including Unity. Using the Live Optics collector, configuration and performance data is captured, analyzed, and compiled into a Project for viewing. This document outlines the process to produce a Unity array storage profile. ...
Acest articol se aplică pentru
Acest articol nu se aplică pentru
Acest articol nu este legat de un produs specific.
Acest articol nu acoperă toate versiunile de produs existente.
Instructions
Quick-Start Instructions
- Launch Live Optics Collector (Windows .NET version)
- Click Get Started
- Click "Yes, I agree" to accept the End User License Agreement (prompted only on first execution)
- Click "Yes, this is me" after verifying identity (prompted only on the first execution)
- Select Storage from the left menu
- Select Unity
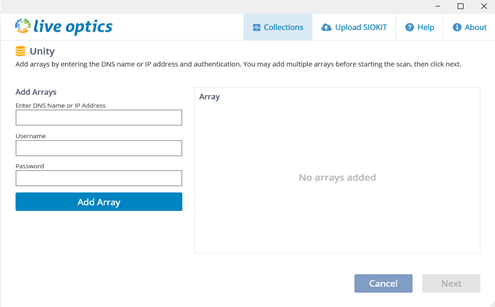
- Enter the Unity array IP address
- Enter a username to access the array (admin)
- Enter the password
- Click Add Array
- If prompted, enter the service account password
- Click Next
- Select the Upload Option, either upload automatically (recommended) or upload later
- Click Next
- If upload automatically was selected, enter the project name to be created, click Next
- After the files are processed and optionally uploaded, click Quit to exit the application
Detailed Instructions
Download and run the Live Optics Windows collector software.
- There are two methods to download the collector software:
- From the invitation email received from a consultant by clicking the Download Collector link.
- From the Live Optics portal, select Collectors from the left menu, then Download Collector. For more information about how to download a Live Optics collector, see knowledge base article Download the Live Optics Collector. Either option results in the Download Collectors page.
Connect to the Asset.
- Select Storage from the list from the Category types and select Unity from the list of storage array assets.
- Enter the array IP address, username, and password. The username should be the admin or admin equivalent account. Once entered, click Add Array.
- If prompted, enter the password for the service account.
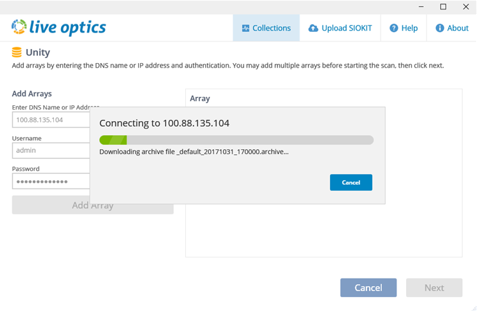
- The collector connects to the array and capture the configuration and performance data. Note, this could take several minutes depending on the size of the array and network connectivity to the array.
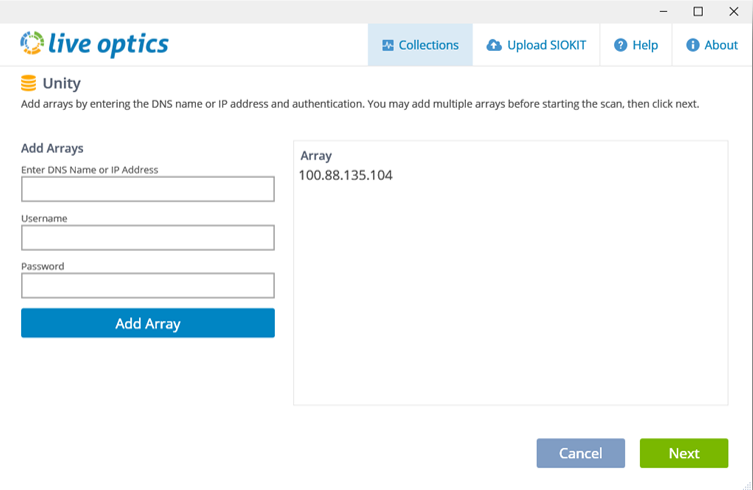
- When complete, the array is listed under the Array column. Add additional arrays to be profiled. Once all the arrays have been added, click Next.
Select the method to upload to the Live Optics website for processing.
- Selecting the default, "Upload my collection data to the Live Optics web portal automatically,” is the recommended method. This option automatically uploads the collected data to the Live Optics portal and starts processing. Use this option when the host running the collector has Internet access. Once selected, click Next.

- Enter the name of the project. Click Next.
- The files are processed and uploaded to the web portal. During the upload, a status bar indicates the progress. As storage array data can be large, the upload may take some time to complete depending on the speed of the Internet connection.
- The collector indicates when the upload has completed. Click Quit to close the collector
- An email from Live Optics is delivered when the project is ready for viewing on the web portal.
- Selecting "I will upload later…" processes and saves the array data to an encrypted file with the name [hostname]_Unity.siokit. The file is written to the same folder from where the collector was run. Use this option when the host running the collector does not have Internet access.

- After the collection process completes, the file must be uploaded to the web portal for processing using the collector.
The process has been completed successfully.
- Once the upload has been completed successfully. Click Quit to close the collector
- An email from Live Optics is sent when the project is ready for viewing on the web portal
Uploading the SIOKIT (applies only if the "upload later" was selected)
- The Live Optics collector software is used to upload the SIOKIT files using the Windows collector. See knowledge base article Uploading SIOKIT file in the Live Optics collector
View Project Results
- Log in to the Live Optics web portal https://app.liveoptics.com
- Recent projects are listed on the dashboard. Select the project.
- The project details page appears. From here reports can be downloaded in Microsoft PowerPoint format (PPT), and Excel (XLXS), shared with other Live Optics accounts, or deleted.
Produse afectate
AnalyticsProprietăți articol
Article Number: 000231445
Article Type: How To
Ultima modificare: 10 oct. 2024
Version: 2
Găsiți răspunsuri la întrebările dvs. de la alți utilizatori Dell
Servicii de asistență
Verificați dacă dispozitivul dvs. este acoperit de serviciile de asistență.