How to Perform a Battery Calibration Cycle on a Dell Laptop
摘要: This process can help resolve problems where the laptop battery discharges quickly or the battery percentage drops suddenly (example: 20% charge to 6% in a short timeframe.)
本文章適用於
本文章不適用於
本文無關於任何特定產品。
本文未識別所有產品版本。
說明
Before You Begin
Before proceeding with these advanced steps, ensure that you have already completed the foundational steps on the Dell Battery Support library page, including:
- Checking battery health in Dell SupportAssist
- Running Dell hardware diagnostics (ePSA / SupportAssist Pre-Boot)
- Updating BIOS, chipset drivers, and power management drivers
- Reviewing basic Windows power settings
- Applying standard battery care and optimization practices
Battery Calibration Cycle
NOTE: This process may take several hours.
NOTE: It is recommended to perform up to three battery calibration cycles to ensure that the laptop’s battery has been fully calibrated.
- Starting with the computer off.
- Press the Power button on the computer and immediately start pressing the F2 key once a second to access the BIOS Setup.
- Navigate to Power Management > Battery Charge Configuration.
- Ensure the BIOS Battery Charge Configuration is set to Standard.
- Save any changes and exit BIOS.
- Start by plugging in the laptop’s AC Adapter to the wall outlet and the laptop. Ensure that the laptop has begun charging once the AC adapter is plugged in (The battery charge light located next to the charging port lights up).
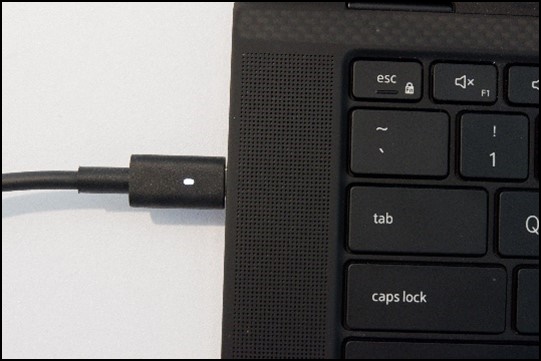
Figure 1: AC Adapter Connected to the ComputerNOTE: Ensure to use the AC Adapter that came with your computer. - Charge the battery to 100% with the laptop powered off or in sleep (Wait for the battery charge light next to the charging port to turn off).
- Disconnect the AC adapter.
- Use the laptop normally until it reaches critical battery level and the system shuts down or hibernates automatically.
- Without powering on, reconnect the AC adapter and charge back to 100% uninterrupted (Wait for the battery charge light next to the charging port to turn off).
- Once the laptop has been charged up to 100%, this completes one battery calibration cycle.
- Power on and check if the charge indicator now updates correctly.
For more information about Dell battery usage and troubleshooting, see these Dell Knowledge Base articles:
- How to Improve the Performance of a Dell Laptop Battery
- How to Troubleshoot Dell Laptop Battery Issues
- How to Check Battery Health Status on Dell Laptops
How to perform a battery calibration cycle on a dell laptop
Duration: 00:53
Closed captions: This video is available in multiple languages. Click the Closed Caption icon and select the language that you want.
受影響的產品
G Series, Alienware, Dell Laptops, Dell Plus, Dell Pro, Dell Pro Max, Dell Pro Plus, Dell Pro Premium, Inspiron, Latitude, Dell Pro Rugged, Vostro, XPS, Legacy Laptop Models, Mobile Workstations, Dell Pro Max 16 XE MC16250文章屬性
文章編號: 000205559
文章類型: How To
上次修改時間: 01 9月 2026
版本: 11
向其他 Dell 使用者尋求您問題的答案
支援服務
檢查您的裝置是否在支援服務的涵蓋範圍內。