Dark horizontal lines or banding on Dell 2350d and 2350dn laser printers
Summary: Steps for correcting dark horizontal lines or banding on the 2350d and 2350dn laser printers.
This article applies to
This article does not apply to
This article is not tied to any specific product.
Not all product versions are identified in this article.
Symptoms
| Article Summary: | How to troubleshoot dark horizontal lines or banding on Dell 2350d and 2350dn laser printers |
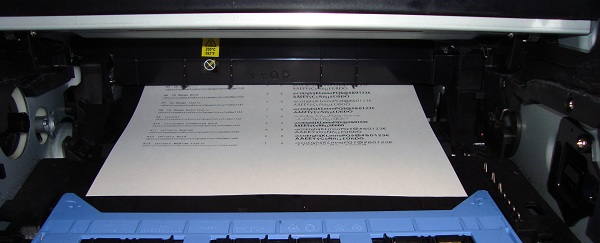
Example of dark horizontal lines: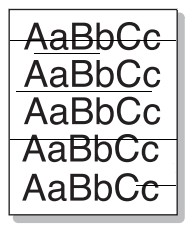
Table of Contents:
- Check media is compatible and media type is correctly set
- Shake and reinsert the toner cartridge
- Replace the toner cartridge
- Clean the charge roller
- Replace the imaging drum
- Perform a stop test
| 1. | Check media is compatible and media type is correctly set |
Incompatible print media may cause print quality issues.
Ensure the media type is correctly set on the printer front panel and in the print driver.
To set the media type on the printer front panel:
- Press the Menu button.
- Press the Right Arrow until Paper Menu appears.
- Press Select.
- Press the Right Arrow until Size/Type appears then press Select.
- Select Source is displayed.
- Press the Right Arrow until the correct source (Tray 1, Tray 2, MPF) appears then press Select.
- Size is displayed below the source name.
- Press the Right Arrow until Type appears then press Select.
- Press the Right Arrow until the correct type (Plain, Label, Envelope) appears then press Select.
- Submitting Changes is displayed.
To set the media type in the print driver:
- Open the on your PC.
- Select the tab marked Paper.
- Check the Paper type setting matches the media physically present and set from the front panel.
| 2. | Shake and reinsert the toner cartridge |
Shaking the cartridge to redistribute toner may improve print quality, especially when the cartridge is almost empty.
To redistribute toner:
- Remove the toner cartridge.
- Hold the cartridge over a sheet of paper to catch any loose toner, gently shake the cartridge.
- Reinsert the toner cartridge.
| 3. | Replace the toner cartridge |
Replace the toner cartridge if possible.
Ensure the replacement toner is either new, or a cartridge you know works correctly.
Back to Top
| 4. | Clean the charge roller |
Loose toner or other contamination on the charge roller may cause print quality issues.
To clean the charge roller:
- Switch the printer off.
- Open the front cover, remove the toner and drum.
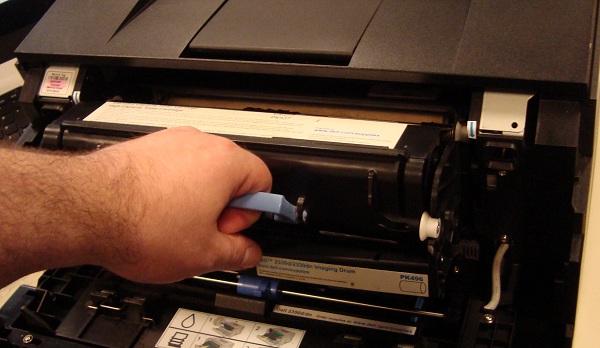
- Press and hold the button on the imaging drum located below and to the left of the toner cartridge handle. Pull on the blue plastic toner cartridge handle to separate the toner and drum.
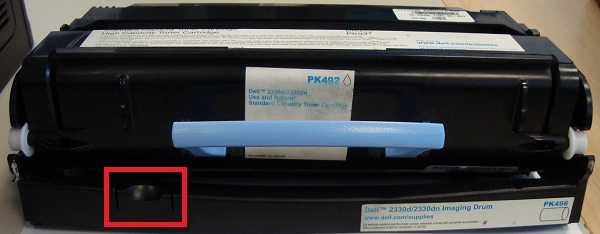
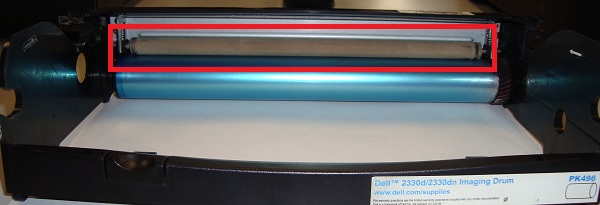
- Locate the beige charge roller on the imaging drum. Clean the charge roller using a dry cloth or tissue.
- Re-insert the toner cartridge in to the imaging drum and insert the assembled unit in to the printer.
| 5. | Replace the imaging drum |
Replace the imaging drum if possible.
Ensure the replacement drum is either new, or a drum you know works correctly.
Back to Top
| 6. | Perform a stop test |
Stopping the paper part way through the printer can help identify where the problem is occurring.
To perform a stop test:
- Open the rear door.
- Print a single sided page.
- As soon as the paper comes in to view at the back of the printer, switch the power off to stop the paper part way through the fuser unit (heated rollers at the rear of the printer).
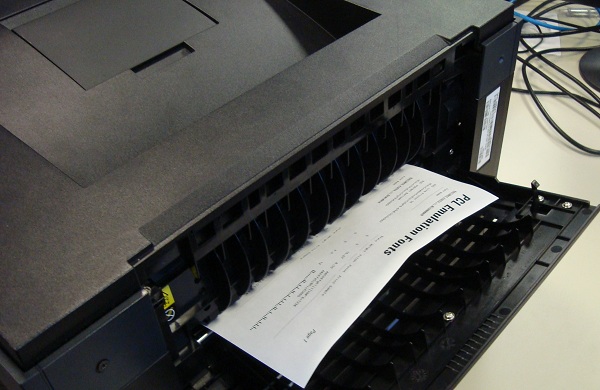
- Open the front cover, remove the toner and drum.

- Check the area of the page which has been printed but has not yet passed through the fuser unit.
If the problem is visible before the fuser unit replace the toner first, then the drum if you have not already done so.
If this does not resolve the problem, or the issue occurs only after the fuser, contact technical support for assistance.
Back to Top
If you require further assistance or wish to give us feedback, please engage our technical team on Twitter.
Cause
above
Resolution
above
Affected Products
Dell 2350d/dn Mono Laser PrinterArticle Properties
Article Number: 000178677
Article Type: Solution
Last Modified: 07 Jan 2025
Version: 7
Find answers to your questions from other Dell users
Support Services
Check if your device is covered by Support Services.