Data Domain: How to upgrade DDMC and Data Domain Operating System
Summary: This article provides a comprehensive procedure for upgrading the DDMC OS and Data Domain Operating System (DDOS) on physical Data Domain systems and Data Domain Virtual Edition (DDVE). ...
This article applies to
This article does not apply to
This article is not tied to any specific product.
Not all product versions are identified in this article.
Instructions
Applies to:
Products
- Dell PowerProtect Storage Direct Data Domain
All supported models - check release notes for compatibility by DD OS version:
DD9800, DD3300, DD3410, DD6400, DD6410, DD9400, DD9410, DD9900, DD9910, DD9910AF - Dell Data Domain Virtual Edition (DDVE)
- Data Domain Operating System (DDOS)
- Data Domain management Center (DDMC)
Exclusions
This procedure does not apply to:
- Data Domain High Availability (DDHA) systems.
For DDHA upgrades see Data Domain: OS Upgrade Guide for High Availability (HA) systems (Login to Dell Support required). - Integrated Data Protection Appliance (IDPA) systems upgraded outside the IDPA workflow.
Release Types
General Availability (GA)
GA releases:
- Complete full Data Domain internal QA testing
- Are approved for production deployments
Long-Term Support (LTS)
LTS releases:
- Target customers standardizing on a version for extended periods
- Receive maintenance updates on a regular cadence
- Provide up to 36 months of software remediation support
- Replace the historical "Target Code" concept
Prerequisites:
Before proceeding:
- Log in to Dell Support.
- Confirm the system is not:
-
- DDHA
- IDPA-managed
-
Validate interoperability using the E-Lab Interoperability Navigator.
Reference: Data Domain: How to use E‑Lab Navigator to verify compatibility before a DDOS upgrade
-
Review the latest release notes of the target version and download the required DD OS Upgrade File (
<version>-<builld>.rpm).
Data Domain: Operating System (DDOS) Software Versions and Download Links
-
- DDVE cloud deployments (AWS, Azure, GCP) use the same DDOS RPM packages as physical Data Domain systems.
- Select 'Download' > an End-User License Agreement (EULA) PDF will be displayed > Read and Accept the EULA to reveal the Download Links.
- Review the upgrade FAQ's here: DDOS upgrades Frequently Asked Questions (FAQ)
- Collection Replication (CTX=0) environments require both systems to be upgraded simultaneously.
Upgrade Procedure:
Phase 1: Download the DDOS Upgrade package
- Sign in to Dell Support.
- The DD Downloads page.
- Select the target version.
- Tip: Use the 'DDOS' or 'DDVE' keyword filter to narrow your search.
- Select the 'Download' Link in the Action column.
- Review and accept the End User License Agreement (EULA).
- Download the required
.rpmpackage.
- Filename format:
<version>-<build>.rpm(example:8.6.1.45-123456.rpm)
- Filename format:
Phase 2: Upload the Upgrade Package to the DD:
- Open the PowerProtect Storage Direct DD System Manager (For example, this is accessed from either
https://hostname/ddemorhttps://IP/ddem). - Log in as
sysadmin. - Go to the Maintenance tab.
- Click Upload Upgrade Package and select the DDOS Upgrade package (.RPM) file downloaded in Phase 1.
Phase 3: Pre-Upgrade Validation:
-
Log in to the Data Domain Command Line Interface (DD-CLI/SSH).
- Open an SSH session.
- Type the IP address or hostname.
- Log in as
sysadminuser.
-
Verify System Identity- Validate the serial number, hostname, SW version and IP address to ensure that you are on the correct server.
system show serialnohostnamenet show settingssystem show version
-
Check Outstanding Alerts
alerts show currentExpectation:
- No unresolved hardware failures
- No critical platform alerts
If hardware issues exist, engage Dell Support before continuing.
-
Verify file system Health
-
filesys status- Expectation:
File system is enabled and running.
-
-
Verify Capacity:
df- Expectation:
-
PostcompPartition must have at least 10% free space.
-
Stop Cleaning Activity
filesys clean statusfilesys clean stop
-
Stop Cloud Tier Activity:
data-movement statusdata-movement stop allcloud clean statuscloud clean stop
-
Verify Replication:
replication show configreplication show stats- Expectation:
- No replication initialization in progress.
- No active synchronization requiring completion
- To stop replication, see: Data Domain: Replication initialization is in progress, and upgrade cannot proceed.
- Expectation:
-
Verify Disk Health
disk show state- Expectation:
- Do not proceed if any disks show:
F = FailedR = ReconstructingC = CopyA = Absent
- Expectation:
-
Verify System Activity:
-
Check workload activity:
system show stats interval 2 count 10ORiostat 2 -
Check for running NFS or CIFS jobs.
nfs show activecifs show active- Stop active jobs before upgrading.
-
-
Verify Upgrade Package
system package list-
Confirm:
- Correct RPM uploaded
- Expected version available
-
-
Proactively reboot.
system reboot- Monitor the DD during reboot:
ping -t [DD IP address]
- Monitor the DD during reboot:
- IDRAC Recommendation (PowerEdge-Based Systems)
- For DDOS 8.4 and earlier:
From the iDRAC user interface: Maintenance -> Diagnostics -> Reboot iDRAC
Reboot iDRAC before starting the upgrade.
- For DDOS 8.4 and earlier:
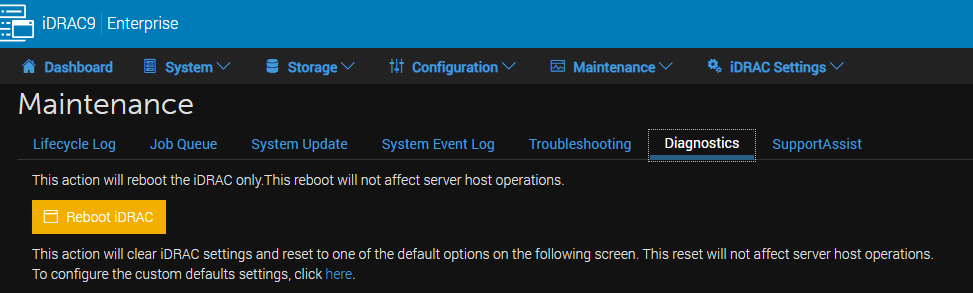
Figure 1: IDRAC User Interface
It takes about 5 minutes for iDRAC to reboot.
DDOS 8.5 and later automatically reboot iDRAC during upgrade.
Phase 4: start Upgrade
After proactive reboot.
- Revalidate Health:
alerts show current- No active failures or alerts
filesys statusFile system is enabled and running
-
Verify Upgrade package:
system package list- Gather the relevant RPM filename (copy it, ready to use for the precheck and upgrade commands.)
-
Run Upgrade Precheck:
system upgrade precheck <filename.rpm>
Do not continue if failures are reported.
-
Start Upgrade.
system upgrade start <filename.rpm>
The appliance automatically reboots during upgrade.
Monitor connectivity:ping -t [DD IP address]
Phase 5: Post Upgrade Validation:
-
Monitor the upgrade.
system upgrade watchsystem upgrade history- The upgrade is completed when the message "Upgrade successfully completed" is displayed.
-
Confirm System Health:
system show versionalerts show currentfilesys status- Verify:
- Correct target DDOS version
- No alerts
- File system is healthy
- Verify:
Verify Services:
ddboost statuscifs statusnfs statusvtl status- Enable the disabled service, if needed (For example: #
ddboost enable).
- Enable the disabled service, if needed (For example: #
-
Review Password Aging
user password aging showIf you see"Maximum days between change"is set to a small value (for example,90), change it to a higher value (for example,99999):
user password aging set <ddboost username> max-days-between-change 99999
Additional Information
If the Dell Remote Proactive team is assisting with your DDOS upgrade, see Data Domain: FAQs for Remote Proactive Data Domain Upgrades (Log in to Dell Support required.)
Videos
How to upgrade the Data Domain Operating System on Data Domain and DD Virtual Edition.
Duration: 00:09:51 (hh:mm:ss)
When available, closed caption (subtitles) language settings can be chosen using the CC icon on this video player.
Watch this video on YouTube from How to upgrade the Data Domain Operating System on Data Domain and DD Virtual Edition. (External Link)
Affected Products
Data Domain Deduplication Storage Systems, DD OS, PowerProtect Data Domain Management CenterArticle Properties
Article Number: 000021710
Article Type: How To
Last Modified: 03 Nov 2026
Version: 30
Find answers to your questions from other Dell users
Support Services
Check if your device is covered by Support Services.