How to Enter BIOS or UEFI Setup on a Dell Computer
Summary: Learn how to open the BIOS setup screen on your Dell laptop, desktop, or tablet. This guide covers the F2 key method, the Windows Advanced startup method, the F12 boot menu, and what to do when none of them work. ...
This article applies to
This article does not apply to
This article is not tied to any specific product.
Not all product versions are identified in this article.
Instructions
Quick answer
There are two reliable ways to open BIOS setup on a Dell computer:
- From a powered-off computer: Turn on the computer, then tap the F2 key about once per second as soon as the Dell logo appears.
- From inside Windows 11: Go to Settings > System > Recovery. Next to Advanced startup, select Restart now. Then select Troubleshoot > Advanced options > UEFI Firmware Settings > Restart.
If neither works, jump to If you cannot open BIOS setup.
How to Access BIOS or UEFI On Your Dell
Duration: 00:01:05 (hh:mm:ss)
When available, closed caption (subtitles) language settings can be chosen using the CC icon on this video player.
What BIOS and UEFI actually are
Your computer has a system firmware that starts running the moment you press the power button. It wakes up the hardware, checks that everything is present, and then hands control over to the operating system. This firmware is called the BIOS (Basic Input/Output System).
UEFI (Unified Extensible Firmware Interface) is the modern version of the same thing. Every Dell computer sold in the last decade or so uses UEFI. It starts up faster, supports larger drives, and adds security features such as Secure Boot.
Dell uses the terms BIOS, UEFI, system firmware, and System Setup to mean the same screen. Windows calls it UEFI Firmware Settings. If you see any of those names, you are in the right place.
You would open this screen to:
- Change which drive or device the computer starts from
- Turn Secure Boot on or off
- Check or enable the TPM security chip
- Turn virtualization support on
- Check your Service Tag and installed memory, and more
Before you begin
Two things are worth doing first. Both take under a minute and they save a lot of trouble later.
1. Save your work and close your apps.
Every method below restarts the computer.
2. If your drive is encrypted, suspend BitLocker first.
This one matters. BitLocker watches your firmware settings. If you change Secure Boot, the TPM setting, or the boot mode, BitLocker sees a hardware change and asks for a 48-digit recovery key the next time the computer starts. If you do not have that key saved, you may be locked out of your system.
To suspend BitLocker before you make firmware changes:
- Select Start, and then select Settings.
- Select Privacy & security, and then select Device encryption or BitLocker drive encryption.
- Next to your operating system drive, select Suspend protection.
- After you finish in BIOS setup and Windows starts normally, turn protection back on.
Note: You only need to do this if you plan to change a setting. Simply looking around in BIOS setup and exiting without saving does not trigger BitLocker.
To find your recovery key, sign in at account.microsoft.com/devices/recoverykey with the Microsoft account used to set up the computer. Work or school computers usually store the key with the IT department.
Method 1: Use the F2 key at startup (works even when Windows will not start)
This is the method most easy and quick to use, and it works whether or not the operating system is healthy.
- Save your work and shut down the computer completely.
- Press the power button to turn the computer on.
- As soon as the Dell logo appears, tap the F2 key about once per second.
- Keep tapping until the BIOS setup screen opens. On many Dell models, you first see a short message in the top-right corner that says Preparing to enter Setup. That means it worked, so you can stop tapping.
Two tips that make the difference:
- Tap, do not hold. Holding the key down can trigger a keyboard error message instead.
- Start early. If you see the Windows logo with the spinning dots, you missed the window. Restart and try again, tapping sooner.
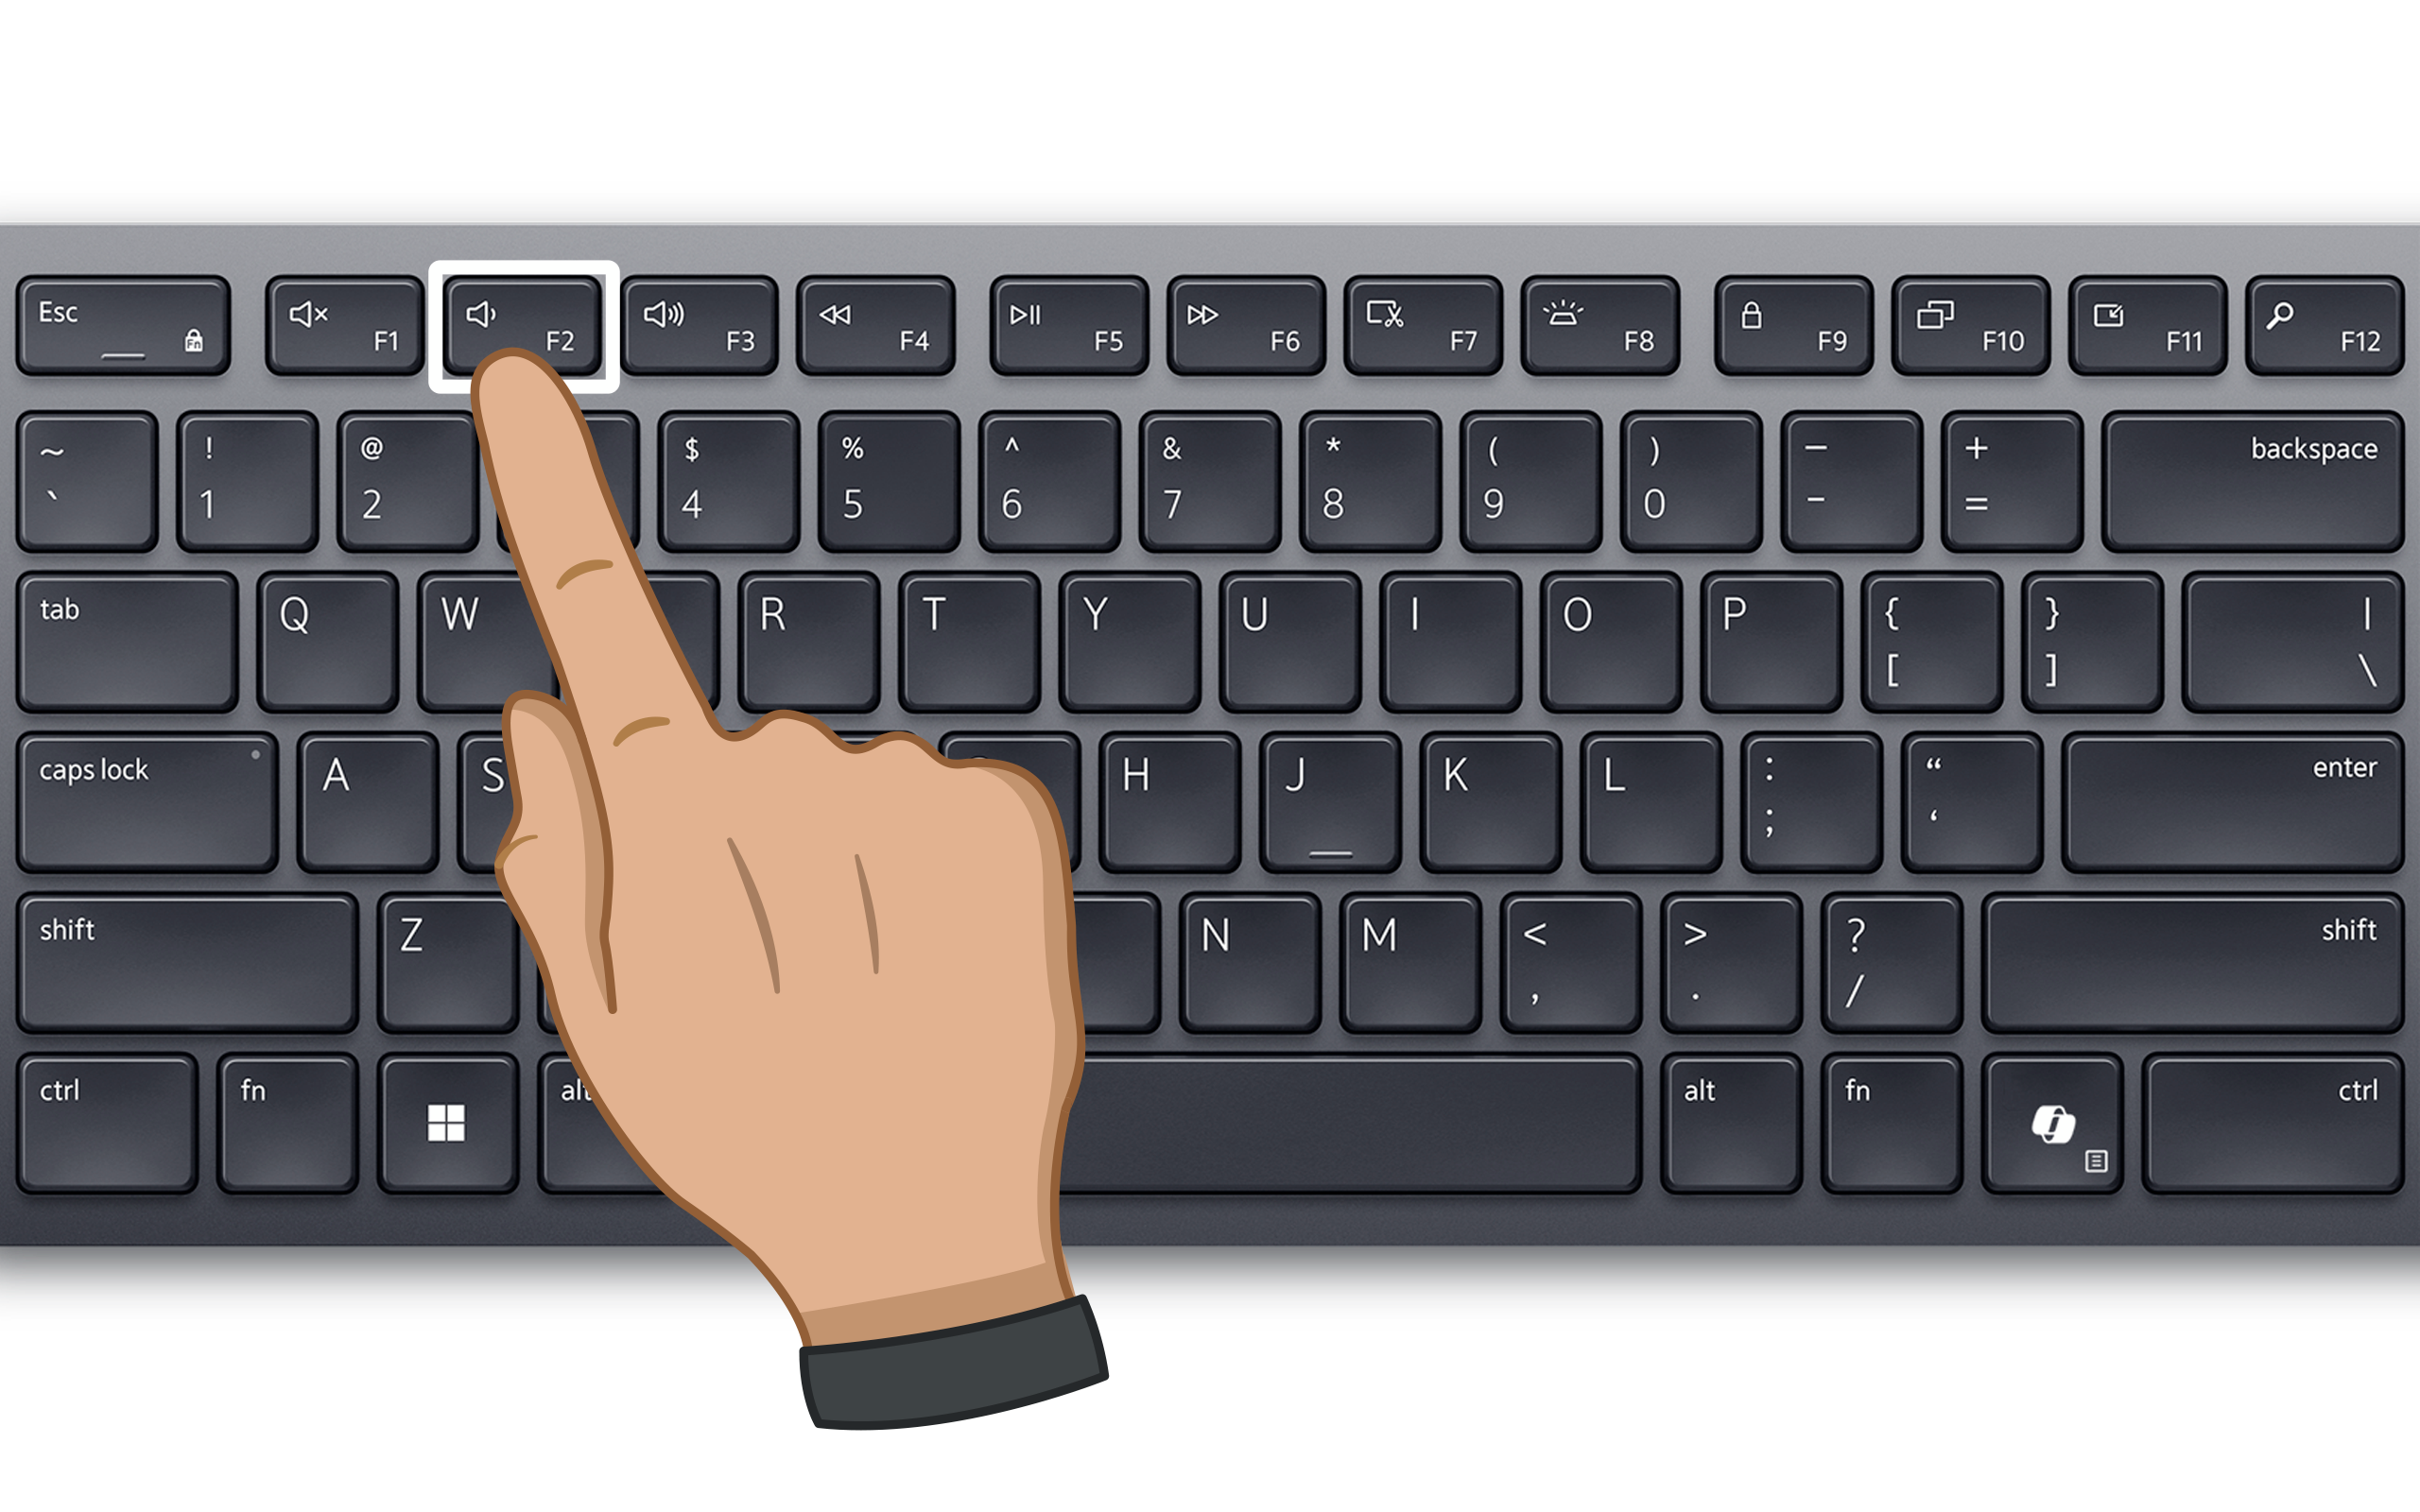
Note: On some Dell laptops, the top row of keys controls brightness and volume by default. If a plain F2 press changes your screen brightness, press Fn + F2 instead. You can change this behavior later in BIOS setup under POST Behavior or Fn Lock Options.
Method 2: Use the F12 one-time boot menu
If F2 is not working, try F12. The one-time boot menu is easier, and it includes a direct link into setup.
- Shut down the computer completely.
- Press the power button.
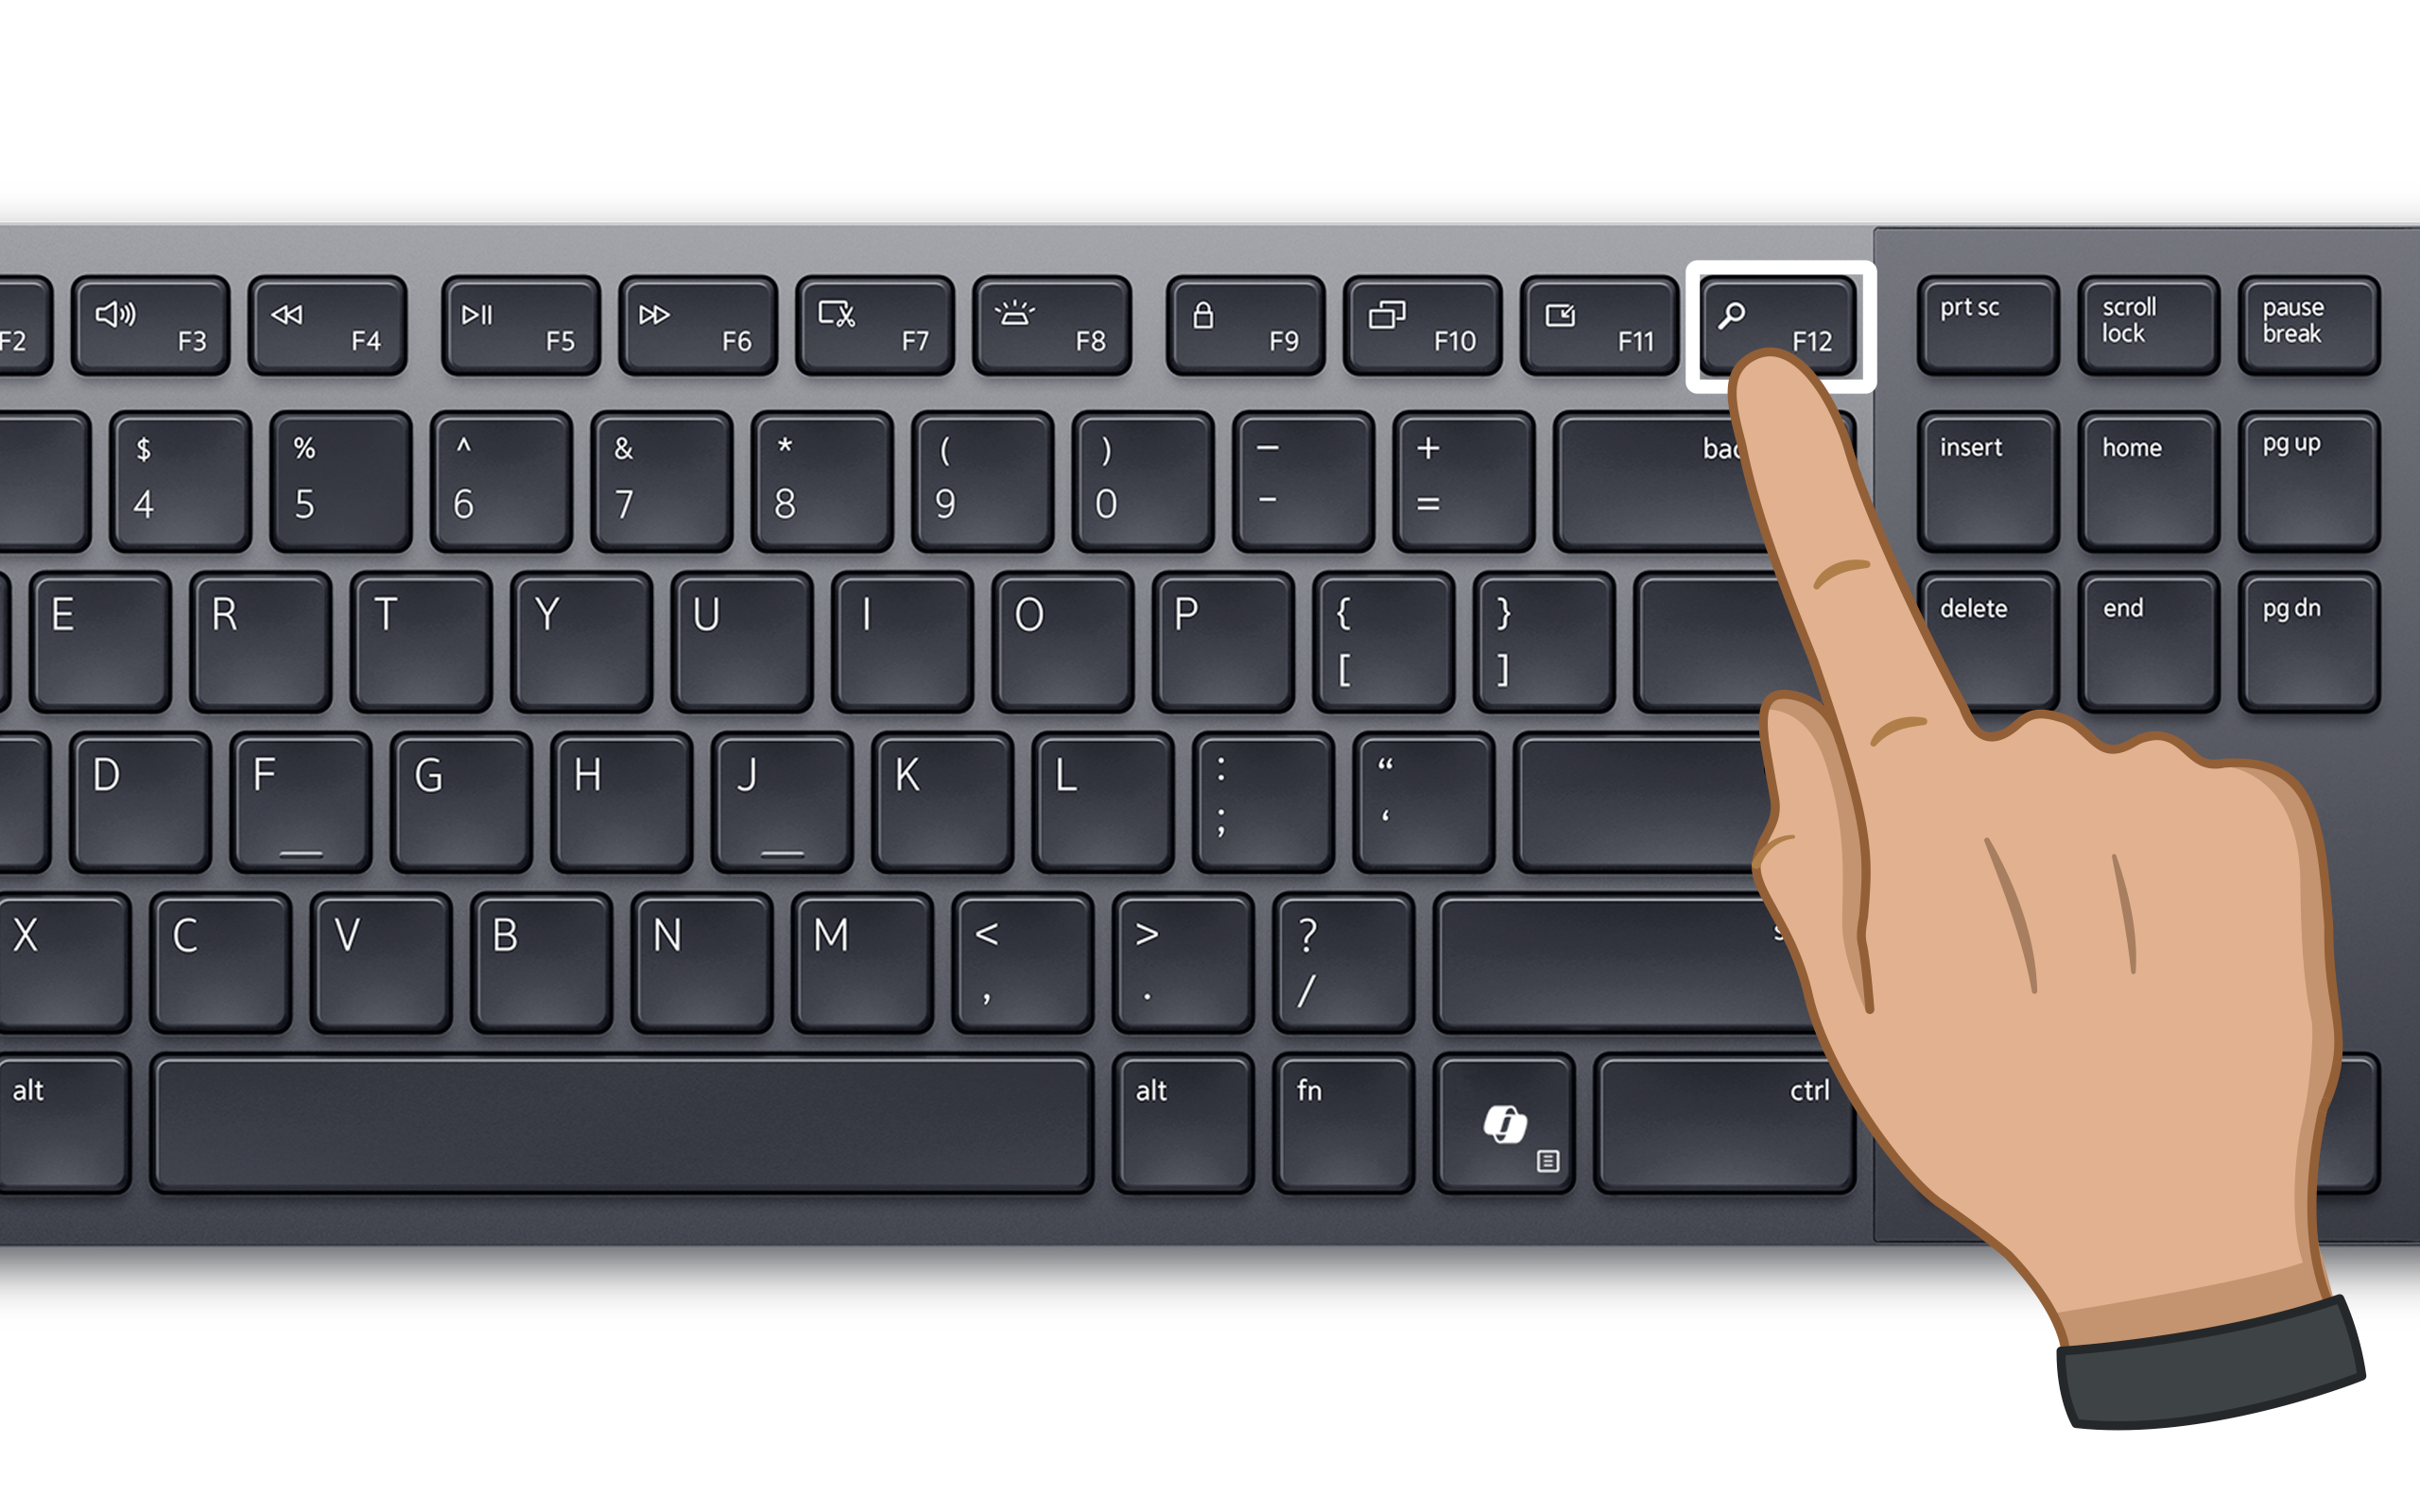
- As soon as the Dell logo appears, tap the F12 key about once per second.
- When the One Time Boot Menu opens, use the arrow keys to select BIOS Setup or System Setup.
- Press Enter.
This menu also lets you start from a USB drive one time only, without changing your saved boot order. That is handy for reinstalling Windows or running recovery media.
Method 3: Restart into BIOS setup from Windows 11
Use this method if the startup keys are not working, or if you are using a wireless or Bluetooth keyboard. Windows hands the computer over to the firmware for you, so timing is not a factor.
- Select Start, and then select Settings. You can also press the Windows logo key + I.
- In the left pane, select System.
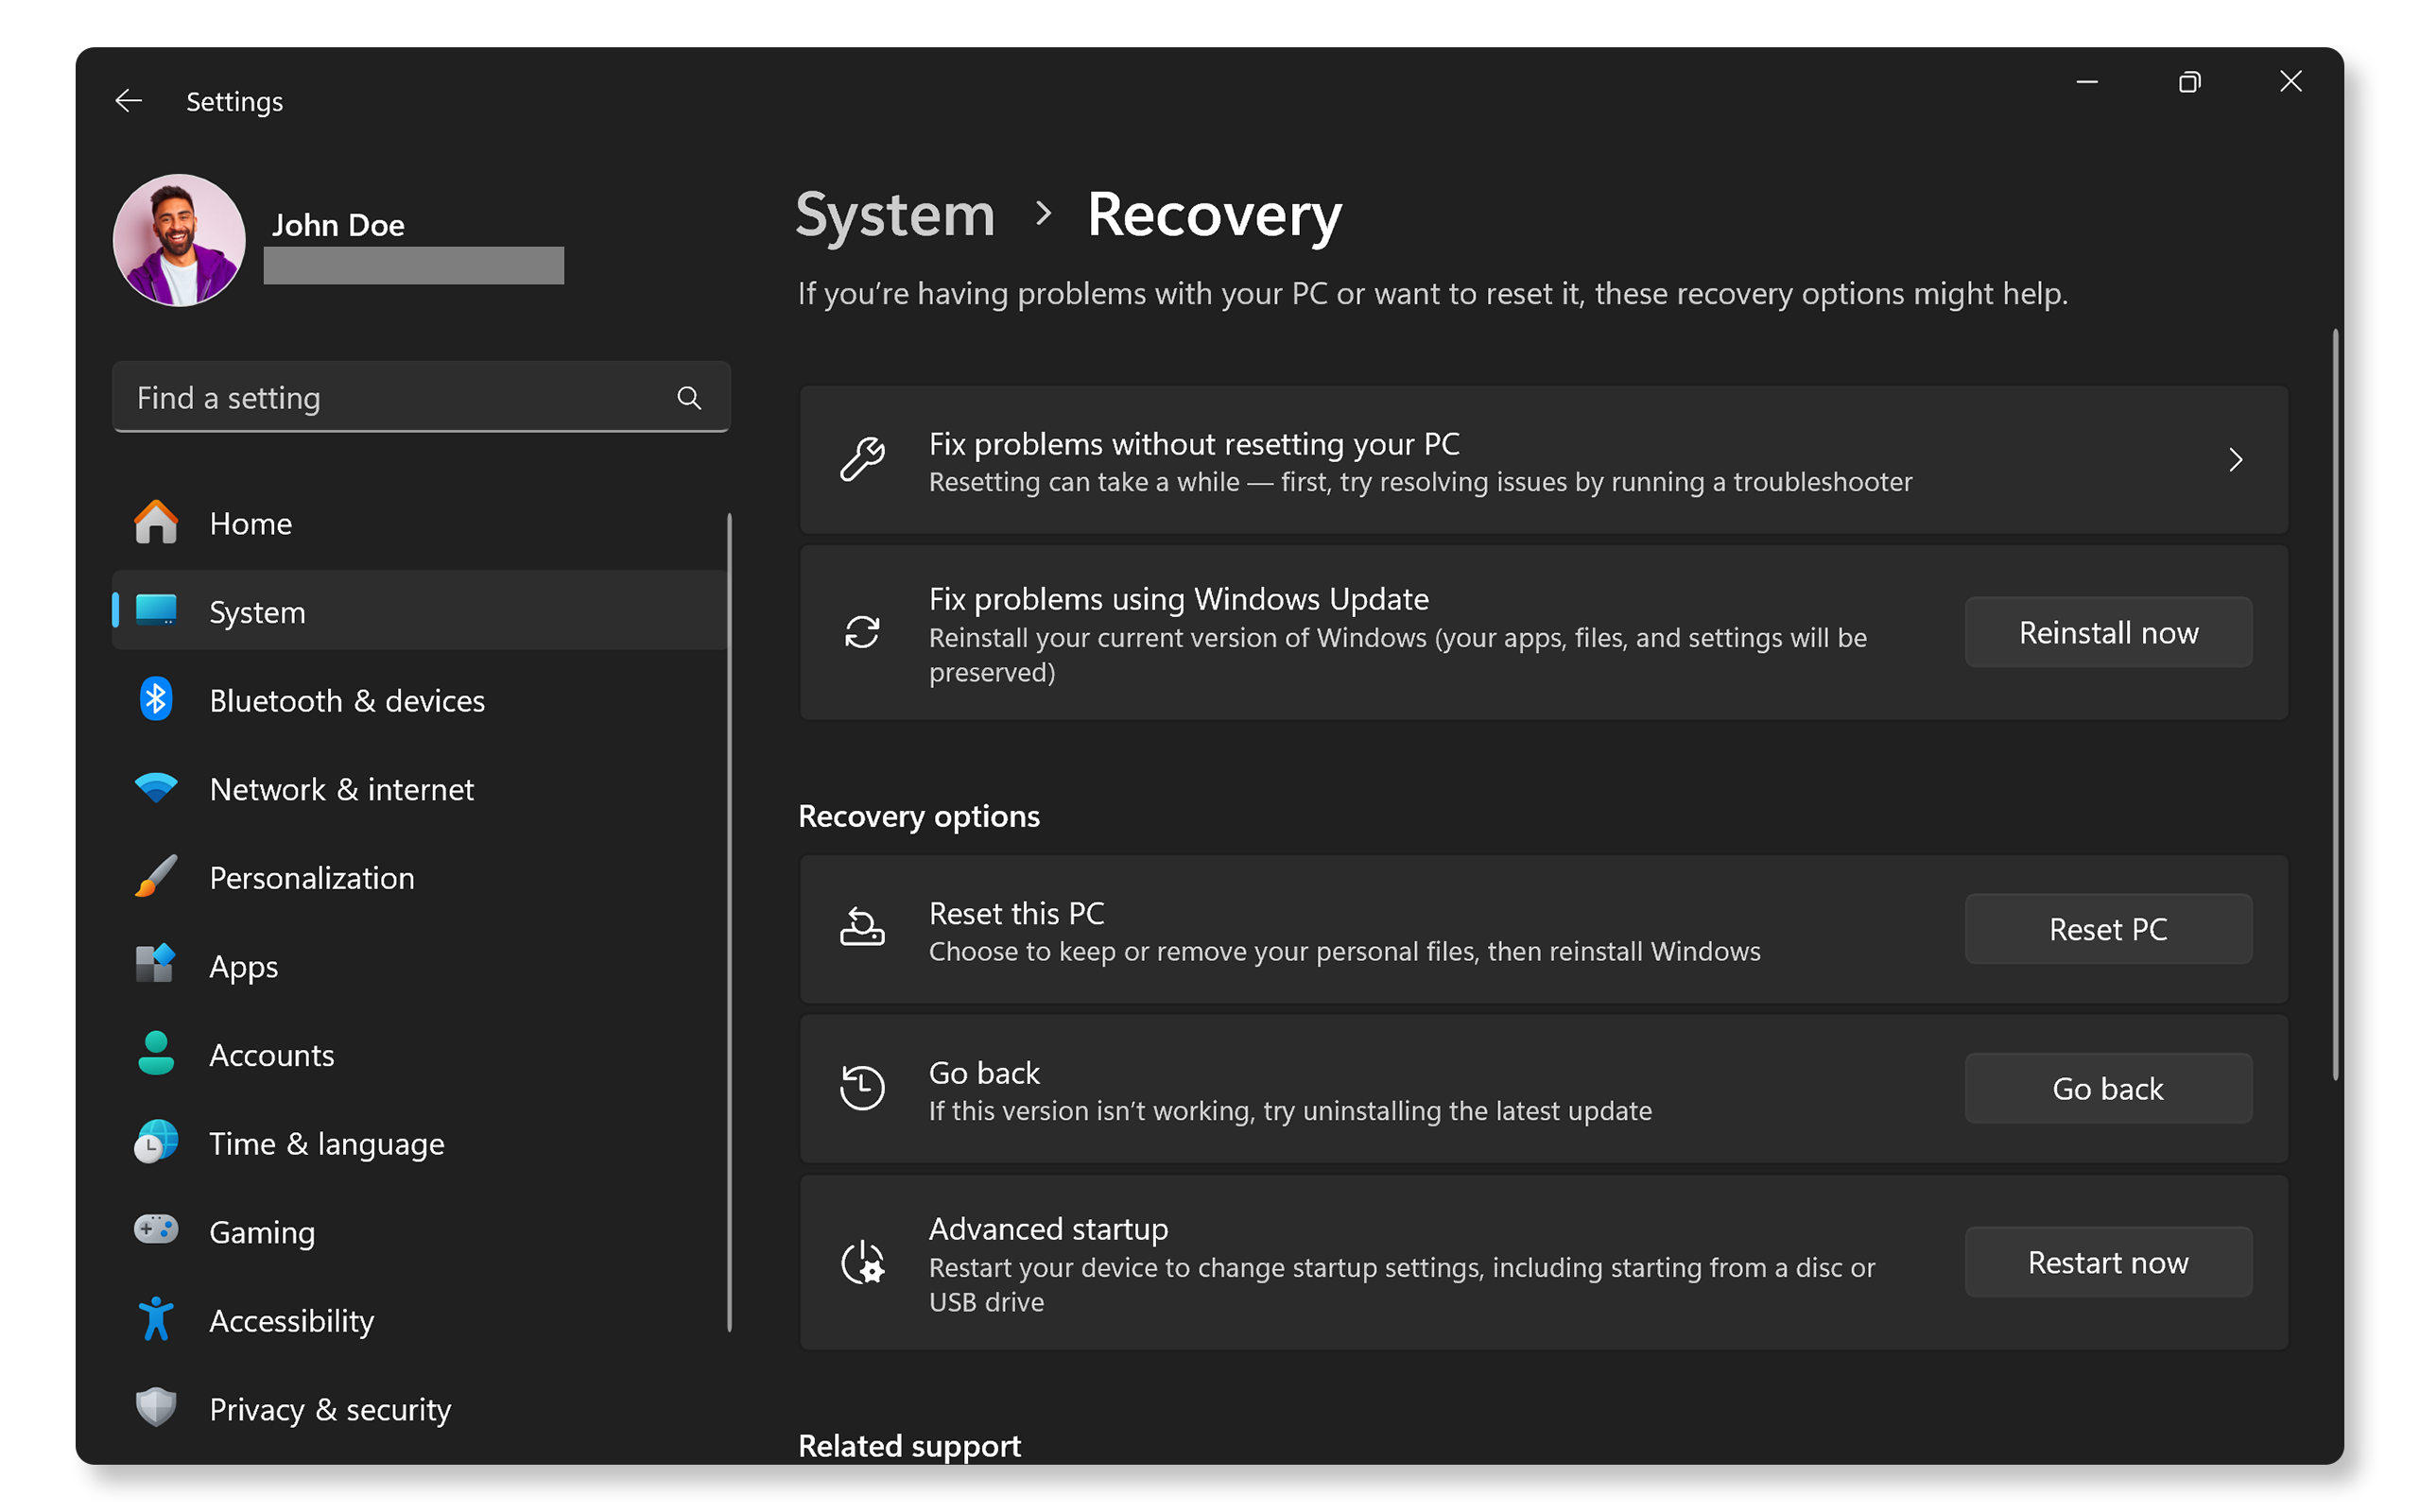
- Scroll down and select Recovery.
- Under Recovery options, find Advanced startup, and then select Restart now.
- When Windows asks you to confirm, select Restart now again.
- On the Choose an option screen, select Troubleshoot.
- Select Advanced options.
- Select UEFI Firmware Settings.
- Select Restart.
The computer restarts once more and opens the BIOS setup screen.
Note: Do not confuse UEFI Firmware Settings with Startup Settings, which sits on the same menu. Startup Settings controls Windows options such as Safe Mode. It does not open your firmware.
Method 4: Start from the Windows sign-in screen
This one is useful when you can reach the sign-in screen but cannot sign in, or when you would rather skip the Settings app.
- At the Windows sign-in screen, select the Power icon in the lower-right corner.
- Press and hold the Shift key, and then select Restart.
- Keep holding Shift key until the Choose an option screen appears.
- Select Troubleshoot.
- Select Advanced options.
- Select UEFI Firmware Settings.
- Select Restart.
The same Shift + Restart shortcut works from the Start menu on the desktop.
Method 5: Use a command (for advanced users and IT administrators)
If you manage several computers, a single command does the whole job.
- Select Start, type
Terminal, and then select Run as administrator. - Type the following command, and then press Enter:
shutdown /r /fw /t 0
The computer restarts straight into BIOS setup. The /fw part tells Windows to hand over to the firmware interface, and /t 0 means restart right away. This command needs administrator rights and only works on computers that support the firmware handover, which covers nearly all current Dell systems.
To open the recovery menu instead of going directly to firmware, use shutdown /r /o /t 0.
Method 6: Dell tablets and 2-in-1 devices without a keyboard
On Dell tablets, the volume buttons take the place of F2 and F12.
- Make sure the tablet is fully powered off and disconnected from any dock.
- Press and hold the Volume up button.
- While still holding it, press and release the Power button.
- Keep holding Volume up until the boot menu appears.
- Select BIOS Setup.
Note: The exact button varies by model. Some Dell tablets use Volume down for setup and Volume up for the boot menu. Check the user guide for your model at Dell.com/support/manuals. If a keyboard is attached, F2 and F12 work normally.
Troubleshooting: If you cannot access BIOS or UEFI setup
Work through these in order. The first three solve most cases.
The computer starts Windows before you can press F2
Fast Startup is usually the cause. When Fast Startup is turned on, shutting down does not fully power off the hardware. The next startup skips part of the normal sequence, which shortens the window for pressing F2.
Here is a useful detail: Fast Startup only affects Shut down, not Restart. So the quickest fix is to select Restart instead of Shut down, then tap F2 as the computer comes back on.
To turn Fast Startup off completely:
- Select Start, type
Control Panel, and then open it. - Select Hardware and Sound, and then select Power Options.
- In the left pane, select Choose what the power buttons do.
- Select Change settings that are currently unavailable.
- Clear the Turn on fast startup (recommended) check box.
- Select Save changes.
Your keyboard is not responding at startup
Windows loads keyboard drivers after the firmware stage. A keyboard that works fine on the desktop may be invisible during those first few seconds.
- Wireless and Bluetooth keyboards often do not respond before Windows loads. Use a wired USB keyboard, or use Method 3, 4, or 5 instead.
- Docking stations, USB hubs, and KVM switches can delay keyboard detection. Plug the keyboard straight into a USB port on the computer itself. On a laptop, undock it and use the built-in keyboard.
- USB 3.0 ports occasionally initialize later than USB 2.0 ports. If your desktop has both, try a different port.
UEFI Firmware Settings is missing from Advanced options
This happens for one of three reasons, and all three are normal rather than a fault.
- Your computer is running in legacy boot mode. Windows only shows this option when it started in UEFI mode. To check, press the Windows logo key + R, type
msinfo32, and then press Enter. Look at the BIOS Mode line. If it says Legacy, that explains it. - Your drive uses the older MBR partition style. UEFI mode needs a GPT drive.
- The Windows Recovery Environment is turned off or damaged. That environment is what presents the option.
What to do: Use Method 1 or Method 2 instead. The F2 and F12 keys work no matter which boot mode your computer uses, so they are the dependable path here.
The BIOS setup screen asks for a password
Systems such as Latitude, OptiPlex, and Precision often ship with a BIOS administrator password set by your IT department. This is a security feature.
- Work computer: Contact your IT administrator. Dell cannot remove or recover a BIOS administrator password.
- Personal computer you set the password on: Enter it as normal. If you have forgotten it, contact Dell Technical Support with your Service Tag and proof of ownership.
The screen stays black or the computer will not start at all
The issue is likely hardware rather than the BIOS key. Try these:
- Disconnect all external devices, including USB drives, printers, and external monitors.
- On a desktop, check that your monitor cable is connected to the graphics card port rather than the motherboard port, if your computer has a separate graphics card.
- Run the built-in hardware test. Shut down, then turn on the computer and tap F12. Select Diagnostics from the boot menu.
- If the diagnostics report an error code, note it down and share it with Dell Technical Support.
Once you are inside BIOS setup
A short orientation, so the screen feels familiar.
Newer Dell computers use a graphical setup screen that you can navigate with a mouse or touchscreen. Older models use a blue text screen where you navigate with the arrow keys, select with Enter, and go back with Esc.
A few things worth knowing:
- Settings are grouped into categories such as General, Boot Configuration, Storage, Security, and Virtualization Support.
- Many Dell models have an Advanced Setup toggle. Turn it on to reveal the full list of options.
- Apply Changes saves what you have adjusted. Exit leaves the setup screen and restarts the computer.
- If something stops working after a change, look for Restore Settings or Load Defaults to return everything to the factory configuration.
Caution: Change one setting at a time and write down what you changed. That way, if the computer behaves differently afterward, you know exactly what to put back.
Frequently asked questions (FAQs)
Q: What key opens BIOS on a Dell computer?
A: Press F2 repeatedly as soon as the Dell logo appears. This works on all Dell desktops, laptops, and workstations.
Q: What is the difference between F2 and F12 on a Dell?
A: F2 opens BIOS setup, where you view and change stored settings. F12 opens the one-time boot menu, where you pick a startup device for this session only. The F12 menu also includes BIOS Setup and Diagnostics.
Q: Why is UEFI Firmware Settings missing in Windows 11?
A: Windows only shows it when the computer started in UEFI mode from a GPT drive with a working recovery environment. If your computer boots in legacy mode, the option does not appear. Use the F2 key at startup instead.
Q: Can I open BIOS setup without restarting?
A: No. BIOS setup runs before Windows loads, so a restart is always required.
Q: Is it safe to enter BIOS setup?
A: Yes. Looking around causes no harm, and you can exit without saving at any time. Take care only when changing settings, particularly Secure Boot, TPM, and boot mode, since those can affect BitLocker and how Windows starts.
Q: Why does my Dell ask for a BitLocker recovery key after I changed a BIOS setting?
A: BitLocker treats firmware changes as a hardware change and asks you to confirm your identity. Enter your recovery key to continue. To avoid this next time, suspend BitLocker before you change firmware settings.
Q: How do I open BIOS if Windows will not start?
A: Use the F2 key at startup. It works independently of Windows, which is why it remains the most dependable method.
Q: Does the F2 key work on Alienware computers?
A: Yes. Alienware desktops and laptops use the same F2 key for setup and F12 for the one-time boot menu.
Affected Products
Alienware, Dell All-in-One, Dell Pro Max Micro, Dell Pro Max Slim, Dell Pro Max Tower, Dell Pro Micro, Dell Pro Slim, Dell Pro Tower, Dell Slim, Dell Tower, Inspiron, Legacy Desktop Models, OptiPlex, Vostro, XPS, G Series, Projectors & Accessories
, G Series, Alienware, Dell Plus, Dell Pro, Dell Pro Max, Dell Pro Plus, Dell Pro Premium, Inspiron, Latitude, Dell Pro Rugged, Vostro, XPS, Legacy Laptop Models, Fixed Workstations, Mobile Workstations
...
Article Properties
Article Number: 000126121
Article Type: How To
Last Modified: 06 Oct 2026
Version: 20
Find answers to your questions from other Dell users
Support Services
Check if your device is covered by Support Services.