PowerFlex: How to Manually Replace a Hard Drive
Summary: This KB will explain the manual procedure on the software side for a hard drive replacement if the Drive Replacement wizard does not work. It will explain the PowerFlex Software pre-requisite steps and how to add the drive back into the PowerFlex software. ...
Instructions
PowerFlex 4.X:
- Log into PowerFlex Manager
- Go to Block > SDSs
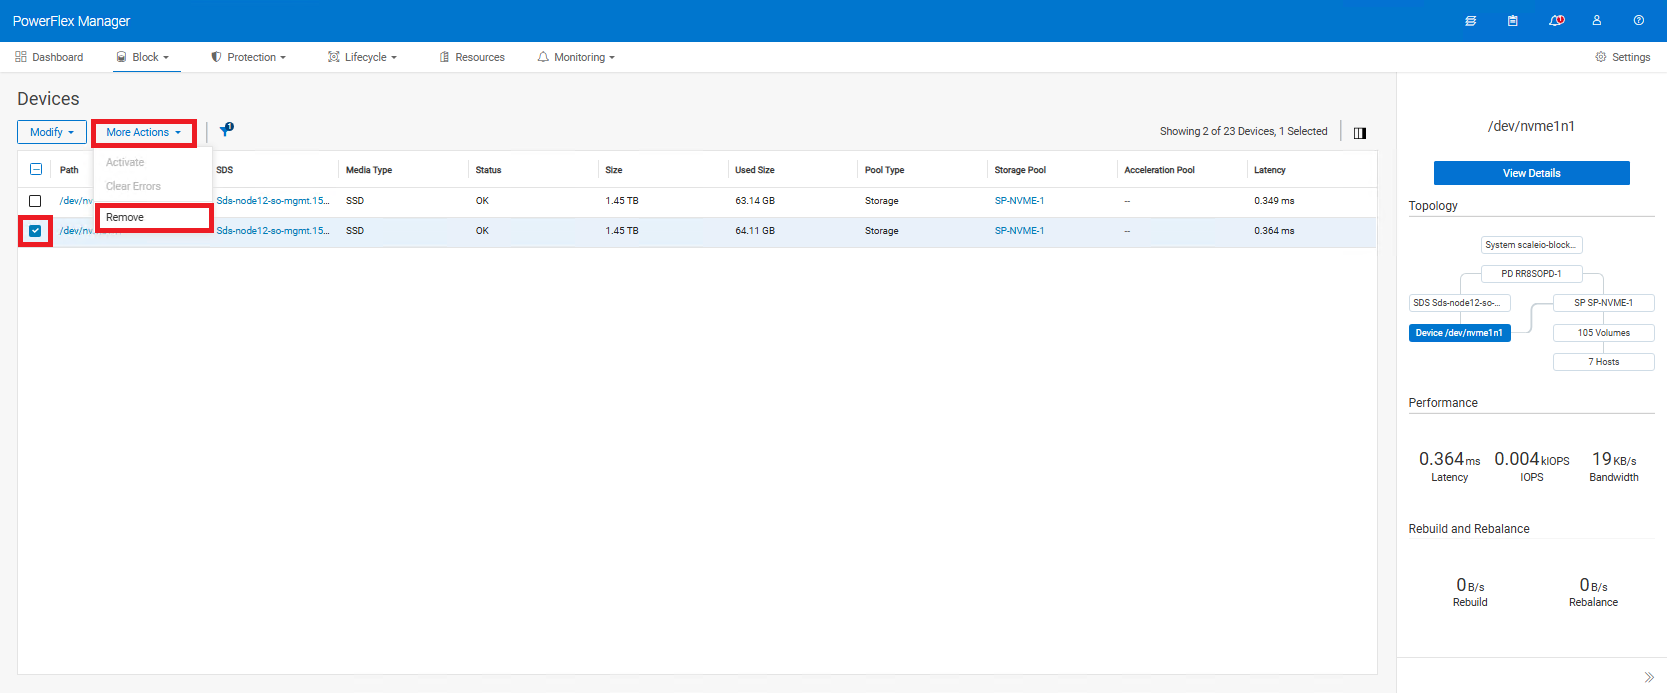
- Select the affected SDS
- A Topology of the SDS will pop up at the right side of the screen. Click on 'x Devices', where X is the number of Disks for that SDS

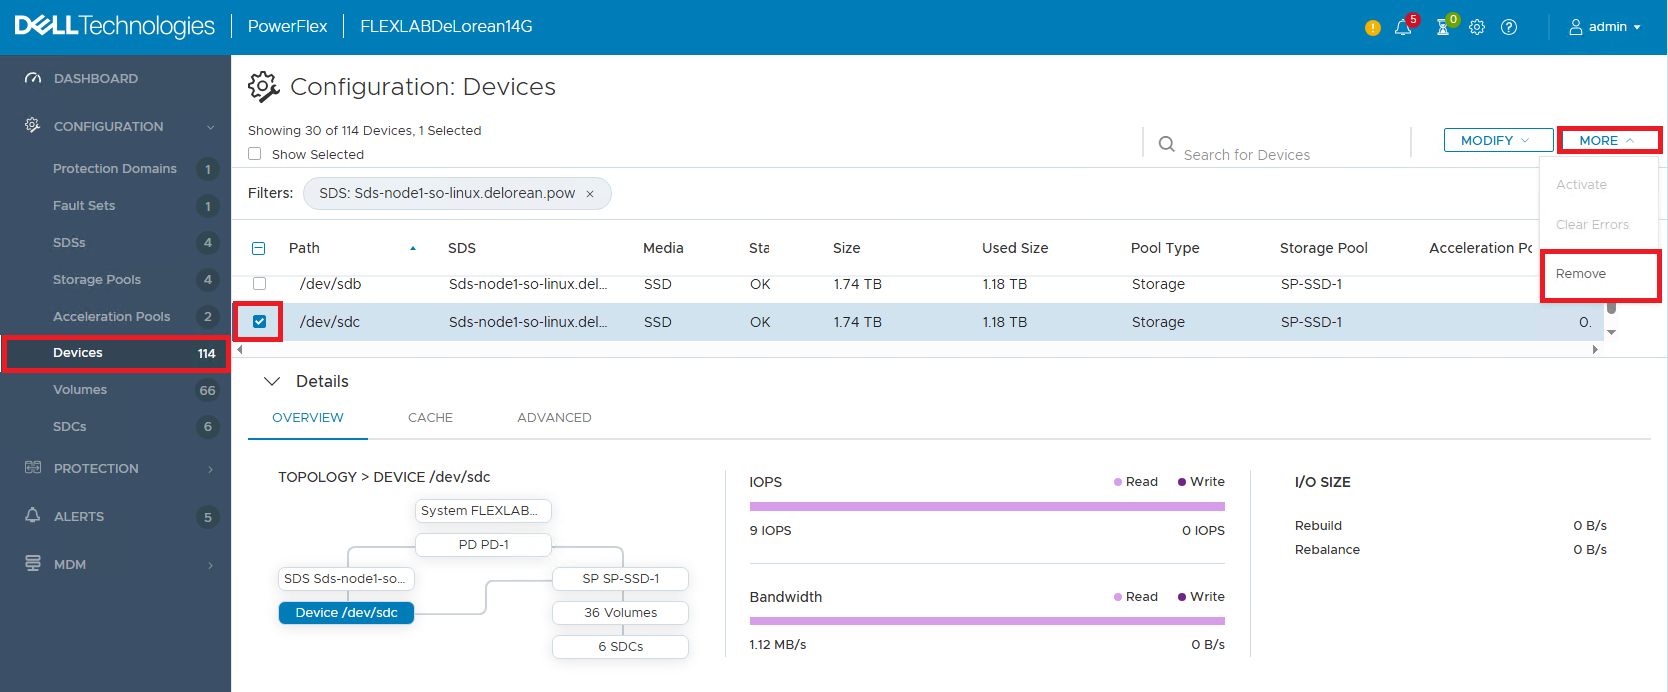
- Locate the affected device. Note down the current device path (ex:
/dev/sda) and the Storage Pool (SP) name (If using Multiple SPs), this will be used in Step 12c. In this example the storage pool name is SP-NVME-1 as shown in the next below image - Select the affected Device > More Actions > Remove
(You will be unable to remove the drive if the node is in Protected Maintenance Mode. Remove it from Protected Maintenance Mode to remove the drive.)
- Proceed to physically replace the drive
After the physical replacement:
- Check the new disk device path, using the commands
lsblkorlsscsion the SDS.
Another command that can be used is ls -l /dev/disk/by-id/ to match the new device path to the disk serial number (optional)
-
- If the new device path stayed the same as the original, proceed to step 9.
- If the new device path is different than the original, you have 2 options
- Use the new device path to add into PowerFlex Manager. This is just cosmetic and does not affect data. This can be done while server is up and running no reboot is needed (Recommended)
- Put the SDS node in Instant or Protected Maintenance Mode and reboot. The new device path will update to the original path (Optional)
- If using CloudLink, new device must be encrypted before being added back to SDS (path after encryption changes to
/dev/mapper/svm_xxx) proceed to the section Re-Encrypting a Drive via Cloud Link above for more details. - Log back into the PowerFlex Manager WebUI
- If applicable, take the SDS out of Instant or Protected Maintenance Mode
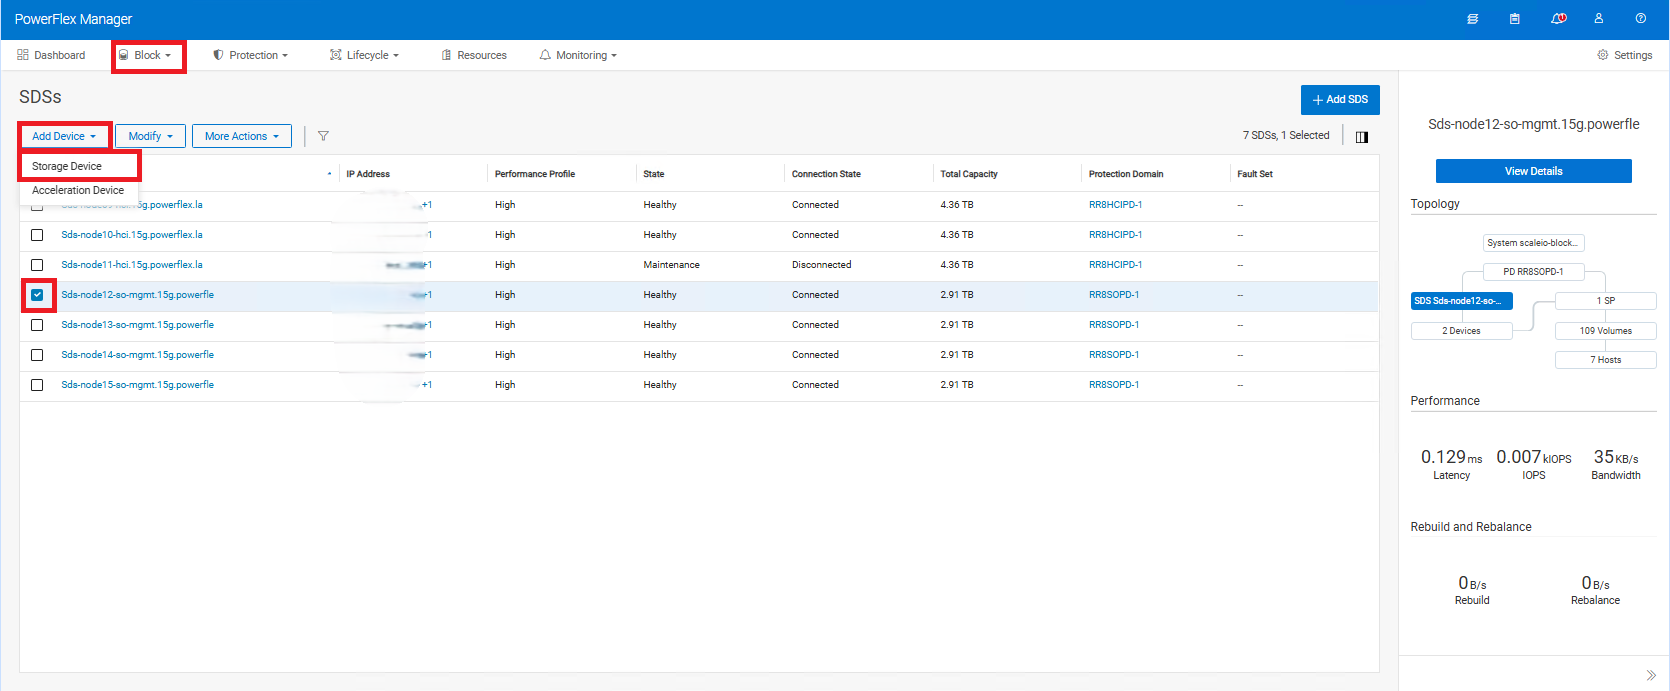
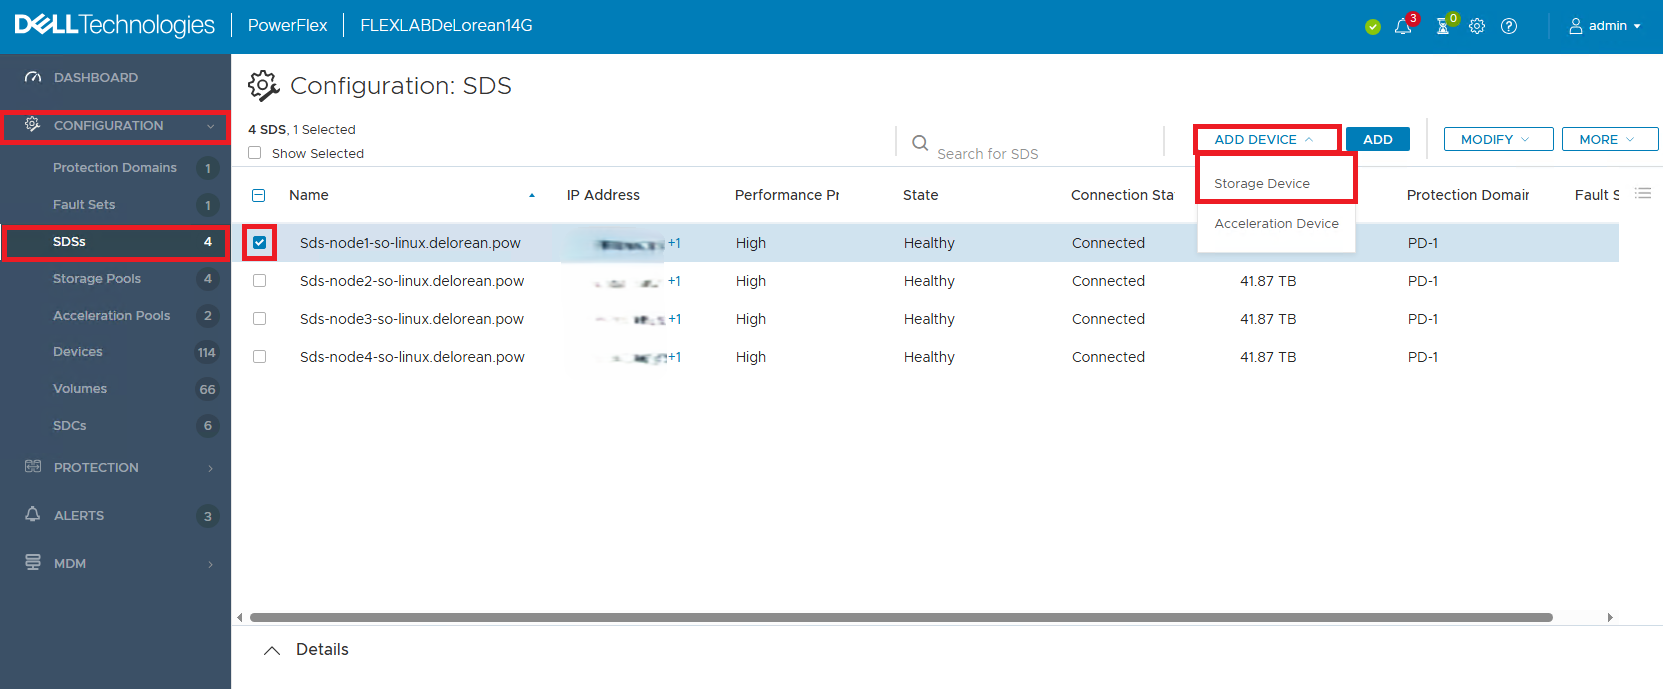
- Add the drive back into the SDS:
- Block > SDSs > Find the affected SDS > Click on the check box
- In the upper left-hand side, click Add Device > Storage Device
-
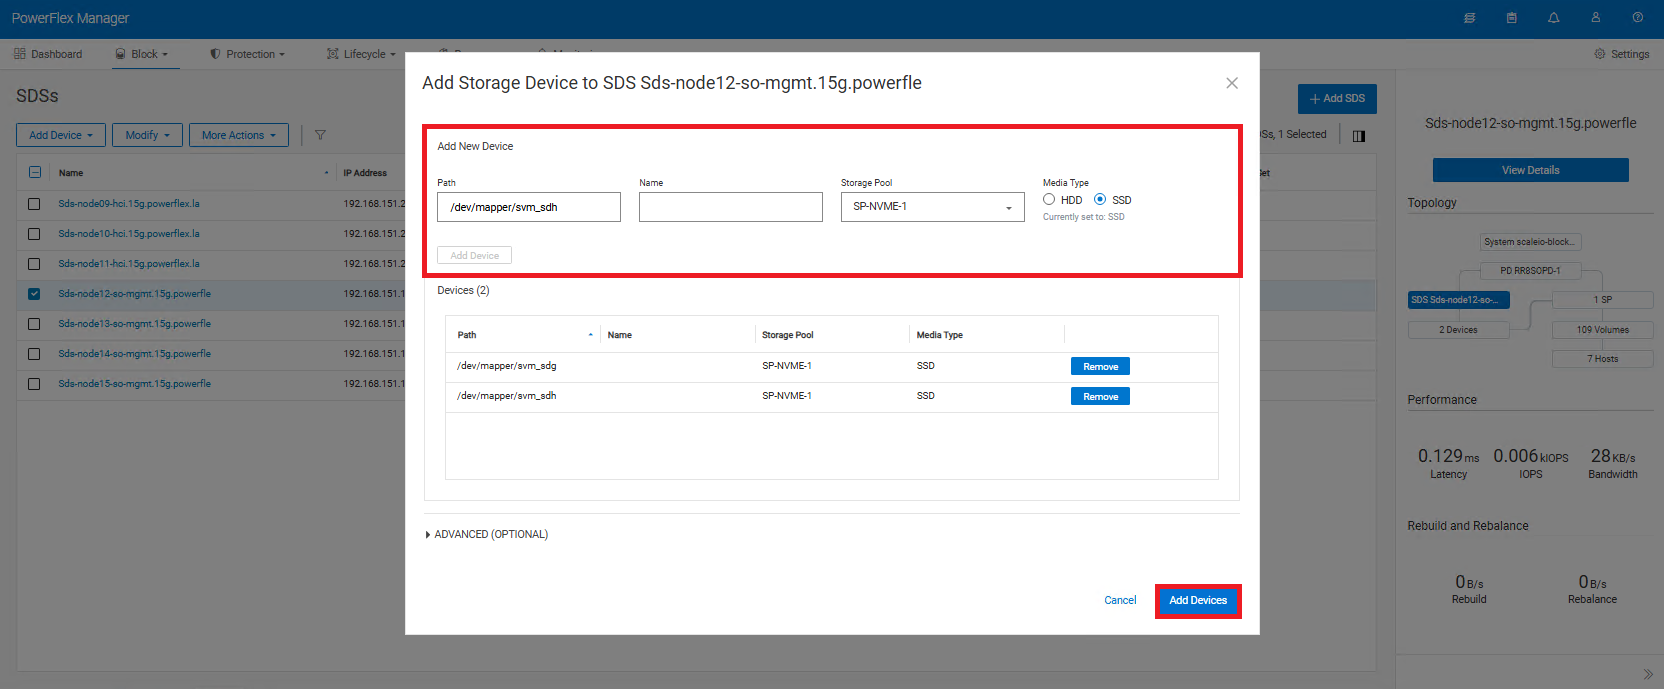
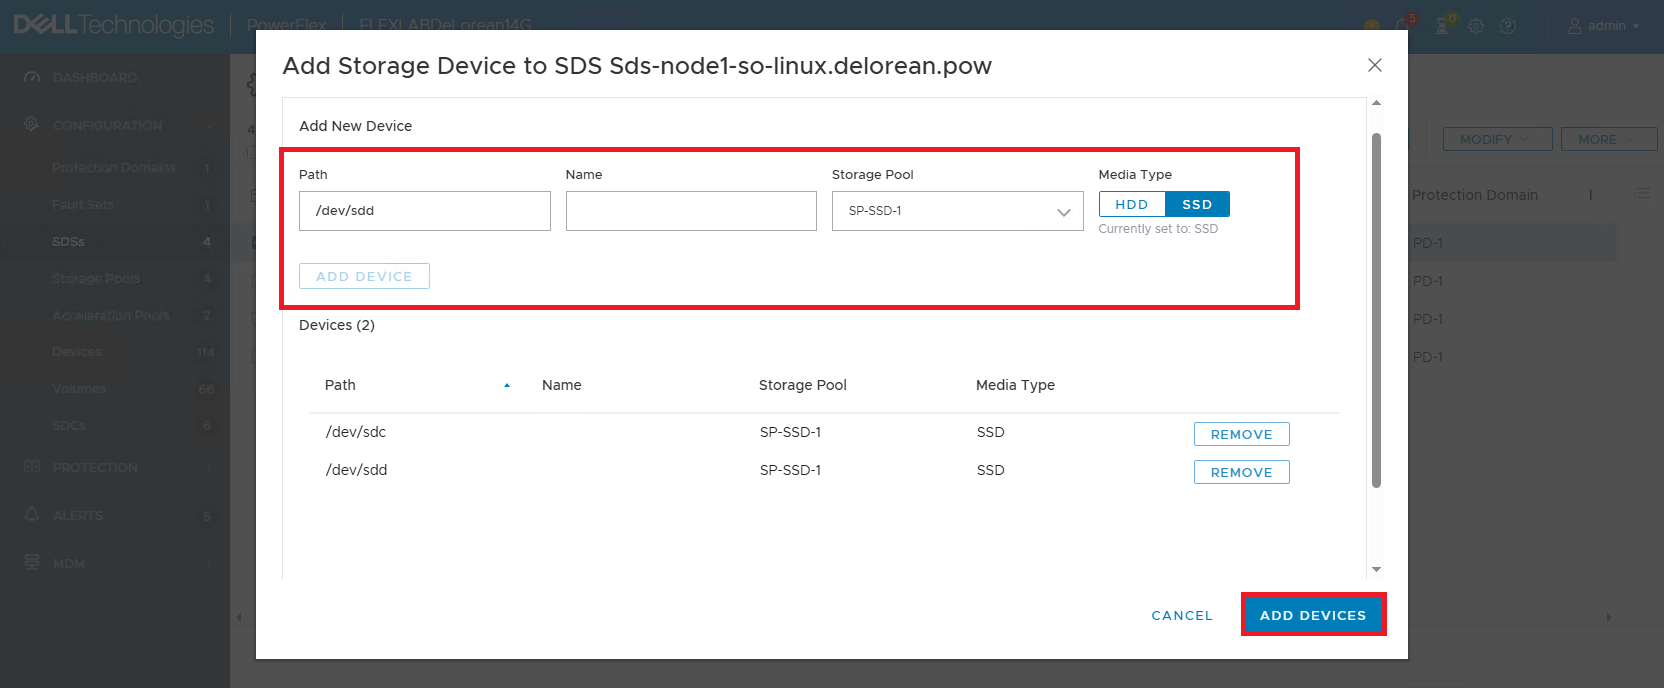
- Enter the correct path for the new drive
- Name field is optional and can be left blank
- Select the Storage Pool that was noted before the replacement > Select Media type > Click Add Device.
- Repeat this step for any additional devices you may have replaced. (You can add multiple devices as demonstrated in the screenshot below)
- Click Add Devices on the bottom right-hand corner
-
- In the Running storage jobs, confirm the disk is rebalancing.
Re-Encrypting a Drive via Cloud Link
Drive Encryption can be through SSH or GUI, both options are outlined below. Use only one of the below 2 methods (not both)
Using Command Line SSH into the SDS:
-
- Run the below command on SDS node
svm encrypt /dev/XXXXXDevice path will change from /dev/XXXX to /dev/mapper/svm_XXXX
-
- Run the following command to verify the new device status:
svm status-
- Go back to original steps you were following above
Using CLC GUI Log in to Cloud Link
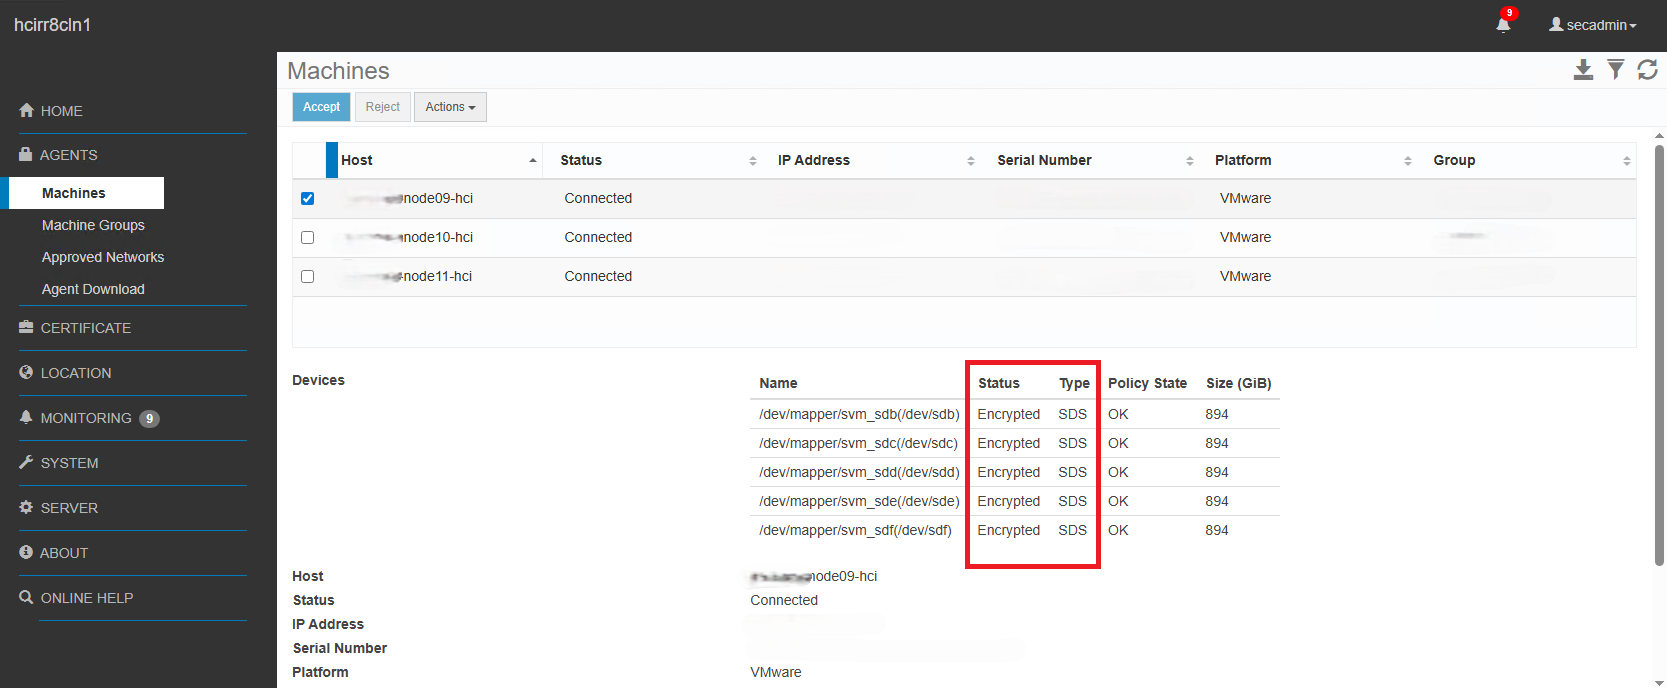
-
- Click on Agents > Machines on the left-hand side
- Find the machine you are working with and check the checkbox
- At the top click Actions > Encrypt
- from the drop down pick the replacement drive path and click Encrypt
- In the Devices section the Status should change to Encrypted and SDS
-
- Go back to original steps you were following above
Additional Information
PowerFlex 3.X:
- Configuration > Devices > Find and Confirm Failed Device
- Make sure to make note of the path name and the storage pool the drive is in
- Then, check off the failed Device > Upper right-hand corner > Select More > Remove
(You will be unable to remove the drive if the node is in Protected Maintenance Mode. Remove it from Protected Maintenance Mode to remove the drive.)
- Proceed to physically replace the drive
After the physical replacement:
- Check the new disk device path, using the commands
lsblkorlsscsi.
Another command that can be used is ls -l /dev/disk/by-id/ to match the new device path to the disk serial number (optional)
-
- If the new device path stayed the same as the original, proceed to step 9.
- If the new device path is different than the original, you have 2 options
- Use the new device path to add into PowerFlex Manager. This is just cosmetic and does not affect data. This can be done while server is up and running no reboot is needed (Recommended)
- Put the SDS node in Instant or Protected Maintenance Mode and reboot. The new device path will update to the original path (Optional)
- If using CloudLink, new device must be encrypted before being added back to SDS (path after encryption changes to
/dev/mapper/svm_xxx) proceed to the section Re-Encrypting a Drive via Cloud Link above for more details. - Log back into the Presentation Server WebUI
- If applicable, take the SDS out of Instant or Protected Maintenance Mode
- Add the device back into presentation server using the correct path:
-
- Configuration > SDSs > Click the Check box next to the relevant SDS > In the upper right-hand corner, click Add Device > Storage Device
-
- Enter the correct path that the new drive is > Do not put the name in the second box - keep it blank > Select the Storage pool that was noted before the replacement > Select Media type > Click Add Device. Repeat this for any additional devices you may have replaced. (You can add multiple devices as demonstrated in the screenshot below)
-
- Click Add Devices on the bottom right-hand corner
-
- In the Dashboard view, confirm there is I/O rebalancing.