View and Manage Location Preferences
Summary: Learn how to manage your individual and company preferences so you can get the most out of your support experience with Dell Technologies.
Instructions
This guide covers how to view and manage company registration settings, locations, and your organization’s userbase via two distinct user types: Company Administrators and Business Users.
Keeping your information up to date helps maintain security and ensures Dell Technologies can provide you with fast, accurate support.
Recommended administrative actions include:
-
Setting your location and asset preferences so we can deliver the right onsite service, replacement parts, and case management support to the appropriate contacts.
-
Managing your userbase by assigning who can access specific assets and locations, and by removing anyone who is no longer part of your organization.
-
Adjusting key security settings, such as default employee access and specifying overall location and asset visibility.
This article provides information about:
-
View and Manage Location Preferences
Related Resources:
How to View or Manage Locations
Within this section, Company Administrators can learn how to view and manage locations for their account, view, and update preferences for locations (Dial Home contact relationships, Site Permissions, Onsite contact relationships, CRU preferences and more), and manage users that have access to the locations and how they obtain that access.
Business users will be able to view much of the same experience, but not manage.
View or Manage Locations
From the Locations module of Manage Company Information (accessible by Company Administrator or Business Users), you will be able to view and manage the locations available to you within your organization.
Locations Module (Manage Company information > Company Information drop-down > Locations)

Figure 1: Manage Locations Grid
The Locations view displays locations available to you within your organization. Visibility to any locations and products found within the Company Sites tab are automatically granted to you through the Dell Technologies online registration process.
Access is designated by the email domain used during registration, which is associated to a company that has an established relationship with Dell Technologies. Any locations and products affiliated to that company or organization will automatically be available for viewing (inherited / My Company) by the user unless location visibility levels have been defined by a Company Administrator by Access Groups.
-
Business users:
-
Can view all open locations and also any restricted locations within their organization, which requires a Company Administrator’s approval for access.
-
Blocked locations will not be visible to Business users. In order for the Business user to gain visibility, they must be explicitly granted access to the location by a Company Administrator.
-
Can request access to a restricted location that the user does not have access to by contacting their Company Administrator.
-
-
Company Administrator users:
-
Can view and manage all locations including open, restricted, and blocked locations within their organization.
-
In addition, Company Administrators have the ability to change location visibility settings and specify CRU preferences and other settings for customizing service of the locations and other settings for customizing service for the locations.
-
Users will also be able to view what type of relationship determines their visibility to a Location ID within the locations list. Company Administrator role capabilities only apply to locations inherited via company affiliated email domain alignment (My Company relationship).

Figure 2: Locations Grid Relationships
Relationship Types:
-
My Company - A location you inherit upon registering for a Dell Technologies online account and are determined from your company affiliated email domain alignment. Company Administrator capabilities pertain to locations of this relationship type.
-
Authorized Contact – Access to a location that is not yet properly associated within the user’s company ecosystem.
-
Secured Site Access – Access to a location within the user’s company ecosystem that has controlled visibility of some kind (ex. Site Visibility) and has been granted by a Company Administrator.
-
Third Party - A location granted and approved from outside of the user’s company as a Third Party consultant.
-
Support Partner – Access to a customer location the Partner company is supporting. This is defined contractually to at least one product at the location (and will only see those contractually specified products related to the location).
Accessing Location Details (Manage Company information > Company Information > Locations > Location Details)
Clicking on an individual Location ID within the Locations module list will display detailed settings for the location.

Figure 3: Locations Grid Location IDs
Administrators can manage basic location preferences by the Preferences subtab, product preferences by the Products subtab, and contacts for the location by the Contacts subtab.
-
Preferences - includes the below location preferences:
-
Location Visibility (currently view only)
-
Location Dial Home Contacts
-
Shipping Contact
-
Onsite Scheduling Contacts
-
Site Access Details
-
Customer Replaceable Unit (CRU) Settings / Shipping Address
-
-
Products - a list of all products for the site.
-
Product-level Dial Home Contacts
-
-
Users - includes the following:
-
Internal Contacts - either have default visibility to the location or a relationship has been explicitly granted to the user allowing access to specific locations with Restricted or Blocked Site Visibility.
-
External Contacts - users from other organizations that have been granted a third-party, authorized contact, or Support Partner relationship to the location.
-
Location Preferences (Manage Company information > Company Information > Locations > Location Details > Preferences)
The first subtab within Location Details (clicking a Location ID) is the Preferences tab which includes various location preferences.
-
Location Visibility (currently view only)
-
Location Dial Home Contacts
-
Shipping Contact
-
Onsite Scheduling Contacts
-
Site Access Details
-
CRU (Customer Replaceable Unit) Settings / Shipping Address
Location Visibility (Manage Company information > Company Information > Locations > Location Details > Preferences)
Company Administrators were formerly able to control access to one, many, or all their organization’s locations by applying Location Visibility where appropriate. This was done on a per location basis by clicking on one of the Location IDs in the results grid of the Locations module.
This visibility control is currently transitioning to the Access Group visibility control. During the transition, any locations that had Location Visibility set to Restricted or Blocked will maintain and display that setting under Location Visibility, and any existing relationships that had been granted to the userbase will remain during the transition.
Changing the Location Visibility online or granting new user relationships, however, is currently not available to Company Administrators.

Figure 4: Location Preferences Visibility
A location could be defined as one of three distinct Security Levels:
-
Open Location - Accessible to all employees belonging to your organization. Employees within your organization inherit association to all such locations within your organization upon registering for a Dell Technologies online account. No maintenance is required as this is the default security level.
-
Restricted Location - Visible in the locations list for all employees in your organization but full access to the location must be requested by the employee and is granted only on a per-request basis. Access to the location must be granted by a Company Administrator within your organization by the Manage approvals subtab within the Manage Contacts tab of Company Administration.
-
Blocked Location - Only visible to Company Administrators from your organization and users explicitly granted access; locations are hidden from all other users. Access can only be granted when a contact is added directly to the blocked location by a Company Administrator from your organization.
The preferred visibility control for the experience is the Access Group functionality, which can be used to provide a more powerful and flexible approach to managing your location visibility and security. To learn more, go to Create and Manage Access Groups
Specify Security Settings (Manage Company information > Company Information > Locations > Location Details)
To edit the Location Visibility setting of a Location ID, the Company Administrator will need to request customer support during this transition period:
-
Sign in to https://www.dell.com/support
-
Trigger this link: Administrative Support
-
Select Enterprise Online Account Help
-
Open Tell us more menu & select the appropriate option
-
Include the Location ID(s) and the Site Visibility assistance needed (ex. change of setting, a user relationship to a Restricted or Blocked location created or removed)
Specify Location Dial Home Contacts (Manage Company information > Company Information > Locations > Location Details > Preferences)
For autogenerated new case creation, Location-level Dial Home contact relationships are used by default for new case creation for self-diagnosis.
Administrators can add Primary, Alternate and After Hours contact relationships respectively for locations within your organization. After triggering Add Contact (or Remove Contact) of the Dial Home Contacts section, search by First Name, Last Name or email address. Select the contact of your choice and click the Add Contact button to save the change (or Cancel to discard).

Figure 5: Location Preferences Site DialHome Contacts
____________________________________________________________________________________

Figure 6: Location Preferences Site DialHome Add Contact
Specify Shipping Contact (Manage Company information > Company Information > Locations > Location Details > Preferences)
Administrators can add a Shipping contact relationship respectively for your organization. After selecting Add (or Remove) Contact, you will have the ability to search by First Name, Last Name or email address. Select the contact of your choice and click the Add Contact button to save the change (or Cancel to discard).

Figure 7: Location Preferences Shipping
_______________________________________________________________________________

Figure 8: Location Preferences Shipping Add Contact
Specify Onsite Scheduling Contacts (Manage Company information > Company Information > Locations > Location Details > Preferences)
Administrators can add a Primary and Secondary contact relationship respectively for your organization. After selecting Add (or Remove) Contact, you will have the ability to search by First Name, Last Name or email address. Select the contact of your choice and click the Add Contact button to save the change (or Cancel to discard).
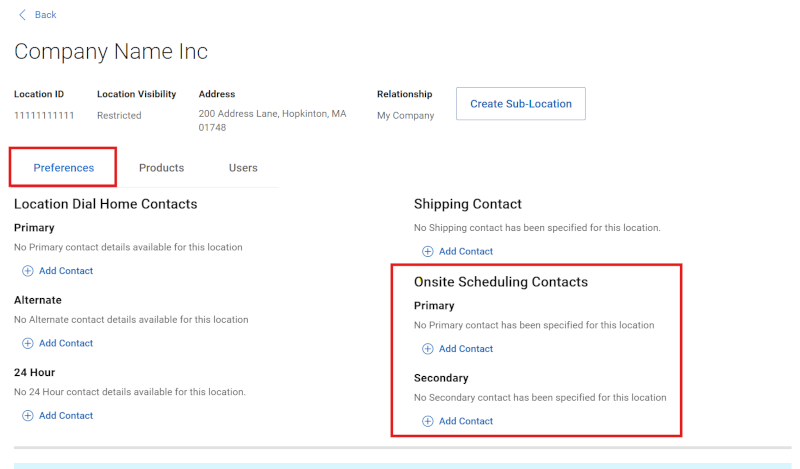
Figure 9: Location Preferences Onsite
_______________________________________________________________________________

Figure 10: Location Preferences Onsite Add Contact
Specify Site Access Details (Manage Company information > Company Information > Locations > Location Details > Preferences)
Company Administrators can define special permissions for part deliveries or onsite support should a location require it by going to the Locations module from the Company Information drop-down. Then click on the individual Location ID from the list of locations.
In the Preferences subtab of a selected Location ID, click Edit of the Site Access Details section, and make any selections/changes needed. Certain selections will prompt additional settings choices. When finished, click the Save button to save any changes (or Cancel to discard).
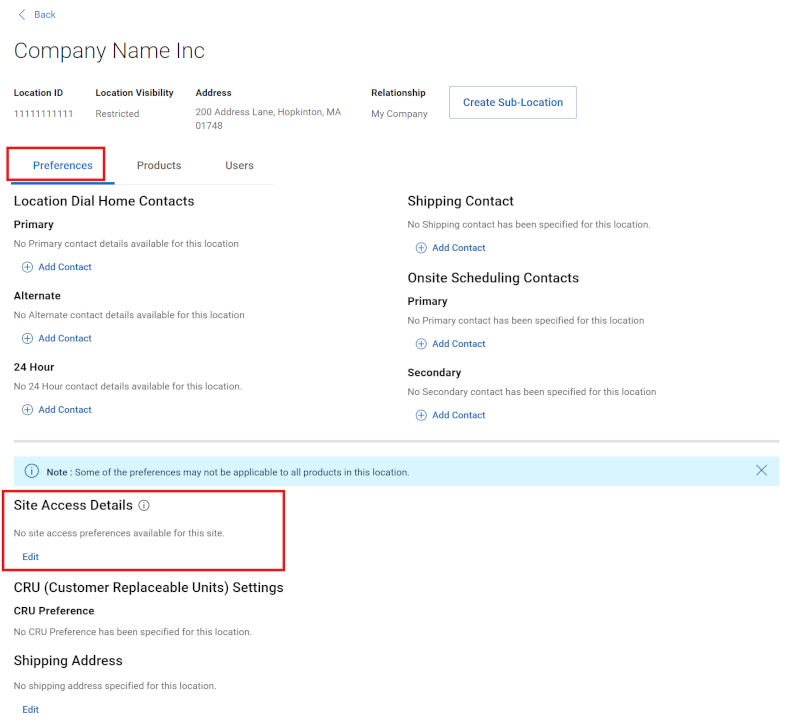
Figure 11: Location Preferences Site Access Details
_______________________________________________________________________________

Figure 12: Location Preferences Site Access Details Save
Specify CRU Settings and Shipping Address (Manage Company information > Company Information > Locations > Location Details > Preferences)
CRU (Customer Replaceable Units) are specific assemblies, components, or individual parts of designated Dell Technologies equipment that a customer is authorized to self-replace. The CRU program allows customers to replace designated hardware components. In the event of a failure, the customer may replace a CRU by using Dell provided diagnostic tools and/or documentation. Assemblies or components not designated as CRU must be serviced or replaced by Dell or an authorized service partner.
For a list of the hardware components that are designated as CRU for a specific hardware system, go to the Dell Product Warranty & Maintenance Table.
Company Administrators can specify their CRU preference for any service activity involving CRU eligible parts by going to the Locations module from the Company Information drop-down. Then click on the individual Location ID from the list of locations.
In the Preferences subtab of the selected Location ID, click Edit of the CRU (Customer Replaceable Units) Settings section, make any selections/changes needed, add a Shipping Address if needed, and click the Save button to save any changes (or Cancel to discard).
You can select the existing Location Address as the shipping address, or enter a new address.

Figure 13: Location Preferences CRU
Customer Replaceable Unit (CRU) Settings:
- Auto CRU Enabled - all eligible parts will automatically be sent to the shipping address provided. Your shipping contact will not be notified prior to shipment.
NOTE: Shipping contact and address required for enrollment.
- Always Contact - your shipping contact will always be notified prior to shipment of the eligible part.
NOTE: Shipping contact and address required for enrollment.
- CRU Option Declined - Dell will always contact you to schedule the onsite go to for part replacement.
- Drives Only - disk drive eligible parts will automatically be sent to the shipping address provided. Your shipping contact will not be notified before shipment.
NOTE: Shipping contact and address required for enrollment.
If the Company Administrator declines to participate in the CRU program, the Onsite Scheduling Contact will be contacted by the Dell Technologies services team to schedule an onsite technician.

Figure 14: Location Preferences CRU Save
Some of the preferences may not be applicable to all product types.
Location Products (Manage Company information > Company Information > Locations > Location Details > Products)
The Products subtab within Location Details will display all products at the location. Any asset-specific dial home contacts can be displayed via the blue arrow.
Depending on your role, you can view or manage asset-specific roles that are related to your install base. Company Administrators can set dial home contacts when the contacts for an asset must be different than the default location level dial home contacts.
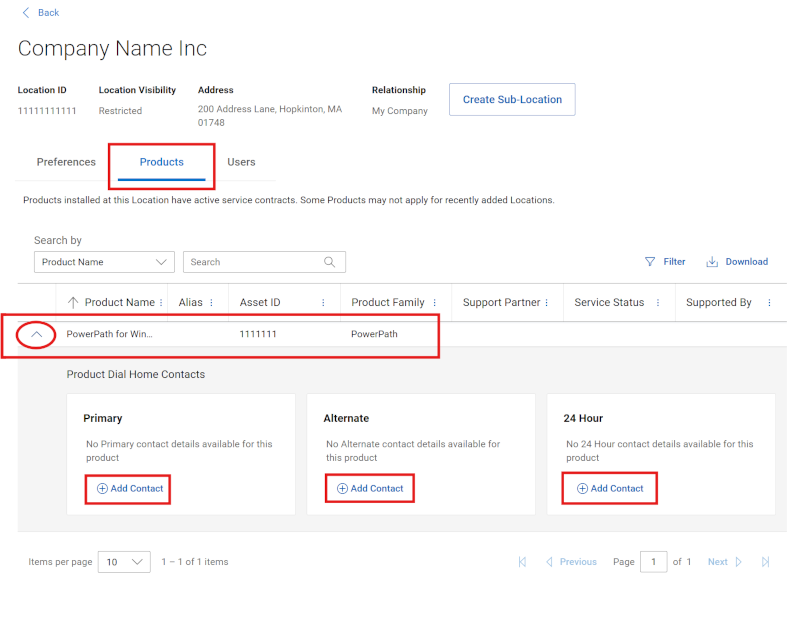
Figure 15: Products Subtab and Show Contacts
A user can see existing contact relationships by expanding the blue arrow next any asset in the grid. Asset level dial home contacts will be used as the primary contact if and when an automatic service request is created. This designation should only be used when the contact must be different than the location -level dial home contact.
-
Primary - Serves as the primary contact.
-
Alternate - If primary contact is not available, the alternate contact can be contacted.
-
After Hours - Optional contact for weekend or after hours support if different than the primary.
A contact is required to have location level association before they can properly be defined as an asset-level contact. Location association can occur through automatic inheritance, Secured Site Access for any Restricted, or Blocked locations or be explicitly granted by third-party or Support Partner relationships.
Specify asset-level Contacts (Manage Company information > Company Information > Locations > Location Details > Products)
Specific Administrator privileges are required to perform the following tasks:
Company Administrators can add or remove product-level contact relationships for any product within their organization unless a support partner is defined on the product.
-
Add Contact relationship (Primary, Alternate or After Hours):
-
Click on the Add Contact option underneath the contact role (Primary, Alternate, After Hours) you would like to add. you will have the ability to search by First Name, Last Name, or email address. Select the contact of your choice and click the Add Contact button to save the change (or Cancel to discard).
-
Search for contacts by First Name, Last Name, or email Address.
-
Select the contact of your choice and click the Add Contact button to save the change (or Cancel to discard).
-

Figure 16: Products Subtab and Add contact
-
Remove Contact (Primary, Alternate, After Hours):
-
Click on the Remove Contact option underneath the contact role (Primary, Alternate, After Hours) you would like to remove.
-
Click Remove button to finalize the relationship removal.
-
-
When a Support Partner is defined on a product, a Company Administrator will not be able to administer the product, as it is supported by the Partner.
A Business user will not be able to perform any actions from this view.
Users (Manage Company information > Company Information > Locations > Location Details > Users)
The Users subtab will display both Internal and External users that have visibility to the location and/or certain product related to the location.

Figure 17: Users
Add/Remove Internal Contacts for a location with a Restricted or Blocked Security Level (Manage Company information > Company Information > Locations > Location Details > Users)
Company Administrators were formerly able to control access to one, many, or all their organization’s locations by applying Location Visibility where appropriate. This was done on a per location basis by clicking on one of the Location IDs in the results grid of the Locations module.
This visibility control is currently transitioning to the Access Group visibility control. During the transition, any locations that had Location Visibility set to Restricted or Blocked will maintain and display that setting under Location Visibility, and any existing relationships that had been granted to the userbase will remain during the transition.
Changing the Location Visibility online or granting new user relationships, however, is currently not available to Company Administrators.
-
Add or Remove a user relationship to a location with Restricted or Blocked Location Visibility setting will require contacting support for assistance.
-
Sign in to Dell Support Site
-
Trigger this link: Administrative Support
-
Select Enterprise Online Account Help
-
Open Tell us more menu & select the appropriate option
-
Provide the information related to your request including Location ID(s), email of the user you wish to add/remove the relationship for, and whether you need the relationship added or removed from the Restricted or Blocked location.
Add/Remove External Contacts (Manage Company information > Company Information > Locations > Location Details > Users)

Figure 18: Users External Contacts
When viewing the details for a specific location (Location Details) the Users sub-tab will include users from outside the user’s organization who have been granted explicit access to the location. The most common example of such a location relationship is a third-party contact, a user from another company that has been granted access to the assets and service information for that location to provide support for the user’s organization.
Business users can view, but not manage, users listed in this area.
Company Administrators can add or remove users in this area.
Add or Remove an External Site Relationship
A Company Administrator can add or remove registered users from outside their organization to their locations via the Users sub-tab of Location Details. Typically this is seen as a third-party relationship. If the intended addition is not properly registered with a full Dell Technologies business account, they will not be available for association to the location.
To add an External Contact to a location, a Company Administrator should:
-
Browse to the Users tab of the location that they want to add the third-party contact.
-
Click the Assign Users button.

Figure 19: Users External Contacts Assign
-
Enter the exact email address of the online support user account that you want to add as a third party to the location in the Search field.
-
If the user is found and displayed in results; click the circled plus+ icon next to the record to add the user to the queue.
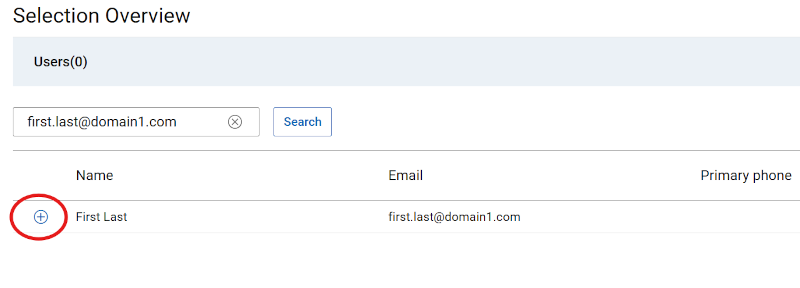
Figure 20: Users External Contacts Plus Icon
-
This will activate the Save button, click Save to perform the addition of the user(s) as third-party relationships to the designated location.
To remove an External Contact, a Company Administrator should:
-
Browse to the Users tab of the location that they want to remove the third-party contact from.
-
Click the ‘…’ ellipsis found to the right of the Third Party relationship you want to remove from the location.

Figure 21: Users External Contacts Remove
-
Clicking the Unassign User button that appears from the ellipsis will remove the relationship and reload the Users grid with the changes.
Online Support help options
Need help? Get started from the Online Support links below. If applicable, please contact your Service Account Manager or Customer Success Manager.
|
Topics |
Help Links Tip: Be sure to sign in to the Online Support site to view all available support options. |
|---|---|
|
Get Technical Support for your products.
|
|
|
Enterprise Online Account assistance View and manage company information, contacts, and service requests.
|
Administrative Support
|
|
Asset / Install Base management. Product registrations
|
|