Das System erfüllt nicht die Anforderungen für die automatische BitLocker-Geräteverschlüsselung
Zusammenfassung: Schritte zum manuellen Verschlüsseln der Festplatte durch BitLocker in OptiPlex 3060-, 5060-, 7060- und XE3-Systemen mit Windows 10.
Dieser Artikel gilt für
Dieser Artikel gilt nicht für
Dieser Artikel ist nicht an ein bestimmtes Produkt gebunden.
In diesem Artikel werden nicht alle Produktversionen aufgeführt.
Symptome
Anforderungen für die automatische BitLocker-Geräteverschlüsselung
Auf OptiPlex 3060-, 5060-, 7060- und XE3-Systemen, auf denen Windows 10 64-Bit Professional und Enterprise Edition ausgeführt wird, wird die BitLocker-Funktion nicht automatisch aktiviert.
Mithilfe der folgenden Schritte können Sie die BitLocker-Funktion überprüfen.
- Drücken Sie die Windows-Taste und tippen Sie Einstellungen ein.
- Wählen Sie Update & Security (Update und Sicherheit) aus.
- Der folgende Bildschirm zeigt, ob das System die automatischen BitLocker-Verschlüsselungsanforderungen erfüllt.

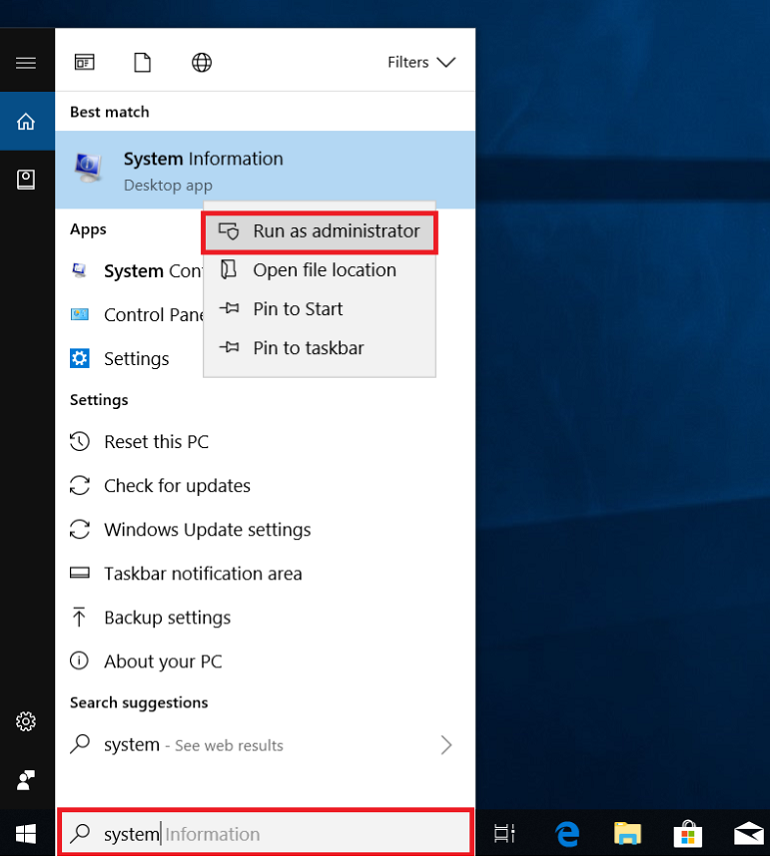
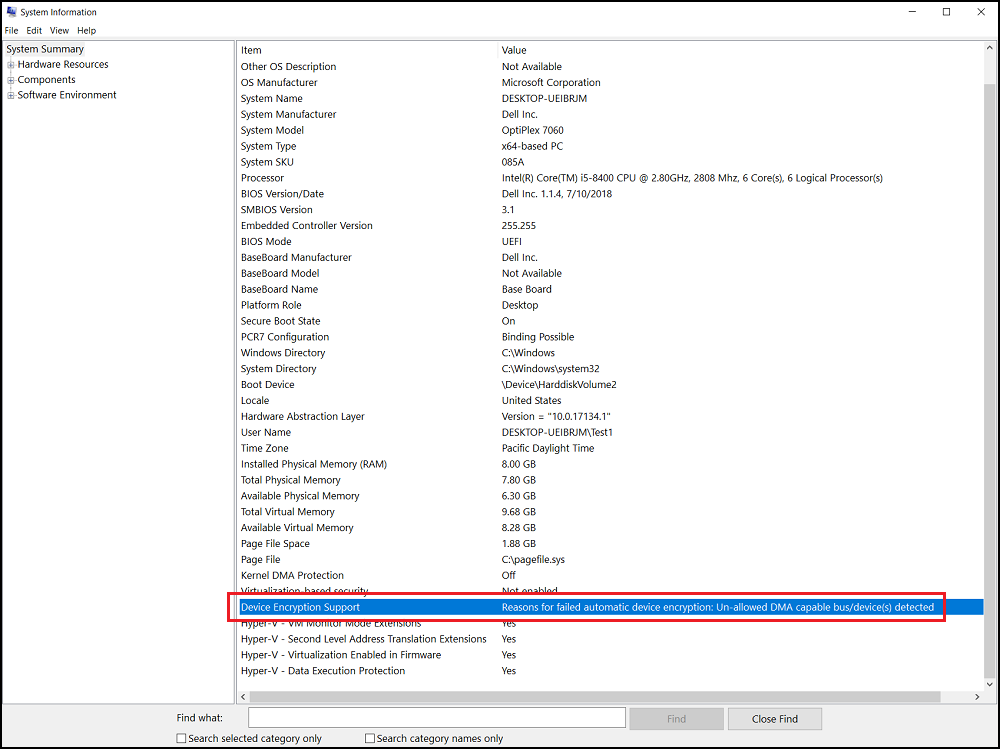
Führen Sie die Systeminformationen als Administrator aus (klicken Sie mit der rechten Maustaste) und aktivieren Sie das Feld "Device Encryption Support". Suchen Sie nach "Gründe für fehlgeschlagene automatische Geräteverschlüsselung: Unzulässige(r) DMA-fähige(r) Bus/Gerät(e) erkannt."
Ursache
Keine Information zur Ursache verfügbar.
Lösung
Sie müssen die BitLocker-Laufwerksverschlüsselung manuell mit den folgenden Schritten einrichten.
Warnung: Die folgenden Schritte sind für fortgeschrittene Nutzer. Nutzer sollten ihre Systemregistrierung manuell sichern (Anleitung zum Sichern und Wiederherstellen der Registrierung in Windows  oder Festlegen eines Systemwiederherstellungspunkts.
Benutzer sollten auch vorsichtshalber Daten sichern.
Benutzer sollten auch vorsichtshalber Daten sichern.
Sie müssen der Liste der zulässigen Geräte einen Bus oder ein Gerät hinzufügen. Navigieren Sie zum Registrierungsschlüssel:
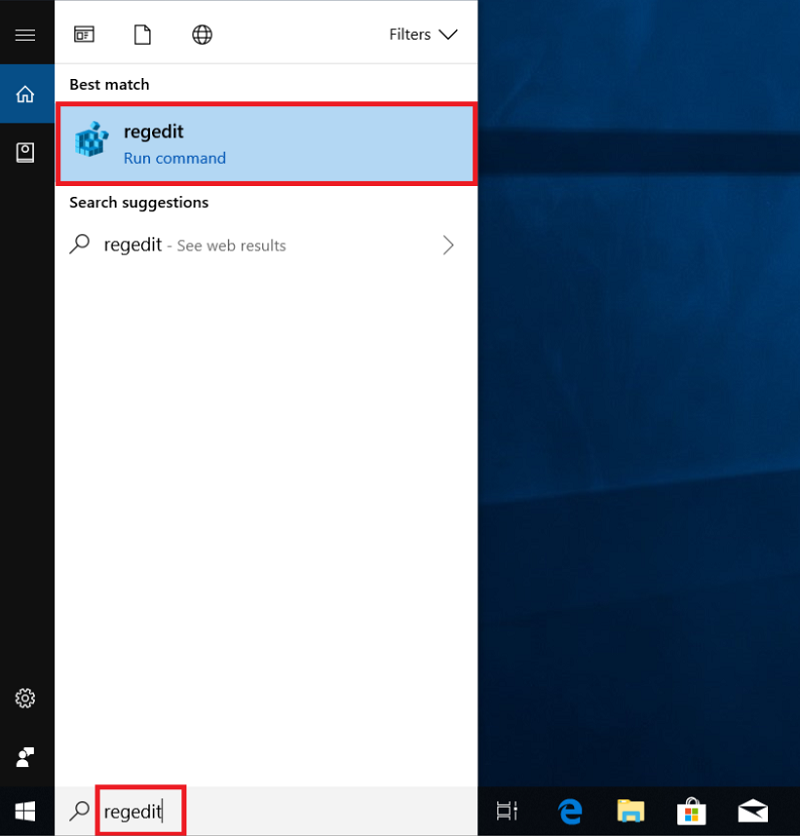
- Führen Sie "regedit" aus, um den Registrierungs-Editor zu öffnen.
- Suchen Sie den folgenden Registrierungsschlüsselpfad:
[HKEY_LOCAL_MACHINE\SYSTEM\CurrentControlSet\Control\DmaSecurity\AllowedBuses]
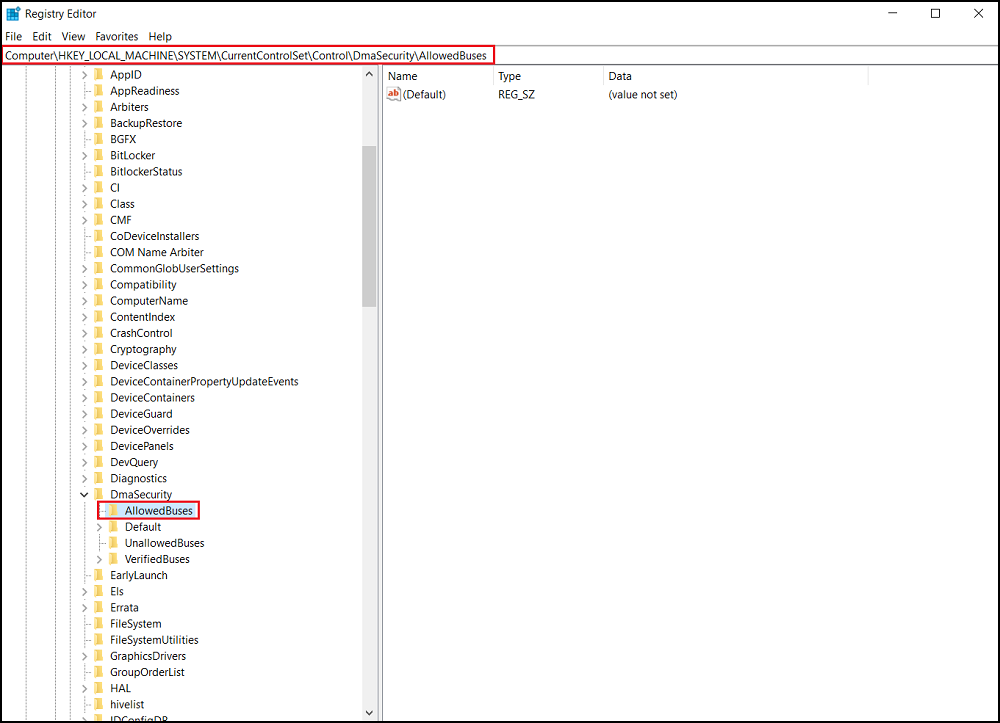
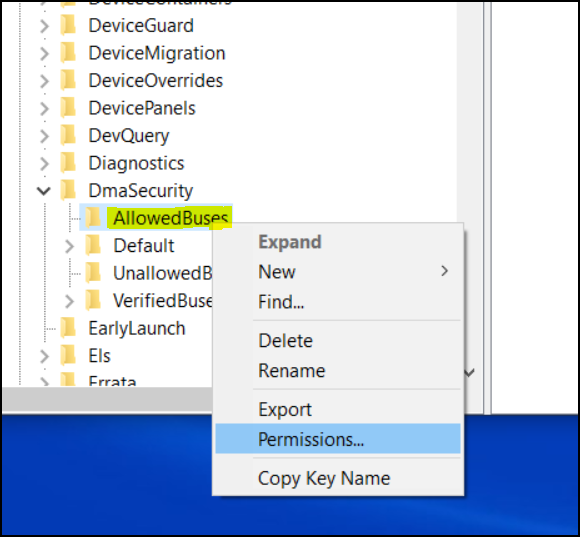
- Klicken Sie mit der rechten Maustaste auf "AllowedBuses" und wählen Sie "Permissions" aus.
- Wählen Sie "Hinzufügen...", um Ihre Benutzernamen im Fenster
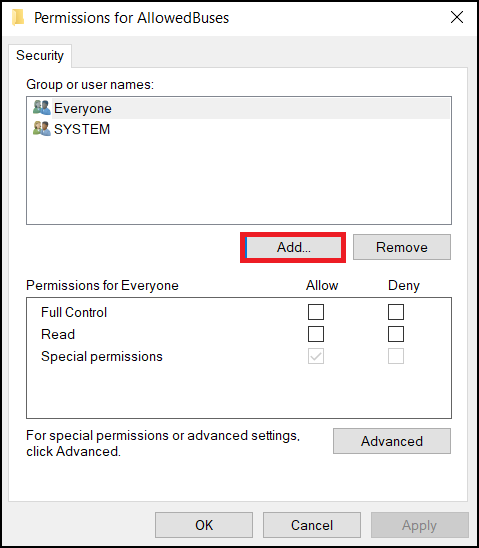
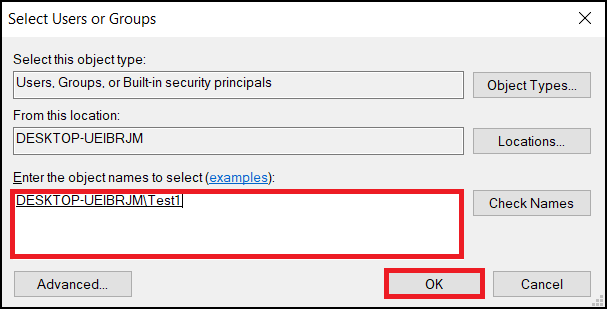
"Berechtigungen für zulässige Busse" hinzuzufügen. Geben Sie Ihren Windows-Nutzerkontonamen ein und klicken Sie auf OK, um den Vorgang abzuschließen.
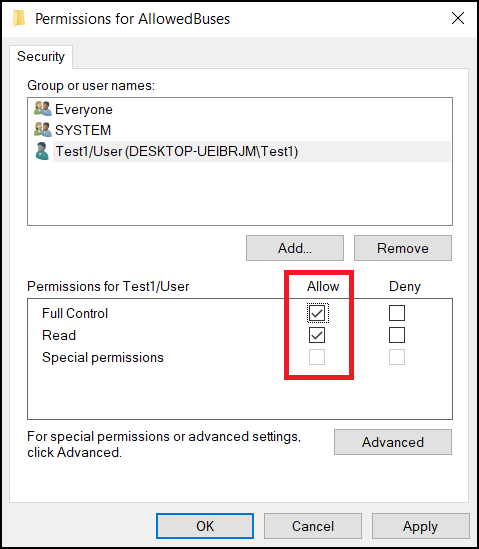
- Aktivieren Sie die Option "Zulassen" unter "Vollzugriff" und "Leseberechtigungen" für Ihr Nutzerkonto und wählen Sie "Anwenden" aus, um die Einstellungen zu speichern.
- Klicken Sie mit der rechten Maustaste auf den Windows-Desktop und wählen Sie Neu -> Textdokument aus.
- Kopieren Sie den folgenden Text und speichern Sie ihn unter Add_AllowedBuses.reg
Windows Registrierungs-Editor Version 5.00
[HKEY_LOCAL_MACHINE\SYSTEM\CurrentControlSet\Control\DmaSecurity\AllowedBuses]

 "Intel 300 Series Chipset Family LPC Controller(Q370)"="PCI\\VEN_8086&DEV_A306"

 "Intel 300 Series Chipset Family LPC Controller(H370)"="PCI\\VEN_8086&DEV_A304"

 "PCI-to-PCI Bridge#1"="PCI\\VEN_8086&DEV_1901"

 "PCI-to-PCI Bridge#2"="PCI\\VEN_104C&DEV_8240"

 "PCI Express Root Port #1"="PCI\\VEN_8086&DEV_A338"

 "PCI Express Root Port #2"="PCI\\VEN_8086&DEV_A339"

 "PCI Express Root Port #3"="PCI\\VEN_8086&DEV_A33A"

 "PCI Express Root Port #4"="PCI\\VEN_8086&DEV_A33B"

 "PCI Express Root Port #5"="PCI\\VEN_8086&DEV_A33C"

 "PCI Express Root Port #6"="PCI\\VEN_8086&DEV_A33D"

 "PCI Express Root Port #7"="PCI\\VEN_8086&DEV_A33E"

 "PCI Express Root Port #8"="PCI\\VEN_8086&DEV_A33F"

 "PCI Express Root Port #9"="PCI\\VEN_8086&DEV_A330"

 "PCI Express Root Port #10"="PCI\\VEN_8086&DEV_A331"

 "PCI Express Root Port #11"="PCI\\VEN_8086&DEV_A332"

 "PCI Express Root Port #12"="PCI\\VEN_8086&DEV_A333"

 "PCI Express Root Port #13"="PCI\\VEN_8086&DEV_A334"

 "PCI Express Root Port #14"="PCI\\VEN_8086&DEV_A335"

 "PCI Express Root Port #15"="PCI\\VEN_8086&DEV_A336"

 "PCI Express Root Port #16"="PCI\\VEN_8086&DEV_A337"

 "PCI Express Root Port #17"="PCI\\VEN_8086&DEV_A340"

 "PCI Express Root Port #18"="PCI\\VEN_8086&DEV_A341"

 "PCI Express Root Port #19"="PCI\\VEN_8086&DEV_A342"

 "PCI Express Root Port #20"="PCI\\VEN_8086&DEV_A343"

 "PCI Express Root Port #21"="PCI\\VEN_8086&DEV_A32C"

 "PCI Express Root Port #22"="PCI\\VEN_8086&DEV_A32D"

 "PCI Express Root Port #23"="PCI\\VEN_8086&DEV_A32E"

 "PCI Express Root Port #24"="PCI\\VEN_8086&DEV_A32F"
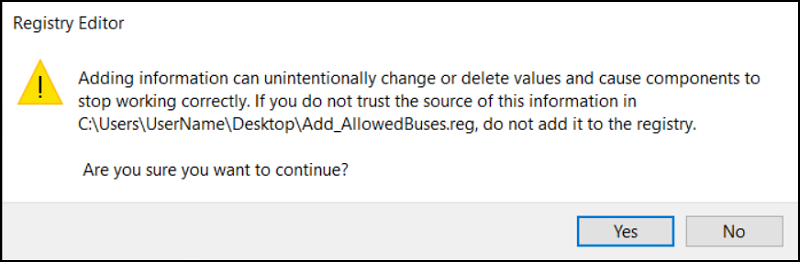
- Doppelklicken Sie auf die Datei Add_AllowedBuses.reg, um die Registrierungsschlüssel hinzuzufügen.
- Klicken Sie auf "Ja", um mit dem Hinzufügen der Registrierungsschlüssel fortzufahren
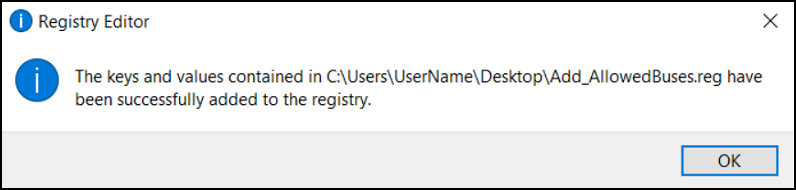
- Alle PCI Express Root-Port-Geräte-IDs der 8. Generation wurden erfolgreich dem Systemregistrierungsschlüssel hinzugefügt.
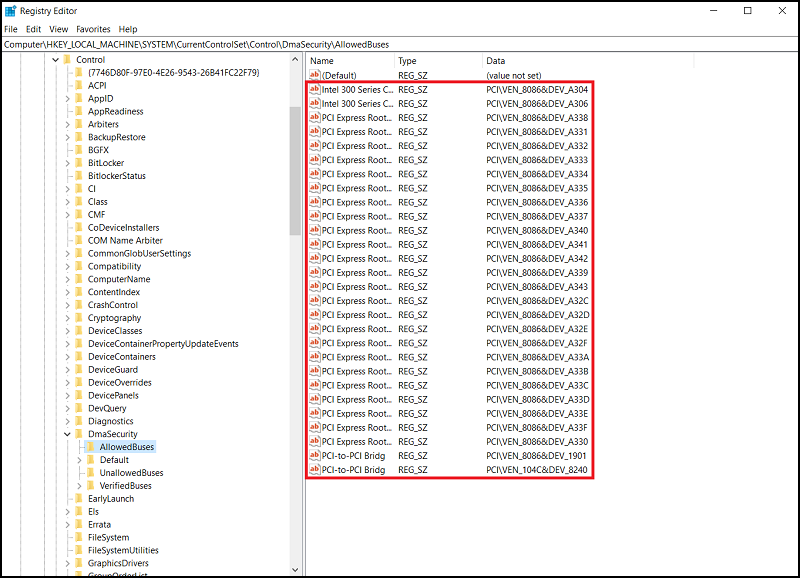
- Überprüfen Sie den Systemregistrierungsschlüssel im folgenden Pfad, alle PCI Express Root-Port-Geräte-IDs wurden erfolgreich hinzugefügt.
- Systeminformationen als Administrator ausführen (Rechtsklick)
[Device Encryption Support] -> [Erfüllt Voraussetzungen]

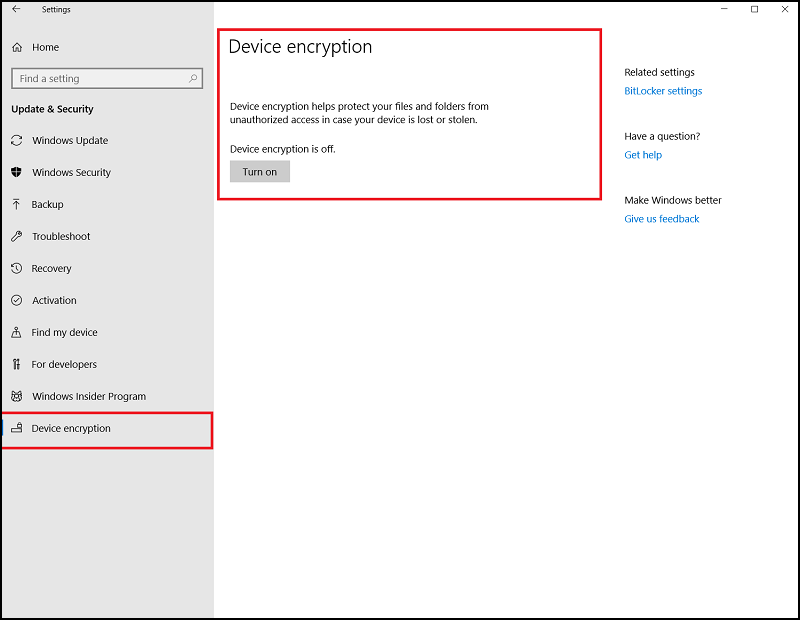
- Sie können jetzt auf die Schaltfläche "Einschalten" klicken, um die Geräteverschlüsselung über [Einstellungen] -> [Geräteverschlüsselung] zu aktivieren.
Betroffene Produkte
Security, Software, OptiPlex 3060 Tower, OptiPlex 3060 Micro, OptiPlex 3060 Small Form Factor, OptiPlex 5060 Tower, OptiPlex 5060 Micro, OptiPlex 5060 Small Form Factor, OptiPlex 7060 Tower, OptiPlex 7060 Micro, OptiPlex 7060 Small Form Factor
, Optiplex XE3
...
Artikeleigenschaften
Artikelnummer: 000124709
Artikeltyp: Solution
Zuletzt geändert: 19 Apr. 2026
Version: 7
Antworten auf Ihre Fragen erhalten Sie von anderen Dell NutzerInnen
Support Services
Prüfen Sie, ob Ihr Gerät durch Support Services abgedeckt ist.