如何在 Dell Security Management Server Virtual 中設定代理設定
Summary: 瞭解如何使用這些指示在 Dell Security Management Server Virtual (先前稱為 Dell Data Protection Virtual Edition) 中設定代理設定。
This article applies to
This article does not apply to
This article is not tied to any specific product.
Not all product versions are identified in this article.
Instructions
本文涵蓋如何在 Dell Security Management Server Virtual (先前稱為 Dell Data Protection | Virtual Edition) 中設定代理設定。
受影響的產品:
- Dell Security Management Server Virtual
- Dell Data Protection Virtual Edition
Dell Security Management Server Virtual 代理設定可能需要設定,以能夠:
- 下載虛擬裝置更新。
- 驗證搭售產品授權。
- 與 Advanced Threat Prevention (ATP) 租戶通訊。
注意:
- 產品大量授權不需要外部驗證。
- ATP 租戶僅搭配 Dell Endpoint Security Suite Enterprise 使用。
- 代理設定可能需要一個以上功能的組態。
按一下虛擬裝置更新或產品授權和 Advanced Threat Protection (ATP) 租戶,即可取得設定代理的詳細資訊。
虛擬裝置更新
Dell Security Management Server Virtual 的代理設定在 9.11.0 版至更新版本、 9.7.0 版至 9.10.1、 9.5.0 版至 9.6.0、 9.0.0 版至 9.4.1 版以及 8.2.0 版至 8.5.0 版本之間有所不同。按一下適當的版本,以瞭解特定的步驟。如需版本控制資訊,請參閱 如何識別 Dell Data Security 伺服器版本。
v9.11.0 及更新版本
注意:在 Dell Security Management Server Virtual v9.11 及更新版本中,更新虛擬裝置更新代理、產品授權和 ATP 租戶的步驟相同。
- 登入 Dell Security Management Server Virtual 管理主控台。
 注意:
注意:- Dell Security Management Server Virtual 的預設登入資料為:
- 使用者名稱:
delluser - 密碼:
delluser
- 使用者名稱:
- 系統管理員可以變更在產品的虛擬裝置選單中的預設密碼。
- Dell Security Management Server Virtual 的預設登入資料為:
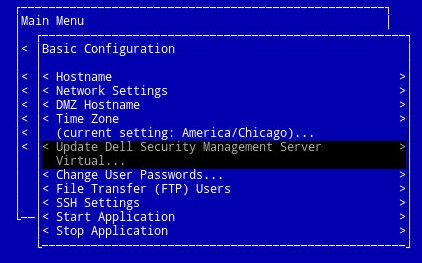
- 從 主功能表中,選取 基本組態 ,然後按下 Enter 鍵。

- 選取升級 Dell Security Management Server Virtual,然後按下 Enter 鍵。

- 選取設定代理,然後按下 Enter 鍵。

- 在 「更新代理 」功能表中:
- 按下使用代理右側空格鍵以啟用此功能。
- 填入 HTTPS 代理和 HTTP 代理。
- 如果需要代理驗證,請按下 需要驗證 右側的空格鍵以啟用此安全性功能,然後前往步驟 5D。如果不需要代理驗證,請前往步驟 5E。
- 填入使用者名稱、密碼和確認密碼。
- 選取 OK,然後按下 Enter 鍵。
 注意:如需升級程序的詳細資訊,請參閱 如何升級 Dell Security Management Server Virtual。
v9.7.0 至 9.10.1
- 登入 Dell Security Management Server Virtual 管理主控台。
 注意:
注意:- Dell Security Management Server Virtual 的預設登入資料為:
- 使用者名稱:
ddpuser - 密碼:
ddpuser
- 使用者名稱:
- 系統管理員可以變更在產品的虛擬裝置選單中的預設密碼。
- Dell Security Management Server Virtual 的預設登入資料為:
- 從 主功能表中,選取 基本組態 ,然後按下 Enter 鍵。

- 選取升級 Dell Security Management Server Virtual,然後按下 Enter 鍵。
- 選取設定代理設定,然後按下 Enter 鍵。

- 在 代理設定 功能表中:
- 按下使用代理右側空格鍵以啟用此功能。
- 填入 HTTPS 代理、HTTP 代理和 FTP 代理。
- 如果需要代理驗證,請按下 需要驗證 右側的空格鍵以啟用此安全性功能,然後前往步驟 5D。如果不需要代理驗證,請前往步驟 5E。
- 填入使用者名稱、密碼和確認密碼。
- 選取 OK,然後按下 Enter 鍵。
 注意:如需升級程序的詳細資訊,請參閱 如何升級 Dell Security Management Server Virtual。
v9.5.0 至 9.6.0
- 登入 Dell Enterprise Server Virtual 管理主控台。
 注意:
注意:- Dell Data Protection Enterprise Server Virtual Edition 的預設登入資料為:
- 使用者名稱:
ddpuser - 密碼:
ddpuser
- 使用者名稱:
- 系統管理員可以變更在產品的虛擬裝置選單中的預設密碼。
- Dell Data Protection Enterprise Server Virtual Edition 的預設登入資料為:
- 從 主功能表中,選取 基本組態 ,然後按下 Enter 鍵。

- 選取更新 DDP Enterprise Server – VE,然後按下 Enter 鍵。

- 選取設定代理設定,然後按下 Enter 鍵。

- 在 代理設定 功能表中:
- 按下使用代理右側空格鍵以啟用此功能。
- 填入 HTTPS 代理、HTTP 代理和 FTP 代理。
- 如果需要代理驗證,請按下 需要驗證 右側的空格鍵以啟用此安全性功能,然後前往步驟 5D。如果不需要代理驗證,請前往步驟 5E。
- 填入使用者名稱、密碼和確認密碼。
- 選取 OK,然後按下 Enter 鍵。
 注意:如需升級程序的詳細資訊,請參閱 如何升級 Dell Security Management Server Virtual。
v9.0.0 至 9.4.1
- 登入 Dell Enterprise Server Virtual 管理主控台。
 注意:
注意:- Dell Data Protection Enterprise Server Virtual Edition 的預設登入資料為:
- 使用者名稱:
ddpuser - 密碼:
ddpuser
- 使用者名稱:
- 系統管理員可以變更在產品的虛擬裝置選單中的預設密碼。
- Dell Data Protection Enterprise Server Virtual Edition 的預設登入資料為:
- 從 主功能表中,選取 基本組態 ,然後按下 Enter 鍵。
- 選取更新 DDP Enterprise Server – VE,然後按下 Enter 鍵。

- 選取設定代理設定,然後按下 Enter 鍵。

- 在 代理設定 功能表中:
- 按下使用代理右側空格鍵以啟用此功能。
- 填入 HTTPS 代理、HTTP 代理和 FTP 代理。
- 如果需要代理驗證,請按下 需要驗證 右側的空格鍵以啟用此安全性功能,然後前往步驟 5D。如果不需要代理驗證,請前往步驟 5E。
- 填入使用者名稱、密碼和確認密碼。
- 選取 OK,然後按下 Enter 鍵。
 注意:如需升級程序的詳細資訊,請參閱 如何升級 Dell Security Management Server Virtual。
v8.2.0 至 8.5.0
注意:如果您對執行這些步驟感到不自在,請聯絡支援人員。如需更多資訊,請參閱 Dell Data Security 國際支援電話號碼。
- 登入 Dell Enterprise Server Virtual 管理主控台。
 注意:
注意:- Dell Data Protection Enterprise Server Virtual Edition 的預設登入資料為:
- 使用者名稱:
ddpuser - 密碼:
ddpuser
- 使用者名稱:
- 系統管理員可以變更在產品的虛擬裝置選單中的預設密碼。
- Dell Data Protection Enterprise Server Virtual Edition 的預設登入資料為:
- 從 主功能表中,選取 啟動 Shell ,然後按下 Enter 鍵。

- 輸入
su ddpsupport然後按下 Enter 鍵。
- 輸入密碼
ddpsupport然後按下 Enter 鍵。 注意:
注意:- Dell Data Protection Enterprise Server Virtual Edition 的預設登入資料為:
- 使用者名稱:
ddpsupport - 密碼:
ddpsupport
- 使用者名稱:
- 系統管理員可以變更在產品的虛擬裝置選單中的預設密碼。
- Dell Data Protection Enterprise Server Virtual Edition 的預設登入資料為:
- 輸入
sudo nano /etc/environment然後按下 Enter 鍵。
- 向下按以前往新的空白行。

- 鍵入以下文字,在代理伺服器和連接埠中填入
proxy.company.com和1234顯示:http_proxy=https://proxy.company.com:1234/ https_proxy=https://proxy.company.com:1234/ ftp_proxy=https://proxy.company.com:1234/ no_proxy="localhost,127.0.0.1" HTTP_PROXY=https://proxy.company.com:1234/ HTTPS_PROXY=https://proxy.company.com:1234/ FTP_PROXY=https://proxy.company.com:1234/ NO_PROXY="localhost,127.0.0.1"
注意:Proxy.company.com與連接埠1234只是示例。您的環境中的代理伺服器 FQDN 和連接埠組態會有所不同。
- 按下 CTRL+X 以結束。出現儲存提示時,請按下 Y 以繼續。

- 按下 Enter 鍵以儲存,不變更檔案名稱。

- 輸入
exit,然後按 Enter 鍵登出ddpsupport。
- 輸入
exit,然後按 Enter 以從 Shell 登出到 UI。
- 從主功能表中選取基本組態,然後按下 Enter 鍵。

- 選取重新啟動裝置,然後按下 Enter 鍵。

- 選取是並按下 Enter 鍵。
 注意:如需升級程序的詳細資訊,請參閱 如何升級 Dell Security Management Server Virtual。
產品授權和進階威脅防護 (ATP) 租戶
Dell Security Management Server Virtual 的代理設定在 9.11.0 版和更新版本、 9.7.0 版至 9.10.1 版以及 8.2.0 版至 9.6.0 版之間會有所不同。按一下適當的版本,以瞭解特定的步驟。如需版本控制資訊,請參閱 如何識別 Dell Data Security 伺服器版本。
v9.11.0 及更新版本
注意:在 Dell Security Management Server Virtual v9.11 及更新版本中,更新虛擬裝置更新代理、產品授權和 ATP 租戶的步驟相同。
- 登入 Dell Security Management Server Virtual 管理主控台。
 注意:
注意:- Dell Security Management Server Virtual 的預設登入資料為:
- 使用者名稱:
delluser - 密碼:
delluser
- 使用者名稱:
- 系統管理員可以變更在產品的虛擬裝置選單中的預設密碼。
- Dell Security Management Server Virtual 的預設登入資料為:
- 從 主功能表中,選取 基本組態 ,然後按下 Enter 鍵。

- 選取升級 Dell Security Management Server Virtual,然後按下 Enter 鍵。

- 選取設定代理,然後按下 Enter 鍵。

- 在 「更新代理 」功能表中:
- 按下使用代理右側空格鍵以啟用此功能。
- 填入 HTTPS 代理和 HTTP 代理。
- 如果需要代理驗證,請按下 需要驗證 右側的空格鍵以啟用此安全性功能,然後前往步驟 5D。如果不需要代理驗證,請前往步驟 5E。
- 填入使用者名稱、密碼和確認密碼。
- 選取 OK,然後按下 Enter 鍵。
 注意:如需升級程序的詳細資訊,請參閱 如何升級 Dell Security Management Server Virtual。
v9.7.0 至 9.10.1
注意:如果您對執行這些步驟感到不自在,請聯絡支援人員。如需更多資訊,請參閱 Dell Data Security 國際支援電話號碼。
- 登入 Dell Security Management Server Virtual 管理主控台。
 注意:
注意:- Dell Security Management Server Virtual 的預設登入資料為:
- 使用者名稱:
ddpuser - 密碼:
ddpuser
- 使用者名稱:
- 系統管理員可以變更在產品的虛擬裝置選單中的預設密碼。
- Dell Security Management Server Virtual 的預設登入資料為:
- 從 主功能表中,選取 啟動 Shell ,然後按下 Enter 鍵。

- 輸入
su ddpsupport然後按下 Enter 鍵。
- 輸入密碼
ddpsupport然後按下 Enter 鍵。 注意:
注意:- Dell Data Protection Enterprise Server Virtual Edition 的預設登入資料為:
- 使用者名稱:
ddpsupport - 密碼:
ddpsupport
- 使用者名稱:
- 系統管理員可以變更在產品的虛擬裝置選單中的預設密碼。
- Dell Data Protection Enterprise Server Virtual Edition 的預設登入資料為:
- 輸入
sudo nano /opt/dell/server/security-server/conf/application.properties然後按下 Enter 鍵。
- 向下捲動至
proxy server settings使用方向鍵。
- At
proxy.server.enabled=false刪除false和類型true。
- At
proxy.server.host=,鍵入代理伺服器的完全限定功能變數名稱 (FQDN)。 注意:影像中的範例 proxy.company.com 可能與您環境中的 FQDN 不同。
 - At
proxy.server.port.ssl=,鍵入代理伺服器的 SSL 埠。 注意:影像中的範例 443 可能與您環境中的連接埠不同。
 - At
proxy.server.port.http=,鍵入代理伺服器的 HTTP 埠。 注意:影像中的範例 80 可能與您環境中的連接埠不同。
 - 如果代理伺服器需要驗證,請前往步驟 11a。如果代理伺服器不需要驗證,請前往步驟 12。
- At
proxy.server.username=,鍵入代理伺服器的使用者名。 注意:圖像中的示例,
proxyusername@company.com,可能與您環境中的使用者名稱不同。 - At
proxy.server.password=替ENC跟CLR。
- At
proxy.server.password=,將字母數位資訊替換為CLR()密碼為proxyusername@company.com。 注意:圖像中的示例,
proxypassword,可能與環境中的密碼不同。
- At
- 按下 CTRL+X 以結束。提示要儲存時,請輸入
Y以繼續。
- 按下 Enter 鍵以儲存,不變更檔案名稱。

- 輸入
exit,然後按 Enter 鍵登出ddpsupport。
- 輸入
exit,然後按 Enter 鍵,從 Shell 登出 主功能表。
- 從 主功能表中,選取 基本組態 ,然後按下 Enter 鍵。

- 選取停止應用程式,然後按下 Enter 鍵。

- 選取是,然後按下 Enter 鍵。

- 所有服務停止後,按下 ESC 鍵返回 基本組態 功能表。

- 選取開始應用程式,然後按下 Enter 鍵。

- 選取是,然後按下 Enter 鍵。

- 所有服務啟動後,按下 ESC 鍵返回 基本組態 功能表。

v8.2.0 至 9.6.0
注意:如果您對執行這些步驟感到不自在,請聯絡支援人員。如需更多資訊,請參閱 Dell Data Security 國際支援電話號碼。
- 登入 Dell Enterprise Server Virtual 管理主控台。
 注意:
注意:- Dell Data Protection Enterprise Server Virtual Edition 的預設登入資料為:
- 使用者名稱:
ddpuser - 密碼:
ddpuser
- 使用者名稱:
- 系統管理員可以變更在產品的虛擬裝置選單中的預設密碼。
- Dell Data Protection Enterprise Server Virtual Edition 的預設登入資料為:
- 從 主功能表中,選取 啟動 Shell ,然後按下 Enter 鍵。

- 輸入
su ddpsupport然後按下 Enter 鍵。
- 輸入的密碼
ddpsupport然後按下 Enter 鍵。 注意:
注意:- Dell Data Protection Enterprise Server Virtual Edition 的預設登入資料為:
- 使用者名稱:
ddpsupport - 密碼:
ddpsupport
- 使用者名稱:
- 系統管理員可以變更在產品的虛擬裝置選單中的預設密碼。
- Dell Data Protection Enterprise Server Virtual Edition 的預設登入資料為:
- 輸入
sudo nano /opt/dell/server/security-server/conf/application.properties然後按下 Enter 鍵。
- 向下捲動至
Proxy server settings使用方向鍵。
- At
proxy.server.enabled=false刪除false和類型true。
- At
proxy.server.host=,鍵入代理伺服器的完全限定功能變數名稱 (FQDN)。 注意:影像中的範例 proxy.company.com 可能與您環境中的 FQDN 不同。
 - At
proxy.server.port.ssl=,鍵入代理伺服器的 SSL 埠。 注意:影像中的範例 443 可能與您環境中的連接埠不同。
 - At
proxy.server.port.http=,鍵入代理伺服器的 HTTP 埠。 注意:影像中的範例 80 可能與您環境中的連接埠不同。
 - 如果代理伺服器需要驗證,請前往步驟 11a。如果代理伺服器不需要驗證,請前往步驟 12。
- At
proxy.server.username=,鍵入代理伺服器的使用者名。 注意:圖像中的示例,
proxyusername@company.com,可能與您環境中的使用者名稱不同。 - At
proxy.server.password=替ENC跟CLR。
- At
proxy.server.password=,將字母數位資訊替換為CLR()密碼為proxyusername@company.com。 注意:圖像中的示例,
proxypassword,可能與環境中的密碼不同。
- At
- 按下 CTRL+X 以結束。提示要儲存時,按下
Y以繼續。
- 按下 Enter 鍵以儲存,不變更檔案名稱。

- 輸入
exit,然後按 Enter 鍵登出ddpsupport。
- 輸入
exit,然後按 Enter 鍵,從 Shell 登出 主功能表。
- 從 主功能表中,選取 基本組態 ,然後按下 Enter 鍵。

- 選取停止應用程式,然後按下 Enter 鍵。

- 選取是,然後按下 Enter 鍵。

- 所有服務停止後,按下 ESC 鍵返回 基本組態 功能表。

- 選取開始應用程式,然後按下 Enter 鍵。

- 選取是,然後按下 Enter 鍵。

- 所有服務啟動後,按下 ESC 鍵返回 基本組態 功能表。

如要聯絡支援部門,請參閱 Dell Data Security 國際支援電話號碼。
請前往 TechDirect,以線上產生技術支援要求。
如需更多深入見解與資源,請加入 Dell 安全性社群論壇。
Additional Information
Videos
Affected Products
Dell EncryptionArticle Properties
Article Number: 000131892
Article Type: How To
Last Modified: 10 Jul 2025
Version: 15
Find answers to your questions from other Dell users
Support Services
Check if your device is covered by Support Services.