Intel 11th, 12th, 13th, and 14th Generation Processors, No Drives Can Be Found During Windows 10 and Windows 11 Installation
Summary: This article provides information about Intel 11th, 12th, 13th, and 14th Generation processors, where installation drives are not found during Windows 11 and Windows 10 installation using retail media or downloaded media from the Microsoft Media Creation Tool. ...
Instructions
Intel 11th (Tiger Lake - TGL), 12th (Alder Lake - ADL), 13th (Raptor Lake - RPL) and 14th (Arrow Lake - ARL) Generation processors use the new Intel Volume Management Device (VMD) technology. It optimizes the storage devices' data processing effectiveness and power consumption.
When you install Windows 10 or Windows 11 Retail, we must load the Intel Rapid Storage Technology (IRST) driver so that you can install Windows. This problem is not experienced with images created using the Dell OS Recovery Tool or reinstallation of the operating system using SupportAssist OS Recovery.
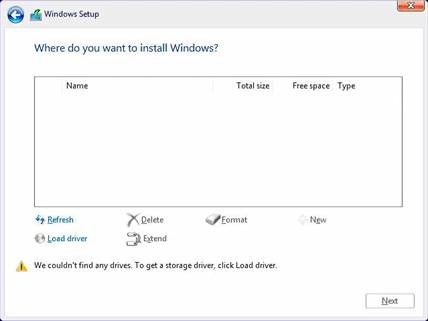
If your computer uses an 11th Generation or newer Intel processor, Windows will not find any drives when installing Windows 10. Use the following steps to install the IRST driver during operating system installation.

| VMD driver Version\ Platform | TGL system | ADL system | RPL system |
|---|---|---|---|
| TGL VMD (18.3.x) | Working | Not working | Not working |
| ADL VMD (19.2.x) | Working | Working | Not working |
| ARL VMD (20.2.x) | Working | Working | Not working |
| RPL VMD (19.5.x) | Working | Working | Working |
(Table 1 - Driver Version)
Intel Rapid Storage Technology (IRST) Drivers:
Download and Extract the IRST Drivers.
- Access the Internet and browse: https://www.dell.com/support
- Enter the service tag of your computer, then click search.
- Click the Drivers & Downloads tab then select the Storage category to find the download for the Intel Rapid Storage Technology Driver.
- Click the Download button to download the driver to your computer.

- Double-Click the Intel-Rapid-Storage-Technology-Driver_XXXXX_WIN64_18.1.1.1033_A00_01.EXE file to start the file extraction process.

- Click the Extract button and select the Dell operating system Recovery Tool USB flash drive to extract the files.

- Once the file extraction process completes, click close, and you now have the drivers on the key.

Install IRST Driver.
- Connect the USB flash drive which includes the Windows 10 installation media and Intel Rapid Storage Technology (IRST) driver to the target computer.
- Restart the Windows 10 or Windows 11 installation process.
- Below is the screen Where you want to install Windows and Windows cannot find any drives. Select Load driver.
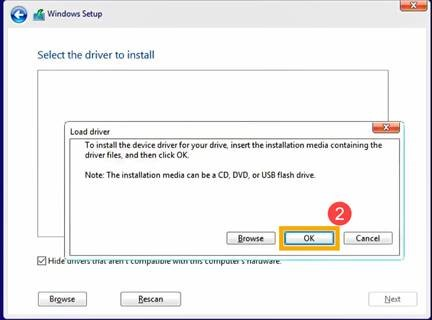
- Select OK (2).
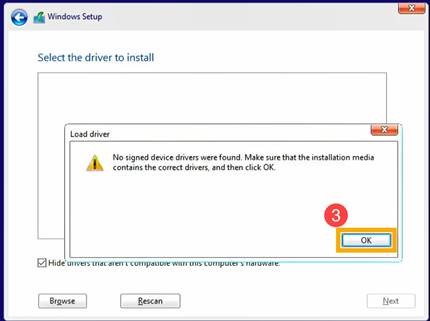
- Click OK (3).
- Select Browse (4), then find the folder (5) where the IRST Drivers were saved and select OK (6).
 Note: For customers using products with Intel 11th generation or later CPUs, select the VMD folder or expand the VMD folder and select the f6vmdflpy-x64 folder under the VMD folder.
Sample folder Path:IRST\production\Windows 10-x64\15063\Drivers\VMD
For customers using products with Intel 10th generation or earlier CPUs, expand the F6 folder and select the f6flpy-x64 folder under the F6 folder.
Sample folder Path:IRST\F6\f6flpy-x64
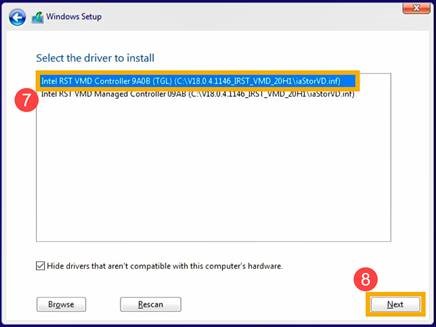
- Select [Intel RST VMD Controller] (7), then select Next (8) to install the driver.
- After the driver installation is completed, the drive will appear.
