VMware vSAN: Come sostituire un disco della cache utilizzando vSphere Web Client

Summary: Questo articolo spiega come sostituire un disco cache in una configurazione vSAN.

This article applies to This article does not apply to This article is not tied to any specific product. Not all product versions are identified in this article.

Instructions

Nell'ambiente vSAN in cui si combinano unità SSD e disco rigido, l'unità SSD utilizzata come memoria cache è chiamata disco cache, l'unità disco rigido utilizzata come spazio dati è chiamata disco di capacità.

AVVERTENZA: È necessario eseguire il backup dei dati prima di eseguire questo passaggio.


Sommario

1.  Come sostituire un disco
cache2. Ulteriori informazioni: Impossibile rimuovere il gruppo di dischi


Come sostituire un disco cache


Se il problema si è verificato sul disco della cache, si tratta di un problema a livello di gruppo di dischi.
Pertanto, è necessario ricreare il gruppo di dischi.


Nota: A seconda della versione, l'icona del gruppo di dischi potrebbe non essere visualizzata in vSphere Web Client anche se il problema si è verificato su un disco della cache. In questo caso, vedere la procedura descritta nella sezione seguente.


Passaggi per la sostituzione

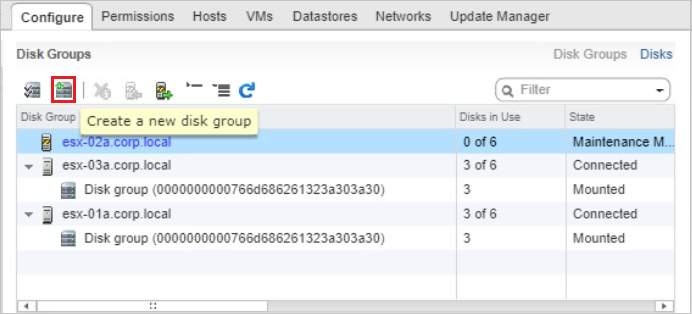
  1. Cliccare sull'icona nella parte superiore di vSphere Web Client per passare alla modalità di manutenzione.
    Si consiglia di passare alla modalità di manutenzione prima della sostituzione, a meno che non vi sia un motivo speciale.
    Consultare Posizionamento di un membro del cluster vSAN in modalitàQuesto link ipertestuale indirizza a un sito web esterno a Dell Technologies. di manutenzione per il passaggio alla modalità di manutenzione e i relativi tipi.

  2. Cliccare sull'icona in alto per rimuovere il disco cache appropriato.
    La rimozione del disco della cache rimuove il gruppo di dischi.

  3. Sostituire fisicamente il disco cache applicabile.

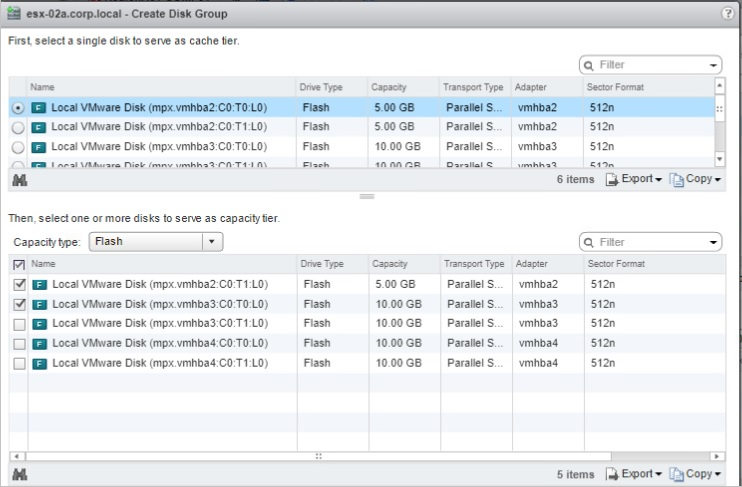
  4. Dopo la sostituzione, cliccare sull'icona "Add" nella parte superiore di vSphere Web Client.
    Mostra il web client vSphere e la posizione su cui cliccare


  • Selezionare un disco di cache dall'elenco superiore, un disco di capacità dall'elenco inferiore e cliccare su OK.
    Mostra la selezione del disco della cache


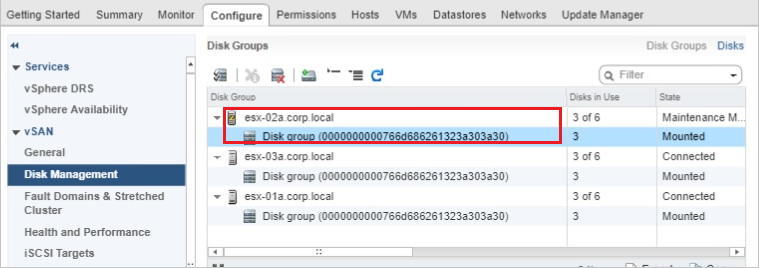
  • Una volta visualizzato il gruppo di dischi creato, rilasciare la modalità di manutenzione.
    Mostra il gruppo di dischi


  • Verificare che la capacità del gruppo di dischi ricreato sia aggiunta alla capacità dell'archivio dati vSAN.

  • Poiché gli avvisi permangono anche se il problema viene risolto, cliccare su Confirm o Reset to Green per eliminarli manualmente.
    Mostra gli avvisi


Informazioni aggiuntive


Impossibile rimuovere il gruppo
di dischiL'icona del gruppo di dischi potrebbe non essere visualizzata in vSphere Web Client o la rimozione del gruppo di dischi potrebbe non riuscire.
In tal caso, provare i seguenti passaggi:


  1. Connettersi all host applicabile utilizzando SSH.

  2. Confermare il disco di capacità "mpx.vmhbax:Cx:Tx:Lx" Eseguendo il comando: esxcli vsan storage list oppure vdq -q -H

  3. Rimozione del disco con capacità applicabile mpx.vmhbax:Cx:Tx:Lx singolarmente eseguendo il comando: esxcli vsan storage remove --evacuation-mode=noAction --disk=mpx.vmhbax:Cx:Tx:Lx.
    Esempio: esxcli vsan storage remove --evacuation-mode=noAction --disk= mpx.vmhba1:C0:T4:L0

  4. Sostituire fisicamente il disco della cache e creare un gruppo di dischi in vSphere Web Client.


A questo punto è possibile selezionare il disco cache sostituito e il disco con capacità esistente che è stato rimosso.


Affected Products

OEMR R230, OEMR R240, OEMR R250, OEMR XE R250, OEMR R260, OEMR XE R260, OEMR R330, OEMR R340, OEMR R350, OEMR XE R350, OEMR R360, OEMR XE R360, OEMR R430, OEMR R440, PowerEdge XR2, OEMR R450, OEMR R530, OEMR R540, OEMR R550, OEMR R5500, OEMR R630 , OEMR R640, OEMR XL R640, OEMR R6415, OEMR R650, OEMR R650xs, OEMR R6515, OEMR R6525, OEMR R660, OEMR XL R660, OEMR R660xs, OEMR R6615, OEMR R6625, OEMR R730, OEMR R730xd, OEMR R740, OEMR XL R740, OEMR R740xd, OEMR XL R740xd, OEMR R740xd2, OEMR R7415, OEMR R7425, OEMR R750, OEMR R750xa, OEMR R750xs, OEMR R7515, OEMR R7525, OEMR R760, OEMR R760xa, OEMR R760XD2, OEMR XL R760, OEMR R760xs, OEMR R7615, OEMR R7625, OEMR R830, OEMR R840, OEMR R860, OEMR R930, OEMR R940, OEMR R940xa, OEMR R960, OEMR T130, OEMR T140, OEMR T150, OEMR T330, OEMR T340, OEMR T350, OEMR T360, OEMR T430, OEMR T440, OEMR T550, OEMR T560, OEMR T630, OEMR T640, OEMR XL T640, OEMR XL R230, OEMR XL R240, OEMR XL R330, OEMR XL R340, OEMR XL R630, OEMR XL R660xs, OEMR XL R6615, OEMR XL R6625, OEMR XL R6715, OEMR XL R6725, OEMR XL R730, OEMR XL R730XD, OEMR XL R760xs, OEMR XL R7615, OEMR XL R7625, OEMR XL R7715, OEMR XL R7725, OEMR XR11, OEMR XR12, OEMR XR4510c, OEMR XR4520c, OEMR XR5610, OEMR XR7620, OEMR XR8610t, OEMR XR8620t, PowerEdge C4130, Poweredge C4140, PowerEdge c6320, PowerEdge c6320p, PowerEdge C6420, PowerEdge C6520, PowerEdge C6525, PowerEdge C6615, PowerEdge C6620, Poweredge FC430, Poweredge FC630, PowerEdge FC640, Poweredge FC830, PowerEdge HS5610, PowerEdge HS5620, PowerEdge M630, PowerEdge M630 (for PE VRTX), PowerEdge M640, PowerEdge M640 (for PE VRTX), PowerEdge M830, PowerEdge M830 (for PE VRTX), PowerEdge MX740C, PowerEdge MX750c, PowerEdge MX760c, PowerEdge MX840C, PowerEdge R230, PowerEdge R240, PowerEdge R250, PowerEdge R260, PowerEdge R330, PowerEdge R340, PowerEdge R350, PowerEdge R360, PowerEdge R430, PowerEdge R440, PowerEdge R450, PowerEdge R470, PowerEdge R530, PowerEdge R530xd, PowerEdge R540, PowerEdge R550, PowerEdge R630, PowerEdge R640, PowerEdge R6415, PowerEdge R650, PowerEdge R650xs, PowerEdge R6515, PowerEdge R6525, PowerEdge R660, PowerEdge R660xs, PowerEdge R6615, PowerEdge R6625, PowerEdge R670, PowerEdge R730, PowerEdge R730xd, PowerEdge R740, PowerEdge R740XD, PowerEdge R740XD2, PowerEdge R7415, PowerEdge R7425, PowerEdge R750, PowerEdge R750XA, PowerEdge R750xs, PowerEdge R7515, PowerEdge R7525, PowerEdge R760, PowerEdge R760XA, PowerEdge R760xd2, PowerEdge R760xs, PowerEdge R7615, PowerEdge R7625, PowerEdge R770, PowerEdge R7715, PowerEdge R7725, PowerEdge R830, PowerEdge R840, PowerEdge R860, PowerEdge R930, PowerEdge R940, PowerEdge R940xa, PowerEdge R960, PowerEdge T130, PowerEdge T140, PowerEdge T150, PowerEdge T160, PowerEdge T30, PowerEdge T330, PowerEdge T340, PowerEdge T350, PowerEdge T360, PowerEdge T40, PowerEdge T430, PowerEdge T440, PowerEdge T550, PowerEdge T560, PowerEdge T630, PowerEdge T640, POWEREDGE VRTX, PowerEdge XR11, PowerEdge XR12, PowerEdge XR4510c, PowerEdge XR4520c, PowerEdge XR5610, PowerEdge XR7620, PowerEdge XR8610t, PowerEdge XR8620t, VMware ESXi 6.5.X, VMware ESXi 6.7.X, VMware ESXi 7.x, VMware ESXi 8.x, VMware VSAN, Dell EMC vSAN C6420 Ready Node, Dell EMC vSAN MX740c Ready Node, Dell EMC vSAN MX750c Ready Node, Dell vSAN Ready Node MX760c, Dell EMC vSAN R440 Ready Node, Dell EMC vSAN R640 Ready Node, Dell EMC vSAN R6415 Ready Node, Dell EMC vSAN R650 Ready Node, Dell EMC vSAN R6515 Ready Node, vSAN Ready Node R660, Dell vSAN R6615 Ready Node, Dell EMC vSAN R740 Ready Node, Dell EMC vSAN R740xd Ready Node, Dell EMC vSAN R750 Ready Node, Dell EMC vSAN R7515 Ready Node, Dell EMC vSAN R760 Ready Node, Dell vSAN R7615 Ready Node, Dell vSAN Ready Node R7625, Dell EMC vSAN R840 Ready Node, Dell EMC vSAN T350 Ready Node ...
Article Properties
Article Number: 000120252
Article Type: How To
Last Modified: 19 Feb 2025
Version:  9
Find answers to your questions from other Dell users
Support Services
Check if your device is covered by Support Services.