Dell Endpoint Security Suite Enterprise and Threat Defense Proxy Settings
Summary: Proxy Settings for Dell Endpoint Security Suite Enterprise or Threat Defense.
Symptoms
- As of May 2022, Dell Endpoint Security Suite Enterprise has reached End of Maintenance. This article is no longer updated by Dell. For more information, reference the Product Life Cycle (End of Support / End of Life) Policy for Dell Data Security. If you have any questions on alternative articles, either reach out to your sales team or contact endpointsecurity@dell.com.
- Reference Endpoint Security for additional information about current products.
Affected Products:
- Dell Endpoint Security Suite Enterprise
- Dell Threat Defense
Affected Versions:
- Windows - Agent 1290 or higher
- macOS - Agent 1300 or higher
- Linux - Agent 1430 or higher
Table of Contents
Dell Endpoint Security Suite Enterprise and Threat Defense support proxy configurations for users is configured through a registry entry. When a proxy is configured, the agent uses the IP address and port for all outbound communication to Cylance hosts.
Cause
Not Applicable
Resolution
Windows
To configure the proxy in Dell Endpoint Security Suite Enterprise and Threat Defense:
- Access the registry. Depending on how your agent was installed (Protected Mode that is enabled or not), you must elevate your privileges or take ownership of the registry.
- Download psexe.exe from the Microsoft website, https://docs.microsoft.com/en-us/sysinternals/downloads/psexec
.
- Open a DOS prompt as Administrator.
- Run this command first:
psexec -i -s cmd.exe.
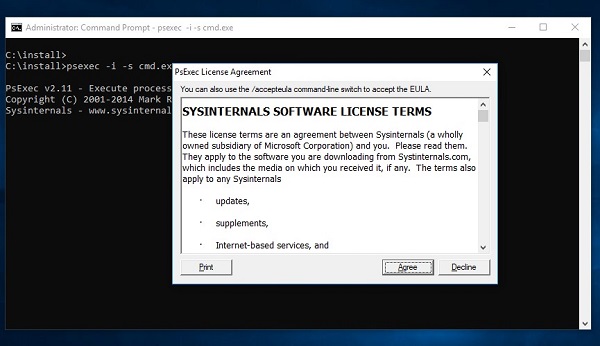
Figure 1: (English Only) Agree to License Terms
- Accept the EULA then run this command inside the new windows opened by
psexec: regedt32.exe:
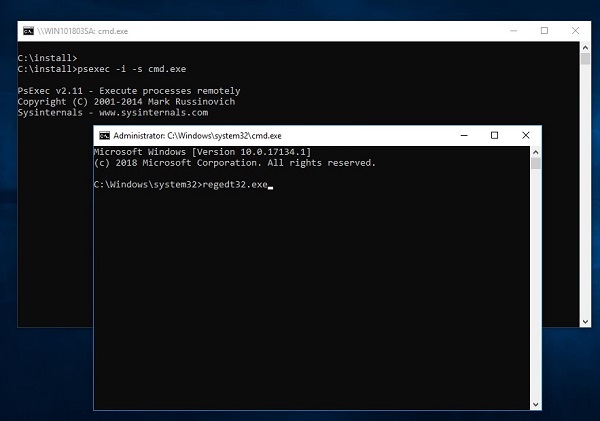
Figure 2: (English Only) Type regedt32.exe
- Back up the Registry before proceeding, reference How to Back Up and Restore the Registry in Windows
- Editing the Registry can cause the computer to become unresponsive on the next reboot.
- Contact Dell Data Security International Support Phone Numbers for assistance if you have concerns about performing this step.
- In the Registry Editor, go to
HKEY_LOCAL_MACHINE\SOFTWARE\Cylance\Desktop - Create a String Value (REG_SZ):
- Value Name = ProxyServer
- Value Data = your Proxy settings.
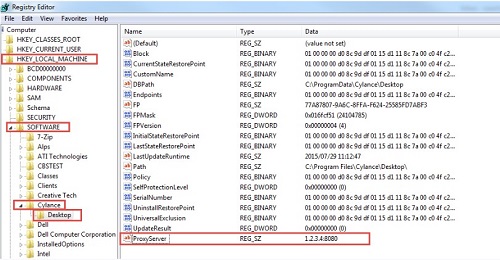
Figure 3: (English Only) Registry Editor
- Configure the proxy and add a rule to allow all traffic to *.cylance.com.
Or
- Use a different proxy policy allowing for unauthenticated proxy access to Cylance hosts (*.cylance.com).
This way, if no user is logged on, Dell Endpoint Security Suite Enterprise agent for Windows and macOS no longer must authenticate and can connect to the cloud and communicate with the console.
macOS
To configure the proxy in Dell Endpoint Security Suite Enterprise and Threat Defense:
Modify the values.xml file in the Cylance folder:
Option 1: To use the command line:
- Access the values.xml file. The default location is
/Library/Application Support/Cylance/Desktop/registry/LocalMachine/Software/Cylance/Desktop/values.xml

Figure 4: (English Only) Open values.xml
- Edit the values.xml file and add the following between the <values> element:
<value name="ProxyServer" type="string">PROXY IP AND PORT HERE</value>- Example:
<value name="ProxyServer" type="string">127.0.0.1:8080</value>

Figure 5: (English Only) Edit values.xml
Type CTRL + X and Y to save the file.
The protection status should be green:
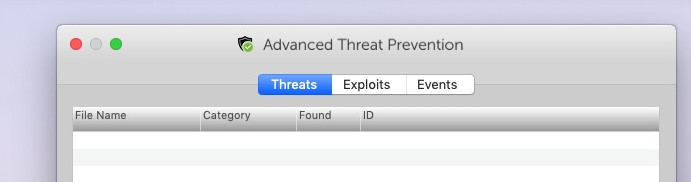
Figure 6: (English Only) Advanced Threat Prevention
Option 2: To use a bash script:
Use a bash script to push the proxy key down to OS X / macOS devices in your organization that require a proxy for outbound communications to Cylance hosts.
- Create a file (CylanceMacProxy.sh) with the following contents:
#!/usr/bin/bash
ADDR=1.2.3.4:8080
FILE="/Library/Application Support/Cylance/Desktop/registry/LocalMachine/Software/Cylance/Desktop/values.xml"
sed -i '' 's/.*<values>.*/&\
<value name="ProxyServer" type="string">'$ADDR'<\/value>/' "$FILE"
Where:
ADDR represents the Proxy Server IP address and port.
- Use your preferred deployment mechanism (Casper, so forth) to run the bash script using sudo.
sudo bash ./CylanceMacProxy.sh
- Configure the proxy and add a rule to allow all traffic to *.cylance.com.
Or
- Use a different proxy policy allowing for unauthenticated proxy access to Cylance hosts (*.cylance.com).
Linux
To configure the proxy in Dell Endpoint Security Suite Enterprise in Linux, choose the appropriate Operating System:
Open a Terminal window and run this command in one line:
echo "env http_proxy=http://proxyaddress:port" /etc/init/cylancesvc.override && systemctl stop cylancesvc && systemctl daemon-reload && systemctl start cylancesvc
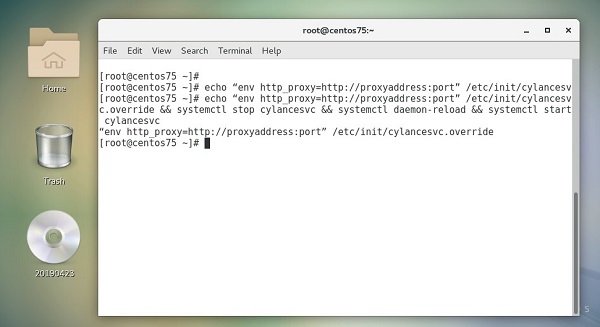
Figure 7: (English Only) Run command in Terminal
Open a terminal window and run these commands:
echo "env https_proxy=https://proxyaddress:port" /etc/init/cylancesvc.override && systemctl stop cylancesvc && systemctl daemon-reload && systemctl start cylancesvc
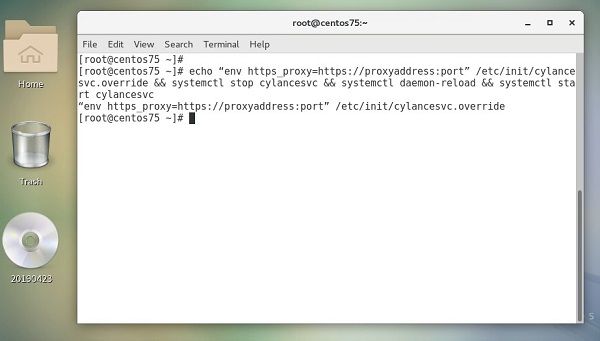
Figure 8: (English Only) Run command in Terminal
Open a Terminal window and run these commands:
mkdir /etc/systemd/system/cylancesvc.service.d && echo "[Service]" /etc/systemd/system/cylancesvc.service.d/proxy.confecho "env=http_proxy=http://proxyaddress:port" /etc/systemd/system/cylancesvc.service.d/proxy.confsystemctl stop cylancesvc && systemctl daemon-reload && systemctl start cylancesvc
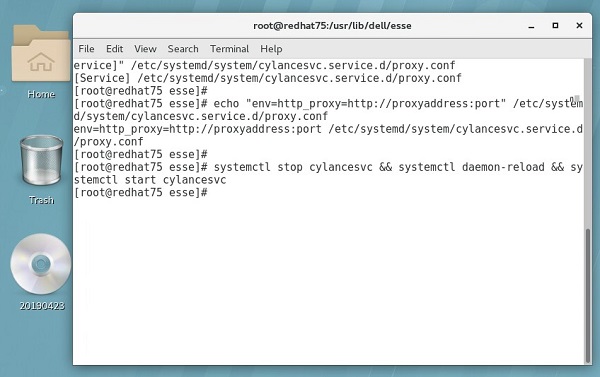
Figure 9: (English Only) Run commands in Terminal
Open a Terminal window and run this command in one line:
mkdir /etc/systemd/system/cylancesvc.service.d && echo "[Service]" /etc/systemd/system/cylancesvc.service.d/proxy.confecho "env=https_proxy=https://proxyaddress:port" /etc/systemd/system/cylancesvc.service.d/proxy.confsystemctl stop cylancesvc && systemctl daemon-reload && systemctl start cylancesvc
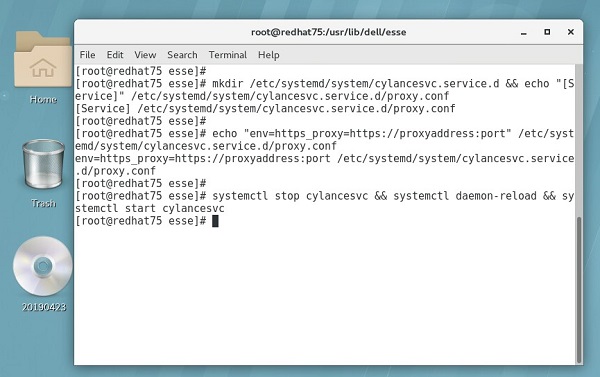
Figure 10: (English Only) Run commands in Terminal
To contact support, reference Dell Data Security International Support Phone Numbers.
Go to TechDirect to generate a technical support request online.
For additional insights and resources, join the Dell Security Community Forum.