Some Images May Not Have the Required Driver When Installing Windows 10 on Intel 12th Generation Computers Using ISO Images
Summary: When installing Windows 10 on Intel 12th Generation computers using ISO images, some images may not have the required Intel Rapid Storage Technology Driver that is embedded into the ISO image. Use this process when other operating computer recovery options are unavailable. ...
Instructions
Table of Contents:
- Overview
- Download and install the Dell OS Recovery Tool
- Download and Extract the IRST Drivers
- Manually Install the IRST Driver during Windows 10 Setup
Overview
The Windows 10 reinstall ISO media for Intel 12th Generation computers may lack the Intel Rapid Storage Technology driver that is required to detect computer storage devices.
Use this when Windows 10 media (Dell or Microsoft) does not contain the required Intel Rapid Storage Technology driver (Version 18.1.1.1033 or later).
Back to TopDownload and install the Dell OS Recovery Tool
Use the Dell OS Recovery Tool to create a USB recovery flash drive. You can use to reinstall the version of Windows that came with your computer.
Link to the Dell OS Recovery ToolUse the Dell OS Recovery Tool to create a bootable Windows 10 USB flash drive to allow you to reinstall Windows 10 on your computer.
When creating the flash drive, select the Advanced Option. Here you will be given only option to select the universal Windows 10 image, without Image Restore options (Figure 1).
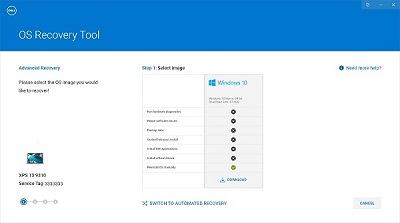
(Figure 1. Creating the Windows 10 Image using the Advanced Mode)
Download and Extract the IRST Drivers
- Access the Internet and browse to: www.dell.com/support.
- Enter the service tag of your computer, then click search.
- Click the Drivers & Downloads tab the select the Serial ATA category to find the download for the Intel Rapid Storage Technology Driver.
- Click the Download button to download the driver to your computer (Figure 2).

(Figure 2. Selecting the IRST driver download) - Double-Click the Intel-Rapid-Storage-Technology-Driver_XXXXX_WIN64_18.1.1.1033_A00_01.EXE file to start the file extraction process (Figure 3).

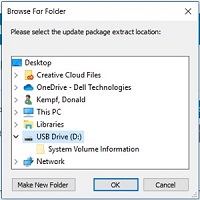
(Figure 3. Opening the IRST Driver) - Click the Extract button and select the Dell OS Recovery Tool USB flash drive to extract the files (Figure 4).
(Figure 4. Extracting the IRST Driver to the USB flash drive) - Once the file extraction process completes, click close and you now have the drivers on the key (Figure 5).
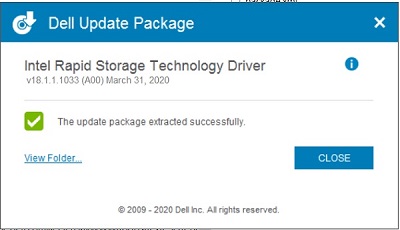
(Figure 5. Close the file extraction window)
Manually Install the IRST Driver during Windows 10 Setup
Once your USB flash drive is set up with the IRST drivers, you can begin the process of installing Windows 10 to your computer.
- Connect the USB flash drive to your computer and press the power button. As the computer is starting up, press the F12 key until you see the One-time Start Menu (Figure 6).
Note: The One-Time boot menu may be White like on the XPS, or Black like other computers have previously displayed.)

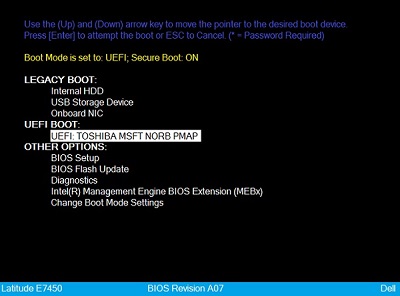
(Figure 6. Select the USB flash drive on the One-time start menu) - Arrow down and select the USB flash drive that is listed in the UEFI Boot section. Then press the Enter key to boot the computer from the USB flash drive.
- Select your Language and keyboard preferences and then click Next (Figure 7).
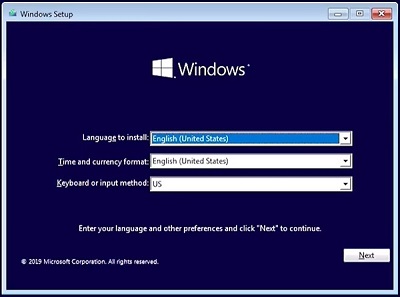
(Figure 7. Windows 10 Setup, Language selection) - Click the Install Now button (Figure 8).

(Figure 8. Windows 10 Setup Install Now Screen)Note: You may receive a Windows User Access Control (UAC) Prompt. If a UAC prompt appears, click YES to confirm you are accessing the computer. - Check the license agreement box then click Next to continue the Windows 10 installation (Figure 9).

(Figure 9. Accepting the license agreement) - Select the Advanced installation option (Figure 10).
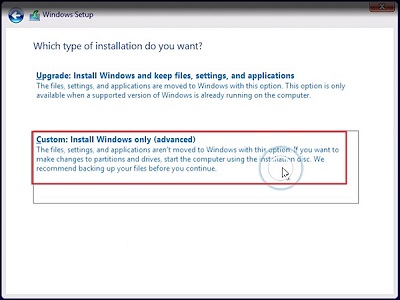
(Figure 10. Select Advanced installation) - Click the Load driver option (Figure 11).
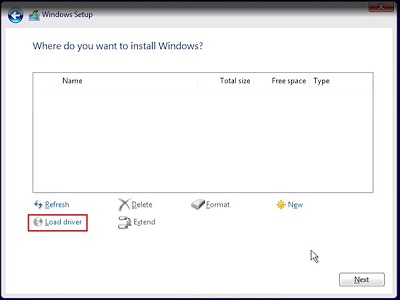
(Figure 11. Load driver) - Click the Browse button in the load driver window (Figure 12).
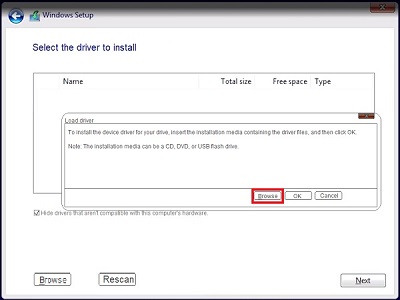
(Figure 12. Click the Browse Button) - Browse to the F6 > VDM > f6dlpy-x64 folder on the USB Key then click OK (Figure 13).
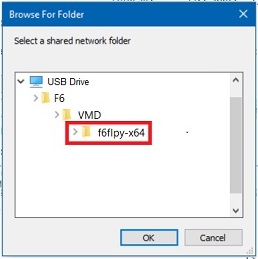
(Figure 13. Browse to the driver folder on the USB Key) - Select the corresponding driver and click Next (Figure 14).
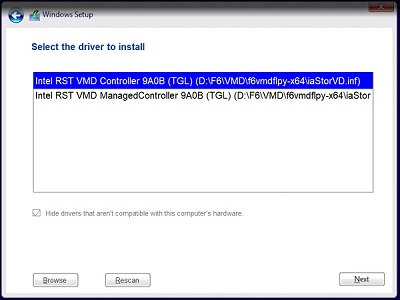
(Figure 14. Select the Intel RST Driver) - The drive partition information is now displayed. Select the Unallocated Space (Blank Drive), or Primary Partition, if data is on the chosen drive (Figure 15).
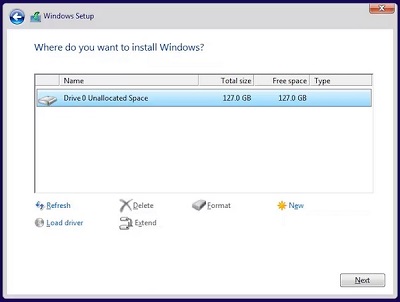
(Figure 15. Select the partition to install Windows) - Click Next, then the Windows install should complete without errors.