How to Use and Troubleshoot the Dell Thunderbolt Dock TB16
Summary: Learn how to setup, use, and troubleshoot Dell Thunderbolt Dock TB16. Find information about drivers, setting up multiple monitors and troubleshooting steps to resolve common issues.
This article applies to
This article does not apply to
This article is not tied to any specific product.
Not all product versions are identified in this article.
Symptoms
 |
Quick LinksGetting Started with your Dell TB16 Docking Station Dell TB16 Dock Setup, Specifications and Service Manual Dell Drivers & Downloads Warranty & Support Services Frequently asked questions |
Dell Thunderbolt Dock TB16 links all your electronic devices to your laptop using a single Thunderbolt 3 (Type-C) cable. When you connect the laptop to the docking station, you can gain access to all your peripherals such as the mouse, keyboard, stereo speakers, external hard drive, and large-screen displays without having to plug each device into the laptop.
NOTE: Dell Thunderbolt Dock TB16 only supports Thunderbolt 3 technology. Older versions of Thunderbolt are not supported.
For help with specifications, setup, connecting an external monitor, troubleshooting common issues, and so on, reference the expanding sections below.
Cause
| Personal computer Connectivity | Thunderbolt 3 (USB Type-C) |
|---|---|
| Video ports |
|
| Audio ports |
|
| Network ports |
|
| USB ports |
|
| Power or DC-in |
|
The Dell Thunderbolt Dock - TB16 is designed for the following PCs with Thunderbolt 3 USB Type-C port:
| Latitude | Precision Mobile | XPS Portable | ||
| Latitude 12 5290 2-in-1 w/Tbt | Precision 15 3520 | XPS 13 2-in-1 7390 2-in-1 | ||
| Latitude 13 5300 2-in-1 w/Tbt | Precision 15 3530 | XPS 13 9300 | ||
| Latitude 13 5300 w/Tbt 3 | Precision 15 3540 | XPS 15 7590 | ||
| Latitude 14 5400 w/Tbt 3 | Precision 15 3541 | XPS 13 9360 | ||
| Latitude 14 5401 | Precision 15 5520 | XPS 13 9360 | ||
| Latitude 14 5480 w/Tbt 3 | Precision 15 5530 | XPS 13 9365 | ||
| Latitude 14 5491 w/Tbt 3 | Precision 15 5530 2-in-1 | XPS 13 9370 | ||
| Latitude 15 5500 w/Tbt 3 | Precision 15 5540 | XPS 13 9380 | ||
| Latitude 15 5501 | Precision 15 7520 | XPS 15 9560 | ||
| Latitude 15 5580 w/Tbt 3 | Precision 15 7530* | XPS 15 9570 | ||
| Latitude 15 5591 w/Tbt 3 | Precision 15 7540* | XPS 15 9575 | ||
| Latitude 12 7200 2-in-1 | Precision 17 7720 | |||
| Latitude 12 7280 w/Tbt 3 | Precision 17 7730* | |||
| Latitude 12 7285 | Precision 17 7740* | |||
| Latitude 12 7290 w/Tbt 3 | *System requires the system's AC Adapter to supplement the Type-C connection to adequately power the system. | |||
| Latitude 13 7300 | ||||
| Latitude 13 7380 w/Tbt 3 | ||||
| Latitude 13 7390 2-in-1 w/Tbt 3 | ||||
| Latitude 13 7390 w/Tbt 3 | ||||
| Latitude 14 7400 | ||||
| Latitude 14 7400 2-in-1 | ||||
| Latitude 14 7480 w/Tbt 3 | ||||
| Latitude 14 7490 w/Tbt 3 | ||||
|
NOTE: w/Tbt 3 indicates ordered with Thunderbolt 3 option.
|
||||
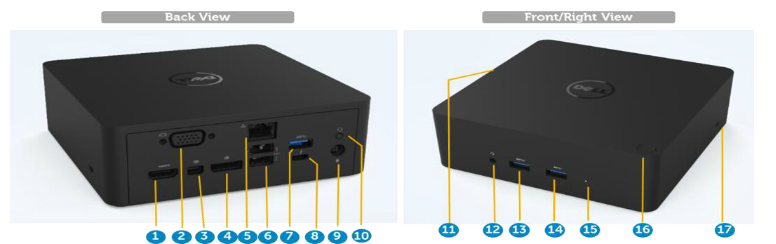
Figure 1: Dell Thunderbolt Dock TB16 Ports
| 1. | HDMI |
| 2. | VGA |
| 3. | mini-DisplayPort (mDP) |
| 4. | DisplayPort (DP) |
| 5. | RJ45 Gigabit Ethernet |
| 6. | USB 2.0 (2 ports) |
| 7. | USB 3.0 |
| 8. | Thunderbolt 3 (USB Type-C) |
| 9. | 3.5 mm Speaker-out |
| 10. | 7.4 mm DC-in power |
| 11. | Dell Docking station connector (Dell Proprietary connection to USB Type 3 port on personal computer) |
| 12. | Headset Jack |
| 13. | USB 3.0 w/PowerShare |
| 14. | USB 3.0 |
| 15. | Power Adapter LED |
| 16. | Dock Button |
| 17. | Kensington lock slot |
NOTE: The Dell Thunderbolt dock will not function on a device with Display Port over USB Type-C with the Thunderbolt cable.
NOTE: You must update your personal computer’s BIOS and the Dell Docking Station drivers to the latest versions available at the Dell Support Website before using the docking station. Older BIOS versions and drivers could result in the docking station not being recognized by your personal computer or not functioning optimally.
To learn more about installing drivers for the Dell Thunderbolt Dock TB16 docking station, see the Dell knowledge-base article Dell Thunderbolt Dock TB16 - Driver Installation Guide
Automated driver installation using Dell Update/Dell Command | Update
Dell highly recommends the following applications to automate the installation of BIOS, firmware, driver, and critical updates specific to your personal computer and docking station. These applications are available to download on the Dell Support Website Driver & Downloads page. Pick your personal computer type from the list or enter the service tag of your personal computer to get the right version for your personal computer.
- The Dell Update application is supported on Dell XPS laptops and Dell Venue
NOTE: A TB16 dock connection to your personal computer is required in order for Dell Update to start software updates on your personal computer. - The Dell Command | Update application is supported on Dell Precision, XPS, and Latitude laptops.
NOTE: The latest Dell Update and Dell Command | Update are not capable of updating the Intel HD Graphics Driver to the latest version. Navigate to the Dell Driver & Downloads Website by searching the service tag of your personal computer. Download and install the latest Intel HD Graphics Driver in "Video" section for your personal computer.
Dell Thunderbolt Dock TB16 Manual Driver installation
Dell Technologies recommends installing the following BIOS, firmware, and drivers step by step in the prescribed order to ensure optimal performance.
NOTE: Administrative rights to the personal computer are required for Flashing the BIOS and installation of Thunderbolt driver/firmware.
Search for your personal computer model name under Select a Product selection, or enter the service tag of your personal computer to locate the Drivers & Downloads page on the Dell support website. Change the Operating personal computer to view all available updates for your personal computer.
- Flash the latest Basic Input/Output System (BIOS) for the personal computer. This is available in the "BIOS" section
- Install the latest Intel Thunderbolt Controller Driver for the personal computer. This is available in the "Chipset" section
- Install the latest Intel Thunderbolt 3 Firmware Update for the personal computer. This is available in the "Chipset" section
- Install the latest Intel HD Graphics Driver for the personal computer. This is available in the "Video" section
- Install the latest ASMedia USB 3.0 Extended Host Controller Driver for Dell Thunderbolt Dock. This is available in the "Docks & Stands" section
- Install the latest RealTek USB GBE Ethernet Controller Driver for Dell Thunderbolt Dock and Dell Dock. This is available in the "Docks & Stands" section
- Install the latest RealTek USB Audio Driver for Dell Thunderbolt Dock and Dell Dock. This is available in the "Docks & Stands" section
- Restart the personal computer
- After the software update process completes, connect the AC adapter to the TB16 dock first and then attach the Thunderbolt 3 (USB Type-C) cable to the personal computer before using the docking station
Microsoft Windows operating system includes the VGA graphics drivers only. For optimum graphics performance, it is recommended that Dell graphics drivers applicable for your personal computer be installed from the Dell Drivers & Downloads website under the "Video" section.
NOTES:
- For NVIDIA Discrete Graphics solutions on the Latitude E-Family and Mobile Dell Precision PCs:
- First, install the Intel Media Adapter Graphics Driver applicable to your personal computer.
- Second, install the NVIDIA Discrete Graphics Driver applicable to your personal computer.
- For AMD Discrete Graphics solutions on the Latitude E-Family and Mobile Dell Precision personal computers:
- First, install the Intel Media Adapter Graphics driver applicable to your personal computer.
- Second, install the AMD Discrete Graphics driver applicable to your personal computer.
Before connecting the docking station to your personal computer and connecting a monitor and other external devices, ensure to install all the required drivers.
Connect the monitor to the docking station using the VGA, HDMI, DisplayPort, mini-DisplayPort, or USB-C cable provided with the monitor. The docking station supports up to 4 monitors that are connected simultaneously. See the Display Resolution Table below for more details about the supported resolution when connecting multiple monitors to the docking station.
To learn more about setting up and troubleshooting issues with multiple monitor setups, see these Dell knowledge-base articles How to Set up Multiple Monitors or How to Troubleshoot Multiple Monitor Issues
Display resolution table
| Single Display (maximum resolution) | Dual Display (maximum resolution) | Triple Display (maximum resolution) | Quad Display (maximum resolution) |
|---|---|---|---|
|
|
NOTE: DP port at 60 Hz is supported, but mDP +HDMI are limited to 30 Hz for 4k
|
NOTE: **Discrete only mode or "Special Graphics Mode."
|
NOTE: Resolution support is also dependent on the maximum resolution that is supported by the monitor.
NOTE: If higher resolution monitors are used, the Intel Graphics driver makes a judgment that is based on monitor specifications and display configurations. Some resolutions may not be supported and removed from the Intel Graphics Media Control Panel.
NOTES:
** Configuration that is supported with AMD and NVIDIA in discrete-only mode or special-graphics mode. These modes are listed in the BIOS for the following PCs: Dell Precision 7510/7529/7710/7720 and requires disabling switchable graphics for discrete-only mode or enabling special-graphics mode when Switchable is enabled. If the personal computer does not have these options in the BIOS, then 4 monitors are NOT supported.
The 5K resolution support is only available in either of these conditions:
With discrete graphics mode only, or special graphics mode or,
*** Using the Thunderbolt 3 USB Type-C to a dual DisplayPort adapter.
| Symptom | Possible Solution |
|---|---|
| No video on the monitors that are attached to the High Definition Multimedia Interface (HDMI), mini-DisplayPort (mDP) port, or DisplayPort (DP) port on the docking station. |
|
| The video on the attached monitor is distorted or flickering. |
|
| The video on the attached monitor is not displaying as an Extended Monitor. |
|
| The audio connector is not functioning, no audio or there is a lag in the audio. |
|
| The USB ports are not functioning on the docking station. |
|
| The HDCP content is not displayed on the attached monitor. |
|
| The LAN port is not functioning. |
|
| Cable LED is not ON after it is connected to your host. |
|
| USB port has no function in a pre-OS environment. | If your BIOS has a USB or Thunderbolt Configuration page, ensure the following options are checked:
|
| PXE boot on dock does not function. | If your BIOS has an integrated NIC page, select Enabled w/PXE. If your BIOS Setup on your personal computer has a USB or Thunderbolt Configuration page, ensure the following options are checked:
|
| USB Boot does not function. | If your BIOS has a USB or Thunderbolt Configuration page, ensure the following options are checked:
|
| AC Adapter is displayed as "Not Installed" in the Battery Information page of the Dell BIOS Setup when the Thunderbolt 3 (Type-C) cable is connected. |
|
| Peripherals connected to the docking station do not work in a pre-OS environment. | Thunderbolt Boot Support is by default, disabled in BIOS Setup on your Dell personal computer. With such a default setting the docking station and the peripherals that are connected to the docking station do not work in a pre-OS environment. If the BIOS Setup on your personal computer has a USB or Thunderbolt Configuration page, check the following options to enable docking station function in a pre-OS environment:
|
| Alert message "You have attached an undersized power adapter to your system" is displayed when the docking station is connected to your personal computer. |
|
| Troubleshooting multiple monitor issues |
|
Frequently asked questions
The Dell Thunderbolt Dock TB16 can charge your mobile or power bank even without being connected to the personal computer. Ensure your dock is connected with external power. The dock fan rotates automatically if the dock gets too warm. This is a normal working condition.
| Latest Product and Support | Description |
|---|---|
|
Thunderbolt 3 docking stations link all external devices to the laptop using a single USB-C cable. Extend the traditional USB capabilities with native multi-display video, audio, data, and power delivery (on select Dell laptops) to charge the laptop with a single USB-C cable. The reversible connector is convenient to use USB-C, with no wrong orientation.
NOTE: Thunderbolt 3 docking stations work with a USB-C port that supports the Thunderbolt 3 protocol. To learn how to identify if the laptop supports Thunderbolt 3, see the FAQ section.
|
This is for Thunderbolt security. You are asked to approve a Thunderbolt device because the Thunderbolt Security level on your unit is set to "User Authorization" or "Secure Connect" in the BIOS Setup. You will not see this page if the Thunderbolt Security level on your personal computer is set to "No Security" or "DisplayPort Only." Also, if you checked "Enable Thunderbolt Boot Support" in the BIOS Setup and power-on the personal computer with TB16 attached, you will not see this page because the Security level is overridden to "No Security" in this case. When you are asked to approve a Thunderbolt device, you may select "Always Connect" if you do not have any security concerns to always allow the Thunderbolt device connection to your personal computer. Or you may select "Connect Only Once" or "Do Not Connect" if you do have concerns.
Security is always Dell’s highest priority. We ship our PCs with "Security level - User Authorization" setting by default. This allows our customers to review the Thunderbolt security conditions of their PCs so they can make selections accordingly. However, this also means that the Thunderbolt dock and the devices that are attached to it must pass Thunderbolt driver security permission checking to get it connected and initialized. This normally means that some extra time is needed before these devices can be accessed by users.
When a new device is plugged in, the USB hub driver notifies the Plug and Play (PnP) manager that a new device was detected. The PnP manager queries the hub driver for all the device's hardware IDs and then notifies Windows OS that a new device must be installed. In this scenario, the user sees a hardware installation window.
Our Thunderbolt dock is designed to operate in AC only, and it does not support a personal computer power source back (powered by personal computer type-C port). A power loss event makes all devices on the dock fail to work. Even when you restore the AC power, the dock may still not function properly because the dock still must negotiate a proper power contract with the personal computer Type-C port and establish a personal computer EC-to-dock-EC connection. A Type-C cable replug is needed to initiate the power contract negotiation and establish personal computer EC-to-dock-EC virtual I2C connection. As a result, after a power loss, the user must unplug the type-C cable, replug in AC power, and then replug the USB-C cable to the personal computer to restore dock back to normal condition.
The fan is triggered by temperature. The dock fan will not rotate until the dock is hot enough to trigger a thermal threshold. Conversely, if your dock is not cool enough, the fan will not stop even when you disconnect the dock from the personal computer.
When you hear a loud fan noise, it is warning you that the dock is in some kind of a hot condition. For example, the vent in the dock may be blocked or the dock is working in a high working-temperature environment (> 35C). Eliminate these abnormal conditions from the dock. If you do not eliminate the abnormal condition, in a worst-case situation, the dock shuts down through the over-temperature protection mechanism. Once this happens, please unplug the Type-C cable from the personal computer and remove dock’s power. Then, plug in the dock power to recover the dock back online.
This is a normal condition. The first time plugging in of the dock’s AC adapter triggers the fan to rotate, but it will after turn off soon.
The dock fan is designed with two different rotate speeds. The dock works on low fan speed. If you put the dock in a heavy loading, or in a high working-temperature environment, the dock fan may have a chance to work at a high speed. But, this is normal and the fan will work at a low/high speed depending on the work loading.
Resolution
 Is your computer out of warranty? For Out of Warranty support, browse to the Dell.com/support website and enter your Dell Service Tag to view our offers.
Note: Offers are only available for consumer and commercial computer customers in the US, Canada, UK, France, Germany, and China. Offers are not applicable to Server and Storage systems.
Additional Information
Affected Products
Dell Thunderbolt Dock TB16, Dell Venue 10 Pro 5056, Dell Venue 8 Pro 5855, Latitude 7275, Latitude E5270, Latitude E5470, Latitude E5570, Precision 3510, Precision 5510, Precision 7510, Precision 7710, XPS 12 9250, XPS 13 9350 (End of Life)
, XPS 15 9550
...
Article Properties
Article Number: 000123995
Article Type: Solution
Last Modified: 13 Oct 2025
Version: 21
Find answers to your questions from other Dell users
Support Services
Check if your device is covered by Support Services.