RHEL7/CentOS7 Obtaining TSR Logs Using the Command Line (RACADM/ISM/IPMITOOL)
Summary: This article describes how RHEL7/CentOS7 can obtain TSR logs (RACADM/ISM/IPMITOOL) locally using the command line.
This article applies to
This article does not apply to
This article is not tied to any specific product.
Not all product versions are identified in this article.
Instructions
Directories:
- Applicable scenarios
- Installing iDRAC Tools uses the racadm command to get the TSR logs
- Installing iDRAC Service Module Get TSR logs using Invoke-SupportAssistCollection (Only for iDRAC9)
- Installing IPMITool: Use IPMITool command to get TSR logs (for iDRAC9 only)
Applicable scenarios
RHEL7/CentOS7 obtains TSR logs locally by using the command line to obtain TSR logs in the following scenarios:iDRAC web is inaccessible or cannot function properly;
The iDRAC is not configured, the iDRAC cable is not connected;
The iDRAC is connected and configured, but the customer does not know the username password;
NOTE:
- The iDRAC Tools or iDRAC Service Module involved in this article need to be installed in the system with administrator rights, and please be sure to read the software installation instructions carefully during the installation process.
- When racadm saves TSR logs locally, iDRAC will briefly insert a USB memory medium into the operating system for transmitting TSR log files.
- Installing ISM will enable the OS to iDRAC Pass-through function of USB NIC by default, and an additional USB iDRAC Virtual NIC device will be added to the system for communication with iDRAC.
- In general, installing iDRAC Tools or iDRAC Service Module will not affect the business environment, if you cannot assess the associated risks or do not want to make any changes to the OS, please give priority to using iDRAC to obtain TSR logs.
Installing iDRAC Tools uses the racadm command to get the TSR logs
Download the iDRAC Tools package and install the racadm tools.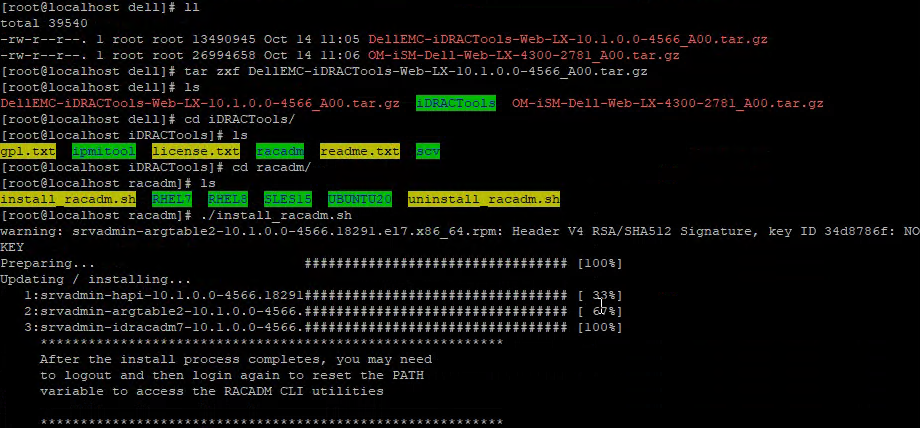
After the installation is complete, close the command line window and log in again to use the racadm commands.
- racadm techsupreport collect (iDRAC7,8,9 recommended)
racadm techsupreport collect -t sysinfo,ttylog

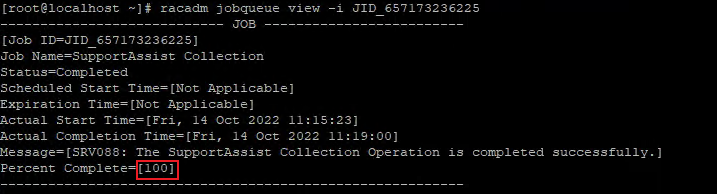
View the progress of the job queue and wait until it reaches 100%.
racadm jobqueue view -i JID_657173236225
Export TSR logs to a specified directory on the server and name it TSR.zip.
racadm techsupreport export -f /tmp/TSR.zip

NOTE: During the file saving process, iDRAC briefly inserts a USB memory medium into the operating system for the transfer of TSR log files.
For more information about the RACADM TechSupreport parameters, please refer to the RACADM User Manual.
For more information about the RACADM TechSupreport parameters, please refer to the RACADM User Manual.
- racadm SupportAssist Collect (iDRAC9 supported only)
Accept EULA.
racadm supportassist accepteula

Use supportassist to create a job that collects TSR logs, which contains debug, sysinfo, and ttylog.
racadm supportassist collect -t sysinfo,ttylog,debug

View the progress of the job queue and wait until it reaches 100%.
racadm jobqueue view -i JID_657178574755

Export TSR logs with the tsrlog.zip command and save them to the specified directory.
racadm supportassist exportlastcollection -f /tmp/tsrlog.zip
 For more information on racadm supportassist parameters, see page 170 of the iDRAC9 racadm manual .
Installing iDRAC Service Module Get TSR logs using Invoke-SupportAssistCollection (Only for iDRAC9)
Download the ISM package and perform the default installation (all default options can be installed, and the OS to iDRAC Pass-through function of USB NIC will be enabled by default after installing ISM).
Read the software installation instructions, press the spacebar to turn the page, and finally press y to accept the EULA.

Automatically enter the installation options interface, here is demonstrated as the default option, directly press i to start the installation, and press y to start the ISM service after the installation is completed.
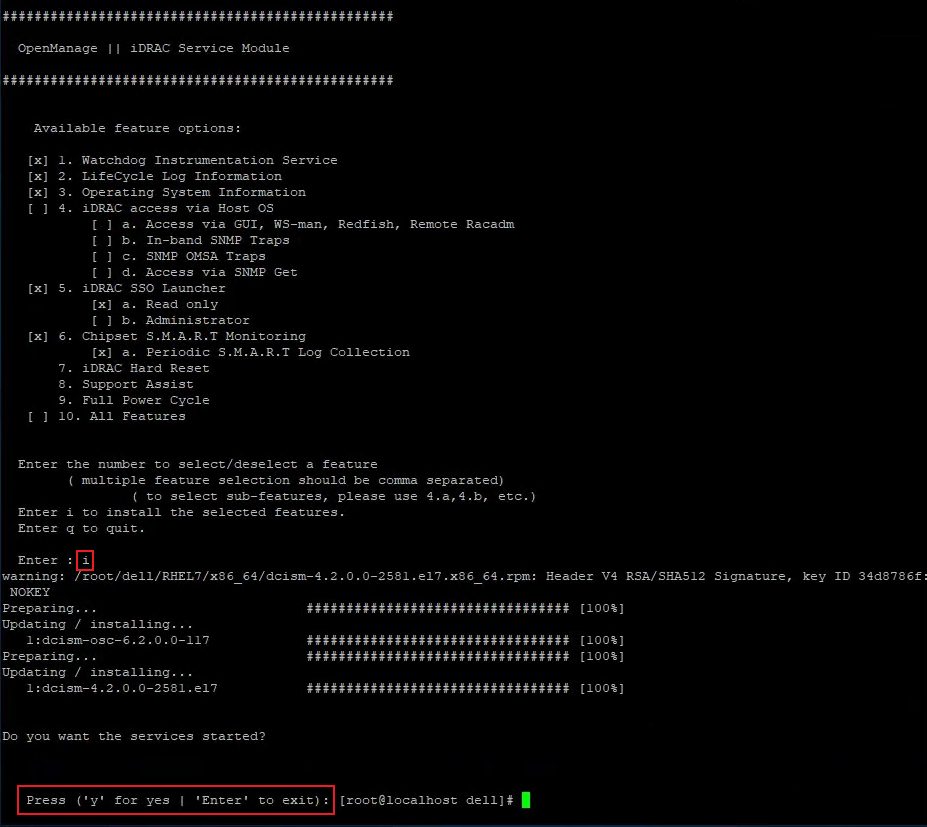
If you do not press y to start the service after the installation is completed, you need to manually start the service and check the service status.
systemctl start dcismeng.service
systemctl status dcismeng.service

Enter cd /opt/dell/srvadmin/iSM/bin/ to switch directories and execute the Invoke-SupportAssistCollection program.
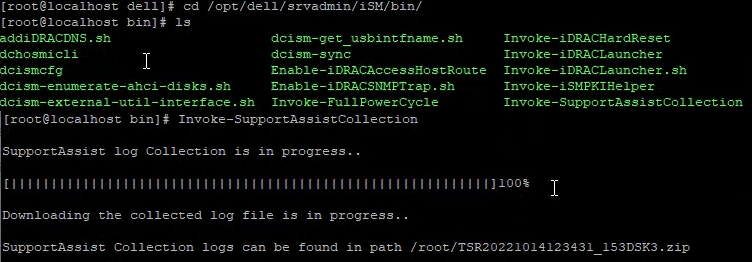
By default, TSR log files are stored in the home directory of the corresponding user.
Installing IPMITool: Use IPMITool command to get TSR logs (for iDRAC9 only)
Locate the IPMITool from the iDRAC Tools package and install it.
ipmitool raw 0x30 0xa8 0x06 0x00 0x00 start TSR log collection and wait for a while
, ipmitool raw 0x30 0xa8 0x07 0x00 0x00 Check the status, return 00 00 00 indicates success
 Return value Explanation:
0x00 – Success
0x01 – Failure
0x02 – Pending
After completing the log collection, you can see from the kernel log that the iDRAC will insert a read-only USB media to the operating system, and the drive letter is /dev/sdb, we need to manually mount this disk in Linux.

Create a mount directory and mount the TSR logs by using the cp command to copy the TSR logs to another directory for storage.

Turn off log collection and eject the iDRAC USB media.
ipmitool raw 0x30 0xa8 0x08 0x00 0x00 turns off log collection and ejects the iDRAC USB media.
ipmitool raw 0x30 0xa8 0x07 0x00 0x00 Check the status, return 00 00 00 for success.

If you need to cancel during the log collection process, use the ipmitool raw 0x30 0xa8 0x09 0x00 0x00 and check the status with the ipmitool raw 0x30 0xa8 0x07 0x00 0x00.
Additional Information
Affected Products
PowerEdge, Enterprise Systems ManagementArticle Properties
Article Number: 000204251
Article Type: How To
Last Modified: 13 Dec 2022
Version: 3
Find answers to your questions from other Dell users
Support Services
Check if your device is covered by Support Services.