PowerEdge: How to boot into the BIOS or the Lifecycle Controller on your PowerEdge Server
Summary: This article explains how to enter in the System Menu (BIOS) of a PowerEdge Dell Server using the shortcut F2.
This article applies to
This article does not apply to
This article is not tied to any specific product.
Not all product versions are identified in this article.
Instructions
Note: This article is part of the Server Tutorials: Support Tools.
To enter the BIOS, press a function <F> key. Which function key to press is dependent upon your specific server. The general guidelines are as follows:
- <F2> Enables you to enter System Setup (BIOS).
- <F10> Enables you to enter system services and starts Lifecycle Controller (for iDRAC/Lifecyle Controller enabled systems)
- <F11> Enables you to enter Boot Manager.
- <F12> Enables you to enter PXE Boot.
Press the wanted <F> key once every 2 s until you see confirmation on the screen that you are entering the correct mode.
The <F> key menu is in the right of the screen, as shown in figure 1.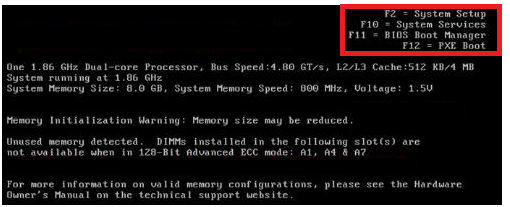
Figure 1.
Note: On older systems, you may not get confirmation. If you do not receive conformation of the mode on screen, then continue to press the correct key every 2 s until the mode is showing on screen.
On newer servers, you must press <F2> once when you see the Dell Splash screen. You should see confirmation of the boot mode in the upper right-hand corner.
Other BIOS may include the Remote Access Card or PERC controller. The method is the same. The 2s rule still applies. You still start at the Dell Splash screen. The only difference is the two key combinations. The POST of the server displays the needed two-key character required. <Ctrl>+<e> and <Ctrl>+<p> are popular for many Dell implementations.
Note: The DRAC can also be accessed by pressing <F2>.
The System Setup Main Menu allows you to configure:
| Option | Description |
| System BIOS | Enables you to configure BIOS settings |
| iDRAC Settings | Enables you to configure iDRAC settings The iDRAC settings utility is an interface to set up and configure the iDRAC parameters by using UEFI. You can enable or disable various iDRAC parameters by using the iDRAC settings utility. For more information about this utility, see Integrated Dell Remote Access Controller User’s Guide at Dell.com/iDRAC Manuals. |
| Device Settings | Enables you to configure device settings (PERC, Network Card) |
Affected Products
PowerEdge c6320, PowerEdge c6320p, PowerEdge C6420, PowerEdge C6520, PowerEdge C6525, PowerEdge C6615, PowerEdge C6620, Poweredge FC430, Poweredge FC630, PowerEdge FC640Products
PowerEdge XR2, Poweredge FC830, PowerEdge M630, PowerEdge M630 (for PE VRTX), PowerEdge M640, PowerEdge M640 (for PE VRTX), PowerEdge M830, PowerEdge M830 (for PE VRTX), PowerEdge MX5016s, PowerEdge MX740C, PowerEdge MX750c, PowerEdge MX760c
, PowerEdge MX840C, PowerEdge R230, PowerEdge R240, PowerEdge R250, PowerEdge R260, PowerEdge R330, PowerEdge R340, PowerEdge R350, PowerEdge R360, PowerEdge R430, PowerEdge R440, PowerEdge R450, PowerEdge R530, PowerEdge R530xd, PowerEdge R540, PowerEdge R550, PowerEdge R630, PowerEdge R640, PowerEdge R6415, PowerEdge R650, PowerEdge R650xs, PowerEdge R6515, PowerEdge R6525, PowerEdge R660, PowerEdge R660xs, PowerEdge R6615, PowerEdge R6625, PowerEdge R730, PowerEdge R730xd, PowerEdge R740, PowerEdge R740XD, PowerEdge R740XD2, PowerEdge R7415, PowerEdge R7425, PowerEdge R750, PowerEdge R750XA, PowerEdge R750xs, PowerEdge R7515, PowerEdge R7525, PowerEdge R760, PowerEdge R760XA, PowerEdge R760xd2, PowerEdge R760xs, PowerEdge R7615, PowerEdge R7625, PowerEdge R830, PowerEdge R840, PowerEdge R860, PowerEdge R930, PowerEdge R940, PowerEdge R940xa, PowerEdge R960, PowerEdge T130, PowerEdge T140, PowerEdge T150, PowerEdge T160, PowerEdge T330, PowerEdge T340, PowerEdge T350, PowerEdge T360, PowerEdge T430, PowerEdge T440, PowerEdge T550, PowerEdge T560, PowerEdge T630, PowerEdge T640, PowerEdge XE2420, PowerEdge XE7420, PowerEdge XE7440, PowerEdge XE8545, PowerEdge XE8640, PowerEdge XE9640, PowerEdge XE9680, PowerEdge XR11, PowerEdge XR12, PowerEdge XR4510c, PowerEdge XR4520c
...
Article Properties
Article Number: 000176910
Article Type: How To
Last Modified: 02 Dec 2025
Version: 10
Find answers to your questions from other Dell users
Support Services
Check if your device is covered by Support Services.