BIOSからセキュア ブート アクティブ データベースをアップデートする方法
Summary: BIOSのセキュア ブート デフォルト データベース(DB)を使用して、セキュア ブートによるオペレーティング システムの起動に使用するアクティブDBを上書きする手順について説明します。
This article applies to
This article does not apply to
This article is not tied to any specific product.
Not all product versions are identified in this article.
Instructions
影響を受けるプラットフォーム:
- Latitude
- OptiPlex
- Inspiron
- Vostro
- XPS
- Precision Workstation
- Dell Pro
- Dell Pro Plus
注:2012年以降に出荷されたすべてのプラットフォーム。
目次:
Warning: これにより、セキュア ブートに精通していない場合、起動しない状況が発生する可能性があります。セキュア ブートActive DBのアップデートはWindows Updateに任せてください。このシナリオは、Windows Updateをブロックしていて、セキュア ブートの要件を理解しているユーザー向けです。
注:これらの手順を実行する前に、BitLockerを無効にする必要があります。
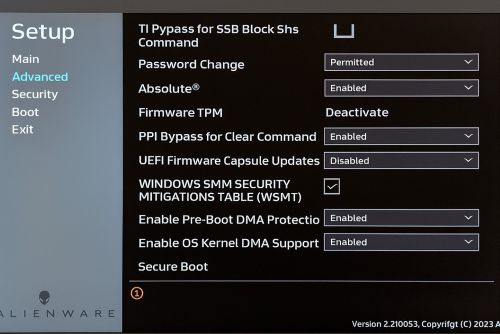
BIOSタイプ1
注:一部のメニューを表示するには、[Advanced Setup](左上)をオンにする必要があります。このオプションは、一部のコンピューター製品ラインでは使用できない場合があります。
次の手順に従います。
- F2を押してBIOSを起動します
- 起動設定の選択
- [Enable Custom Mode]をオンにします([Expert Key Management]の下)
- [Reset All Keys]をクリックします
- [Apply]ボタンをクリックします
- [Exit]ボタンをクリックします(プロンプトが表示されたら[OK]をクリックして保存します)
- 次回の起動時に 、F2 を押してBIOSに入ります
- 起動設定の選択
- [カスタム モードを有効にする]をオフにします([エキスパート キー管理]の下)
- [Apply]ボタンをクリックします
- [Exit]ボタンをクリックします(プロンプトが表示されたら[OK]をクリックして保存します)
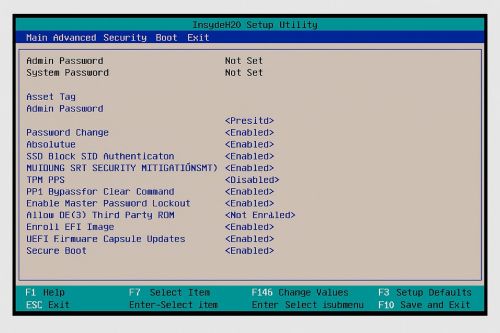
BIOS タイプ 2
次の手順に従います。
- F2を押してBIOSを起動します
- [Secure Boot]を選択します
- [Expert Key Management]を選択します
- [Enable Custom Mode]というタイトルのチェックボックスを確認します
- [ Reset All Key ]ボタンをクリックします
- [Apply]ボタンをクリックします
- [Exit]ボタンをクリックします(プロンプトが表示されたら[OK]をクリックして保存します)
- 次回の起動時に 、F2 を押してBIOSに入ります
- [Secure Boot]を選択します
- [Expert Key Management]を選択します
- Enable Custom Modeというタイトルのチェックボックスをオフにします
- [Apply]ボタンをクリックします
- [Exit]ボタンをクリックします(プロンプトが表示されたら[OK]をクリックして保存します)
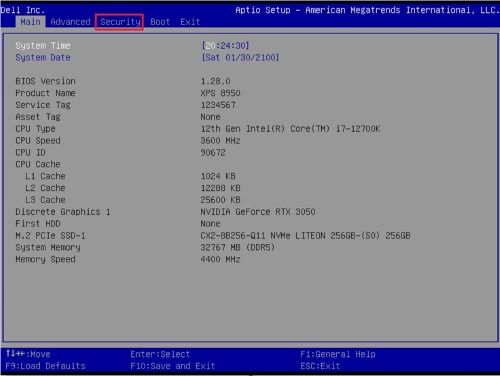
BIOSタイプ3
次の手順に従います。
- F2を押してBIOSを起動します
- 上部にある [セキュリティ]タブ を選択します
- [Secure Boot]を選択します
- [Expert Key Management]を選択します
- カスタマー モードの選択
- [Enabled]を選択します
- [Reset All Keys]を選択します
- [Yes]を選択します
- 上部にある [Exit ]を選択します
- [Exit Saving Changes]を選択します
- [Yes]を選択します
- 次回の起動時に 、F2 を押してBIOSに入ります
- 上部にある [セキュリティ]タブ を選択します
- [Secure Boot]を選択します
- [Expert Key Management]を選択します
- カスタマー モードの選択
- [Disabled]を選択します
- 上部にある [Exit ]を選択します
- [Exit Saving Changes]を選択します
- [Yes]を選択します
BIOSタイプ4
次の手順に従います。
- F2を押してBIOSを起動します
- 上部にある [セキュリティ]タブ を選択します
- [Secure Boot]を選択します
- [エキスパート キー管理]で、[カスタマー モード]を選択します
- [Enabled]を選択します
- [Reset All Keys]を選択します
- [Yes]を選択します
- 上部にある [Exit ]を選択します
- [Exit Saving Changes]を選択します
- [Yes]を選択します
- 次回の起動時に 、F2 を押してBIOSに入ります
- 上部にある [セキュリティ]タブ を選択します
- [Secure Boot]を選択します
- [エキスパート キー管理]で、[カスタマー モード]を選択します
- [Disabled]を選択します
- 上部にある [Exit ]を選択します
- [ Exit Saving Changes]を選択します
- [Yes]を選択します
BIOSタイプ5
次の手順に従います。
- F2を押してBIOSを起動します
- 左側の[ 詳細設定 ]を選択します
- [Secure Boot]を選択します
- [エキスパート キー管理]で、[カスタム モード]を選択します
- ドロップダウンで [Enabled ]を選択します
- [Reset All Keys]をクリックします
- [Yes]を選択します
- 左側にある [Exit ]を選択します
- [Exit Saving Changes]を選択します
- [Yes]を選択します
- 次回の起動時に 、F2 を押してBIOSに入ります
- 左側の[ 詳細設定 ]を選択します
- [Secure Boot]を選択します
- [エキスパート キー管理]で、[カスタム モード]を選択します
- ドロップダウンで [Disabled ]を選択します
- 左側にある [Exit ]を選択します
- [ Exit Saving Changes]を選択します
- [Yes]を選択します
Affected Products
Alienware, Dell Pro All-in-One, Dell Pro Max Micro, Dell Pro Max Slim, Dell Pro Max Tower, Dell Pro Micro, Dell Pro Slim, Dell Pro Tower, Dell Slim, Inspiron, OptiPlex, Vostro, XPS, G Series, G Series, Alienware, Dell Laptops, Dell Plus, Dell Pro
, Dell Pro Max, Dell Pro Plus, Dell Pro Premium, Inspiron, Latitude, Dell Pro Rugged, Vostro, XPS, Fixed Workstations, Mobile Workstations, Dell Pro Max Micro XE FCM2250
...
Article Properties
Article Number: 000368610
Article Type: How To
Last Modified: 12 Sept 2025
Version: 1
Find answers to your questions from other Dell users
Support Services
Check if your device is covered by Support Services.