How to Update Your Dell Monitor Firmware
Summary: Learn how to update your Dell monitor firmware using the Dell Display and Peripheral Manager app on Windows or Mac, or manually with a downloaded package. Step-by-step instructions included. ...
This article applies to
This article does not apply to
This article is not tied to any specific product.
Not all product versions are identified in this article.
Instructions
Quick answer
You can update your Dell or Alienware monitor's firmware two ways: automatically through the Dell Display and Peripheral Manager (DDPM) app, or manually by downloading a firmware file from Dell's Drivers & Downloads page. Most updates take 10 to 30 minutes, and your monitor will restart on its own once it's done.
Looking for drivers, software, or a user manual instead? This article walks you through installing a firmware update. If you're trying to locate the driver files, or the manual for your monitor, Dell and Alienware Monitor Drivers, Software, and Manuals: Complete Guide is the article you want.
Keeping your monitor's firmware current helps it run at its best. Updates can improve performance, fix known issues, and occasionally add new features. There are two ways to do it: through the DDPM app, or manually with a downloaded firmware file. This guide covers both, for Dell and Alienware monitors, on Windows and Mac.
Note: Not every monitor gets firmware updates. If your monitor doesn't show one listed on the Drivers & Downloads page, it probably doesn't need one right now.
In this article
- Before you begin
- Method 1: Update using Dell Display and Peripheral Manager (recommended)
- Update on Windows
- Update on Mac
- Method 2: Update manually (Windows and Mac)
- Set up your monitor and computer
- Download the firmware update file
- Install the update on Windows
- Install the update on Mac
- Silent installation (advanced, Windows only)
- How to check your current firmware version
- What to do if your firmware update doesn't complete
- Common reasons a firmware update may not complete
- If your monitor won't turn on after a failed update
- Frequently asked questions
- Need more help?
Before you begin
A few quick things to check first:
- Turn on DDC/CI. This lets your computer talk to your monitor. Press the menu button on your monitor, open the settings menu, and confirm DDC/CI is set to On.
- Connect the USB upstream cable. Plug the USB cable that came with your monitor (USB-B or USB-C) directly between the monitor and your computer.
- Update one monitor at a time. Don't run updates on multiple monitors at once.
- Turn off sleep mode. Disable sleep or power-saving settings on both your monitor and your computer so neither drifts off mid-update.
Method 1: Update using Dell Display and Peripheral Manager (recommended)
Dell Display and Peripheral Manager (DDPM) is a free app for managing your Dell monitors and peripherals, including firmware. It runs on Windows and Mac, and it can notify you automatically when a new firmware update is available.
Note: DDPM is built for Dell monitors and peripherals only. It won't detect or update non-Dell devices.
Update on Windows
System requirements: Windows 11 or Windows 10 (build 17763 or newer). Windows 11 ARM devices with Qualcomm Snapdragon X-Elite or X-Plus chips are supported starting with DDPM version 2.3.2.
- Connect your monitor to your computer with a USB upstream cable, plugged in directly, not through a docking station or USB hub.
- Open Dell Display and Peripheral Manager from the system tray or Start menu.
- Select Settings (gear icon).
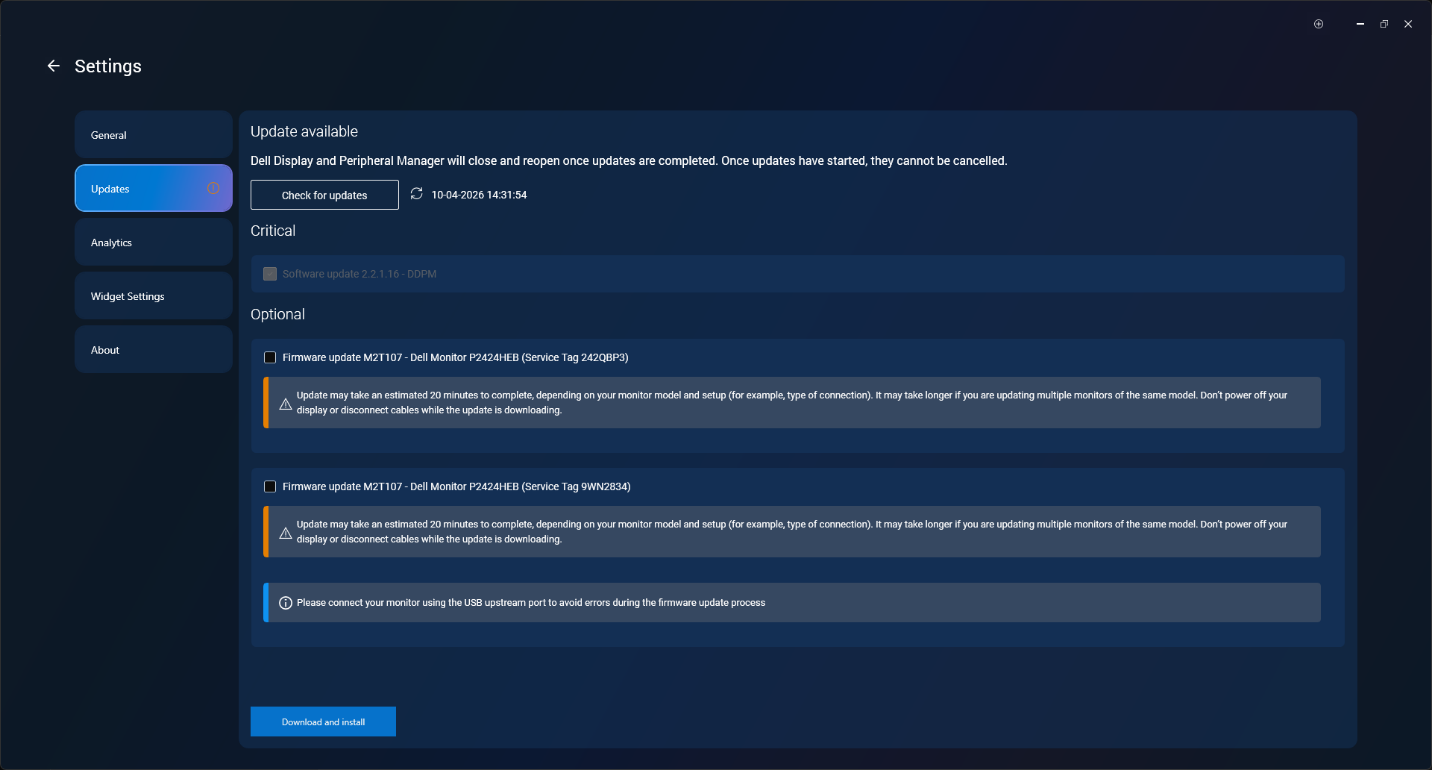
- Under Updates, select Check for updates.
- If an update is available for your monitor, select Download and install.
- Follow the on-screen instructions. Don't disconnect the USB cable or turn off your monitor while it's updating.
- The update may take 10 to 30 minutes, depending on your monitor model. The screen may go blank briefly near the end, that's normal.
- Your monitor restarts automatically when it's done.
Note: Not ready to update right now? DDPM lets you defer to a later time. You'll need an internet connection to download the update.
Update on Mac
Important: DDPM for Mac supports MacBook Air, Mac mini, and Mac Pro models with M1, M2, M3, M4, or M5 chips, running macOS 12 through 26. iMac isn't currently supported.
- Turn off sleep mode on your Mac before you start. Go to System Settings > Battery (or Energy Saver) and disable automatic sleep.
- Connect your monitor to your Mac with a USB-C or Thunderbolt cable, plugged in directly.
- Open Dell Display and Peripheral Manager from Launchpad.
- Select Settings (gear icon).
- Under Updates, select Check for updates.
- If an update is available for your monitor, select Download and install.
- Follow the on-screen instructions. Don't disconnect the USB cable or turn off your monitor while it's updating.
- The update may take 10 to 30 minutes, depending on your monitor model. The screen may go blank briefly near the end, that's normal.
- Your monitor restarts automatically when it's done.
Note: DDPM for Mac needs Accessibility and Automation permissions. If macOS prompts you, select OK to allow access. You can also turn these on later from Privacy & Security in System Settings.
Method 2: Update manually (Windows and Mac)
Prefer to skip the app, or don't see DDPM support for your monitor? You can download the firmware directly from Dell and install it yourself. The process is nearly identical on both operating systems, you'll download the same firmware, just packaged differently: a .exe file on Windows and a .pkg file on Mac.
Step 1: Set up your monitor and computer
Getting the connections right matters more than anything else here.
- Turn off sleep or power-saving mode on both your monitor and your computer.
- Disconnect all video cables from the monitor — HDMI, DisplayPort, or VGA.
- Disconnect all USB cables from the monitor except the one you'll use for the update.
- If you have more than one monitor connected, disconnect the others too.
- Connect a USB upstream cable directly from your monitor to your computer. Skip docking stations and USB hubs, use a direct connection only.
- Make sure your monitor is plugged into power and turned on.
Choosing your computer: A laptop is the easiest option since its built-in screen lets you follow along while the update runs. Using a desktop instead? You can connect a second monitor over video cable to view the instructions, just make sure that second monitor has no USB cables attached.
Warning: Don't disconnect the USB cable or turn off your monitor or computer at any point during the update.
Step 2: Download the firmware update file
- Go to Dell Drivers & Downloads.
- Identify your monitor: enter its Service Tag, Express Service Code, or Model Number and select Search, or select Browse all products to find it manually.
- Under Operating System, choose Windows or macOS, matching the computer you're installing from.
- Under Category, select Application.
- Find the most recent firmware entry in the list, it's typically labeled Firmware Update Utility on Windows or Firmware Update Package on Mac.
- Select Download and save the file somewhere easy to find, like your desktop or Downloads folder.
Step 3: Install the update on Windows
- Open File Explorer and go to the folder where you saved the file.
- Double-click the downloaded
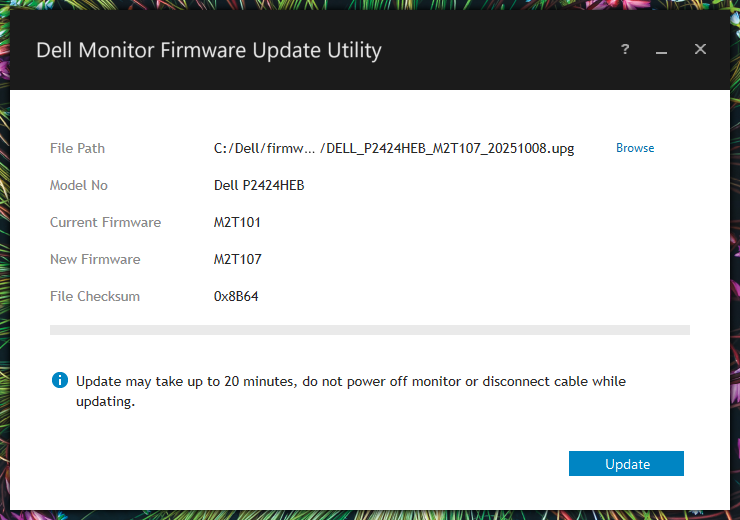
.exefile (for example,Dell_MonitorFirmwareUpdateUtility_XXXXXXX_XXXXXX.exe). - Select Update and follow the on-screen instructions. The utility detects your connected monitor and starts the update automatically.
- The update takes about 10 to 30 minutes. Your monitor restarts on its own once it's finished.
Step 4: Install the update on Mac
- Open Finder and go to the folder where you saved the file, typically Downloads.
- Double-click the downloaded
.pkgfile (for example,Dell_MonitorFirmwareUpdateUtility_XXXXXXX_XXXXXX.pkg). - If macOS blocks the file because it came from the internet, go to System Settings > Privacy & Security, and select Open Anyway next to the message about the blocked app.
- Follow the installer prompts, selecting Continue and then Install. You'll likely be asked for your Mac login password to authorize the install.
- The installer detects your connected monitor and starts the update automatically.
- The update takes about 10 to 30 minutes. Your monitor restarts on its own once it's finished.
Silent installation (advanced, Windows only)
Prefer to install from the Command Prompt instead of the on-screen installer? This option is currently available on Windows only. There are two silent install modes, depending on how much you want to see during the update:
- Unattended mode (
-s): Runs without any prompts or clicks needed, but still shows the installer's progress window on screen. - Fully quiet mode (
-q): Runs completely in the background with no visible window at all.
To silently install the firmware, follow these steps:
- Open File Explorer and go to the extracted firmware folder.
- Select the address bar at the top of File Explorer, type cmd, and press Enter. A Command Prompt window opens in that folder.
- Type one of the following commands, replacing the filename with your firmware file's exact name, and press Enter:
- For unattended mode with a visible progress window:
start /wait Dell_MonitorFirmwareUpdateUtility_XXXXXXX_XXXXXX.exe -s - For fully quiet mode with no visible window:
start /wait Dell_MonitorFirmwareUpdateUtility_XXXXXXX_XXXXXX.exe -q
- For unattended mode with a visible progress window:
- The firmware installs silently in the background. No further action is needed.
How to check your current firmware version
Before you update, it's worth checking which firmware version your monitor is running, that way you know whether an update is actually needed, and you can confirm afterward that it worked.
Option 1: Check using Dell Display and Peripheral Manager (DDPM)
- Open Dell Display and Peripheral Manager from the system tray (Windows) or Launchpad (Mac).
- Select Settings.
- Select your monitor from the list of connected devices.
- Select the information icon (i). The current firmware version, Service Tag, and Manufactured month and year.
Check the DDPM's user guide for additional details.
Option 2: Check using your monitor's on-screen menu
No computer needed, you can find this directly on the monitor.
- Press the menu button on your monitor to open the on-screen display (OSD) menu.
- Go to Menu > Others or Menu > Personalize, depending on your model.
- Scroll down to find the firmware version, shown as a code, for example: M3B106.
Tip: Note this number before and after updating, it's the quickest way to confirm the update actually completed.
What to do if your firmware update doesn't complete
Most updates go through without a hitch, but if something interrupts the process, here's how to recover.
Step 1: Don't force a power-off
Warning: Do not turn off the monitor while the update is in progress. Forcing a shutdown mid-update could leave the monitor in an unrecoverable state.
If the update looks stuck, no progress for a while, resist the urge to unplug the monitor or turn it off. It may still be working in the background.
Since updates can normally take 10 to 30 minutes, give it that full window before taking any further action.
Step 2: Power cycle your monitor and computer
If the update has clearly stopped, or you see an error message:
- Turn off the monitor using its power button.
- Unplug the monitor's power cable from the outlet.
- Wait 10 seconds.
- Plug the power cable back in and turn the monitor on.
- Restart your computer to clear any software state that might be blocking the update.
- Try the update again.
Step 3: Reset all connections
If power cycling doesn't help:
- Turn off the monitor and disconnect all cables; power, video, and USB.
- Wait 30 seconds.
- Reconnect only the power cable and the USB upstream cable, connected directly to your computer.
- Leave video cables, other USB devices, and docking stations disconnected for now.
- Retry the update.
Additional steps
Still stuck? Try these:
- Run the updater as administrator (Windows). Right-click the Dell Monitor Firmware Update Utility file and select Run as administrator. This gives it the permissions it needs to communicate with your monitor.
- Check for Windows updates. Some firmware issues trace back to a specific Windows version. Go to Settings > Windows Update and select Check for updates before retrying.
- Try a different computer. If your current computer still can't detect the monitor, try a different computer, ideally a desktop with a direct USB connection.
Common reasons a firmware update may not complete
If updates keep failing, it's usually one of these:
- No direct USB connection. The update needs a USB upstream cable connected directly between the monitor and computer. A docking station or hub in between may block communication, plug directly into your computer instead.
- Other USB devices connected. Webcams, USB drives, or headsets plugged into the monitor or computer can interfere. Disconnect everything except your mouse, keyboard, and the monitor you're updating.
- DDC/CI is turned off. The updater needs this enabled to detect your monitor. Press the menu button on your monitor, go to Menu > Others, and confirm DDC/CI is On.
- Webcam disabled in the monitor menu (certain models). On monitors with a built-in webcam, like the Dell UltraSharp 32 4K Video Conferencing Monitor (U3224KB) or the Dell 24 Video Conferencing Monitor (S2422HZ), the update may not complete if the webcam is turned off in the OSD menu. Turn it on before retrying.
- Wrong firmware file. If you see the message "The selected firmware is not for this monitor," the file you downloaded is for a different model. Go back to Dell Drivers & Downloads, confirm your monitor by Service Tag, Express Service Code, or Model Number, and download the correct file.
If your monitor won't turn on after a failed update
If an update fails, your monitor shows a clear message, like "firmware update was not completed", rather than going dark or becoming unresponsive.
If your monitor does appear unresponsive, try a full reset before assuming anything's wrong:
- Disconnect all cables from the monitor, including power.
- Wait 30 seconds.
- Reconnect the power cable only, and turn the monitor on.
- Reconnect the USB cable and retry the update from the beginning.
Frequently asked questions
Q: How long does a Dell monitor firmware update take?
A: Updates may take 10 to 30 minutes, depending on your monitor model. The screen may go blank briefly near the end, that's expected.
Q: Can I update Dell monitor firmware on a Mac?
A: Yes. You can use the DDPM app or install the .pkg firmware file manually. Both methods work the same way they do on Windows.
Q: What happens if a firmware update fails?
A: You'll typically see an on-screen message such as "firmware update was not completed." This doesn't damage the monitor, power cycling it, and trying again usually resolves it.
Q: Do I need an internet connection to update my monitor's firmware?
A: You need internet to check for and download the update, whether through DDPM or manually.
Q: Why won't my computer detect my monitor during the update?
A: This is almost always a cable issue. Make sure the USB upstream cable is connected directly between your monitor and computer, not through a dock or hub.
Need more help?
- Visit the Dell Community Forums to hear from other Dell users.
- Check out Monitor Support for more troubleshooting guides.
Note: This guide covers Dell and Alienware monitors only. If you're using a third-party monitor, check that manufacturer's website for firmware update instructions.
Affected Products
Alienware and Dell Gaming Monitors, C Series, D Series, E Series, P Series, S Series, SE Series, UltraSharp Premier (UP) Series, UltraSharp (U) Series, Dell Monitors, Dell Plus Monitors, Dell Pro Monitors, Dell Pro Plus MonitorsArticle Properties
Article Number: 000131809
Article Type: How To
Last Modified: 10 Sep 2026
Version: 15
Find answers to your questions from other Dell users
Support Services
Check if your device is covered by Support Services.