Windows Server: Cluster disk fails and marked as read-only
Summary: This article provides information about how to resolve a failed cluster disk in Failover Cluster Manager when the Cluster Shared Volume disk is marked as Read-Only.
Symptoms
A cluster disk is failed in Failover Cluster Manager and the corresponding Cluster Shared Volume (CSV) is marked as read-only. Attempts to bring the cluster disk resource online fail. The cluster disk resource is listed under Available Storage. Follow the steps in the solution to resolve the issue.
Cause
Resolution
1. Remove the cluster disk resource from the cluster in using Windows PowerShell.
a. Press Windows Logo, type Windows PowerShell, right-click Windows PowerShell and click Run as administrator to open Windows PowerShell.
b. Run the command in PowerShell:
Remove-ClusterResource "Cluster Disk 1" -force
Where Cluster Disk 1 is the name of the resource to remove from the cluster.
2. Use diskpart.exe to remove the read-only attribute on the disk.
a. Press the Windows Logo+R, type:
runas /user:administrator@domain.local
Where domain.local is replaced by the name of the Active Directory domain or local server name and press Enter.
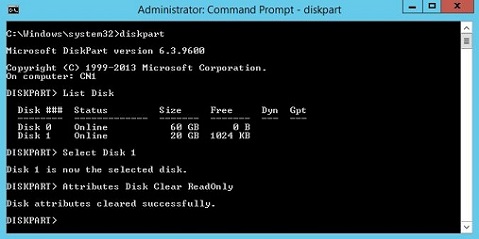
b. Type diskpart.exe and press Enter to enter the diskpart utility command interface.
diskpart.exe
c. Type:
list disks
and press Enter to list the disks attached to the server.
d. Type
Select Disk 1
Where Disk 1 is the disk with the read-only attribute set.
e. Type
Attributes Disk Clear ReadOnly
to clear the read-only attribute.
3. Add the disk to the cluster in using Windows PowerShell.
a. Using the same Windows PowerShell prompt opened in step 1 type
Get-Disk -Number 1 | Add-ClusterDisk
where -Number 1 is the disk number assigned in to the disk and press Enter.
4. Enable CSV on the cluster disk resource.
a. Open Server Manager by pressing Windows Logo+R, type
servermanager.exe
and press Enter. The same task can be accomplished by pressing Windows Logo and selecting Server Manager on the left side of the screen.
b. Click the Tools menu in the upper right corner and select Failover Cluster Manager to open Failover Cluster Manager.
c. Click Cluster Shared Volumes under the name of the cluster.
d. Click Add Storage under Actions on the right.
e. Check the box next to Cluster Disk 1 where Cluster Disk 1 is the name of the cluster disk resource added in step 3a and click OK.
Additional Information
Additional Information:
This information applies to Windows Server 2008, Windows Server 2008 R2, Windows Server 2012 and Windows Server 2012 R2.
Additional information about RemoveClusterResource can be found on TechNet.
Additional information about Get-Disk can be found on TechNet.
Additional information about diskpart.exe can be found on TechNet.