How to Install Ubuntu Custom Partitions
Résumé: This article provides information about how to use the Ubuntu Linux operating system installation. How to create and use multiple custom partitions on the hard drives in your Dell computer. ...
Cet article concerne
Cet article ne concerne pas
Cet article n’est associé à aucun produit spécifique.
Toutes les versions du produit ne sont pas identifiées dans cet article.
Instructions
Table of Contents:
- Use the Ubuntu install disc to create and install custom partitions
- What to know and check before starting an install
- Ubuntu Disk Partitioning
- Finalizing the Install
Use the Ubuntu Install disc to create and install Custom Partitions
How to tailor the Ubuntu install to your needs using custom partitions on your drive.
How to check that your model is certified as tested by Canonical for Ubuntu:
- Go to the Ubuntu Certified Hardware
site and check if your model is approved.
Note: If your device requires technical support and does not ship with Ubuntu, the operating system must be returned to what shipped. Does the issue continue at that point? If it does not, then there would be limited support possible at that point.
A copy of the latest DVD or USB installation media from canonical is required. (These include the latest updates and fixes for this operating system.)
Download the appropriate Ubuntu ISO from the Ubuntu Download site.
Note: The images below may differ slightly from what displays on your own computer; Depending on the version of Ubuntu being installed.
What to know and check before starting an install
There are three main things to check before starting off an Ubuntu Install:
- Check the type of hardware that is being targeted
- Check the type of BIOS settings that would affect the install
- Check the version of Ubuntu to be installed
What type of Hard Ware is in use and does it change the install method?
The type or format of your storage media can affect how to go about installing Ubuntu on your computer. That can be anything from:
- Install on one of the new M2 cards
- Install on a standard serial advanced technology attachment (SATA) hard drive
- Install on the same SATA hard drives in an Intel Matrix redundant array of independent disks (RAID) configuration
Check that the hardware in your device allows for the kind of install that is running. Reading through the article that is linked below gives ideas of how to change your installation method to accommodate your hardware:
Note: USB 2.0 and older removable media devices are not supported on computers using the new Intel SkyLake Processors. The Chipsets for the CPUs no longer support the USB 2.0 Hub.
What type of BIOS is set up and does it change your install method?
The difference between Legacy and Unified Extensible Firmware Interface (UEFI) BIOS setups can be the difference between an install succeeding or failing. Check out the linked articles below for more information about the subject:
- Installing Ubuntu on a Dell computer configured for the UEFI BIOS
- Updating the Dell BIOS in Ubuntu Environments
Which version of Ubuntu is required?
Ubuntu as with any other operating system is constantly looking to improve and better its usage and performance. What is different with Ubuntu is the option of two updates at any time:
- The first is the most recent Long-Term Support (LTS) release:
-
This update is available every two years, and Ubuntu fully supports it with updates for five years. It is considered a tested and stable build.
- The second is the most recent Normal release:
-
This update is available every 6 months, and Ubuntu only supports updates for nine months. These normal releases are considered to be cutting-edge but can have issues because of this. Testers and developers use these types of build.
If looking to upgrade to a new version of Ubuntu instead, check out the following article that is linked below:
Ubuntu Disk Partitioning
-
Follow the standard installation guide until the Installation Type screen appears. The option required is the last option - Something Else. Select that and click Continue, the Install goes to the Advanced Partitioning Tool. The Advanced Partitioning Tool is the installer’s tool for going through the custom partitioning choices.
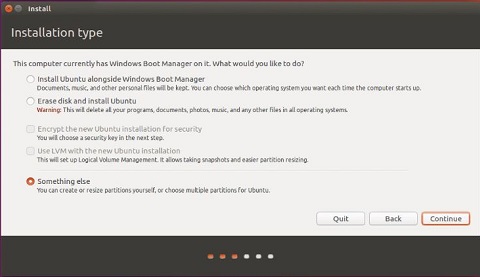
Note: The installer has support for LVM and full disk encryption only in the automated partitioning modes. They are not supported in the Advanced Partitioning Tool.
-
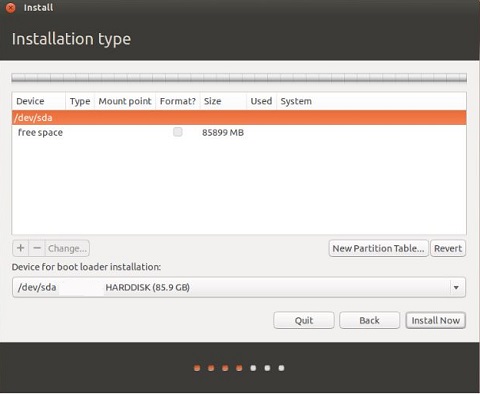
This window displays all the partitions on the Hard Drive and any Free Unallocated Space. In this case, a blank hard disk drive is in use. Select the New Partition Table button.

Note: There are only a maximum of Four logical partitions possible if the Hard Drive is using a MBR-based scheme.
-
The empty partition creation warning displays on-screen. Click Continue to begin.

-
Click the + button to create a new partition. There are no special options in this tool. The installer prompts to create any new partition as a logical partition, if there are any pre-existing primary partitions. Either go along with what the installer wants to use or modify it.
Note: Dell Technologies recommends creating the first partition for the Ubuntu install as a primary partition.
Information about partitions, directories, and file systems in the guide is linked below for a more in-depth explanation:
Note: This step is repeated for each of the other partitions that are required.
-
Create a Root Partition. This partition is mounted at /. Ubuntu needs a Minimum of 20 GB to run correctly. Leave the file system as the default Ext4. If for example, there is one primary partition left and all the remaining partitions are created as logical partitions by the installer. There are no other choices.
-
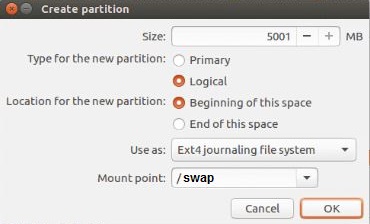
A paging file is required, so create a Swap Partition. This partition is for /swap. That is disk space that the computer may use as memory. (Like a paging file in Windows operating systems.) Commonly it is twice the size of the amount of random access memory (RAM) installed in the Device. Ensure to select swap area from the Use as dropdown menu.
-
Next create the Home Partition. This partition is mounted at /home. The disk space is what is left on the Hard Drive,
When all the partitions have been created, they should all be listed in the main window of the Advanced Partitioning Tool. Specify the Device for boot loader installation to finalize this.
-
It defaults to /dev/sda or the hard drives' master boot record (MBR) to have Ubuntu as the primary boot device and for it to control the boot.
-
Another operating system on the hard drive is already running, and it must be the primary boot: As in the example below, install GRUB in the boot partition of that operating system which is sda5 here. Select /dev/sda5 from the dropdown menu instead.
-
Note: GRUB - Grand Unified Bootloader is the boot loader in Ubuntu and most other Linux distributions.
-
Click install now if the partition is showing for the boot loader installation.
-
Once the installation of Ubuntu has been completed, reboot the computer.
-
If Ubuntu was chosen, then this finishes the install. Further help with configuring your Ubuntu is available from the guide that is linked below.
-
If another operating system is chosen, then rebooting drops into that operating system's boot loader. Add an entry for Ubuntu into that operating system's boot menu.
-
Note: If there are any issues after completing the installation, the easiest and quickest resolution is to run the install again.
Informations supplémentaires
Note:
Ubuntu provides software support through the following methods:
Dell provides Technical Support:
Ubuntu provides software support through the following methods:
Dell provides Technical Support:
Produits concernés
Dell Pro, Dell Pro Max, Dell Pro Plus, Dell Pro Premium, Inspiron, Latitude, Dell Pro Rugged, Vostro, XPS, Fixed Workstations, Dell Pro Max 14 Premium MA14250, Dell Pro Max 16 Premium MA16250, Dell Pro Max 16 Plus MB16250
, Dell Pro Max 18 Plus MB18250
...
Propriétés de l’article
Numéro d’article: 000131391
Type d’article: How To
Dernière modification: 22 juil. 2025
Version: 12
Trouvez des réponses à vos questions auprès d’autres utilisateurs Dell
Services de support
Vérifiez si votre appareil est couvert par les services de support.