ECS: OBS: xDoctor: Una o più interfacce di rete sono inattive o mancanti
Riepilogo: xDoctor segnala un errore di avvertenza indicante che una delle interfacce ECS è inattiva agli switch.
Questo articolo si applica a
Questo articolo non si applica a
Questo articolo non è legato a un prodotto specifico.
Non tutte le versioni del prodotto sono identificate in questo articolo.
Sintomi
xDoctor riporta la seguente avvertenza indicante che una delle interfacce ECS è inattiva:
Displaying xDoctor Report (2017-09-01_064438) Filter:['CRITICAL', 'ERROR', 'WARNING'] ...

Timestamp    = 2017-09-01_064438
    Category = platform
    Source   = ip show
    Severity = WARNING
    Node     = 169.254.1.1
    Message  = One or more network interfaces are down or missing
    Extra    = {'1xx.2xx.1.4': ['slave-0']}
- Verificare lo stato dei collegamenti delle interfacce nel cluster. Nell'esempio riportato di seguito, il nodo 4 indica NO-CARRIER, ovvero non è presente alcuna connessione all'interfaccia secondary-0.
Comando:
# viprexec -i 'ip link show | egrep "slave-|public"'
Esempio:
admin@node1:~> viprexec -i 'ip link show | egrep "slave-|public"'

Output from host : 1xx.1xx.219.1
bash: public: command not found
3: slave-0: <BROADCAST,MULTICAST,SLAVE,UP,LOWER_UP> mtu 1500 qdisc mq master public state UP mode DEFAULT group default qlen 1000
5: slave-1: <BROADCAST,MULTICAST,SLAVE,UP,LOWER_UP> mtu 1500 qdisc mq master public state UP mode DEFAULT group default qlen 1000
10: public: <BROADCAST,MULTICAST,MASTER,UP,LOWER_UP> mtu 1500 qdisc noqueue state UP mode DEFAULT group default

Output from host : 1xx.1xx.219.2
bash: public: command not found
3: slave-0: <BROADCAST,MULTICAST,SLAVE,UP,LOWER_UP> mtu 1500 qdisc mq master public state UP mode DEFAULT group default qlen 1000
5: slave-1: <BROADCAST,MULTICAST,SLAVE,UP,LOWER_UP> mtu 1500 qdisc mq master public state UP mode DEFAULT group default qlen 1000
10: public: <BROADCAST,MULTICAST,MASTER,UP,LOWER_UP> mtu 1500 qdisc noqueue state UP mode DEFAULT group default

Output from host : 1xx.1xx8.219.3
bash: public: command not found
4: slave-0: <BROADCAST,MULTICAST,SLAVE,UP,LOWER_UP> mtu 1500 qdisc mq master public state UP mode DEFAULT group default qlen 1000
5: slave-1: <BROADCAST,MULTICAST,SLAVE,UP,LOWER_UP> mtu 1500 qdisc mq master public state UP mode DEFAULT group default qlen 1000
10: public: <BROADCAST,MULTICAST,MASTER,UP,LOWER_UP> mtu 1500 qdisc noqueue state UP mode DEFAULT group default

Output from host : 1xx.1xx.219.4
bash: public: command not found
2: slave-0: <NO-CARRIER,BROADCAST,MULTICAST,SLAVE,UP> mtu 1500 qdisc mq master public state DOWN mode DEFAULT group default qlen 1000
5: slave-1: <BROADCAST,MULTICAST,SLAVE,UP,LOWER_UP> mtu 1500 qdisc mq master public state UP mode DEFAULT group default qlen 1000
10: public: <BROADCAST,MULTICAST,MASTER,UP,LOWER_UP> mtu 1500 qdisc noqueue state UP mode DEFAULT group default
- Verificare che sia stato rilevato un collegamento dalle singole interfacce:
Comando:
# viprexec -i "echo slave-0;sudo ethtool slave-0 | grep 'Link detected:';echo slave-1;sudo ethtool slave-1 | grep 'Link detected:'"
Esempio:
admin@node1:~> viprexec -i "echo slave-0;sudo ethtool slave-0 | grep 'Link detected:';echo slave-1;sudo ethtool slave-1 | grep 'Link detected:'" Output from host : 1xx.1xx.219.1 slave-0 Link detected: yes slave-1 Link detected: yes Output from host : 1xx.1xx.219.2 slave-0 Link detected: yes slave-1 Link detected: yes Output from host : 1xx.1xx.219.3 slave-0 Link detected: yes slave-1 Link detected: yes Output from host : 1xx.1xx.219.4 slave-0 Link detected: no slave-1 Link detected: yes
- Verificare che gli switch siano Arista su ambienti Gen 1 o Gen 2 e Dell (o altro modello) su ambienti Gen 3.
NOTA: se gli switch non sono di tipo Arista o Dell, sono switch gestiti dall'utente. È necessario informare l'utente che una connessione inattiva deve essere corretta.
Comando:
# viprexec -i "sudo lldpcli show neigh | grep SysDescr"
Esempio:
Gen 1 o Gen 2
Gen 1 o Gen 2
admin@ecssh121:~> viprexec -i "sudo lldpcli show neigh | grep SysDescr"

Output from host : 1xx.1xx.219.1
    SysDescr:     Arista Networks EOS version 4.11.7.2 running on an Arista Networks DCS-7150S-24
    SysDescr:     Arista Networks EOS version 4.11.7.2 running on an Arista Networks DCS-7150S-24
    SysDescr:     Arista Networks EOS version 4.15.6M running on an Arista Networks DCS-7048T-A

Output from host : 1xx.1xx.219.2
    SysDescr:     Arista Networks EOS version 4.11.7.2 running on an Arista Networks DCS-7150S-24
    SysDescr:     Arista Networks EOS version 4.11.7.2 running on an Arista Networks DCS-7150S-24
    SysDescr:     Arista Networks EOS version 4.15.6M running on an Arista Networks DCS-7048T-A

Output from host : 1xx.1xx.219.3
    SysDescr:     Arista Networks EOS version 4.11.7.2 running on an Arista Networks DCS-7150S-24
    SysDescr:     Arista Networks EOS version 4.11.7.2 running on an Arista Networks DCS-7150S-24
    SysDescr:     Arista Networks EOS version 4.15.6M running on an Arista Networks DCS-7048T-A

Output from host : 1xx.1xx.219.4
    SysDescr:     Arista Networks EOS version 4.11.7.2 running on an Arista Networks DCS-7150S-24
    SysDescr:     Arista Networks EOS version 4.11.7.2 running on an Arista Networks DCS-7150S-24
    SysDescr:     Arista Networks EOS version 4.15.6M running on an Arista Networks DCS-7048T-A
Esempio:
Gen 3
Gen 3
admin@ecsnode1:~> viprexec -i "sudo lldpcli show neigh | grep SysDescr"

Output from host : 1xx.1xx.219.1
    SysDescr:     OS10
    SysDescr:     OS10
    SysDescr:     OS10
    SysDescr:     OS10

Output from host : 1xx.1xx.219.2
    SysDescr:     OS10
    SysDescr:     OS10
    SysDescr:     OS10
    SysDescr:     OS10

Output from host : 1xx.1xx.219.3
    SysDescr:     OS10
    SysDescr:     OS10
    SysDescr:     OS10
    SysDescr:     OS10

Output from host : 1xx.1xx.219.4
    SysDescr:     OS10
    SysDescr:     OS10
    SysDescr:     OS10
    SysDescr:     OS10

Output from host : 1xx.1xx.219.5
    SysDescr:     OS10
    SysDescr:     OS10
    SysDescr:     OS10
    SysDescr:     OS10

Output from host : 1xx.1xx.219.6
    SysDescr:     OS10
    SysDescr:     OS10
    SysDescr:     OS10
    SysDescr:     OS10

Output from host : 1xx.1xx.219.7
    SysDescr:     OS10
    SysDescr:     OS10
    SysDescr:     OS10
    SysDescr:     OS10

Output from host : 11xx.1xx.219.8
    SysDescr:     OS10
    SysDescr:     OS10
    SysDescr:     OS10
    SysDescr:     OS10
- Controllare nella configurazione dell'interfaccia pubblica l'interfaccia collegata secondary-0 e secondary-1 per il pubblico sul nodo che non mostra alcun collegamento rilevato dal comando nel passaggio 2:
Comando:
# sudo cat /etc/sysconfig/network/ifcfg-public
Esempio:
admin@node4:~> sudo cat /etc/sysconfig/network/ifcfg-public
BONDING_MASTER=yes
BONDING_MODULE_OPTS="miimon=100 mode=4 xmit_hash_policy=layer3+4"
BONDING_SLAVE0=slave-0
BONDING_SLAVE1=slave-1
BOOTPROTO=static
IPADDR=xxx.xxx.xxx.xxx/xx
MTU=1500
STARTMODE=auto
- Controllare che sui nodi sia stato impostato il parametro Link Aggregation Control Protocol (LACP) corretto (IEEE 802.3ad Dynamic link Aggregation è l'impostazione predefinita prevista).
Comando:
# viprexec -i "grep Mode /proc/net/bonding/public"
Esempio:
admin@node1:~> viprexec -i "grep Mode /proc/net/bonding/public"

Output from host : 1xx.1xx.219.1
Bonding Mode: IEEE 802.3ad Dynamic link aggregation

Output from host : 1xx.1xx.219.2
Bonding Mode: IEEE 802.3ad Dynamic link aggregation

Output from host : 1xx.1xx.219.3
Bonding Mode: IEEE 802.3ad Dynamic link aggregation

Output from host : 1xx.1xx.219.4
Bonding Mode: IEEE 802.3ad Dynamic link aggregation
- Verificare che le connessioni siano coerenti con le porte e che le interfacce siano collegate eseguendo le operazioni seguenti:
ECS Gen 1 o Gen 2:
I mapping ECS Gen 1 o Gen 2 per i nodi sono i seguenti per le porte degli switch corrispondenti:
Ethernet9 = nodo 1
Ethernet10 = nodo 2
Ethernet11 = nodo 3
Ethernet12 = nodo 4
Ethernet13 = nodo 5
Ethernet14 = nodo 6
Ethernet15 = nodo 7
Ethernet16 = nodo 8
Ethernet10 = nodo 2
Ethernet11 = nodo 3
Ethernet12 = nodo 4
Ethernet13 = nodo 5
Ethernet14 = nodo 6
Ethernet15 = nodo 7
Ethernet16 = nodo 8
Comando:
# viprexec -i "sudo lldpcli show neigh | egrep 'SysName|PortID'"
Esempio (esempio da ECS Gen 1 o Gen 2):
admin@ecssh121:~> viprexec -i "sudo lldpcli show neigh | egrep 'SysName|PortID'"
Output from host : 1xx.1xx.219.1
    SysName:      rabbit
    PortID:       ifname Ethernet9
    SysName:      hare
    PortID:       ifname Ethernet9
    SysName:      turtle
    PortID:       ifname Ethernet1

Output from host : 1xx.1xx.219.2
    SysName:      rabbit
    PortID:       ifname Ethernet10
    SysName:      hare
    PortID:       ifname Ethernet10
    SysName:      turtle
    PortID:       ifname Ethernet2

Output from host : 1xx.1xx.219.3
    SysName:      hare
    PortID:       ifname Ethernet11
    SysName:      rabbit
    PortID:       ifname Ethernet11
    SysName:      turtle
    PortID:       ifname Ethernet3

Output from host : 1xx.1xx.219.4
    SysName:      hare
    PortID:       ifname Ethernet12
    SysName:      turtle
    PortID:       ifname Ethernet4
NOTA: nell'esempio precedente, la connessione a Ethernet12 Rabbit è mancante per il nodo 4. Con tutte le informazioni raccolte finora, sappiamo che la porta 12 si trova sullo switch Rabbit ed è collegata all'interfaccia secondary-0 del nodo 4.
ECS Gen 3:
I mapping ECS Gen 3 per i nodi sono i seguenti per le porte degli switch corrispondenti:
I mapping ECS Gen 3 per i nodi sono i seguenti per le porte degli switch corrispondenti:
ethernet1/1/1 = nodo 1
ethernet1/1/2 = nodo 2
ethernet1/1/3 = nodo 3
ethernet1/1/4 = nodo 4
ethernet1/1/5 = nodo 5
ethernet1/1/6 = nodo 6
ethernet1/1/7 = nodo 7
ethernet1/1/8 = nodo 8
ethernet1/1/2 = nodo 2
ethernet1/1/3 = nodo 3
ethernet1/1/4 = nodo 4
ethernet1/1/5 = nodo 5
ethernet1/1/6 = nodo 6
ethernet1/1/7 = nodo 7
ethernet1/1/8 = nodo 8
- Verificare che le connessioni siano attive per ECS, che si connette ai quattro switch ECS Gen 3, front-end rabbit e hare, back-end, fox e hound.
Comando:
# viprexec -i "sudo lldpcli show neigh | egrep 'SysName|PortID'"
Esempio:
admin@ecsnode1:~> viprexec -i "sudo lldpcli show neigh | egrep 'SysName|PortID'"

Output from host : 1xx.1xx.219.1
    SysName:      rabbit
    PortID:       ifname ethernet1/1/1
    SysName:      hare
    PortID:       ifname ethernet1/1/1
    SysName:      fox
    PortID:       ifname ethernet1/1/1
    SysName:      hound
    PortID:       ifname ethernet1/1/1

Output from host : 192.168.219.2
    SysName:      rabbit
    PortID:       ifname ethernet1/1/2
    SysName:      hare
    PortID:       ifname ethernet1/1/2
    SysName:      fox
    PortID:       ifname ethernet1/1/2
    SysName:      hound
    PortID:       ifname ethernet1/1/2

Output from host : 1xx.1xx.219.3
    SysName:      rabbit
    PortID:       ifname ethernet1/1/3
    SysName:      hare
    PortID:       ifname ethernet1/1/3
    SysName:      fox
    PortID:       ifname ethernet1/1/3
    SysName:      hound
    PortID:       ifname ethernet1/1/3

Output from host : 1xx.1xx.219.4
    SysName:      rabbit
    PortID:       ifname ethernet1/1/4
    SysName:      hare
    PortID:       ifname ethernet1/1/4
    SysName:      fox
    PortID:       ifname ethernet1/1/4
    SysName:      hound
    PortID:       ifname ethernet1/1/4

Output from host : 1xx.1xx.219.5
    SysName:      rabbit
    PortID:       ifname ethernet1/1/5
    SysName:      hare
    PortID:       ifname ethernet1/1/5
    SysName:      fox
    PortID:       ifname ethernet1/1/5
    SysName:      hound
    PortID:       ifname ethernet1/1/5

Output from host : 1xx.1xx.219.6
    SysName:      rabbit
    PortID:       ifname ethernet1/1/6
    SysName:      hare
    PortID:       ifname ethernet1/1/6
    SysName:      fox
    PortID:       ifname ethernet1/1/6
    SysName:      hound
    PortID:       ifname ethernet1/1/6

Output from host : 1xx.1xx.219.7
    SysName:      rabbit
    PortID:       ifname ethernet1/1/7
    SysName:      hare
    PortID:       ifname ethernet1/1/7
    SysName:      fox
    PortID:       ifname ethernet1/1/7
    SysName:      hound
    PortID:       ifname ethernet1/1/7

Output from host : 1xx.1xx.219.8
    SysName:      rabbit
    PortID:       ifname ethernet1/1/8
    SysName:      hare
    PortID:       ifname ethernet1/1/8
    SysName:      fox
    PortID:       ifname ethernet1/1/8
    SysName:      hound
    PortID:       ifname ethernet1/1/8
- Connettersi allo switch Rabbit con credenziali di amministratore e controllare lo stato dell'interfaccia.
Comando:
ECS Gen 1 o Gen 2
ECS Gen 1 o Gen 2
# ssh <switch name>
# show interfaces show interfaces Ethernet<Interface Number>
Esempio:
ECS Gen 1 o Gen 2
admin@ecs1:~> ssh rabbit
Password:
Last login: Tue Sep  5 11:13:30 2017 from 1xx.1xx.219.1
rabbit>show interfaces Ethernet12
Ethernet12 is down, line protocol is notpresent (notconnect)
  Hardware is Ethernet, address is 444c.a8de.8f83 (bia 444c.a8de.8f83)
  Description: MLAG group 4
  Member of Port-Channel4
  Ethernet MTU 9214 bytes , BW 10000000 kbit
  Full-duplex, 10Gb/s, auto negotiation: off, uni-link: n/a
  Loopback Mode : None
  0 link status changes since last clear
  Last clearing of "show interface" counters never
  5 minutes input rate 0 bps (0.0% with framing overhead), 0 packets/sec
  5 minutes output rate 0 bps (0.0% with framing overhead), 0 packets/sec
     0 packets input, 0 bytes
     Received 0 broadcasts, 0 multicast
     0 runts, 0 giants
     0 input errors, 0 CRC, 0 alignment, 0 symbol, 0 input discards
     0 PAUSE input
     0 packets output, 0 bytes
     Sent 0 broadcasts, 0 multicast
     0 output errors, 0 collisions
     0 late collision, 0 deferred, 0 output discards
     0 PAUSE output
Comando:
ECS Gen 3
# ssh <switch name>
# show interfaces ethernet 1/1/<Interface Number>
Esempio:
ECS Gen 3
rabbit# show interface ethernet 1/1/4
Ethernet 1/1/9 is up, line protocol is down
Description: VLT Group 9
Port is part of Port-channel 9
Hardware is Dell EMC Eth, address is d8:9e:f3:c6:31:09
    Current address is d8:9e:f3:c6:31:09
Pluggable media not present

Interface index is 17305276
Internet address is not set
Mode of IPv4 Address Assignment: not set
Interface IPv6 oper status: Enabled
MTU 9216 bytes, IP MTU 9184 bytes
LineSpeed 0, Auto-Negotiation off
FEC is auto
Flowcontrol rx off tx off
ARP type: ARPA, ARP Timeout: 60
Last clearing of "show interface" counters: 6 days 17:39:09
Queuing strategy: fifo
Input statistics:
     0 packets, 0 octets
     0 64-byte pkts, 0 over 64-byte pkts, 0 over 127-byte pkts
     0 over 255-byte pkts, 0 over 511-byte pkts, 0 over 1023-byte pkts
     0 Multicasts, 0 Broadcasts, 0 Unicasts
     0 runts, 0 giants, 0 throttles
     0 CRC,  overrun, 0 discarded
Output statistics:
     0 packets, 0 octets
     0 64-byte pkts, 0 over 64-byte pkts, 0 over 127-byte pkts
     0 over 255-byte pkts, 0 over 511-byte pkts, 0 over 1023-byte pkts
     0 Multicasts, 0 Broadcasts, 0 Unicasts
     0 throttles, 0 discarded, 0 Collisions, 0 wreddrops
Rate Info(interval 299 seconds):
     Input 0 Mbits/sec, 0 packets/sec, 0% of line rate
     Output 0 Mbits/sec, 0 packets/sec, 0% of line rate
Time since last interface status change: 6 days 17:39:10
Verificare la presenza di possibili problemi con le schede di interfaccia di rete (NIC):
Un altro componente per verificare se i nodi memorizzano nel buffer dei messaggi (dmesg) i problemi recenti della scheda di interfaccia di rete sul nodo interessato. Nell'esempio seguente, la scheda di rete esegue un loop tra lo stato attivo e inattivo.
Se è presente un avviso della scheda di rete in dmesg, potrebbe essere necessaria una sostituzione.
- Se è di tipo ECS Gen 1 o Gen 2, fornire l'output al tecnico di supporto hardware ECS per l'analisi.
- Se ECS Gen 3 : fornire l'output al team hardware Dell esperto nell'hardware della serie EX.
Comando:
# sudo dmesg -T
Esempio:
admin@node1:~> sudo dmesg -T
[Tue Jul  6 09:40:56 2021] public: link status definitely up for interface slave-1, 25000 Mbps full duplex
[Tue Jul  6 09:40:56 2021] bnxt_en 0000:04:00.1 slave-1: NIC Link is Down
[Tue Jul  6 09:40:56 2021] public: link status definitely down for interface slave-1, disabling it
[Tue Jul  6 09:40:57 2021] public: link status definitely down for interface slave-1, disabling it
[Tue Jul  6 09:41:09 2021] bnxt_en 0000:04:00.1 slave-1: NIC Link is Up, 25000 Mbps full duplex, Flow control: ON - receive & transmit
[Tue Jul  6 09:41:09 2021] bnxt_en 0000:04:00.1 slave-1: FEC autoneg off encodings: None
[Tue Jul  6 09:41:09 2021] public: link status definitely up for interface slave-1, 25000 Mbps full duplex
[Tue Jul  6 09:41:10 2021] bnxt_en 0000:04:00.1 slave-1: NIC Link is Down
[Tue Jul  6 09:41:10 2021] bnxt_en 0000:04:00.1 slave-1: speed changed to 0 for port slave-1
[Tue Jul  6 09:41:11 2021] public: link status definitely down for interface slave-1, disabling it
[Tue Jul  6 09:41:20 2021] bnxt_en 0000:04:00.1 slave-1: NIC Link is Up, 25000 Mbps full duplex, Flow control: ON - receive & transmit
[Tue Jul  6 09:41:20 2021] bnxt_en 0000:04:00.1 slave-1: FEC autoneg off encodings: None
[Tue Jul  6 09:41:20 2021] public: link status definitely up for interface slave-1, 25000 Mbps full duplex
[Tue Jul  6 09:41:22 2021] bnxt_en 0000:04:00.1 slave-1: NIC Link is Down
[Tue Jul  6 09:41:22 2021] bnxt_en 0000:04:00.1 slave-1: speed changed to 0 for port slave-1
[Tue Jul  6 09:41:22 2021] public: link status definitely down for interface slave-1, disabling it
[Tue Jul  6 09:41:31 2021] bnxt_en 0000:04:00.1 slave-1: NIC Link is Up, 25000 Mbps full duplex, Flow control: ON - receive & transmit
[Tue Jul  6 09:41:31 2021] bnxt_en 0000:04:00.1 slave-1: FEC autoneg off encodings: None
[Tue Jul  6 09:41:32 2021] public: link status definitely up for interface slave-1, 25000 Mbps full duplex
[Tue Jul  6 09:41:33 2021] bnxt_en 0000:04:00.1 slave-1: NIC Link is Down
Causa
Possibili cause di questo problema:
- A volte l'SFP (Small Form-Factor Pluggable) non era posizionato correttamente durante l'installazione.
- Switch gestiti dall'utente che vengono eseguiti con modifiche al di fuori del nostro controllo. Nei casi in cui gli switch gestiti dall'utente vengono mantenuti, come gli aggiornamenti del firmware, i collegamenti possono interrompersi e potrebbero essere rinegoziati, come mostrato nella risoluzione riportata di seguito.
- Hardware guasto su ECS:
- Scheda di interfaccia di rete (NIC)
- Cavo di rete
- SFP (Small Form-Factor Pluggable)
- Switch di rete o porta dello switch
Risoluzione
IMPORTANTE. Una nuova funzionalità è stata rilasciata in xDoctor 4-8.104.0 e versioni successive. Questa Knowledge Base (KB) è ora automatizzata con xDoctor per tentare di ripristinare rapidamente un'interfaccia del nodo controllando i dettagli sia del nodo che dello switch. Se lo script non è in grado di ripristinare l'interfaccia, fornisce un riepilogo dettagliato dei risultati.
Per configurare il repository di automazione con xDoctor 4-8.104.0 e versioni successive, seguire ECS: ObjectScale: Come eseguire gli script di automazione della KB (pilota automatico)
- Eseguire il comando di automazione da un nodo con xDoctor 4-8.104.0 e versioni successive.
Nota:
--target-nodeè supportato per questa azione. Questo script è stato incluso nella versione xDoctor 4-8.104.0, che include la versione 3.0 degli script di automazione Ansible.
Comando:
Esempio:
# sudo xdoctor autopilot --kb 50341 --target-node <Node NAN IP>
Esempio:
admin@ecsnode1:~> sudo xdoctor autopilot --kb 50341 --target-node 169.254.1.1
Checking for existing screen sessions...
Starting screen session 'autopilot_kb_50341_20250627_124206'...
Screen session 'autopilot_kb_50341_20250627_124206' started successfully.
Attaching to screen session 'autopilot_kb_50341_20250627_124206'...
- Riepilogo della revisione:
Esempio:
>TASK [Print all summaries] ***************************************************************************************************************************************************************************
ok: [169.254.1.7] => {
    "msg": [
        "Host: 169.254.1.7",
        "*******************************************************************************",
        "Node interface summary:",
        "*******************************************************************************",
        "Interface status for switch rabbit and node interface(slave-0):",
        "                           Node Interface: UP",
        "                           Node physical link detected: yes",
        "                           Node SFP Vendor: DELL",
        "                           Node SFP PN: VXFJY",
        "                           Node SFP Type: GBIC/SFP defined by 2-wire interface ID",
        "                           Node connection detected: ethernet1/1/7",
        "                           Switch Interface: ethernet1/1/7",
        "                           Switch Speed: 25G",
        "                           Switch Status: up",
        "                           Switch SFP Model: 25GBASE-CR-3.0M",
        "                           Switch SFP Qualified: true",
        "Interface status for switch hare and node interface(slave-1):",
        "                           Node Interface: UP",
        "                           Node physical link detected: yes",
        "                           Node SFP Vendor: DELL",
        "                           Node SFP PN: VXFJY",
        "                           Node SFP Type: GBIC/SFP defined by 2-wire interface ID",
        "                           Node connection detected: ethernet1/1/7",
        "                           Switch Interface: ethernet1/1/7",
        "                           Switch Speed: 25G",
        "                           Switch Status: up",
        "                           Switch SFP Model: 25GBASE-CR-3.0M",
        "                           Switch SFP Qualified: true",
        "Interface status for switch fox and node interface(pslave-0):",
        "                           Node Interface: UP",
        "                           Node physical link detected: yes",
        "                           Node SFP Vendor: DELL",
        "                           Node SFP PN: VXFJY",
        "                           Node SFP Type: GBIC/SFP defined by 2-wire interface ID",
        "                           Node connection detected: ethernet1/1/7",
        "                           Switch Interface: ethernet1/1/7",
        "                           Switch Speed: 25G",
        "                           Switch Status: up",
        "                           Switch SFP Model: 25GBASE-CR-3.0M",
        "                           Switch SFP Qualified: true",
        "Interface status for switch hound and node interface(pslave-1): ",
        "                           Node Interface:UP",
        "                           Node physical link detected:yes",
        "                           Node SFP Vendor: DELL",
        "                           Node SFP PN: VXFJY",
        "                           Node SFP Type: GBIC/SFP defined by 2-wire interface ID",
        "                           Node connection detected: ethernet1/1/7",
        "                           Switch Interface: ethernet1/1/7",
        "                           Switch Speed: 25G",
        "                           Switch Status: up",
        "                           Switch SFP Model: 25GBASE-CR-3.0M",
        "                           Switch SFP Qualified: true",
        "*******************************************************************************",
        "Actions taken and Reccomendations:",
        "*******************************************************************************",
        "Validated node(s) to switch connection are correct: PASS: Node(s) are correctly connected on all reachable Dell managed switches",
        "Validated SFP on the node(s): PASS: SFP detected on all interfaces",
        "Validated interface status on the node(s): PASS: All interfaces are up",
        "Validated SFP on the switches are qualified: PASS: All SFPs are qualified.",
        "Validated Frontend switch(es): PASS: All frontend switches appear to be Dell managed switches.",
        "Validated Backend switch(es): PASS: All backend switch(es) are reachable",
        "*******************************************************************************"
    ]
}

TASK [Fail if validation fails] **********************************************************************************************************************************************************************
skipping: [169.254.1.7] => {"changed": false, "skip_reason": "Conditional result was False", "skipped": true}

PLAY RECAP *******************************************************************************************************************************************************************************************
169.254.1.7                : ok=70   changed=6    unreachable=0    failed=0
localhost                  : ok=8    changed=1    unreachable=0    failed=0

Playbook execution successful
20241112 22:28:58.932: | PASS (2 min 44 sec)
================================================================================
Status: PASS
Time Elapsed: 3 min 1 sec
Debug log: /opt/emc/caspian/service-console/log/20241112_222531_run_KB_Fix/dbg_robot.log
HTML log: /opt/emc/caspian/service-console/log/20241112_222531_run_KB_Fix/log.html
================================================================================


[screen is terminating]
NOTA: se gli switch non sono di tipo Arista o Dell, sono switch gestiti dall'utente. È necessario informare l'utente che una connessione inattiva deve essere corretta. Una volta ricevuta la conferma, seguire l'articolo ECS: Come filtrare gli avvisi degli switch da xDoctor per disabilitare l'analisi negli switch gestiti dall'utente.
Procedura manuale di seguito:
Prima di eseguire qualsiasi lavoro: Nei casi in cui gli switch gestiti dall'utente vengono mantenuti, come gli aggiornamenti del firmware, i collegamenti possono interrompersi e potrebbero essere rinegoziati. L'esempio riportato di seguito riguarda l'interfaccia secondary-0 inattiva dopo un aggiornamento del firmware eseguito dall'utente su uno switch FE gestito dall'utente. Il seguente comando viene utilizzato per rinegoziare l'interfaccia:
ethtool -r <i/f name>

admin@ecs-n-1:~> sudo ethtool slave-0
Settings for slave-0:
        Supported ports: [ FIBRE ]
        Supported link modes:   1000baseX/Full
                                10000baseSR/Full
        Supported pause frame use: Symmetric
        Supports auto-negotiation: Yes
        Advertised link modes:  1000baseX/Full
                                10000baseSR/Full
        Advertised pause frame use: No
        Advertised auto-negotiation: Yes
        Speed: Unknown!
        Duplex: Unknown! (255)
        Port: FIBRE
        PHYAD: 0
        Transceiver: internal
        Auto-negotiation: off
        Supports Wake-on: g
        Wake-on: g
        Current message level: 0x0000000f (15)
                               drv probe link timer
        Link detected: no
admin@ecs-n-1:~>

admin@ecs-n-1:~> sudo ethtool -r slave-0
admin@ecs-n-1:~>

admin@ecs-n-1:~> sudo ethtool slave-0
Settings for slave-0:
        Supported ports: [ FIBRE ]
        Supported link modes:   1000baseX/Full
                                10000baseSR/Full
        Supported pause frame use: Symmetric
        Supports auto-negotiation: Yes
        Advertised link modes:  1000baseX/Full
                                10000baseSR/Full
        Advertised pause frame use: No
        Advertised auto-negotiation: Yes
        Speed: 10000Mb/s
        Duplex: Full
        Port: FIBRE
        PHYAD: 0
        Transceiver: internal
        Auto-negotiation: off
        Supports Wake-on: g
        Wake-on: g
        Current message level: 0x0000000f (15)
                               drv probe link timer
        Link detected: yes
NOTA: Se l'interfaccia è ancora inattiva e non è possibile eseguire una nuova negoziazione, un rappresentante Dell dovrà essere on-site per ispezionare e riposizionare l SFP e il cavo. Se ciò non funziona, si consiglia di sostituire l SFP e la connessione del cavo dallo switch al nodo.
Esistono diversi modelli SFP che utilizzano rame o fibra. Inoltre, gli switch back-end e front-end possono utilizzare diversi tipi di cavi SFP. Verificare quale parte sia richiesta prima della sostituzione.
Informazioni aggiuntive
Estratto dalla guida hardware di ECS Gen1 o Gen2.
Cablaggio di rete
I diagrammi di cablaggio di rete si applicano a ECS Appliance serie U, serie D o serie C in un rack Dell o fornito dal cliente.
Cablaggio di rete
I diagrammi di cablaggio di rete si applicano a ECS Appliance serie U, serie D o serie C in un rack Dell o fornito dal cliente.
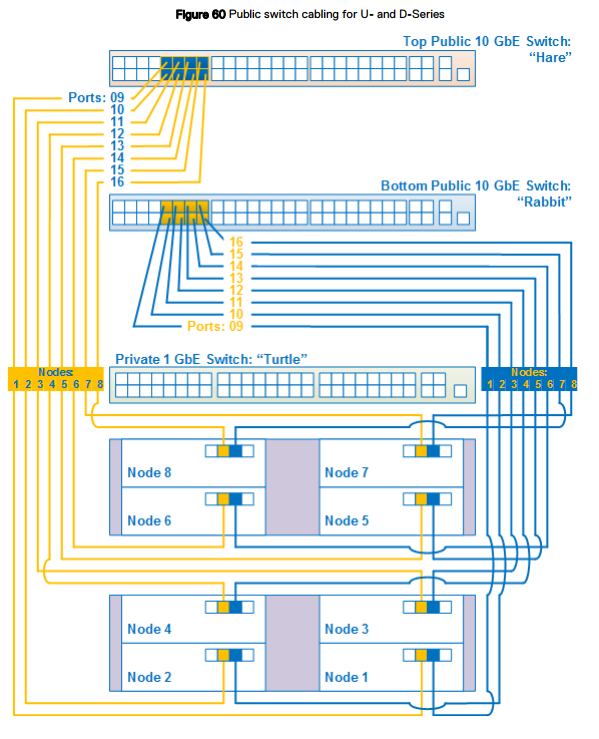
Per distinguere tra i tre switch, ciascuno ha un soprannome.
- Hare: lo switch pubblico da 10 GbE si trova nella parte superiore del rack di un modello serie U o D oppure nello switch superiore in un segmento serie C.
- Rabbit: lo switch pubblico da 10 GbE si trova sotto lo switch Hare nella parte superiore del rack di un modello serie U o D oppure sotto lo switch Hare in un segmento serie C.
- Turtle: lo switch privato da 1 GbE si trova sotto lo switch Rabbit nella parte superiore del rack di un modello serie U oppure sotto lo switch Hare in un segmento serie C.
Cablaggio di rete serie U e D
La figura seguente mostra un diagramma semplificato del cablaggio di rete per una configurazione rack a otto nodi per ECS Appliance serie U o D configurato da Dell o dal cliente. Dopo questa figura, altre figure e tabelle dettagliate forniscono informazioni sul colore di porte, etichette e cavi.
La figura seguente mostra un diagramma semplificato del cablaggio di rete per una configurazione rack a otto nodi per ECS Appliance serie U o D configurato da Dell o dal cliente. Dopo questa figura, altre figure e tabelle dettagliate forniscono informazioni sul colore di porte, etichette e cavi.
Vedere la tabella riportata di seguito per gli switch e le porte corrispondenti e anche la figura per i numeri delle porte degli switch appropriate.
Switch 1 = Rabbit = Switch inferiore
Switch 2 = Hare = Switch superiore
Porte dei nodi:
Secondaria-0 = P01 = Porta destra per il collegamento allo switch 1/Rabbit/inferiore.
Secondaria-1 = P02 = Porta sinistra per il collegamento allo switch 2/Hare/superiore.
Switch 1 = Rabbit = Switch inferiore
Switch 2 = Hare = Switch superiore
Porte dei nodi:
Secondaria-0 = P01 = Porta destra per il collegamento allo switch 1/Rabbit/inferiore.
Secondaria-1 = P02 = Porta sinistra per il collegamento allo switch 2/Hare/superiore.
Prodotti interessati
ECS ApplianceProdotti
ECS Appliance, ECS Appliance Gen 1, ECS Appliance Gen 2, ECS Appliance Gen 3, ECS Appliance Hardware Gen1 U-Series, Elastic Cloud StorageProprietà dell'articolo
Numero articolo: 000050341
Tipo di articolo: Solution
Ultima modifica: 03 apr 2026
Versione: 11
Trova risposta alle tue domande dagli altri utenti Dell
Support Services
Verifica che il dispositivo sia coperto dai Servizi di supporto.