文書番号: 000128677
How to reset the BIOS of a Dell PowerEdge Server?
概要: BIOS settings can be reverted to factory mode.
文書の内容
現象
This article explains how to restore the BIOS defaults settings on a Dell PowerEdge Server. This procedure may be valid for other Dell products.
 Note: This article is part of the Server Tutorials: Support Tools, available here.
 Caution: Resetting your BIOS will clear all setting back to defaults this may prevent your system from booting to the operating system until custom settings are reapplied.
The image of key mapping and light location for your reference

Located the jumpers on the system motherboard normally next to the coin cell battery is the
NVRAM_CLR / PWRD_EN jumpers these can be used to reset your BIOS
Example Motherboard

Table of Contents
1. Restore the BIOS defaults settings on a Dell PowerEdge Server.
Note: This article is part of the Server Tutorials: Support Tools, available here.
Caution: Resetting your BIOS will clear all setting back to defaults this may prevent your system from booting to the operating system until custom settings are reapplied.
Please following the steps to restore the BIOS defaults settings in the system setup page.
-
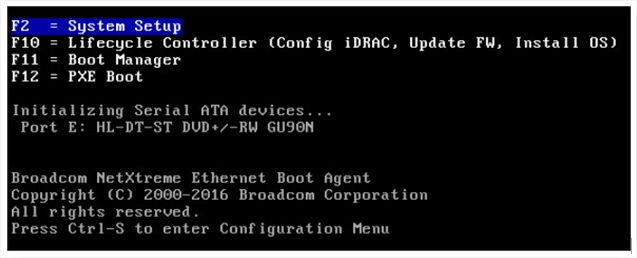
Power on the system.
-
While the blue Dell logo is visible, press the < F2 > key to enter the System Setup.
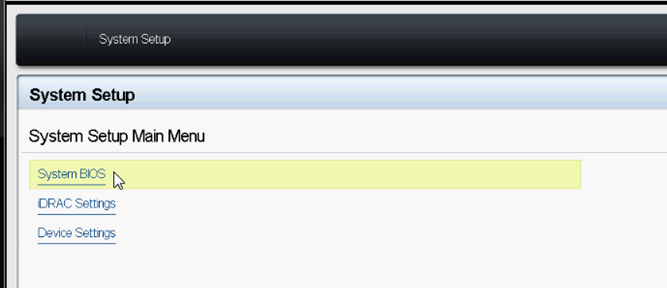
- Enter the "System BIOS" section
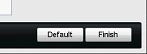
- Click on the button "Default" in the low-end corner.
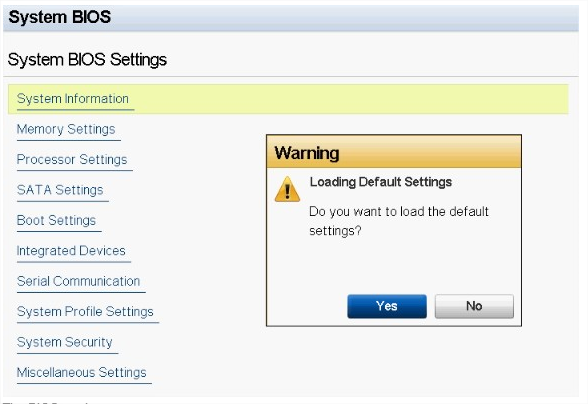
- A popup will ask the confirmation of action, press "Yes".
- The BIOS settings are now reset.
- Press the < Num Lock > key, and verify that the Num Lock light is on.
- Press the < Caps Lock > key, and verify that the Caps Lock light is on.
- Press the < Scroll Lock > key, and verify that the Scroll Lock light is on. The lights on the keyboard should all be illuminated as in Figure 1.
- Press the < Alt >+< F > keys at the same time. The system will beep as the setup defaults are restored.
The image of key mapping and light location for your reference
2. Clearing the BIOS using the motherboard Jumper (Desktop/Servers only)
Located the jumpers on the system motherboard normally next to the coin cell battery is the
NVRAM_CLR / PWRD_EN jumpers these can be used to reset your BIOS
Example Motherboard
| Jumper | Setting | Description |
|---|---|---|
| NVRAM_CLR |  (default) (default) |
The configuration settings are retained at system boot (pins 3-5) |
 |
The configuration settings are cleared at the next system boot (pins 1-3) | |
| PWRD_EN |  (default) (default) |
The password feature is enabled (pins 2-4) |
 |
The password feature is disabled (pins 4-6) |
Turn off the system, including any attached peripherals, and disconnect the system from the electrical outlet.
Open the System.
Remove the jumper plug from the NVRAM_CLR jumper. See the Figure above to locate the password jumper (labeled "NVRAM_CLR ") on the system board.
Move the Jumper from Pin's 3-5 to pins 1-3 for ten seconds
Move the jumper back to Pins 3-5 (default)
Close the system.
Reconnect your system and peripherals to their electrical outlets, and turn on the system.
You will need to enter the system BIOS and re-enter the time and date and settings required.
原因
-
解決方法
-
文書のプロパティ
影響を受ける製品
Servers
最後に公開された日付
20 9月 2021
バージョン
4
文書の種類
Solution