Automatic BitLocker Device Encryption for Dell Computers
摘要: BitLocker encryption provides robust security for Dell computers. Learn about necessary requirements, vital hardware specs, and key management steps for effective Windows security.
本文适用于
本文不适用于
本文并非针对某种特定的产品。
本文并非包含所有产品版本。
说明
BitLocker is a Windows security feature that protects your files by encrypting (scrambling) the data on your hard drive. If someone tries to access your drive without permission, they won't be able to read your files.
Here's what happens on your Dell computer:
- BitLocker turns on automatically when you first set up Windows 10 or Windows 11
- It works quietly in the background, you won't notice it's there
- Your computer creates a special recovery key (like a backup password) that's saved to your Microsoft account
You might be reading this article because:
- Your computer is asking for a BitLocker recovery key
- You need to repair or service your Dell computer
- You want to check if your drive is encrypted
- You want to turn off encryption
Check if your computer is encrypted
Want to see if BitLocker is protecting your drive? Here's how to check:
- Right-click the Start button (Windows logo in the corner).
- Select Terminal (Admin) or Windows PowerShell (Admin).
- If a pop-up asks "Do you want to allow this app to make changes?", select Yes.
- Type this command exactly as shown and press Enter:
manage-bde -status C:(If your Windows is installed on a different drive, replace "C" with that drive letter)
- Look at the results under "Conversion Status":
- Fully Encrypted = BitLocker is on and protecting your files
- Fully Decrypted = BitLocker is off
- Encryption in Progress = BitLocker is currently encrypting your drive (this can take a while)
- Decryption in Progress = BitLocker is being removed
What does this mean for you?
If your drive shows as "Fully Encrypted," your files are protected. You should save your recovery key in a safe place (we'll show you how below).
Find and save your BitLocker recovery key
Your recovery key is a 48-digit number that works like a backup password. You might need it if:
- You update your computer's BIOS or firmware
- You replace hardware like your motherboard or hard drive
- Windows doesn't recognize your computer after repairs
- You move your hard drive to another computer
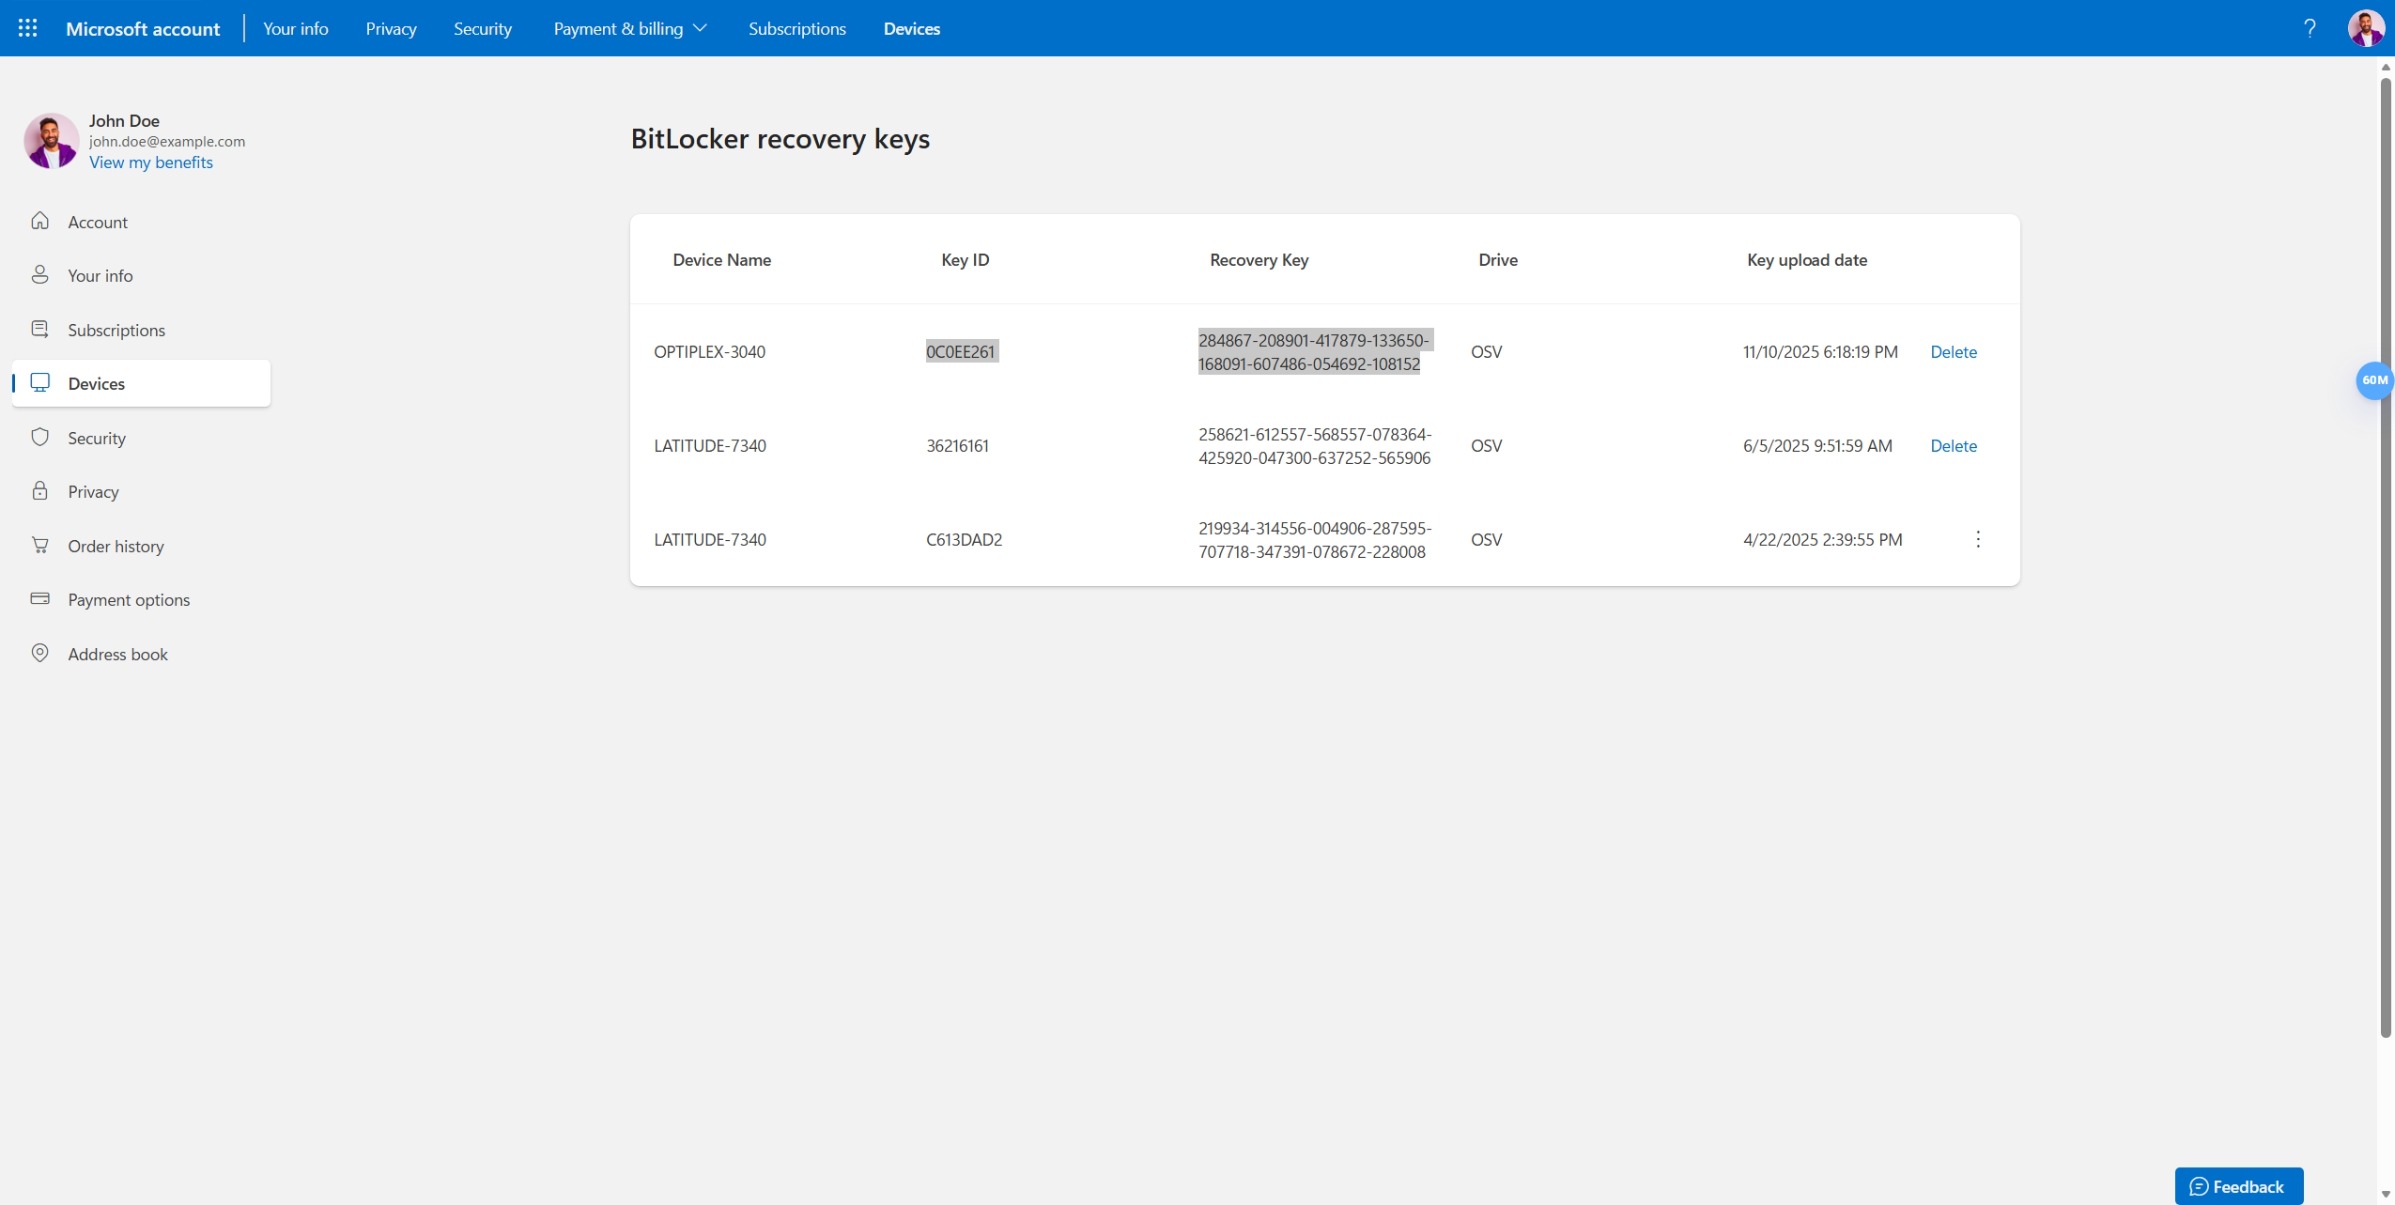
Where to find your recovery key
Option 1: Check your Microsoft account (most common)
- On any device, go to account.microsoft.com/devices/recoverykey
- Sign in with the same Microsoft account you use on your Dell computer
- You'll see a list of recovery keys for all your devices
- Find the one that matches your computer name and date
Option 2: Check for a printed copy
When you first set up Windows, you might have been asked to print or save your recovery key. Check these places:
- A USB flash drive you used during setup
- Printed papers from when you first got your computer
- A text file saved in your Documents folder
Option 3: Check your Azure Active Directory account (for work computers)
If your Dell computer is managed by your work or school:
- Ask your IT administrator, they may have your recovery key
- Or check your organization's device management portal
Save a backup copy now
If you found your recovery key, save a backup copy right now.
- Select Start > Settings > Privacy & security > Device encryption
- Select Back up your recovery key
- Choose where to save it:
- To your Microsoft account (recommended, you can access it from any device)
- To a USB flash drive (remove the drive and store it safely)
- Print it (keep the paper in a secure location, not with your computer)
Note: Save your recovery key in more than one place. BitLocker's strong security means only you can unlock your computer, as the encryption is designed to keep your data secure from everyone. Dell can't help you recover it.
Your computer is asking for a recovery key, what to do
If you see a blue screen asking for your BitLocker recovery key, don't panic. This usually happens after:
- Updating your computer's BIOS
- Hardware repairs or replacements
- Moving your hard drive to another computer
- Certain Windows updates
Here's what to do:
- Find your recovery key using the steps above
- Type all 48 digits on the blue screen (include the dashes if shown)
- Press Enter
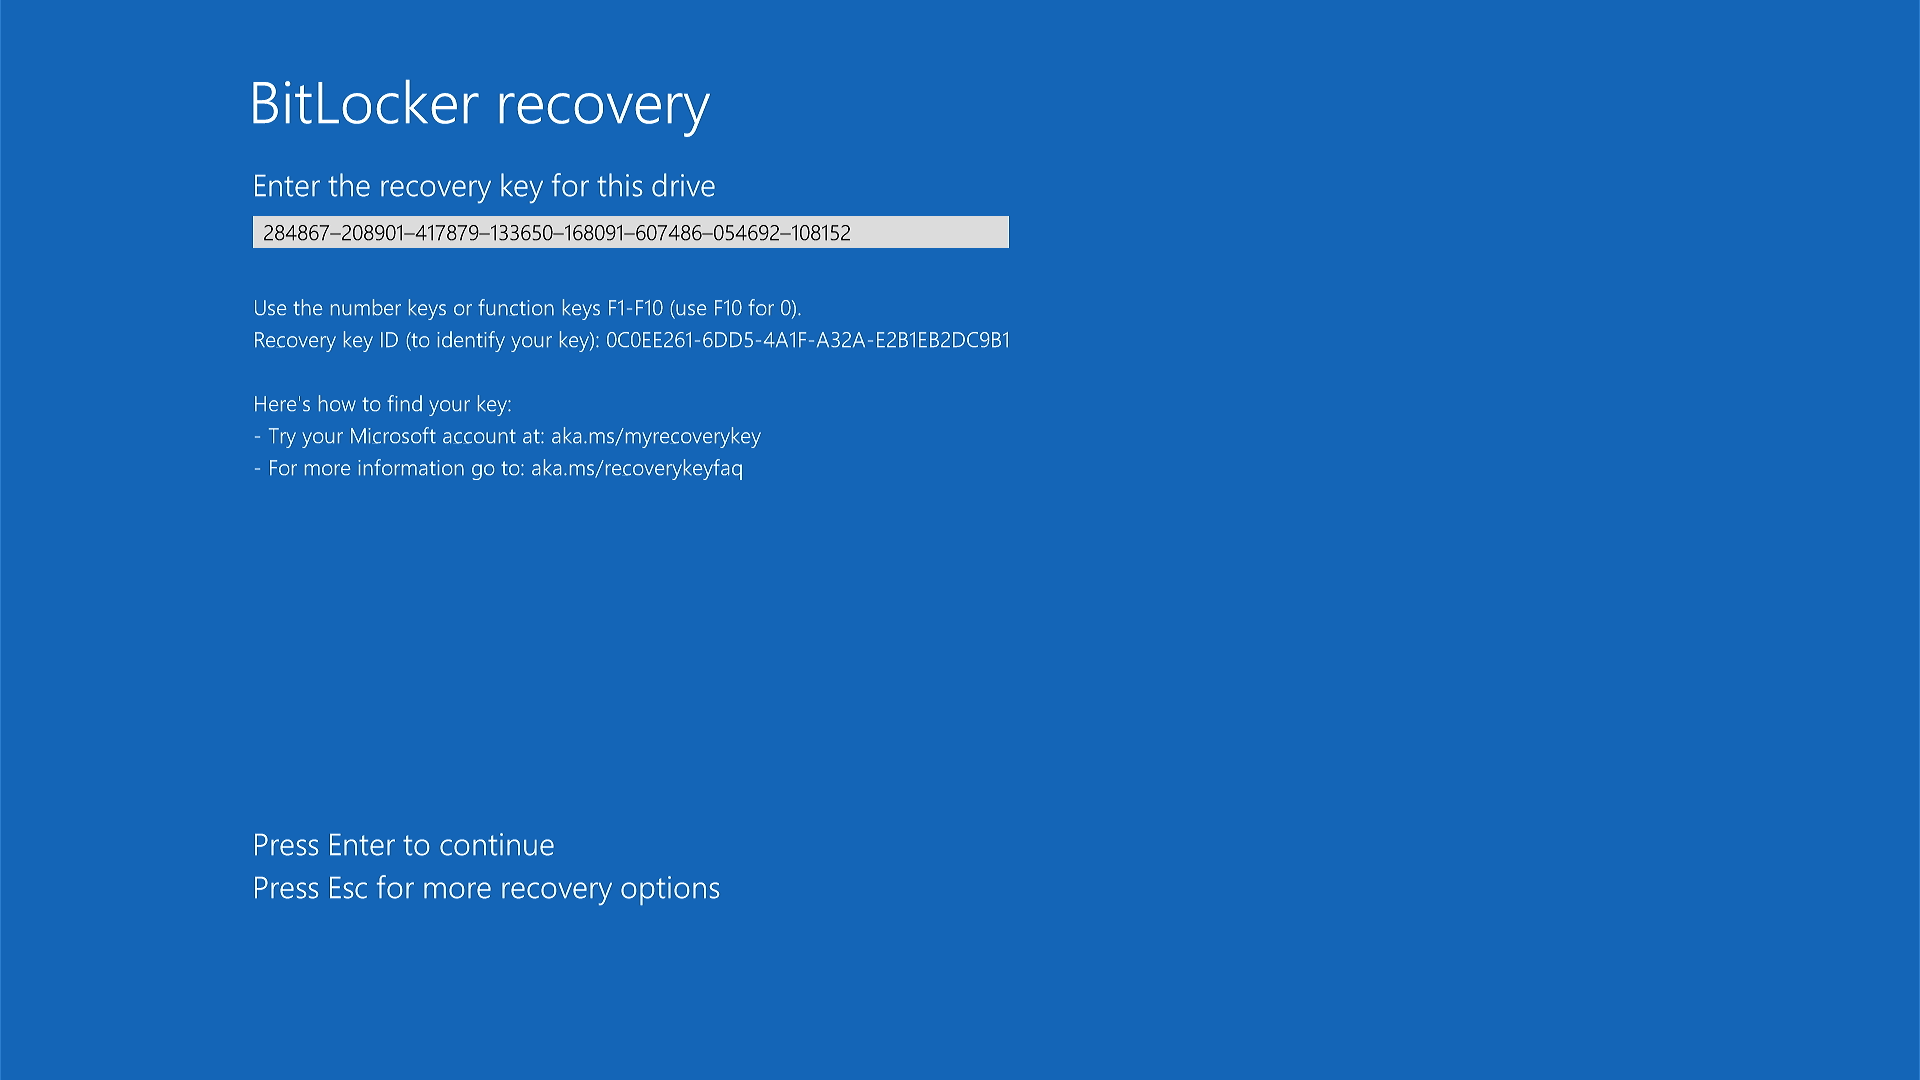
Your computer should start normally.
What if I can't find my recovery key?
If you've checked everywhere and can't find it, you may need to reinstall Windows (which will erase your files).
Temporarily pause encryption for service or repairs
If you're taking your Dell computer for repairs or servicing it yourself, you should pause (suspend) BitLocker first. This prevents the blue recovery key screen from appearing after service.
When to pause BitLocker:
- Before updating your computer's BIOS
- Before hardware repairs (motherboard, hard drive, memory)
- Before taking your computer to a Dell service center
- Before any major system changes
How to pause BitLocker
- Right-click the Start button.
- Select Terminal (Admin) or Windows PowerShell (Admin).
- Select Yes if asked to allow changes.
- Type this command and press Enter:
Suspend-BitLocker -MountPoint "C:" -RebootCount 0(Replace "C" with your drive letter if different)
- You'll see a message saying BitLocker is suspended.
What happens now?
BitLocker protection is paused, but your files stay encrypted. After service is complete, BitLocker will stay paused until you turn it back on.
Turn BitLocker back on after service
Once repairs are done, turn BitLocker protection back on:
- Right-click the Start button.
- Select Terminal (Admin) or Windows PowerShell (Admin).
- Select Yes if asked to allow changes.
- Type this command and press Enter:
Resume-BitLocker -MountPoint "C:"
Your files are protected again.
Why pause instead of turning off completely?
Pausing takes only a few seconds. Turning off BitLocker completely can take hours and then several hours more to turn back on. Pausing is faster and easier for repairs.
Turn off BitLocker permanently
Before you start: Think carefully about turning off BitLocker. Once it's off, anyone who accesses your hard drive can read your files, even if they steal your computer or remove the drive.
You might want to turn it off if:
- You're preparing to restore a Windows backup image
- You're permanently removing the hard drive
- You're giving away or recycling your computer (after wiping your data)
Note: Turning off BitLocker can take a long time, about 1 minute for every 500 MB of data. A 500 GB drive could take 16 hours or more.
How to turn off BitLocker
Option 1: Using Windows Settings (easier)
- Select Start > Settings > Privacy & security > Device encryption
- Turn off Device encryption
- Wait for decryption to complete (your computer will show progress)
Option 2: Using Command Line
- Right-click the Start button.
- Select Terminal (Admin) or Windows PowerShell (Admin).
- Select Yes if asked to allow changes.
- Type this command and press Enter:
manage-bde -off C:(Replace "C" with your drive letter if different)
- Decryption will start. You can keep using your computer, but it may run slower.
To check decryption progress:
Follow the steps in "Check if your computer is encrypted" above. Look for "Decryption in Progress" and the percentage completed.
Advanced: Prevent BitLocker on new Windows installations
This section is for IT professionals and advanced users only.
If you're preparing computers for your organization and need to prevent BitLocker from turning on automatically, you can modify the Windows registry before installation.
Warning: Incorrectly editing the registry can cause serious problems. Only proceed if you're comfortable with these advanced steps.
Modify the registry to prevent encryption
Before installing Windows:
- Add this registry key to your Windows image:
Location:HKEY_LOCAL_MACHINE\SYSTEM\CurrentControlSet\Control\BitLocker
Name:PreventDeviceEncryption
Type: DWORD (32-bit)
Value:1(True)
Note: This only works if you add it to the Windows image before installation. If Windows is already installed and BitLocker has turned on, use the "Turn off BitLocker permanently" steps above instead.
Frequently asked questions
Q: Will BitLocker slow down my computer?
A: No. Modern Dell computers have special hardware that handles encryption automatically. You won't notice any difference in speed.
Q: Do Dell computers come with BitLocker already on?
A: No. Dell computers aren't encrypted when they leave the factory. BitLocker turns on automatically when you first set up Windows at home.
Q: Can I turn off BitLocker and turn it back on later?
A: Yes, but it's time-consuming. Turning it off can take hours, and turning it back on takes hours again. If you need to service your computer, pause BitLocker instead, it's much faster.
Q: What happens if I forget my recovery key?
A: Without the recovery key, there's no way to unlock your computer. Even Dell and Microsoft can't help you recover it. That's why it's so important to save your recovery key in multiple safe places.
Q: Is my recovery key the same as my Windows password?
A: No. Your Windows password logs you into your account. Your recovery key unlocks the entire hard drive if Windows can't start normally.
Q: Why did BitLocker turn on without asking me?
A: Windows turns on BitLocker automatically during setup to protect your files. This is a security feature built into Windows 10 and Windows 11.
受影响的产品
Alienware, Dell All-in-One, Dell Pro All-in-One, Dell Pro Max Micro, Dell Pro Max Slim, Dell Pro Max Tower, Dell Pro Micro, Dell Pro Slim, Dell Pro Tower, Dell Slim, Dell Tower, Inspiron, OptiPlex, Vostro, XPS, G Series, G Series, Alienware
, Dell Laptops, Dell Plus, Dell Pro, Dell Pro Max, Dell Pro Plus, Dell Pro Premium, Inspiron, Latitude, Dell Pro Rugged, Vostro, XPS, Fixed Workstations, Mobile Workstations, Dell Pro Max Micro XE FCM2250, Dell Pro Max Slim XE FCS1250, Dell Pro Max Tower T2 XE FCT2250, Dell Pro Max 16 XE MC16250, Dell Pro Micro Plus XE QBM1250, Dell Pro Slim Plus XE5 QBS1250, Dell Pro Tower Plus XE5 QBT1250
...
文章属性
文章编号: 000124701
文章类型: How To
上次修改时间: 19 4月 2026
版本: 20
从其他戴尔用户那里查找问题的答案
支持服务
检查您的设备是否在支持服务涵盖的范围内。