How to configure an Oracle VM Network
摘要: Our charter is to deliver solutions that simplify IT by providing database solutions, custom development, dynamic datacenters, flexible computing.
本文适用于
本文不适用于
本文并非针对某种特定的产品。
本文并非包含所有产品版本。
症状
Applies to:
Oracle VM 3.1.1原因
How do I Configure an Oracle VM Network?
解决方案
When configuring a network via the Oracle VM Manager, one must map available network ports to the logical network. Each logical network requires a name or alias and performs at least one network function. Oracle VM has the following network functions:
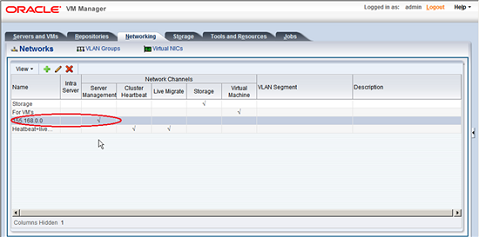
Figure 1: Oracle VM Network
Each additional Oracle VM Server discovered from the Oracle VM Manager either adds an entry into the
existing Server Management network or creates a new Server Management network if the server is connected to a subnet where no Oracle VM Server was previously discovered.
The steps listed in the Creating Virtual Machine Networks describe how to create a network and assign a
"Virtual Machine" role to it. Similarly, it is recommended to create different networks for the different network functions.
NOTE: It is recommended to have separate network port(s) for each function.
NOTE: Additional network is required when using iSCSI storage.
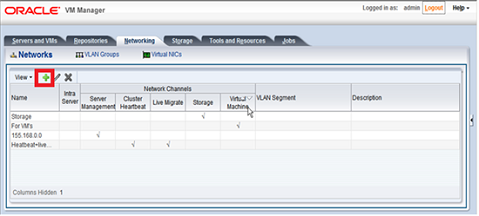
Figure 2: Oracle VM Manager console
In the Create Network Wizard, select Create network with bond/ports only and click Next.

Figure 3: Create Network
In the Create Network step of the wizard, enter name for the network and select the Storage in the Network Channels and click Next.

Figure 4: Create Network step of the wizard
In the Select Servers step of the wizard, move the Oracle VM Servers to be included in the new network to the Selected Servers and click Next.
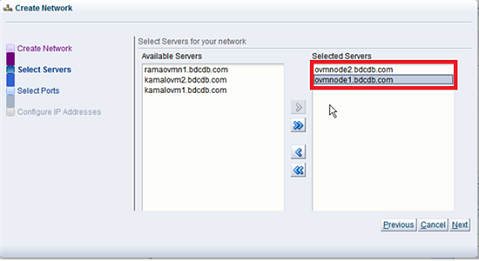
Figure 5: Select Servers step of the wizard
In the Select Ports step of the wizard, select Ethernet port from each Oracle VM Server and move them to the Select Ports field and click Next.

Figure 6: Select Ports step of the wizard
In the Configure IP Addresses step of the wizard, enter the IP addresses for storage networking and click Finish to create storage network.
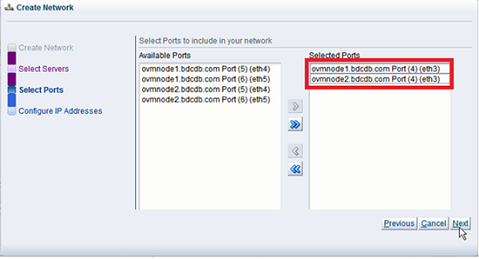
Figure 7: Configure IP Addresses
NOTE: If you are using Compellent iSCSI create two storage networks for each fault domain and give the IP addresses configured in the previous step within the range of the fault domain’s IP address subnet.
Created Storage Networks will be displayed under the Networking tab.

Figure 8: Created Storage Networks
- Server Management
- Cluster Heartbeat
- Live Migrate
- Storage
- Virtual Machine
Figure 1: Oracle VM Network
Each additional Oracle VM Server discovered from the Oracle VM Manager either adds an entry into the
existing Server Management network or creates a new Server Management network if the server is connected to a subnet where no Oracle VM Server was previously discovered.
Creating Oracle VM Networks
The steps listed in the Creating Virtual Machine Networks"Virtual Machine" role to it. Similarly, it is recommended to create different networks for the different network functions.
NOTE: It is recommended to have separate network port(s) for each function.
NOTE: Additional network is required when using iSCSI storage.
Creating Storage Network
After logging into the Oracle VM Manager console, click the Networking tab and Networks sub tab and add network by clicking "+" sign icon.
Figure 2: Oracle VM Manager console
In the Create Network Wizard, select Create network with bond/ports only and click Next.
Figure 3: Create Network
In the Create Network step of the wizard, enter name for the network and select the Storage in the Network Channels and click Next.
Figure 4: Create Network step of the wizard
In the Select Servers step of the wizard, move the Oracle VM Servers to be included in the new network to the Selected Servers and click Next.
Figure 5: Select Servers step of the wizard
In the Select Ports step of the wizard, select Ethernet port from each Oracle VM Server and move them to the Select Ports field and click Next.
Figure 6: Select Ports step of the wizard
In the Configure IP Addresses step of the wizard, enter the IP addresses for storage networking and click Finish to create storage network.
Figure 7: Configure IP Addresses
NOTE: If you are using Compellent iSCSI create two storage networks for each fault domain and give the IP addresses configured in the previous step within the range of the fault domain’s IP address subnet.
Created Storage Networks will be displayed under the Networking tab.
Figure 8: Created Storage Networks
受影响的产品
Software文章属性
文章编号: 000146495
文章类型: Solution
上次修改时间: 30 7月 2025
版本: 5
从其他戴尔用户那里查找问题的答案
支持服务
检查您的设备是否在支持服务涵盖的范围内。