文章編號: 000145519
How to Create a Bootable USB Flash Drive using Dell Diagnostic Deployment Package
摘要: This article shows how to create a bootable USB flash drive using the Dell Diagnostic Deployment Package (DDDP).
文章內容
說明
Affected Products:
- Dell Diagnostic Deployment Package
Affected Platforms:
- OptiPlex
- Latitude
- Precision Workstations
- G-Series
- Inspiron
- Alienware
- Vostro
- XPS
Note: This process does not apply to UEFI enabled computers.
There are occasions where you must create a bootable USB Flash Drive. Scenarios that require a USB drive include; a BIOS update outside the operating system, when no operating system is installed, or when the computer cannot boot to the operating system. Difficulty getting the BIOS updates to work within the Operating System, due to permissions, restrictions, anti-virus, or compatibility with the update schedule.
By default, most USB flash drives are not bootable and computers do not recognize them during the boot process.
There are several different ways to create a bootable USB flash drive. One way is to use the DDDP.
Note: Using DDDP only creates a bootable partition of up to 2 GB in size, on the USB flash drive. If you require a larger bootable USB flash drive, learn How to Make a Bootable USB flash drive Using Diskpart.
You can create a bootable USB flash drive using the following instructions:
- Download the Dell Diagnostic Distribution Package (DDDP), go to https://downloads.dell.com/diags/CW1322A1.exe.
- The File Download window is displayed. Select Run to download the software.
- A User Account Control (UAC) window may appear. Select Yes to continue the download process.
- The Dell 32-bit diagnostic window appears. Select Continue to progress.
- The folder creation window appears. Select Ok to use the default folder.
- A Dell Diagnostic dialog window appears, it states all files were successfully extracted. Select Ok to continue. The DDDP main menu appears. Close the window by clicking the X on the upper right corner.
- Browse to the folder where DDDP was extracted to (the default location is C:\Dell\Drivers\R174621) and select the DIAGS folder.
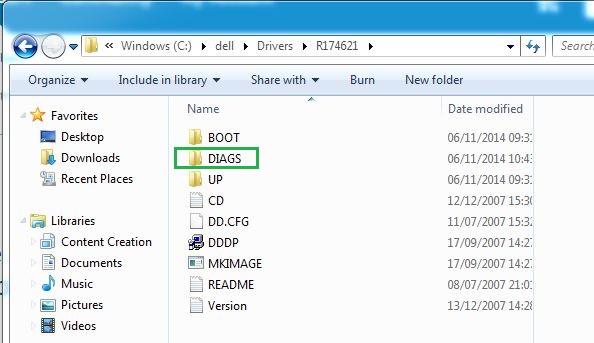
Figure 1: (English Only) DIAGS Folder
- Open the DIAGS directory and remove everything, EXCEPT for the following:
- COMMAND.com
- DELLBIO.bin
- DELLRMK.bin
- AUTOEXEC.bat
- CONFIG.sys
- Insert a USB flash drive.
Warning: This removes all data from the USB memory stick. Before you proceed, ensure to backup all personal data from the USB drive to a different storage device.
- Go to C:\Dell\Drivers\R174621\ and double-click the application DDDP.
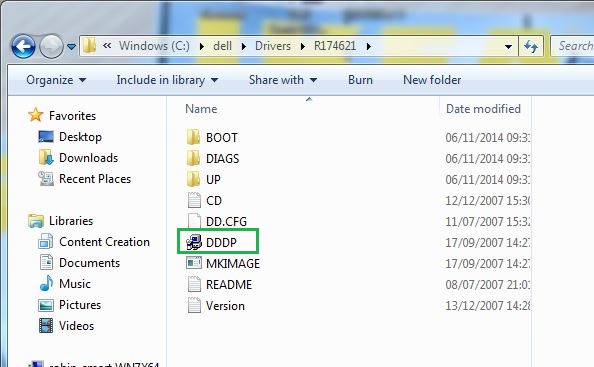
Figure 2: (English Only) Location of the DDDP.exe file
- Run the DDDP utility and choose Install to a USB flash drive. This prepares a bootable USB flash drive.
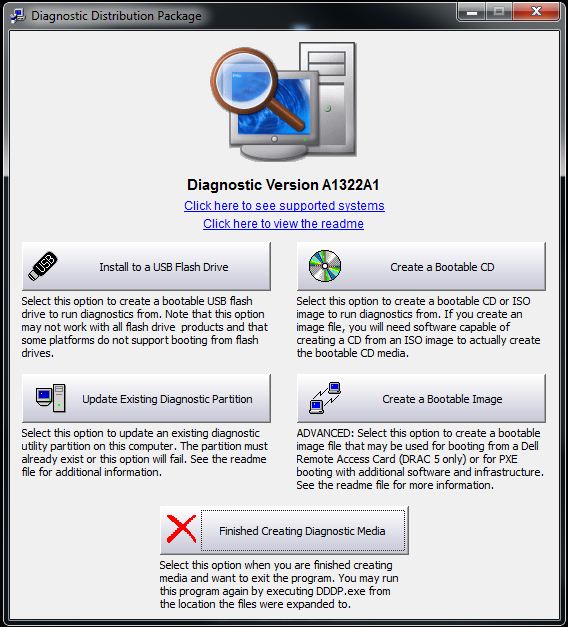
Figure 3: (English Only) Install to a USB Flash Drive
- Restart the computer and at the Dell logo, press F12 to enter the One Time Boot Menu.
- Select the USB storage device to boot to the USB flash drive.
- The computer boots to a command prompt and displays C:\>.
- You now have a bootable USB drive. If you are going to use this to update the system BIOS, see the Note below for more information.
Note: This method can be used with updating the system BIOS from a USB flash drive. Learn more about Dell BIOS Updates.
其他資訊
Recommended Articles
Here are some recommended articles related to this topic that might be of interest to you.
- How to Make a Bootable USB Flash Drive Using Diskpart
- How to Flash the Bios on a Dell Desktop or Laptop with a USB Flash Drive or Thumb Drive
- How to create a bootable USB drive for Operating System deployment on BIOS based systems
- How to Download and Use the Dell Operating System Recovery Image
- Flashing the BIOS from the F12 One-Time Boot Menu
文章屬性
受影響的產品
Alienware, Inspiron, Legacy Desktop Models, OptiPlex, Vostro, XPS, G Series, G Series, Alienware, Inspiron, Latitude, Vostro, XPS, Legacy Laptop Models, Fixed Workstations, Mobile Workstations
上次發佈日期
07 5月 2024
版本
8
文章類型
How To