NetWorker:如何匯入或更換 NMC 的認證授權單位簽署憑證
摘要: 這些指示說明如何在 NetWorker Management Console (NMC) 伺服器上,將預設的 NetWorker 自我簽署憑證替換為 CA 簽署的憑證。
本文章適用於
本文章不適用於
本文無關於任何特定產品。
本文未識別所有產品版本。
說明
這些指示說明如何將預設 NetWorker 自我簽署憑證更換為 NetWorker Management Console (NMC) 的 CA 簽署憑證。本知識文章提供 Windows 和 Linux NMC 伺服器的操作說明。
以下依作業系統分類的文章,詳細說明如何將 NetWorker 伺服器驗證服務 (AUTHC) 與 NetWorker Web 使用者介面 (NWUI) 的自我簽署憑證,替換為 CA 簽署的憑證:
- NetWorker:如何匯入或更換「AUTHC」和「NWUI」的認證授權單位簽署憑證 (Linux)
- NetWorker:如何匯入或更換「AUTHC」和「NWUI」的認證授權單位簽署憑證 (Windows)
涉及的憑證:
-
<server>.csr:NetWorker Management Console 伺服器憑證簽署要求 -
<server>.key:NetWorker Management Console 伺服器私人金鑰 -
<server>.crt:NetWorker Management Console 伺服器 CA 簽署的憑證 -
<CA>.crt:CA 根憑證 -
<ICA>.crt:CA 中繼憑證 (選用,如果有)
注意:其中 <server> 是 NMC 伺服器的短名稱。
開始之前:
此程序會使用 OpenSSL 公用程式。此公用程式在 Linux 作業系統上預設提供;然而,Windows 系統則未包含此工具。有關安裝 OpenSSL 的問題,請諮詢系統管理員。所需的 OpenSSL 版本會因安裝的 NetWorker 版本而有所不同。
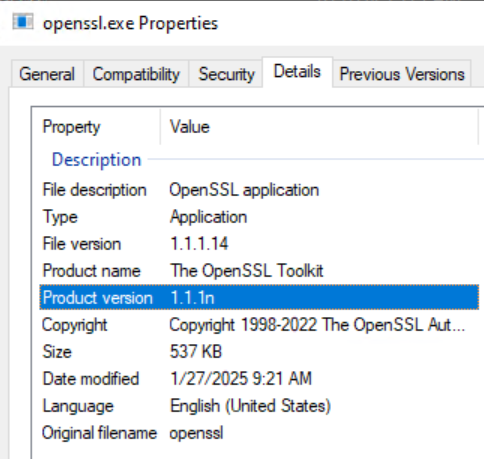
- NetWorker 19.9 至 19.11 需要 OpenSSL 版本 1.1.1n
- NetWorker 19.12.0.0 (僅限 Linux) 支援 OpenSSL 3.0.14 版
- NetWorker 19.12.0.2 (僅限 Windows) 支援 OpenSSL 3.0.14 版
警告:如果使用錯誤版本的 OpenSSL,NMC 的 GSTD 程序將無法啟動 NetWorker:NMC GST 服務開始,然後在更換 cakey.pem 後立即關閉。
OpenSSL 版本可識別如下:
Linux:
# openssl versionWindows:
- 從 Windows 檔案總管前往 openssl.exe 位置。此路徑可能會有所不同,具體取決於 OpenSSL 的安裝方式。
- 打開 openssl.exe 檔,然後前往詳細資料標籤。產品版本欄位會詳細說明 OpenSSL 版本:
或者,如果 openssl.exe 檔案路徑是系統的一部分 PATH 變數,您可以執行”openssl version命令來自和管理命令提示符。如果目錄包含 openssl.exe 不是系統的一部分 PATH、變更目錄 (cd) 複製到包含 openssl.exe。
產生私人金鑰和憑證簽署要求 (CSR) 檔案以提供給您的 CA。
- 在 NMC 伺服器上,使用 OpenSSL 命令列公用程式建立 NetWorker 伺服器私人金鑰檔案 (
<server>.key) 和 CSR 檔案 (<server>.csr)。
Linux:
# openssl req -new -newkey rsa:4096 -nodes -out /tmp/<server>.csr -keyout /tmp/<server>.key
Windows:
set openssl="<Full system path to the openssl.exe file>"
%openssl% req -new -newkey rsa:4096 -nodes -out "C:\tmp\<server>.csr" -keyout "C:\tmp\<server>.key"
如果出現以下情況,CSR 和金鑰檔案可以放置在您選擇的位置
C:\tmp 不存在。
- 傳送 CSR 檔案 (
<server>.csr) 至 CA 以產生 CA 簽署的憑證檔 (<server>.crt)。CA 應提供 CA 簽署的憑證檔案 (<server>.crt)、根憑證 (<CA>.crt),以及任何中繼 CA 憑證 (<ICA>.crt)。
Linux NetWorker Management Console (NMC) 伺服器:
- 取得個別金鑰檔案或 PFX 格式單一檔案中的 CA 簽署憑證。
- 如果 CA 簽署的憑證位於單一 PFX 檔案中,則私人金鑰和 CA 簽署的憑證可像使用 OpenSSL 工具一樣解壓縮 (Windows 可能未安裝 OpenSSL,可個別安裝)。
注意:執行此程序時,請務必更換
.crt 和 .key 具有完整檔案路徑的檔,相應地包括證書和金鑰檔的檔名。
- 從 PFX 檔案擷取私密金鑰和 CA 簽署憑證。
私人金鑰:
# openssl pkcs12 -in <file>.pfx -out <server>.key -nodes -nocerts
CA 憑證:
# openssl pkcs12 -in <file>.pfx -out <server>.crt -nokeys
-
-
- 驗證的完整性
server.key和server.crt。
- 驗證的完整性
-
注意:請確保輸出結果顯示這兩組輸出具有相同的總和雜湊值。若其不同,則存在問題。若其相同,請前往下一個步驟。
私人金鑰:
# openssl pkey -in <server>.key -pubout -outform pem | sha256sum
CA 憑證:
# openssl x509 -in <server>.crt -pubkey -noout -outform pem | sha256sum
-
-
- 將私密金鑰、CA 簽署的伺服器憑證、root CA (及任何中繼憑證) 轉換為 PEM 格式。
-
私人金鑰:
# openssl rsa -in <server>.key -outform pem -out server.key.pem
CA 簽署的伺服器憑證:
# openssl x509 -in <server>.crt -outform pem -out server.crt.pem
根 CA 憑證:
# openssl x509 -in CA.crt -outform pem -out CA.crt.pem
中繼 CA 憑證 (如適用):
# openssl x509 -in ICA.crt -outform pem -out ICA.crt.pem
- 結合
server.key.pem、根CA.crt、中繼憑證 (若適用),並將已簽署的伺服器憑證放入cakey.pemNMC 的檔案:
# cat server.key.pem CA.crt.pem ICA.crt.pem server.crt.pem > cakey.pem
- 關閉 NMC 伺服器的
gst服務:
# systemctl stop gst
- 製作現有
cakey.pem檔,然後將預設檔替換為在步驟 2 D 中創建的檔。
# cp /opt/lgtonmc/etc/cakey.pem /opt/lgtonmc/etc/cakey.pem_orig
# cp cakey.pem /opt/lgtonmc/etc/cakey.pem
注意:可使用
cakey.pem 文件對應於埠 9001。將此檔案替換為在步驟 2,D 中創建的組合檔,會將自簽名證書替換為 CA 簽名證書。
- 製作 NMC 伺服器的
server.crt和server.key檔案,然後將原始檔案取代為已簽署的server.crt和server.key:
# cp /opt/lgtonmc/apache/conf/server.crt /opt/lgtonmc/apache/conf/server.crt_orig
# cp <server>.crt  /opt/lgtonmc/apache/conf/server.crt
# cp /opt/lgtonmc/apache/conf/server.key /opt/lgtonmc/apache/conf/server.key_orig
# cp <server>.key /opt/lgtonmc/apache/conf/server.key
注意:替換上述文件對應於埠 9000。替換上述檔后,埠 9000 的自簽名證書將替換為 CA 簽名證書。
- 啟動 NMC 伺服器的
gst服務:
# systemctl start gst
- 監控 NMC 伺服器的
/opt/lgtonmc/logs/gstd.raw對於任何錯誤。
NetWorker:如何使用nsr_render_log呈現.raw紀錄檔
注意:若觀察到任何問題,您可以還原為備份副本。使用 copy 命令覆寫原始檔案,確保檔案保留正確的擁有權和權限。這些檔案必須由預設 NMC 服務帳戶擁有 (
nsrnmc) 與 600 權限。
驗證:
當 NMC 伺服器的 gst 服務正在執行中,請在 NMC 伺服器上執行下列命令:
openssl s_client -connect localhost:9001 -showcerts 2>/dev/null </dev/null
openssl s_client -connect localhost:9000 -showcerts 2>/dev/null </dev/null
範例:
nve:~ # openssl s_client -connect localhost:9001 -showcerts 2>/dev/null </dev/null
CONNECTED(00000003)
---
Certificate chain
 0 s:/C=CA/ST=Ontario/L=Toronto/O=Dell Technologies/OU=DPD/CN=nve.networker.lan
   i:/C=CA/ST=Ontario/L=Toronto/O=Dell Technologies/OU=DPD/CN=dc.networker.lan
...
...

nve:~ # openssl s_client -connect localhost:9000 -showcerts 2>/dev/null </dev/null
CONNECTED(00000003)
---
Certificate chain
 0 s:/C=CA/ST=Ontario/L=Toronto/O=Dell Technologies/OU=DPD/CN=nve.networker.lan
   i:/C=CA/ST=Ontario/L=Toronto/O=Dell Technologies/OU=DPD/CN=dc.networker.lan
...
...
nve:~ #
Windows NetWorker Management Console (NMC) 伺服器:
- 取得個別金鑰檔案或 PFX 格式單一檔案中的 CA 簽署憑證。
- 如果 CA 簽署的憑證位於單一 PFX 檔案中,則私人金鑰和 CA 簽署的憑證可像使用 OpenSSL 工具一樣解壓縮 (Windows 通常未安裝 OpenSSL,可個別安裝)。
注意:執行此程序時,請務必更換
.crt 和 .key 具有完整檔案路徑的檔,相應地包括證書和金鑰檔的檔名。
- 從 PFX 檔案擷取私密金鑰和 CA 簽署憑證。
私人金鑰:
%openssl% pkcs12 -in <file>.pfx -out <server>.key -nodes -nocerts
CA 憑證:
%openssl% pkcs12 -in <file>.pfx -out <server>.crt -nokeys
-
-
- 驗證的完整性
server.key和server.crt。
- 驗證的完整性
-
注意:請確保輸出結果顯示這兩組輸出具有相同的總和雜湊值。若其不同,則存在問題。若其相同,請前往下一個步驟。
私人金鑰:
%openssl% pkey -in <server>.key -pubout -outform pem | %openssl% dgst -sha256
CA 憑證:
%openssl% x509 -in <server>.crt -pubkey -noout -outform pem | %openssl% dgst -sha256
-
-
- 將私密金鑰、CA 簽署的伺服器憑證、root CA (及任何中繼憑證) 轉換為 PEM 格式。
-
私人金鑰:
%openssl% rsa -in <server>.key -outform pem -out C:\tmp\server.key.pem
CA 簽署的伺服器憑證:
%openssl% x509 -in <server>.crt -outform pem -out C:\tmp\server.crt.pem
- 結合
server.key.pem和sever.crt.pem進入cakey.pem用於 NMC 的檔案。為此,建議使用下列 PowerShell 命令:
PS C:\tmp> Get-Content server.key.pem,server.crt.pem | Out-File cakey.pem -Encoding ascii
注意:如果
-Encoding ascii 未設定,可能會觀察到下列問題:NetWorker:更換憑證後,Windows NMC 伺服器無法啟動 GSTD 服務
- 關閉 NMC 伺服器的
gst服務:
net stop gstd
- 製作原件的副本
cakey.pem,然後放置組合的 CA 簽名cakey.pem取而代之的是:
copy "C:\Program Files\EMC NetWorker\Management\GST\etc\cakey.pem" "C:\Program Files\EMC NetWorker\Management\GST\etc\cakey.pem_orig"
copy C:\tmp\cakey.pem "C:\Program Files\EMC NetWorker\Management\GST\etc\cakey.pem"
注意:系統會提示您將覆寫原始憑證。當有原始憑證的副本時,請覆寫憑證。覆寫原始憑證可確保保留檔案的擁有權和許可權。可使用
cakey.pem 文件對應於埠 9001。將此檔案替換為在步驟 2,D 中創建的組合檔,會將自簽名證書替換為 CA 簽名證書。
- 製作 NMC 伺服器的
server.crt和server.key檔案,然後將原始檔案取代為已簽署的server.crt和server.key:
copy "C:\Program Files\EMC NetWorker\Management\GST\apache\conf\server.crt" "C:\Program Files\EMC NetWorker\Management\GST\apache\conf\server.crt_orig"
copy "C:\Program Files\EMC NetWorker\Management\GST\apache\conf\server.key" "C:\Program Files\EMC NetWorker\Management\GST\apache\conf\server.key_orig"
copy <server>.crt "C:\Program Files\EMC NetWorker\Management\GST\apache\conf\server.crt"
copy <server>.key "C:\Program Files\EMC NetWorker\Management\GST\apache\conf\server.key"
注意:替換上述文件對應於埠 9000。替換上述檔后,埠 9000 的自簽名證書將替換為 CA 簽名證書。
- 啟動 NMC 伺服器的
gst服務:
net start gstd
- 監控 NMC 伺服器的
C:\Program Files\EMC NetWorker\Management\GST\logs\gstd.raw對於任何錯誤。
NetWorker:如何使用nsr_render_log呈現.raw紀錄檔
注意:若觀察到任何問題,您可以還原為備份副本。使用 copy 命令覆寫原始檔案,確保檔案保留正確的擁有權和權限。這些檔案必須由預設 NMC 服務帳戶擁有 (
nsrnmc) 與 600 權限。
驗證:
當 NMC 伺服器的 gst 服務正在執行中,請從 NMC 伺服器上的 PowerShell 執行下列命令,更換 連接埠。為連接埠 9000 執行一次,為連接埠 9001 執行一次。
param(
    [string]$Server = "localhost",
    [int]$Port = PORT
)

$tcp = [System.Net.Sockets.TcpClient]::new()
$tcp.Connect($Server, $Port)

# Accept any certificate so we can inspect it (this is inspection only)
$ssl = [System.Net.Security.SslStream]::new(
    $tcp.GetStream(),
    $false,
    { param($sender, $cert, $chain, $errors) $true }
)

try {
    # SNI/target host is the $Server value
    $ssl.AuthenticateAsClient($Server)

    $remoteCert = [System.Security.Cryptography.X509Certificates.X509Certificate2]::new($ssl.RemoteCertificate)

    # Some keys use CNG and PublicKey.Key can be $null; fall back safely
    $keySize = try { $remoteCert.PublicKey.Key.KeySize } catch { $null }
    if (-not $keySize) { $keySize = ($remoteCert.PublicKey.EncodedKeyValue.RawData.Length * 8) }

    "=== Certificate (from $($Server):$Port) ==="
    "Subject                 : $($remoteCert.Subject)"
    "Issuer                  : $($remoteCert.Issuer)"
    "NotBefore               : $($remoteCert.NotBefore)"
    "NotAfter                : $($remoteCert.NotAfter)"
    "Public Key              : $($remoteCert.PublicKey.Oid.FriendlyName) ($keySize-bit)"
    "Signature Algorithm     : $($remoteCert.SignatureAlgorithm.FriendlyName)"
}
finally {
    $ssl.Dispose()
    $tcp.Dispose()
}
範例:
PS C:\Users\Administrator.NETWORKER> param(
>>     [string]$Server = "localhost",
>>     [int]$Port = 9001
>> )
PS C:\Users\Administrator.NETWORKER>
PS C:\Users\Administrator.NETWORKER> $tcp = [System.Net.Sockets.TcpClient]::new()
PS C:\Users\Administrator.NETWORKER> $tcp.Connect($Server, $Port)
PS C:\Users\Administrator.NETWORKER>
PS C:\Users\Administrator.NETWORKER> # Accept any certificate so we can inspect it (this is inspection only)
PS C:\Users\Administrator.NETWORKER> $ssl = [System.Net.Security.SslStream]::new(
>>     $tcp.GetStream(),
>>     $false,
>>     { param($sender, $cert, $chain, $errors) $true }
>> )
PS C:\Users\Administrator.NETWORKER>
PS C:\Users\Administrator.NETWORKER> try {
>>     # SNI/target host is the $Server value
>>     $ssl.AuthenticateAsClient($Server)
>>
>>     $remoteCert = [System.Security.Cryptography.X509Certificates.X509Certificate2]::new($ssl.RemoteCertificate)
>>
>>     # Some keys use CNG and PublicKey.Key can be $null; fall back safely
>>     $keySize = try { $remoteCert.PublicKey.Key.KeySize } catch { $null }
>>     if (-not $keySize) { $keySize = ($remoteCert.PublicKey.EncodedKeyValue.RawData.Length * 8) }
>>
>>     "=== Certificate (from $($Server):$Port) ==="
>>     "Subject                 : $($remoteCert.Subject)"
>>     "Issuer                  : $($remoteCert.Issuer)"
>>     "NotBefore               : $($remoteCert.NotBefore)"
>>     "NotAfter                : $($remoteCert.NotAfter)"
>>     "Public Key              : $($remoteCert.PublicKey.Oid.FriendlyName) ($keySize-bit)"
>>     "Signature Algorithm     : $($remoteCert.SignatureAlgorithm.FriendlyName)"
>> }
>> finally {
>>     $ssl.Dispose()
>>     $tcp.Dispose()
>> }
=== Certificate (from localhost:9001) ===
Subject                 : CN=win-srvr02.networker.lan, OU=DPD, O=Dell Technologies, L=Toronto, S=Ontario, C=CA
Issuer                  : CN=dc.networker.lan, OU=DPD, O=Dell Technologies, L=Toronto, S=Ontario, C=CA
NotBefore               : 03/09/2026 15:42:43
NotAfter                : 06/11/2028 15:42:43
Public Key              : RSA (2048-bit)
Signature Algorithm     : sha256RSA

PS C:\Users\Administrator.NETWORKER> param(
>>     [string]$Server = "localhost",
>>     [int]$Port = 9000
>> )
PS C:\Users\Administrator.NETWORKER>
PS C:\Users\Administrator.NETWORKER> $tcp = [System.Net.Sockets.TcpClient]::new()
PS C:\Users\Administrator.NETWORKER> $tcp.Connect($Server, $Port)
PS C:\Users\Administrator.NETWORKER>
PS C:\Users\Administrator.NETWORKER> # Accept any certificate so we can inspect it (this is inspection only)
PS C:\Users\Administrator.NETWORKER> $ssl = [System.Net.Security.SslStream]::new(
>>     $tcp.GetStream(),
>>     $false,
>>     { param($sender, $cert, $chain, $errors) $true }
>> )
PS C:\Users\Administrator.NETWORKER>
PS C:\Users\Administrator.NETWORKER> try {
>>     # SNI/target host is the $Server value
>>     $ssl.AuthenticateAsClient($Server)
>>
>>     $remoteCert = [System.Security.Cryptography.X509Certificates.X509Certificate2]::new($ssl.RemoteCertificate)
>>
>>     # Some keys use CNG and PublicKey.Key can be $null; fall back safely
>>     $keySize = try { $remoteCert.PublicKey.Key.KeySize } catch { $null }
>>     if (-not $keySize) { $keySize = ($remoteCert.PublicKey.EncodedKeyValue.RawData.Length * 8) }
>>
>>     "=== Certificate (from $($Server):$Port) ==="
>>     "Subject                 : $($remoteCert.Subject)"
>>     "Issuer                  : $($remoteCert.Issuer)"
>>     "NotBefore               : $($remoteCert.NotBefore)"
>>     "NotAfter                : $($remoteCert.NotAfter)"
>>     "Public Key              : $($remoteCert.PublicKey.Oid.FriendlyName) ($keySize-bit)"
>>     "Signature Algorithm     : $($remoteCert.SignatureAlgorithm.FriendlyName)"
>> }
>> finally {
>>     $ssl.Dispose()
>>     $tcp.Dispose()
>> }
=== Certificate (from localhost:9000) ===
Subject                 : CN=win-srvr02.networker.lan, OU=DPD, O=Dell Technologies, L=Toronto, S=Ontario, C=CA
Issuer                  : CN=dc.networker.lan, OU=DPD, O=Dell Technologies, L=Toronto, S=Ontario, C=CA
NotBefore               : 03/09/2026 15:42:43
NotAfter                : 06/11/2028 15:42:43
Public Key              : RSA (2048-bit)
Signature Algorithm     : sha256RSA
其他資訊
即使已將 NMC 的自我簽署憑證更換為由 CA 簽署的憑證,您在透過 NMC 啟動器連線至 NMC 伺服器時,仍可能會看到以下警告訊息:
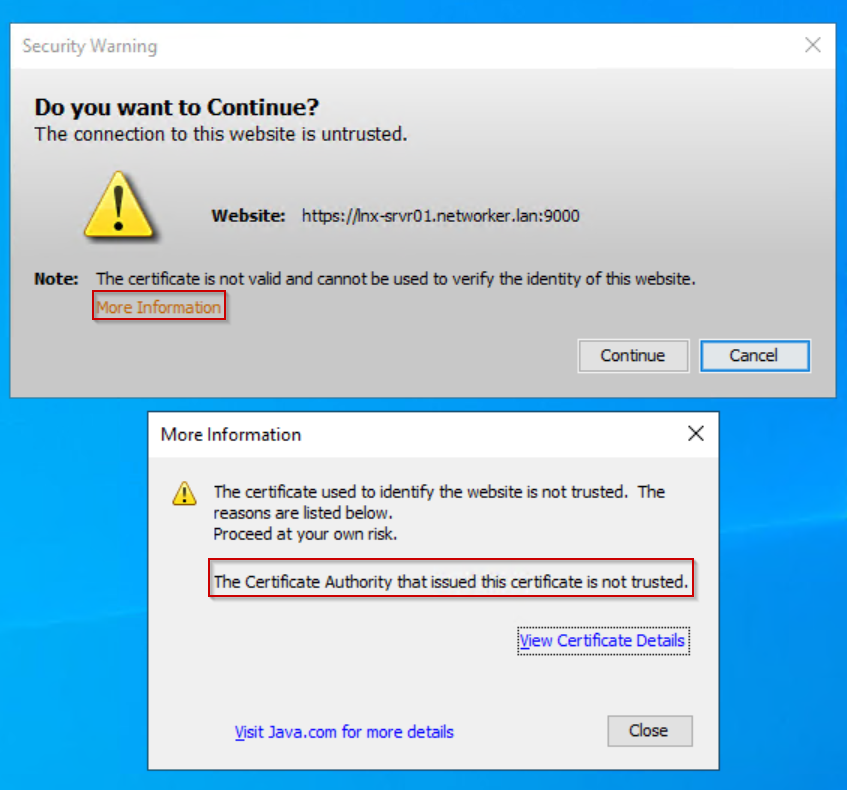
按一下「檢視憑證詳細資料」。憑證詳細資料會驗證是否使用 CA 簽署的憑證。
出現警告是因為 NMC 用戶端的信任根憑證中缺少該已簽署的憑證。
注意:NMC 用戶端是指任何用來存取 NMC 的主機。
可以忽略此警告;或者,NMC 伺服器的 CA 簽署憑證也可以匯入 NMC 用戶端的信任根憑證:
- 將 NMC 伺服器的 CA 簽署憑證 (
<server>.crt) 在您選擇的資料夾中。 - 開啟 CA 簽署的憑證屬性。
- 按一下安裝憑證。
- 選取本機。
- 選取將所有憑證放在下列存放區中。
- 按一下瀏覽。
- 選取受信任的根憑證授權單位,然後按一下確定。
- 按一下 Next (下一步)。
- 按一下完成。
- 隨即會出現訊息,說明匯入失敗或成功,按一下確定。
- 在 CA 簽署的憑證屬性上,按一下確定。
在下一次 NMC 啟動時,即不會出現安全性警告。
受影響的產品
NetWorker, NetWorker Management Console產品
NetWorker Family文章屬性
文章編號: 000269947
文章類型: How To
上次修改時間: 20 8月 2026
版本: 10
向其他 Dell 使用者尋求您問題的答案
支援服務
檢查您的裝置是否在支援服務的涵蓋範圍內。