PowerEdge: Export a SupportAssist Collection Using iDRAC UI or racadm cmd
Summary: Learn how to create and export a SupportAssist Collection using iDRAC9 and iDRAC10 on Dell devices. Resolve technical issues with this step-by-step guide.
This article applies to
This article does not apply to
This article is not tied to any specific product.
Not all product versions are identified in this article.
Instructions
The iDRAC9 and iDRAC10 SupportAssist utility can create a SupportAssist collection, also known as a Technical Support Report (TSR). The iDRAC provides an application interface for gathering platform information that enables support services to resolve platform problems. The iDRAC generates a SupportAssist collection of the system. It saves the collection locally. The SupportAssist collection, or Technical Support Report, can then be used to troubleshoot a system.
Note: For Dell systems with iDRAC7 or iDRAC8, reference Export a SupportAssist Collection over iDRAC7 and iDRAC8.
Note: Using the iDRAC 10 is identical in terms of functional steps. All current firmware versions work for this purpose.
How to Extract SupportAssist Logs Using iDRAC9.
Duration: 00:01:34 (hh:mm:ss)
Closed caption (subtitles) language settings can be chosen using the CC icon on this video player.
To export a SupportAssist Collection using the iDRAC9:
Note: How to configure the Integrated Dell Remote Access Controller 9 (iDRAC9) with Lifecycle Controller network settings explains how to configure the Integrated Dell Remote Access Controller.
- Log in to the iDRAC UI (Figure 1).
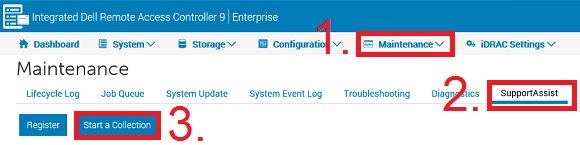
Figure 1: iDRAC9 SupportAssist Collection Menu - Click Maintenance, and then click SupportAssist (Figure 1).
Note: If the server is not registered for SupportAssist, the SupportAssist Registration Wizard is displayed. Registration is optional. If registration is not wanted, click Cancel, and then click Cancel Registration. Registration must be completed to automatically send the collection to Dell Support. - Click Start a Collection (Figure 1).
- Select the datasets to include in the collection. Optionally, proceed with the default selection.
Note: OS and Application Data requires the iDRAC Service Module (iSM) be installed and running. For more information, reference Support for Dell iDRAC Service Module. iSM is an optional software application that can include relevant OS and Application Data in the SupportAssist collection. The Operating System and Application Data option is disabled and not selectable if either the iDRAC Service Module is not installed and running or if the Operating System BMC/iDRAC Passthrough is disabled in the iDRAC. - Collection Preferences: Select datasets that should be filtered for Personally Identifiable Information (Figure 2).
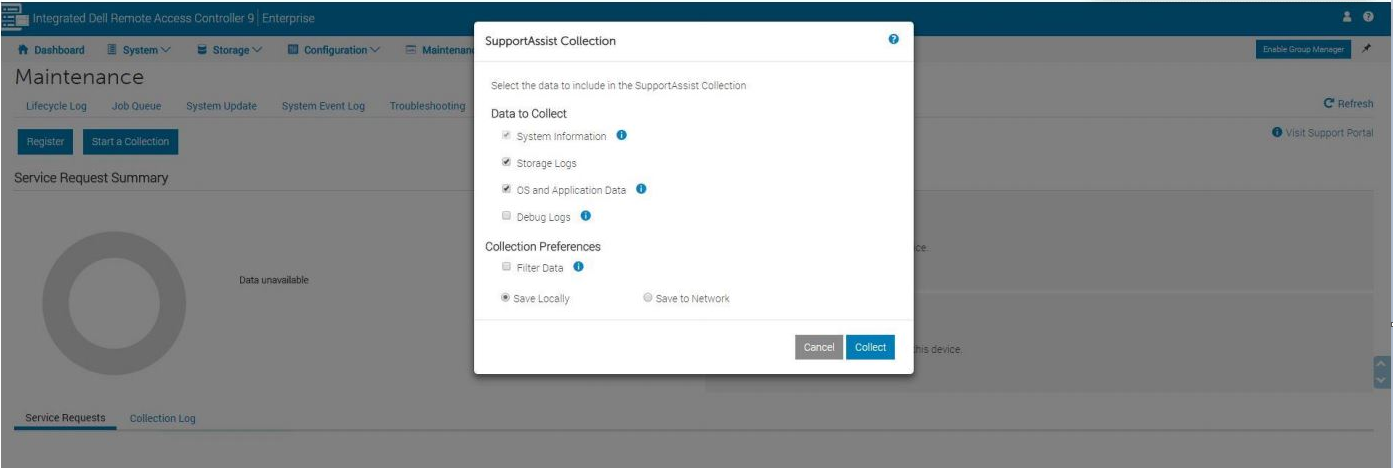
Figure 2: iDRAC9 Collection Preferences
Note:
- Select the Filter Data option to exclude host names, MAC addresses, logs, or registry contents.
- Thermal data is not in the collection when filtering is enabled.
- Debug logs and storage logs are not in the collection when filtering is enabled. - Once collection is complete a green banner appears informing completion and giving you the option to save and view
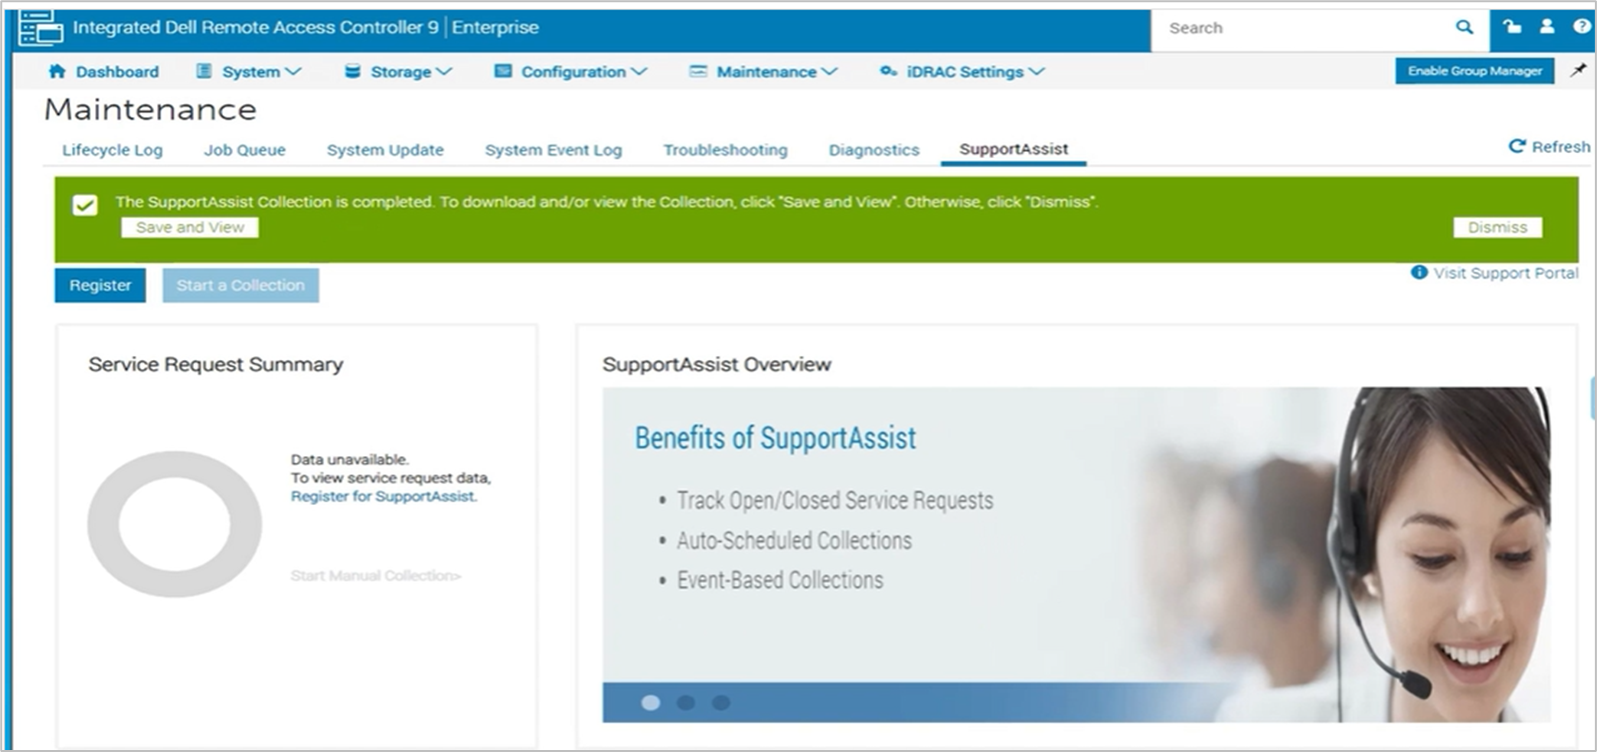
- Depending how your browser is set up for downloading files
- Download automatically to the "download folder"
- Setup to ask where to save the file
Note: If the Save to Network option is selected, the provided network details are saved as default for all future collections.
Note: As of iDRAC9 firmware 7.0 and newer it is no longer possible for an iDRAC SupportAssist collection to be directly sent to Dell.- Save locally option saves the generated collection on the local system.
Note: A message displays to save a compacted file to open in your browser. Certify that this message is not blocked.
- Save to Network option saves the generated collection to a defined CIFS or NFS share location
- Click Collect to proceed with Collection generation.
- Accept the End-User Level Agreement (EULA) to continue the process.
Note:
- Updating the system's drivers and firmware may resolve many of the issues that are captured in a SupportAssist collection. For more information, reference Updating Firmware and Drivers on Dell PowerEdge Servers.
- Access iDRAC documentation by selecting "iDRAC <xx>," the installed firmware version and then documentation
Additional Information
To log in to the iDRAC using racadm, see the following tutorial:
Tutorial on iDRAC RACADM Command Line
Duration: 00:05:18 (hh:mm:ss)
When available, closed caption (subtitles) language settings can be chosen using the CC icon on this video player.
Caution: The racadm
techsupreport command syntax differs between iDRAC generations and may change with firmware updates. iDRAC7 and iDRAC8 use the generate subcommand, while iDRAC9 and iDRAC10 use the collect subcommand. Always verify the correct subcommands and options in the RACADM CLI reference guide for your installed iDRAC firmware version.
Note: For iDRAC7 and iDRAC8 racadm commands, reference Export a SupportAssist Collection over iDRAC7 and iDRAC8.
Note: Follow the latest
racadm CLI reference guide found in the documentation for your iDRAC.
At the time of writing for the iDRAC10 this is: iDRAC10 RACADM CLI Reference Guide (PDF)
The latest documentation can be found on the Dell support page in the documentation section for the iDRAC in question.
The latest documentation can be found on the Dell support page in the documentation section for the iDRAC in question.
Generate a SupportAssist (TSR) Collection Using racadm on iDRAC9 and iDRAC10
- Connect to the iDRAC using an SSH connection (use an SSH client).
- Run the following command to generate the collection, specifying the desired log types:
racadm techsupreport collect -t SysInfo
Note: Log type options are added with a comma and no spaces. Available log types include:- SysInfo — Main system information log
- TTYLog — Storage controller logs
- OSAppAll — OS logs (available only if the iDRAC Service Module (iSM) is installed on the OS and running)
racadm techsupreport collect -t SysInfo,TTYLog - Check the job queue to verify that the collection is complete:
racadm jobqueue view
- Once the job has completed successfully, export the collection using one of the following methods:
- Local save (when running racadm locally on the server):
racadm techsupreport export -f <filename>.zip
- Network share save:
racadm techsupreport export -l <CIFS or NFS share path> -u <share username> -p <share password>
Note: The-foption for local file save is available only when running racadm locally on the server. When connected remotely via SSH, use the-loption with a network share path instead.
Note: The-foption for the file name is not needed when using a share to save the file. - Local save (when running racadm locally on the server):
Affected Products
iDRAC9, iDRAC10 - 1.30.xx SeriesArticle Properties
Article Number: 000126308
Article Type: How To
Last Modified: 16 Sep 2026
Version: 32
Find answers to your questions from other Dell users
Support Services
Check if your device is covered by Support Services.