Dell BIOS and UEFI Update Download and Installation Guide
Summary: Information about how to download and install the latest BIOS or UEFI updates on a Dell computer. This guide covers accessing BIOS or UEFI, updating using USB or Windows, and recovering corrupt BIOS or UEFI on Dell computers. ...
This article applies to
This article does not apply to
This article is not tied to any specific product.
Not all product versions are identified in this article.
Instructions
Updating your BIOS or UEFI is easier than you might think. For the most streamlined experience with step-by-step instructions, helpful videos, and comprehensive troubleshooting support, visit our BIOS/UEFI Update Guide. This dedicated resource walks you through every update method and answers common questions in one convenient location.
Continue reading below for essential information about BIOS updates, or jump straight to the BIOS/UEFI Update Guide for detailed instructions.
Understanding BIOS and UEFI
BIOS (Basic Input/Output System) and UEFI (Unified Extensible Firmware Interface) are the firmware that connects your computer's hardware to its operating system. Think of it as the foundation that helps your computer start up and communicate with its components.
Modern Dell computers use UEFI, which offers:
- Faster startup times
- Enhanced security features
- Better compatibility with new hardware
- Improved system stability
Why Update Your BIOS or UEFI?
Dell regularly releases BIOS updates that can improve your computer's performance and reliability. Updates typically include:
- Security enhancements – Protection against newly discovered vulnerabilities
- Performance improvements – Optimizations for better speed and efficiency
- Hardware compatibility – Support for new components and peripherals
- Bug fixes – Solutions to known issues that affect system stability
- Feature additions – New capabilities and settings
Dell recommends updating your BIOS as part of regular system maintenance to keep your computer running smoothly.
Before You Update: Important Precautions
Taking a few simple steps before updating can help ensure a smooth process:
Essential Steps
- Back up your data – While rare, update interruptions can affect system stability
- Charge your laptop – Ensure at least 10% battery (we recommend using AC power)
- Stay connected to power – Keep laptops plugged in throughout the update
- Close all programs – This prevents interference during the update
- Disconnect external devices – Remove USB drives, printers, and other peripherals
BitLocker Users: Read This First
If your computer uses BitLocker encryption, you'll need to temporarily suspend it before updating:
- Search for "BitLocker" in Windows
- Select "Manage BitLocker"
- Choose "Suspend protection"
- Proceed with your BIOS update
- Re-enable BitLocker after the update completes
Note: If you don't suspend BitLocker, you'll need your recovery key after restarting. Find your recovery key in your Microsoft Account  under Devices.
How to Update Your BIOS: Multiple Easy Methods
Dell provides several convenient ways to update your BIOS. For complete instructions for each method, visit our BIOS/UEFI Update Guide.
- SupportAssist (Recommended for Most Users) The easiest automated option that scans and installs updates for you.
- Windows Update BIOS updates appear as optional updates in Windows Settings.
- Dell Command | Update Designed for business computers like Latitude, OptiPlex, and Precision.
- Standalone Update Utility Download and run the update file directly from Dell's website on Windows.
- USB Flash Drive Perfect for Linux users or when Windows isn't accessible.
- Over-The-Air (OTA) Update Available on modern systems for remote BIOS updates.
- Dell Update or Alienware Update Pre-installed tools for Inspiron, XPS, G-Series, and Alienware systems.
Each method works well, choose the one that fits your situation. The BIOS/UEFI Update Guide provides detailed guidance for all approaches.
Checking Your Current BIOS Version
Before updating, verify your current BIOS version to see if an update is available:
Method 1: BIOS/UEFI Settings
- Restart your computer
- Press F2 repeatedly when you see the Dell logo
- Look for the BIOS version under System Information or Overview

Method 2: Windows System Information
- Press Windows + R
- Type msinfo32 and press Enter
- Find "BIOS Version/Date" in the list

Method 3: Command Prompt
- Open Command Prompt
- Type wmic bios get smbiosbiosversion
- Press Enter to see your version

Accessing BIOS/UEFI Settings
Need to change BIOS settings? Here's how:
- Turn on or restart your computer
- Press F2 several times as soon as you see the Dell logo
- The BIOS setup screen will appear
Alternative method:
- Press F12 at the Dell logo
- Select "BIOS Setup" or "System Setup" from the menu
If F2 doesn't work, try pressing Fn + F2 together, or press F2 repeatedly rather than holding it down.
Note: The BIOS interface may look different depending on your Dell computer model. Settings are designed for experienced users, so change only what you need to adjust.
Troubleshooting Update Issues
If your BIOS update encounters problems:
- Ensure stable power – Connect your laptop to AC power
- Charge your battery – At least 50% for laptops
- Remove external devices – Disconnect docking stations, external drives, and peripherals
- Try a different method – If one update method fails, try using the standalone BIOS update utiliy
- Check compatibility – Verify you downloaded the correct BIOS file for your specific model
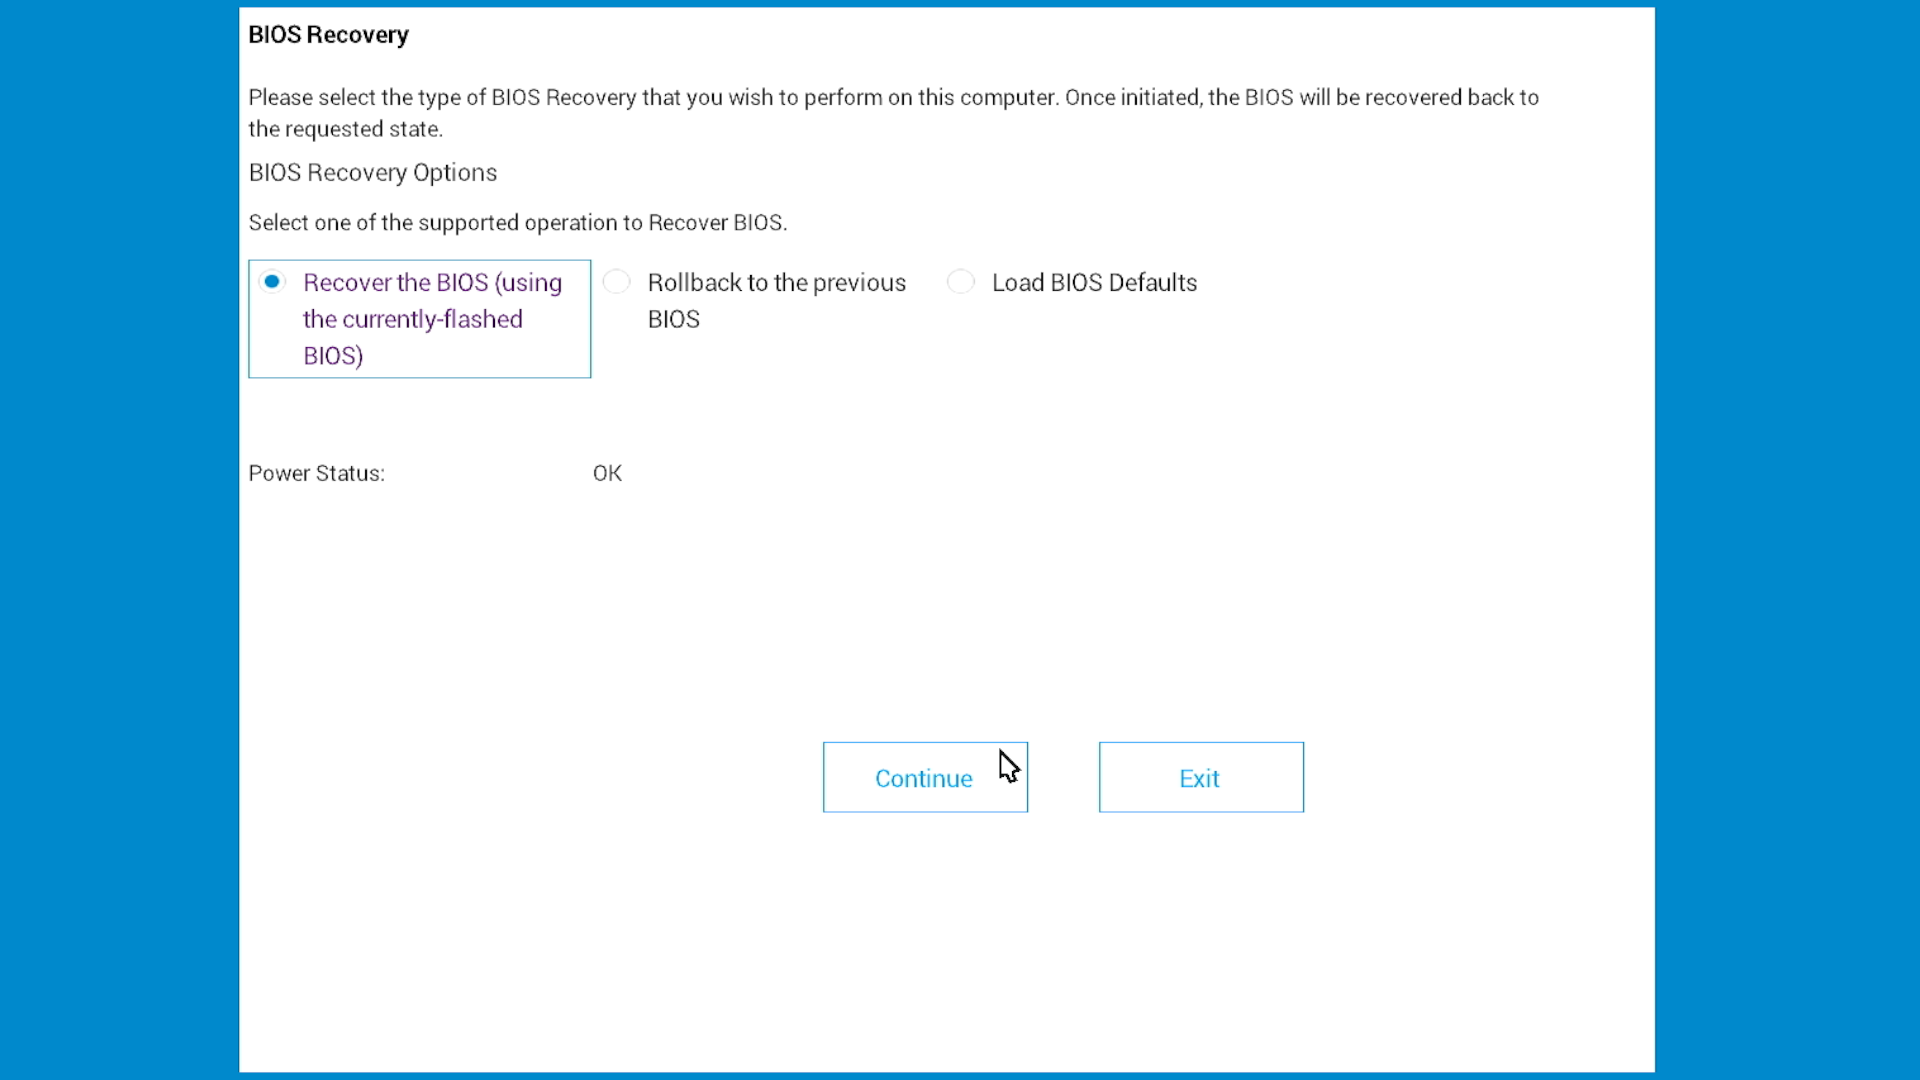
BIOS Recovery
If your computer won't start after a failed update, Dell provides BIOS recovery feature on modern Dell systems. This feature can restore your BIOS using recovery files stored on your hard drive or a USB drive.
Recovery is available through:
- BIOS Recovery Tool – Software designed to fix corrupted BIOS on modern Dell systems
For complete recovery instructions and step-by-step guidance, check our BIOS recovery guide.
BIOS Security Features
Your BIOS offers password protection to secure your computer:
- Supervisor/Admin Password – Prevents unauthorized BIOS changes
- System/User Password – Required to start the computer
- Hard Drive/SSD Password – Protects data on internal drives
Frequently Asked Questions
Q: How often should I update my BIOS?
A: Update during regular maintenance or when Dell releases critical updates for security or specific issues you're experiencing.
Q: Will updating delete my data?
A: No, BIOS updates don't affect your files. However, backing up data before any system update is always good practice.
Q: Can I downgrade to an older BIOS version?
A: Sometimes. Dell may restrict downgrades when newer versions include critical security fixes. Check the specific BIOS release notes.
Q: Do I need administrator rights?
A: Yes, you must be logged in as an administrator to install BIOS updates.
Q: What if my update fails?
A: Don't worry, try a different update method. The Support Library covers multiple approaches and troubleshooting steps.
How to Update the BIOS or UEFI
Watch this video to learn how to download and install the latest BIOS or UEFI on a Dell computer.
Duration: 03:46
When available, closed caption (subtitles) language settings can be chosen using the Settings or CC icon on this video player.
How to perform Firmware Update Over The Air using Dell BIOSConnect
Duration: 2:02
Closed captions: This video is available in multiple languages. Click the Closed Caption icon and select the language that you want.
Affected Products
Alienware, Dell All-in-One, Dell Pro All-in-One, Dell Pro Max Micro, Dell Pro Max Slim, Dell Pro Max Tower, Dell Pro Micro, Dell Pro Slim, Dell Pro Tower, Dell Slim, Dell Tower, Inspiron, Legacy Desktop Models, OptiPlex, Vostro, XPS, G Series
, G Series, Alienware, Dell Laptops, Dell Plus, Dell Pro, Dell Pro Max, Dell Pro Plus, Dell Pro Premium, Inspiron, Latitude, Dell Pro Rugged, Vostro, XPS, Legacy Laptop Models, XPS Tablets, Fixed Workstations, Mobile Workstations, Dell Pro Max Micro XE FCM2250, Dell Pro Max Slim XE FCS1250, Dell Pro Max Tower T2 XE FCT2250, Dell Pro Max 16 XE MC16250, Dell Pro Micro Plus XE QBM1250, Dell Pro Slim Plus XE5 QBS1250, Dell Pro Tower Plus XE5 QBT1250
...
Article Properties
Article Number: 000124211
Article Type: How To
Last Modified: 19 Apr 2026
Version: 40
Find answers to your questions from other Dell users
Support Services
Check if your device is covered by Support Services.