The features of the Dell Pro Dual Monitor Arm MDA20
Summary: The following article provides information about the use, features, assembly, and compatibility of the Dell Pro Dual Monitor Arm MDA20.
This article applies to
This article does not apply to
This article is not tied to any specific product.
Not all product versions are identified in this article.
Instructions
Table of Contents:
Introduction


(Figure.1 and 2 Dell Dual Monitor Arm with and without the monitors attached)
If you are looking to maximize your productivity, then you should look at this Dell Pro Dual Monitor Arm MDA20.
The Dell Pro Dual Monitor Arm MDA20 supports mounting your computer and/or one or two monitors. You can install your Dell UltraSharp, or P-Series monitors using the Quick Release. It mounts selected OptiPlex Micro, Ultra, or Wyse computers on the monitor with virtually no tools. The counterbalance indicator on the arm offers replication across identical monitors ensuring rapid deployment across busy workspaces. The integrated cable management slot with clips can hold up to 10 cables which help to keep your desk neat and uncluttered.
You can locate further information about the Dell Pro Dual Monitor Arm MDA20 on the following link:
You can search the Dell Sales Site for the Dell Pro Dual Monitor Arm MDA20 to find out information such as the price.
Features
| Product Type | Desk Mount (Adjustable) |
| Color | Black |
| Installation | Clamp desks up to 53 mm (2.1 in.) thick and Grommet hole diameter is up to 50.8 mm (2 in.) |
| Panel Mount | Dell Quick Release Mount VESA-compliant Monitor Mount VESA Adapter Plate Mount Sets included |
| System Mount | Select OptiPlex Micro and Ultra models and Wyse Thin Clients |
| VESA Mounting Interface | 100 mm x 100 mm (3.9 in. x 3.9 in.) |
| Dynamic Arm Supported Weight Range (Per Arm) |
2.2 kg to 10 kg (4.8 lbs to 22.0 lbs) |
| Recommended Use | Two LCD Flat Displays |
| Recommended Display Size | 19 in. to 27 in. |
| Cable Management | Slots in upper and lower arms for up to 10 cables |
Note: The swivel range limiter switch is set to the unlocked position when the stand is shipped from Dell.
Assembly
Note: The following parts ship in the box:
- Base
- Static Arms
- Dynamic Arms
- VESA adapter plate
- Screws
- Plastic spacer

(Figure.3 In the Box)
Assembly Steps:
-
The desk mount fits to a flat edge like the back of your desk

(Figure.4 Desk Mount)
-
Attach the screw clamp over the bolts in the desk mount and tighten the bolts and then the screw clamp to secure the mount to the desk
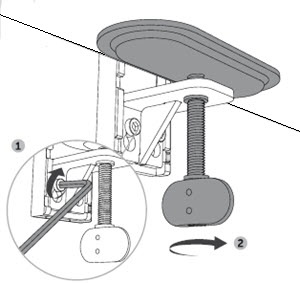
(Figure.5 Screw Clamp)
-
Slide both of the lower arms over the desk mount

(Figure.6 Lower Arms)
-
Line up the dots on the arm and mount and move the slider to lock the arm at either 180° or 360° on both

(Figure.7 Slider Lock Lower Arms)
-
Slide the upper arm down on to the lower arm for both

(Figure.8 Upper Arms)
-
Line up the dots where the lower and upper arms connect and use the slide to lock in your preferred angle on each arm

(Figure.9 Slider Lock Upper Arms)
-
Slide and pull the covers off both of the lower and upper arms

(Figure.10 Cable Tray Covers)
-
Route your cables through the exposed clips to keep them tidy and out of the way

(Figure.11 Cable Routing)
-
Attach your devices to the end of each arm

(Figure.12 Attachment)
-
Plug up your cables

(Figure.13 Attach Cables)
-
Fit the covers back onto the lower and upper arms to conceal the cables
Range of Movement

(Figure.14 Vertical Movement)

(Figure.15 Depth of Movement)
| Movement | Height adjustable, Swivels, Tilts, and Pivots |
| Pivot | 90° clockwise and 90° anti-clockwise |
| Attachment Tilt | Tilts downward 35° and upwards by 80° |
| Lower Arm | Slide locks between 180° and 360° at the base of the arms |
| Upper Arm | Slide locks between 180° and 360° at the base of the upper arms |
| Attachment Swivel | 180° at the end of the upper arms |
| Pan | 180° |
| Height Range | 266 mm (10.5 in.) |
| Depth Range | 548 mm (21.6 in.) |
Affected Products
OptiPlex Micro, OptiPlex Ultra, P Series, UltraSharp Premier (UP) Series, UltraSharp (U) Series, Dell Pro Dual Monitor Arm MDA20, OptiPlex 3000 Thin ClientArticle Properties
Article Number: 000153027
Article Type: How To
Last Modified: 17 Apr 2025
Version: 10
Find answers to your questions from other Dell users
Support Services
Check if your device is covered by Support Services.