Dell Unity: Reimaging A Storage Processor
Summary: This article covers the steps required to reimage a Storage Processor (SP) of a Dell Unity array. A Storage Processor reimage reinstalls the Unity operating software on a single SP while preserving the array configuration and customer data. During the procedure, the affected SP is temporarily unavailable and its workloads fail over to the peer SP. In a properly redundant environment, host access remains online with only brief path failover activity expected. ...
Αυτό το άρθρο ισχύει για
Αυτό το άρθρο δεν ισχύει για
Αυτό το άρθρο δεν συνδέεται με κάποιο συγκεκριμένο προϊόν.
Δεν προσδιορίζονται όλες οι εκδόσεις προϊόντων σε αυτό το άρθρο.
Instructions
The process to reimage a Dell Unity Storage Processor (SP) can be started using the Command-Line Interface (CLI) or Unisphere (UI).
This task can be performed after:
- Validating that a software issue exists with the Storage Processor (SP), such as software corruption.
- Validating that no issues with the Storage Processor (SP) are in place, such as internal component faults.
Unisphere (UI)
Step 1: Transition the SP into Service Mode.
- From the UI, go to
SYSTEM > Service > Service Tasks.
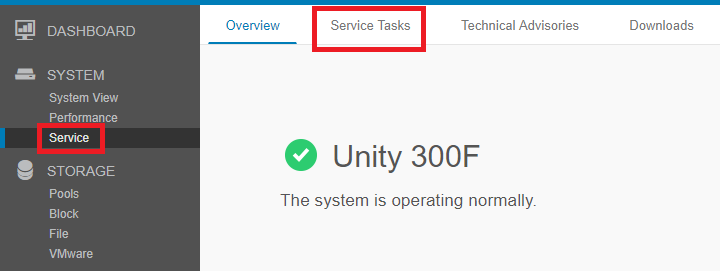
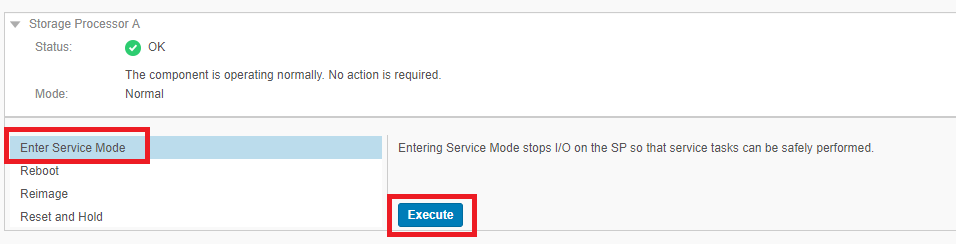
- On the Service Tasks page, scroll to the SP that is intended to be reimaged and select the option
Enter Service Mode > Execute.
- Enter the credentials of the Service user and select OK.
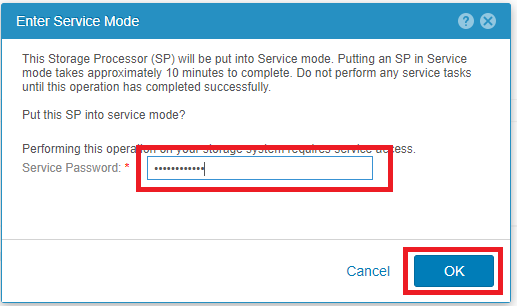
- The Storage Processor selected reboots to Service Mode.
Step 2: Begin the reimage task.
- After the reboot of the SP into Service Mode, navigate back to
SYSTEM > Service > Service Tasks. - On the Service Tasks page, scroll to the SP that is intended to be reimaged and select the option
Reimage > Execute.
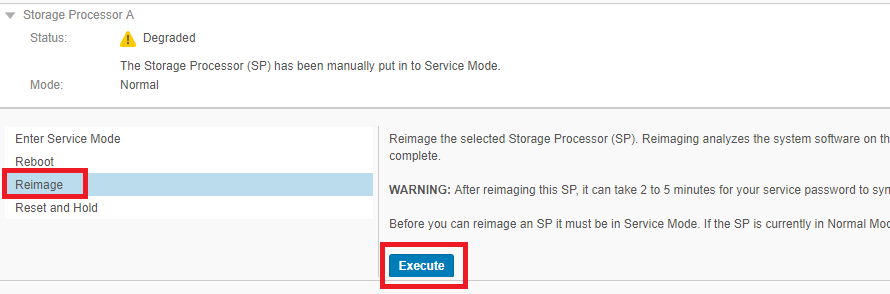
- Enter the credentials of the Service user and select OK.
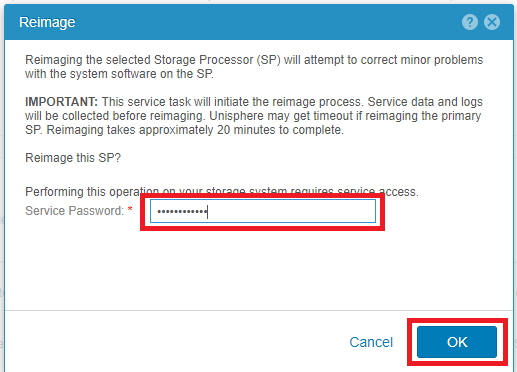
- The Storage Processor selected reboots to Service Mode.
- The reimage process for the selected SP begins.
COMMAND LINE INTERFACE (CLI)
Step 1: Transition the SP into Service Mode.
- Open an SSH session to the array and log In with the Service user credentials.
- Confirm that you are on the correct SP where the reimage process is intended to take place.
- Run
ssh peerif you must move to the other SP.
- Run
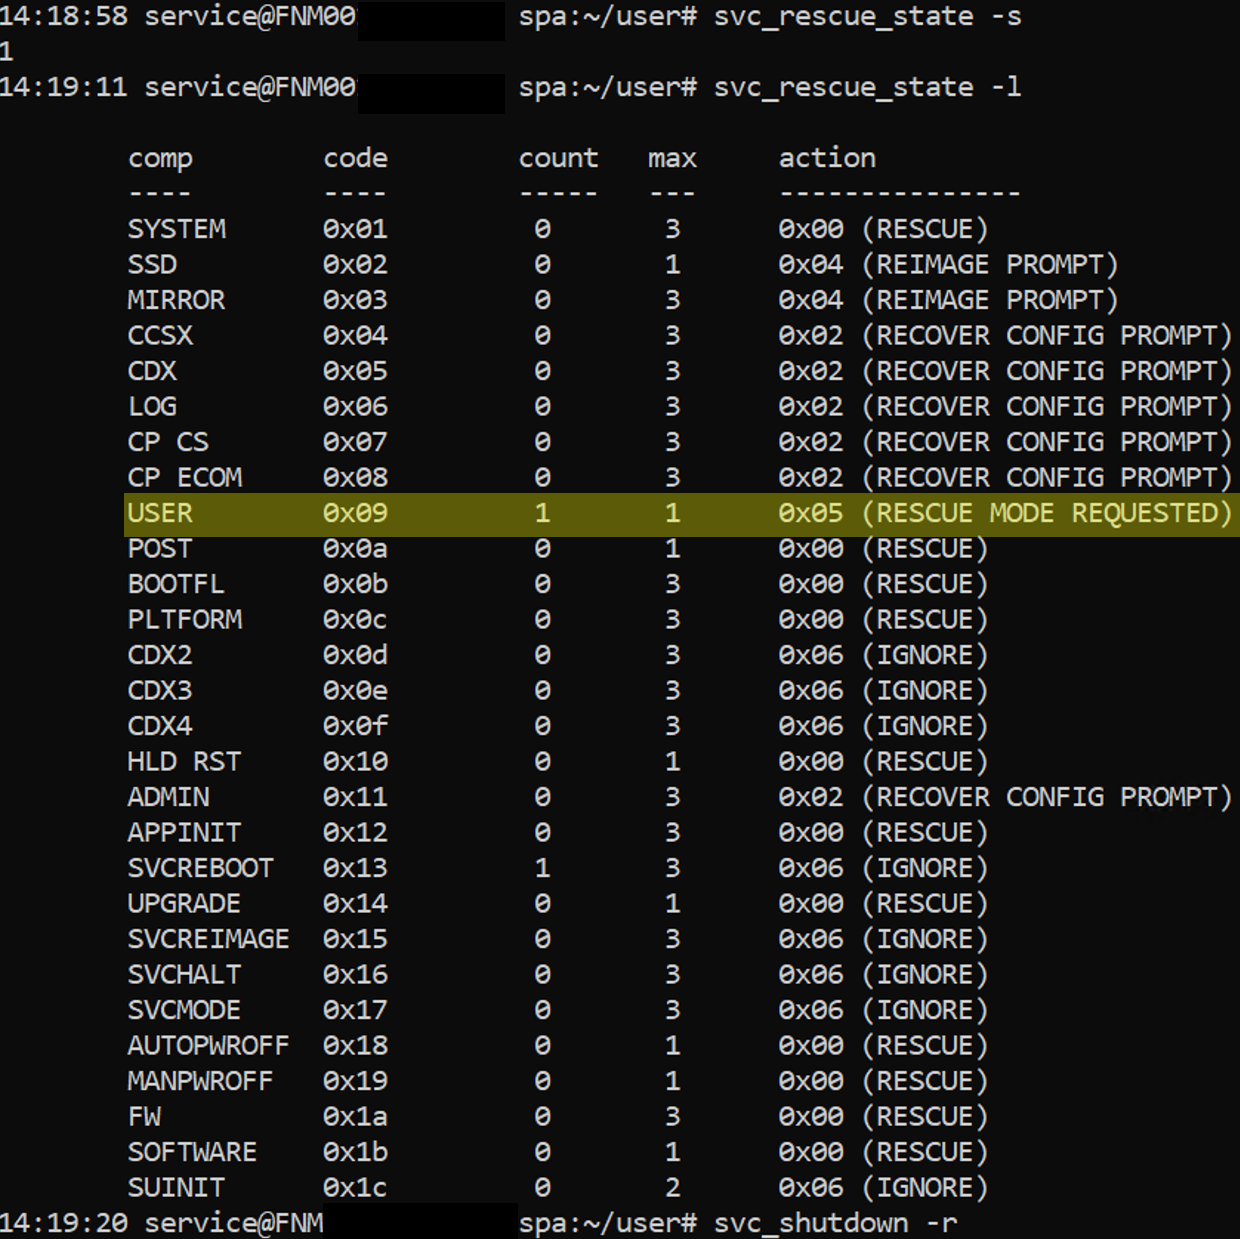
- Set the flag to boot into Service Mode. This option manually forces the SP to boot into Service Mode the next time it is rebooted.
svc_rescue_state -s
- Confirm that the SP has the boot flag set correctly. This option details why the current SP has booted into Service Mode.
svc_rescue_state -l
- Reboot the SP.
svc_shutdown -r
Step 2: Begin the reimage task.
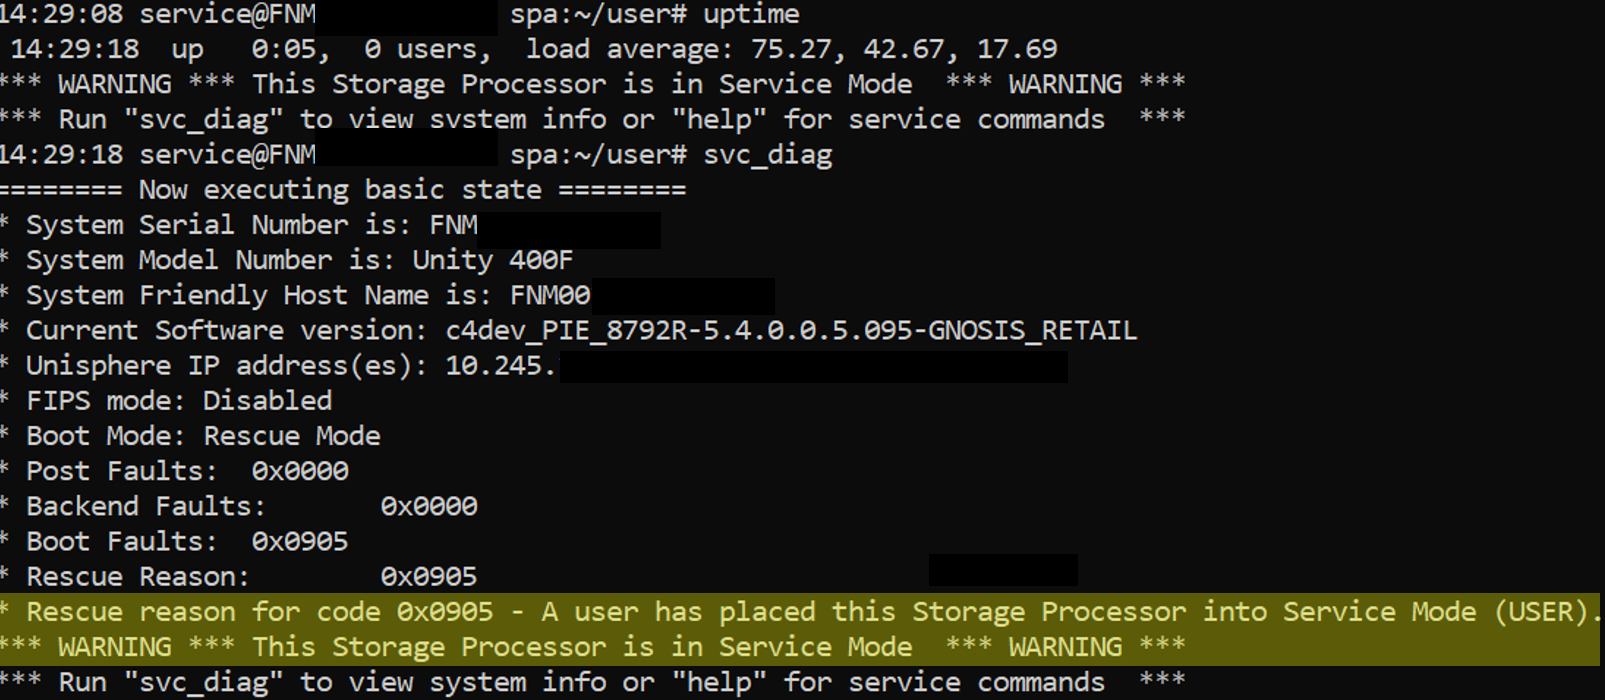
- After the reboot of the SP into Service Mode, open or restart the SSH session, using the Service user credentials, and verify that the SP shows the following banner:
*** WARNING *** This Storage Processor is in Service Mode *** WARNING ***
- Alternatively, you can run
svc_diagto verify the status of the Storage Processor.
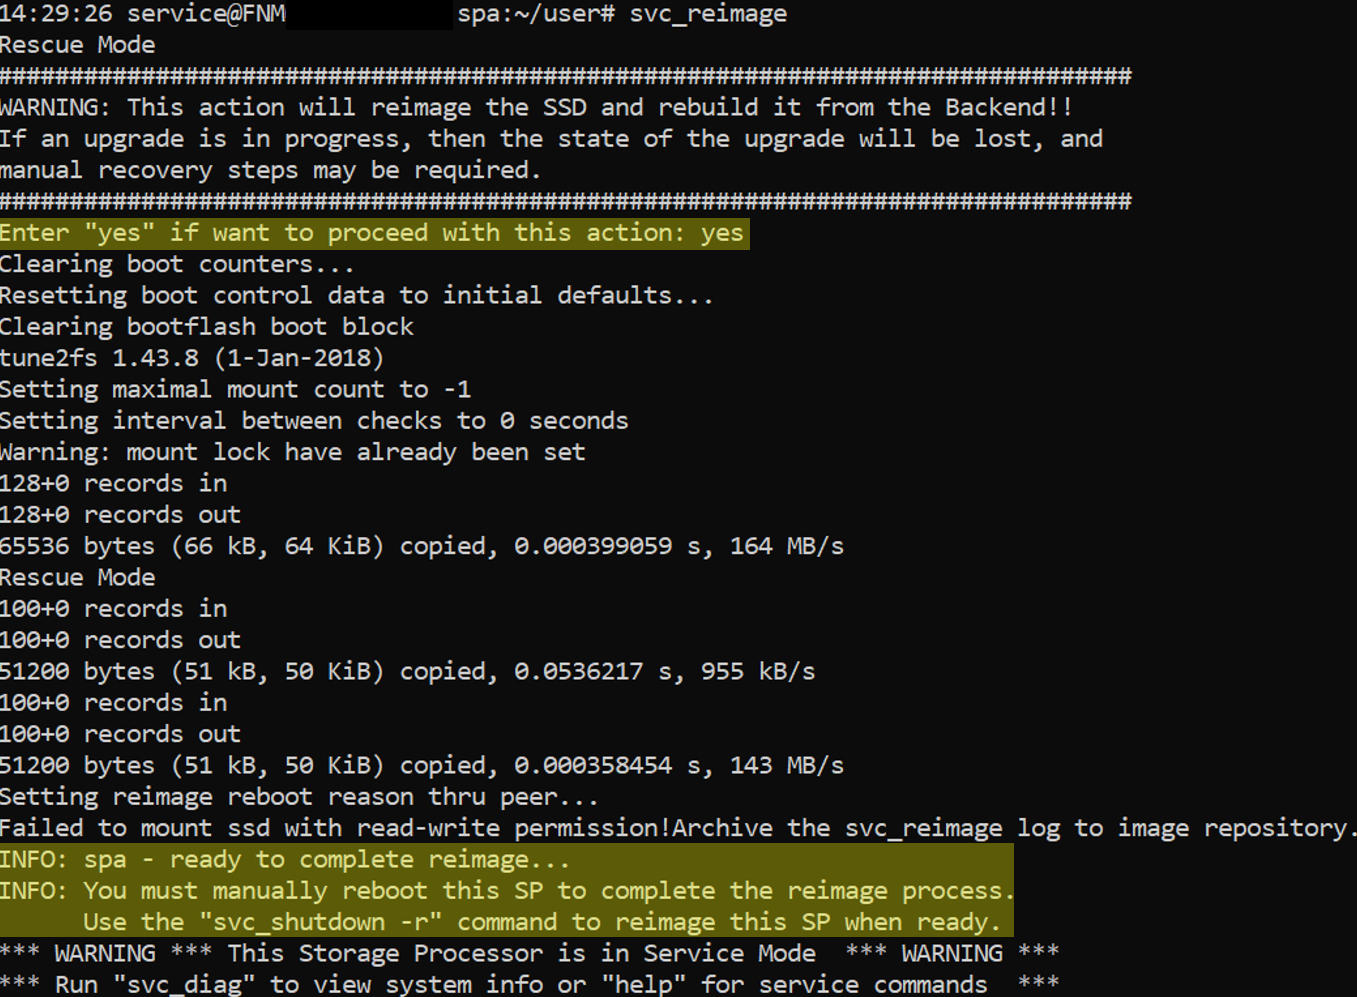
- Start the reimage processor by running
svc_reimage.- Awareness: This task does not complete the reimage process. An SP reboot is required.
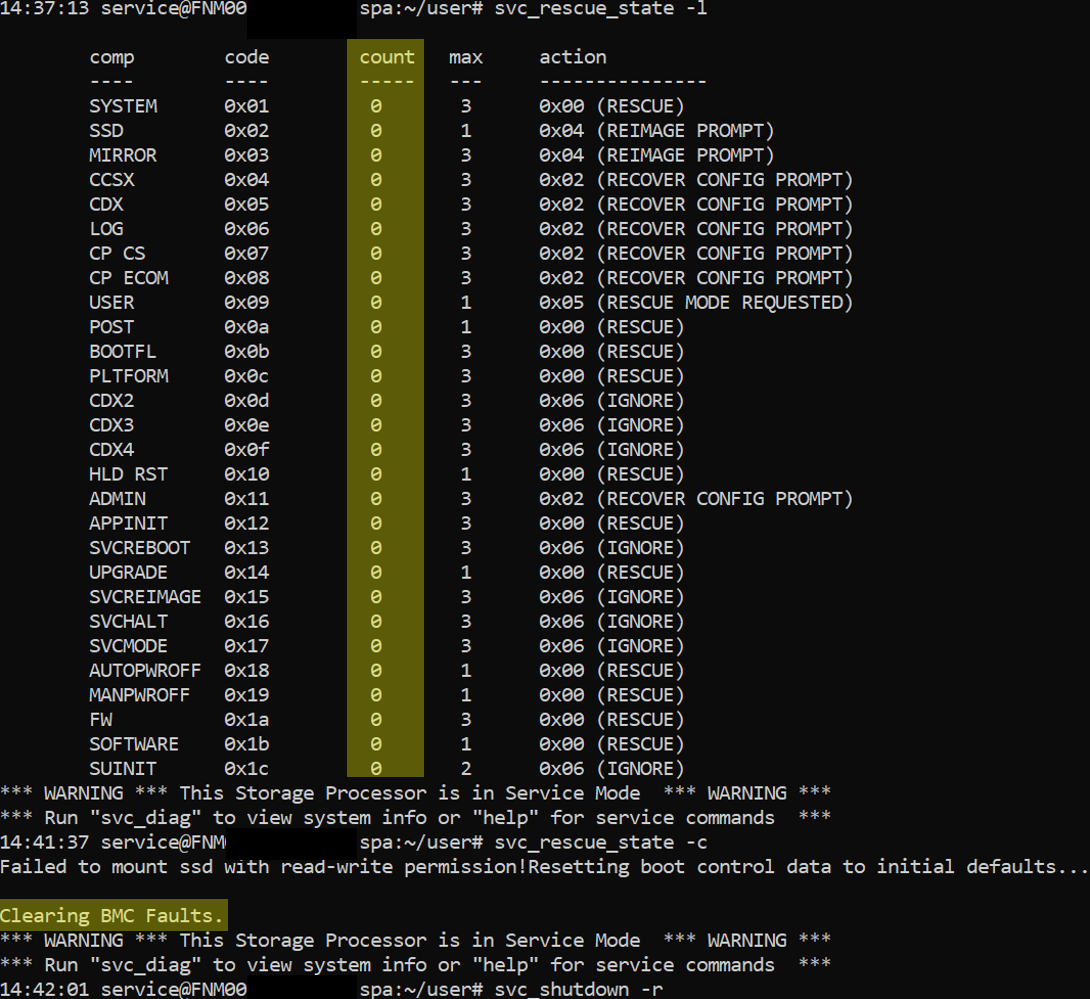
- Confirm that all flags are cleared
svc_rescue_state -l
- Clear and reset all the boot counters. This option resets all the boot control counters, clears all BMC faults, and instructs the SP to attempt to boot into Normal Mode on the next reboot. Note that errors or faults may still cause the system to boot back into Service Mode. In most instances, you must first address the failure condition which put the SP into service mode before proceeding with clearing the counters.
svc_rescue_state -c
- Reboot the Storage Processor
svc_shutdown -r
- Wait for the reimage task to complete.
- This should take around 20-30 minutes.
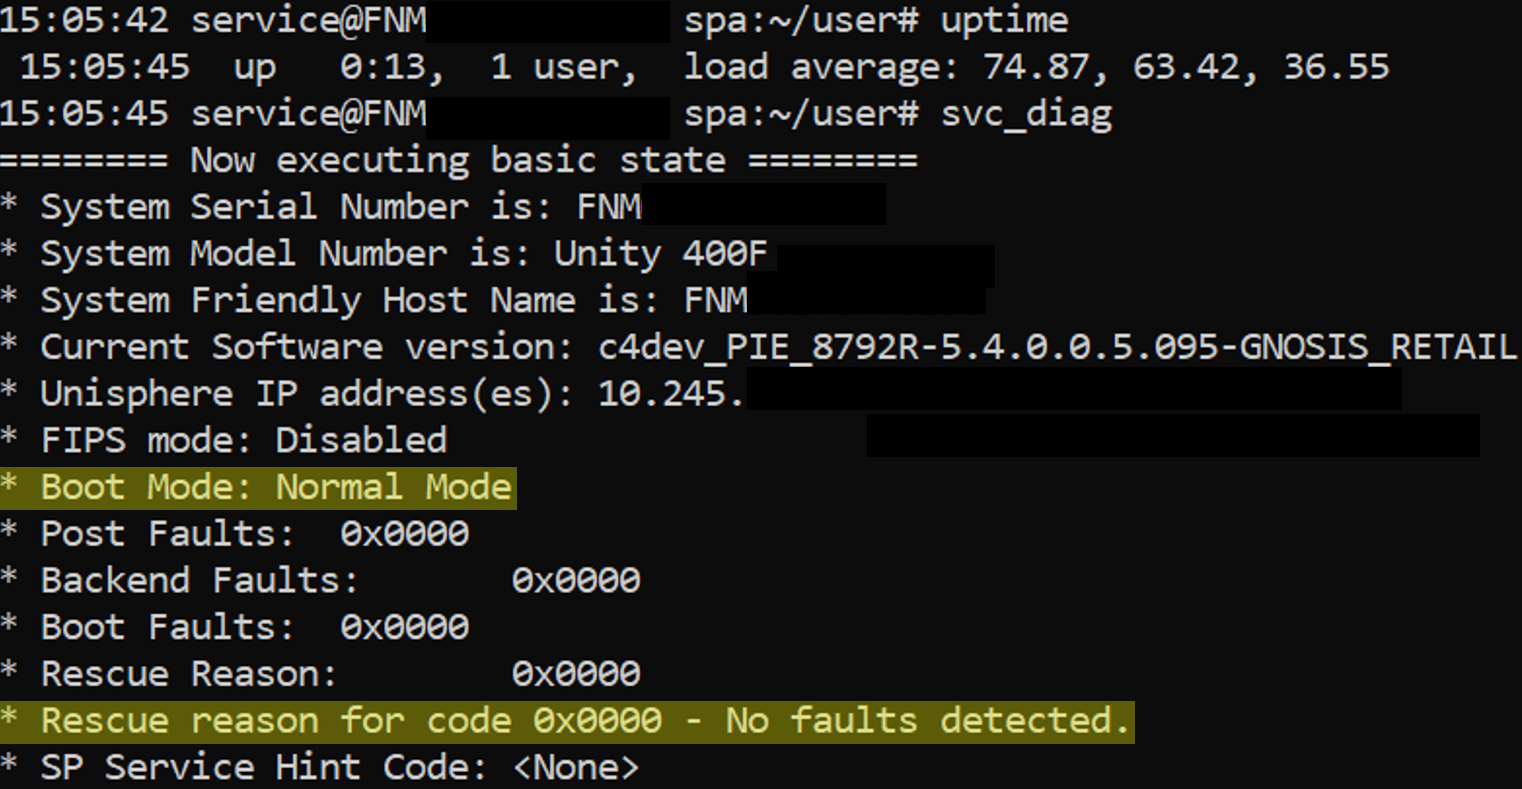
- Run
svc_diagto verify the status of the Storage Processor and confirm it is back to Normal Mode.
Additional Information
- The reimage task requires the SP being in Service Mode. When an SP is in Service Mode, it stops servicing I/O to the hosts.
- In physical deployments, and if the peer SP is healthy, all NAS servers on the SP failover to the peer SP.
- By default, when the reimage process completes, the NAS servers failback to the original SP.
- If the Failback Policy is disabled, the NAS servers do not automatically failback to the original SP and they remain on the peer SP. A manual failback of the NAS servers is required.
- Performance can degrade when all NAS servers reside on a single SP.
- An example of the CLI method is attached under the Related tab.
- The file name is:
Example of a Unity SP Reimage using CLI.docx
- The file name is:
A Dell Unity Storage Processor (SP) reimage does not reinitialize the array or erase customer data. It is essentially a recovery process that reinstalls the Unity Operating Environment (OE) onto one SP's system partition using a known-good image stored internally on the array.
What Happens During the Reimage?
- The target SP is placed into Service Mode and rebooted.
- The SP's system/software partition is overwritten with a clean Unity OE image.
- The SP retains its persistent configuration information, including:
- System configuration
- Networking
- Host registrations
- User data
- Array personality/configuration information
- The SP reboots back into normal operation and rejoins the system.
What Is Impacted?
During a Single-SP Reimage on a Healthy Dual-SP Unity
The impact is generally equivalent to an SP reboot:
- The reimaged SP is unavailable during the procedure.
- All block and file resources owned by that SP trespass/fail over to the peer SP.
- Host I/O should remain online if:
- Multipathing is configured correctly.
- Hosts have active paths to both SPs.
- The peer SP is healthy and has sufficient resources.
Expected Customer Observations
- Brief path loss or path failover events on hosts.
- ALUA path state changes.
- Possible event log notifications related to SP failover/failback.
- Temporary increase in load on the surviving SP.
What Is NOT Impacted?
A standard SP reimage does not:
- Delete LUNs, file systems, or VMware datastores.
- Erase pools or RAID groups.
- Remove host registrations.
- Reset Unisphere configuration.
- Reset user accounts or passwords.
- Change Unity OE version. The SP is reimaged using the array's stored software image.
When Is It Typically Used?
Dell support usually recommends an SP reimage when there is evidence of:
- SP software corruption
- Failed software upgrades on a specific SP
- Services failing to start correctly
- Persistent boot issues that are software-related rather than hardware-related
Dell specifically notes that hardware faults should be ruled out before performing a reimage.
Important Caveats
A reimage is not the same as:
- Reinitialize (
svc_reinit): wipes the entire array and deletes all customer data. [manualowl.com] - SP replacement: involves replacing physical hardware.
- OE upgrade: changes the running software version.

Επηρεαζόμενα προϊόντα
Dell EMC Unity, Dell EMC Unity Family |Dell EMC Unity All Flash, Dell EMC Unity Hybrid, Dell Unity Operating Environment (OE)Ιδιότητες άρθρου
Article Number: 000022675
Article Type: How To
Τελευταία τροποποίηση: 21 Αυγ 2026
Version: 8
Βρείτε απαντήσεις στις ερωτήσεις σας από άλλους χρήστες της Dell
Υπηρεσίες υποστήριξης
Ελέγξτε αν η συσκευή σας καλύπτεται από τις Υπηρεσίες υποστήριξης.