如何在 Windows 10 和 11 Microsoft存取 UEFI 和 BIOS 韌體設定畫面
Summary: 下列文章提供在 Dell 電腦上使用Microsoft Windows 10 或 11 存取整合可延伸韌體介面 (UEFI) 或 BIOS 的相關資訊。
This article applies to
This article does not apply to
This article is not tied to any specific product.
Not all product versions are identified in this article.
Instructions
Windows 11 和 Windows 10 作業系統可開機進入受支援 Dell 電腦上的 UEFI BIOS 韌體設定。使用整合式進階啟動選項。
注意:部分 Dell 電腦可能不支援此功能,因為無法變更 BIOS 中的 UEFI 和序列 ATA (SATA) 設定。
- 開啟電腦。
- 在 Dell 標誌中,輕觸 F2 鍵數次。
本文的影像以英文顯示,僅供圖解說明之用。
- 按一下開始,然後選取設定。
- 按一下更新和安全性。
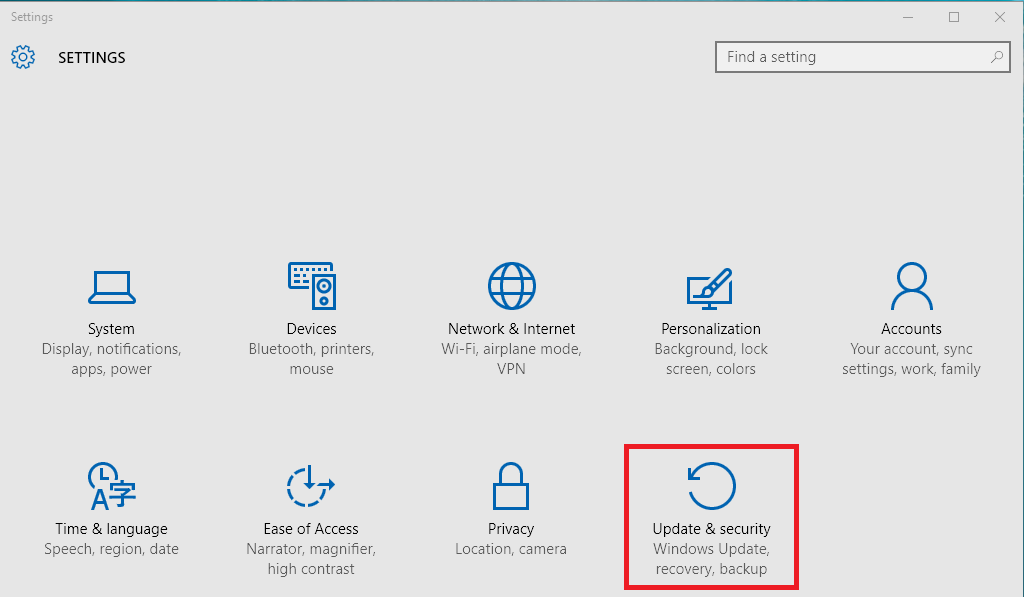
- 在左窗格中,按一下復原。
- 在進階啟動下,按一下立即重新開機。

- 按一下故障診斷。

- 按一下進階選項。

- 選取 UEFI 韌體設定。

- 按一下重新開機以重新開機電腦,然後輸入 UEFI。(BIOS)
注意:如果您的作業系統已損毀,則只能到達 Windows 登入畫面。不過,您仍有機會從登入畫面輸入「進階選項」。
-
開機至登入畫面。
-
按一下登入畫面上的電源按鈕。
-
按住Shift 鍵,然後按一下重新開機。
-
選取 UEFI 韌體設定。
Additional Information
建議的文章
以下是一些與本主題相關的建議文章,您可能會感興趣。
Affected Products
Alienware, Dell All-in-One, Dell Pro Max Micro, Dell Pro Max Slim, Dell Pro Max Tower, Dell Pro Micro, Dell Pro Slim, Dell Pro Tower, Dell Slim, Dell Tower, Inspiron, Legacy Desktop Models, OptiPlex, Vostro, XPS, G Series, Projectors & Accessories
, G Series, Alienware, Dell Plus, Dell Pro, Dell Pro Max, Dell Pro Plus, Dell Pro Premium, Inspiron, Latitude, Dell Pro Rugged, Vostro, XPS, Legacy Laptop Models, Fixed Workstations, Mobile Workstations, Dell Pro Max Micro XE FCM2250
...
Article Properties
Article Number: 000126121
Article Type: How To
Last Modified: 22 July 2025
Version: 18
Find answers to your questions from other Dell users
Support Services
Check if your device is covered by Support Services.