PowerEdge: Server Initial Start-up Guide
Summary: This is the start-up page for a new Dell PowerEdge Server with an Integrated Dell Remote Access Controller (iDRAC). The article details system installation, use of the iDRAC, LifeCycle Controller (LCC) configuration, and installing an operating system. ...
This article applies to
This article does not apply to
This article is not tied to any specific product.
Not all product versions are identified in this article.
Instructions

You have unboxed your brand-new PowerEdge server. It is now time to install in the relevant rack, get the iDRAC setup and install the operating system. This enables you to integrate the device into your infrastructure. This guide is here to help you through all the steps needed. It also provides best practices to ensure an optimal configuration and performance. The information here also simplifies maintenance and management.
This article is intended as a guide to system installation, use of the iDRAC, LifeCycle Controller (LCC) configuration, and installing an operating system. It also includes a segment to assist learning more about Systems Management options. It begins with the latest release of the PowerEdge which runs iDRAC9. For information about how to setup and manage previous versions of iDRAC, go to the bottom of this page. If you are not sure which version of iDRAC your server runs, you can check this article How to identify the iDRAC version embedded in a PowerEdge server and hardware leveraging PowerEdge server hardware.
Steps to get started:
- Installing the system in its new location
- Configuring the iDRAC for better system management
- Logging in the iDRAC web interface
- Configuring the LCC (LCC)
- Installing an Operating System
Features and Resources:
- Update Strategies
- Embedded Hardware Diagnostic
- Secure Connect Gateway
- Getting Started Guides for older servers
Setting up the system
- Unpack the system
- Install the system into the rack. How to physically install a server in a rack or tower mode is explained in PowerEdge: Rack Rail Types for Installation, Static Rails vs. Sliding Rails
- Connect the peripheral devices to the system
- Connect the power and turn on the system. It can be done by pressing the power button or by using the iDRAC
Configure the iDRAC
The Integrated Dell Remote Access Controller (iDRAC) is designed to improve productivity for system administrators and improve the overall availability of Dell systems. The iDRAC alerts administrators about system issues. This allows remote system management and reduces the need for physical access to the system.
The initial configuration of the iDRAC9 and the LCC is explained step by step in PowerEdge: How to configure iDRAC9 and Lifecycle Controller network settings.
Log in to iDRAC
To log in into the iDRAC Web User Interface:
- Open a browser and enter the IP address. The address by default is 192.168.0.120.
Note: There are other ways to connect to the iDRAC using command-line protocols (SSH, RACADM). For more information about this, see the latest Integrated Dell Remote Access Controller User's Guide under the title "Setting up iDRAC Communication."
- The login screen is displayed. The default username is "root<"
- If you have not opted for secure default access to iDRAC, then the default password is "calvin"
- If you have opted for secure default access to iDRAC, the Secure Password is on a sticker on the underside of the Service Tag information.

Figure 1: Sticker with a secure default password - Enter the Username and password to log in iDRAC.
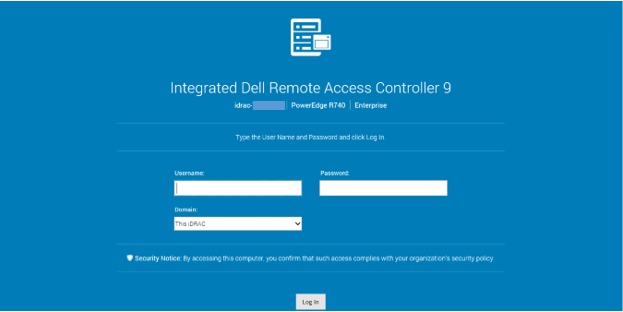
Figure 2: iDRAC9 web interface login screen
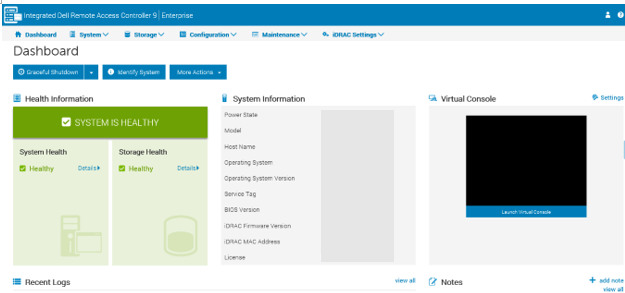
Figure 3: iDRAC9 dashboardNote: In the iDRAC settings, it is possible to enable directory login (Microsoft AD or LDAP).
For more information about logging in to the iDRAC and iDRAC licenses, see the latest Integrated Dell Remote Access Controller User's Guide.
Configure and Launch LifeCycle Controller (LCC)
Dell LCC is an advanced embedded systems management technology that enables remote server management using the iDRAC. Using LCC, you can update the firmware using a local or Dell-based firmware repository. The OS Deployment wizard available in LCC enables you to deploy an operating system. To access the LCC, press F10 during startup. The LCC shares an IP address with one of the server network cards. The IP address must be configured at least once to use the update and the operating system installation feature.
Installation of an Operating System
The embedded LCC simplifies the installation of the operating system with the "OS Deployment" feature. This feature preloads the necessary drivers before the installation process. This gives a smooth installation as the operating system recognizes all components.
Find all details in the dedicated article on how to install Windows or Linux based operating systems "How to install the operating system on a Dell PowerEdge Server?"
Update Strategies
Dell PowerEdge servers offer a wide variety of options for keeping firmware and drivers up to date. Dell provides many useful tools to simplify the update process from updating a single driver on a single system to updating all systems at once. For more information, read the dedicated article Updating a PowerEdge.
Embedded Hardware Diagnostic
System Hardware Diagnostics are embedded in the LCC. The LCC has a physical (as opposed to logical) view of the attached hardware. This can identify hardware problems that the operating system and other online tools cannot identify. Find all details in the dedicated article How to Run Hardware Diagnostics on your PowerEdge Server.
Secure Connect Gateway
Secure connect gateway is an enterprise monitoring technology that is delivered as an appliance and a stand-alone application. It monitors your devices and proactively detects hardware issues that may occur. Depending on your service contract, it also automates support request creation for issues that are detected on the monitored devices.
The application edition can be installed on a server running a Windows or Linux operating system. For more information, see the Secure Connect Gateway product page.
Previous generation servers
How to identify the generation of a server is explained in these articles:
Additional Information
Watch this video:
Affected Products
C Series, Rack Servers, Tower Servers, XE Servers, XR Servers, iDRAC9Article Properties
Article Number: 000123958
Article Type: How To
Last Modified: 19 Apr 2026
Version: 17
Find answers to your questions from other Dell users
Support Services
Check if your device is covered by Support Services.