NVP vProxy: How to Backup Individual VMs from the Command Line
Summary: This article describes how to start individual VMware Virtual Machines (VM) backing up using the command line for additional troubleshooting and debugging.
This article applies to
This article does not apply to
This article is not tied to any specific product.
Not all product versions are identified in this article.
Instructions
You can start an individual VM client backup using the UI as shown below:

Figure 1: NetWorker Management Console (NMC) option for starting individual VM backups
To run a single client using the command line for logging, scripting, or troubleshooting purposes, follow these steps:
- Verify the NetWorker Group has required VMs selected.
- In NetWorker's VMware view, note the Group and UUID of the VM you want to start from the command line.
Use one of the following options to get these details:
Option 1: From the NMC go to Protection > VMware View > select the VM.
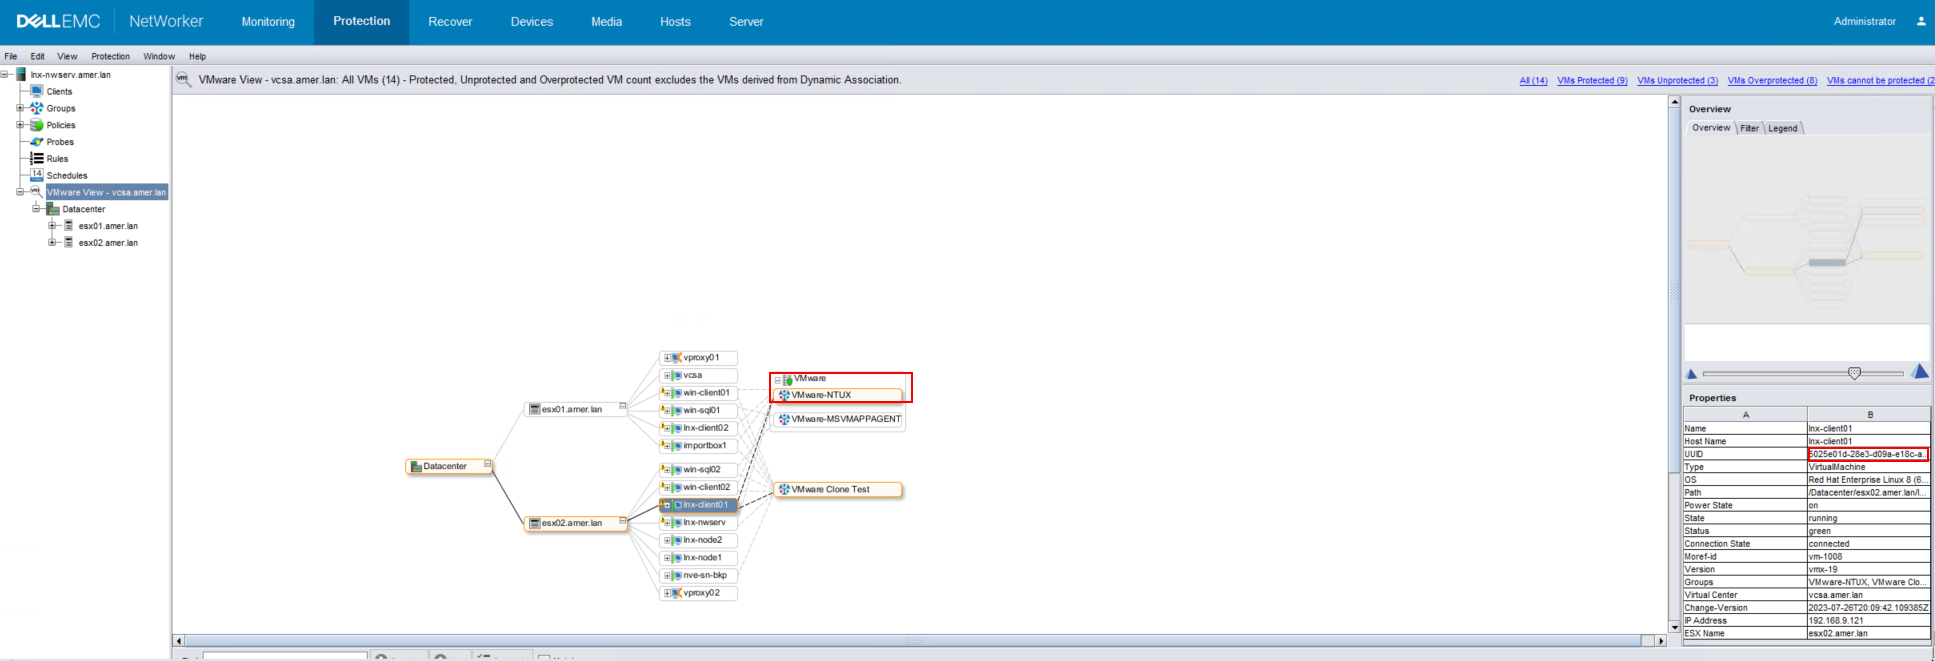
Figure 2: NMC VMware View showing VM's assigned protection policy and workflow
Option 2: Use
mminfo to identify the VM policy and VM UUID from a previous backup.
mminfo -kvot -q vmname=vmname
[root@lnx-nwserv]:~# mminfo -kvot -q vmname=lnx-client01
 volume        type   client           date     time         size ssid      fl   lvl name
...
ddve01VMbackup.001 Data Domain vcsa.amer.lan 11/03/2023 11:16:28 AM 104 GB 3729071324 cr full vm:5025e01d-28e3-d09a-e18c-a9c62b296864:vcsa.amer.lan
ddve02VMclone.001 Data Domain vcsa.amer.lan 11/03/2023 11:16:28 AM 104 GB 3729071324 cr full vm:5025e01d-28e3-d09a-e18c-a9c62b296864:vcsa.amer.lan
Using one of the Save Set IDs (SSID) from the output, you can get the details about the protection policy the VM was backed up in.
mminfo -S -q ssid=SSID
[root@lnx-nwserv]:~# mminfo -S -q ssid=3729071324
ssid=3729071324 savetime=11/03/2023 11:16:28 AM (1699028188) vcsa.amer.lan:vm:5025e01d-28e3-d09a-e18c-a9c62b296864:vcsa.amer.lan
  level=full   sflags=vrF      size=107479350484 files=1          insert=11/03/2023
  create=11/03/2023 complete=11/03/2023 browse=11/17/2023 11:51:48 PM retent=11/17/2023 11:59:59 PM
  clientid=e78e6f97-00000004-64d3cd5a-64d3cff4-00065000-c3b5a556
         **backup start time: 1699028188;
              *backup_device: Data Domain;
                *backup_mode: VSS;
         *policy action name: "backup: 1699028188",
                              "clone_ddboost: 1699029004";
                *policy name: "VMware: 1699028188 1699029004";
       *policy workflow name: "VMWare-NTUX: 1699028188 1699029004";
*policy_workflow_action_path: /VMware/VMWare-NTUX/backup;
             *proxy_hostname: vproxy02.amer.lan;
*ss data domain backup cloneid: 1699028188;
*ss data domain dedup statistics: "v1:1699028188:107393162694:16106059:15643051",
                              "v1:1699029004:12865696547:89393565:71775611";
             *SSID directory: Yes;
           *vcenter_hostname: vcsa.amer.lan;
            *vm_backup_level: incr;
                    *vm_info: \
"{
  \"name\": \"lnx-client01\",
  \"host-name\": \"lnx-client01\",
  \"ip-address\": \"192.168.9.121\",
  \"template\": false,
  \"moref-id\": \"vm-1008\",
  \"vcenter-name\": \"vcsa.amer.lan\",
  \"path\": \"/Datacenter/esx02.amer.lan/lnx-client01\",
  \"moref-path\": \"/datacenter-3/domain-s15/vm-1008\",
  \"vm-path\": \"/Datacenter/Clients/LINUX/lnx-client01\",
  \"moref-vm-path\": \"/datacenter-3/group-v1015/group-v5179/vm-1008\",
  \"datastore\": \"esx02-datastore\",
  \"datastore-moref\": \"datastore-18\",
  \"os-identifier\": \"rhel8_64Guest\",
  \"os-name\": \"Red Hat Enterprise Linux 8 (64-bit)\",
  \"version\": \"vmx-19\",
  \"change-version\": \"2023-07-26T20:09:42.109385Z\",
  \"esxi-moref\": \"host-17\",
  \"esxi-name\": \"esx02.amer.lan\",
  \"datacenter\": \"datacenter-3\",
  \"compute-resource\": \"domain-s15\",
  \"cluster-compute-resource\": \"\",
  \"networks\": [
    \"Production VM Network\"
  ],
  \"disks\": [
    {
      \"display-name\": \"Hard disk 1\",
      \"datastore\": \"esx02-datastore\",
      \"datastore-moref\": \"datastore-18\",
      \"disk-key\": 2000,
      \"size-kb\": 104857600,
      \"thin\": true,
      \"disk_mode\": \"persistent\",
      \"disk_stats\": {
        \"Statistics\": {
          \"ProvisionedBytes\": 107374182400,
          \"UsedBytes\": 12822249472,
          \"ChangedBytes\": 27066368,
          \"SecondsTaken\": 45
        },
        \"DDStatistics\": {
          \"PreClientCompBytes\": 13345183,
          \"PostClientCompBytes\": 3367829,
          \"TotalSegments\": 3206,
          \"RedundantSegments\": 1648
        },
        \"BaseFileName\": \"[esx02-datastore] lnx-client01/lnx-client01.vmdk\"\

      }
    }
  ]
}";
                    *vm_name: lnx-client01;
                    *vm_uuid: 5025e01d-28e3-d09a-e18c-a9c62b296864;
                       group: VMware-NTUX;
            saveset features: CLIENT_SAVETIME;
  Clone #1: cloneid=1699028188  time=11/03/2023 11:16:28 AM    retent=11/10/2023  flags=
    frag@         0 volid=4241740115 file/rec=       0/0     rn=0 last=11/03/2023
  Clone #2: cloneid=1699029004  time=11/03/2023 11:30:04 AM    retent=11/17/2023  flags=
    frag@         0 volid=4224963130 file/rec=       0/0     rn=0 last=11/03/2023
- Begin backup using command line:
nsrworkflow -s {nsr_server} -p {policy_name} -w {workflow_name} -L -c "work items:{VMware_UUID}"
Example:
[root@lnx-nwserv]:~#nsrworkflow -s lnx-nwserv.amer.lan -p VMware -w VMware-NTUX -L -c "work items:5025e01d-28e3-d09a-e18c-a9c62b296864"
You can monitor the saved session from the NetWorker Management Console (NMC), or using the nsrwatch command.
Information about the jobs is logged in the policy logs:
- Linux:
/nsr/logs/policy/POLICY_NAME/WORKFLOW_NAME - Windows (Default):
C:\Program Files\EMC NetWorker\nsr\logs\policy\POLICY_NAME\WORKFLOW_NAME - NetWorker: How to use nsr_render_log to render .raw log files
Additional Information
To get more details regarding the VMware group:
nsrpolicy group display -g "vmgroup"
To run multiple clients in the same command, separate the multiple work item:UUID arguments with commas:
nsrworkflow -s nsr_server -p policy_name w workflow_name -L -c "work items:VMware_UUID-1","work items:VMware_UUID-2"
Affected Products
NetWorkerProducts
NetWorkerArticle Properties
Article Number: 000009652
Article Type: How To
Last Modified: 11 Sept 2025
Version: 7
Find answers to your questions from other Dell users
Support Services
Check if your device is covered by Support Services.