Dell EMC Unity:如何在 Unity 上为 NFS 导出配置 NIS/网络组(用户可纠正)
Summary: 如何在 Unity 上为 NFS 导出配置 NIS/网络组本地文件/网络组
This article applies to
This article does not apply to
This article is not tied to any specific product.
Not all product versions are identified in this article.
Instructions
前提条件:
Unity 中的 NIS/Negroup。
Unity 与 NIS 服务器配合使用,以进行网络组>主机名解析,工作机制如下所示。(请参考附带的 tcpdump NIS.cap 文件,以获取更多详细信息)
Unity 中的本地/网络组:
说明:从 Unity OE 4.1.x 版本开始,Unity 支持在本地 netgroup 文件中定义
netgroup。在 Unity OE 4.1.x 版本之前,Unity 不支持本地 netgroup 文件。
过程(在 NIS 服务器中定义网络组):
步骤 1 — 在 Unity 上配置
注释

步骤 2 — 在 NIS 服务器上配置(我使用 CentOS6.2 及其本机 NIS 软件作为 NIS 服务器)
从不属于 netgroup mfgnasroot 的主机测试装载 NFS 共享,访问拒绝。
- 为 Unity 上的 NFS 共享配置网络组。
- 将 NIS 服务器用于 netgroup>主机名称解析。此知识库文章使用 CentOS 6.2 的本机 NIS 服务器进行测试。其他 NIS 服务器应具有其所有者配置方法,但理论应相同。
- 允许 NIS/NFS/RPC 的网络端口。
Unity 中的 NIS/Negroup。
Unity 与 NIS 服务器配合使用,以进行网络组>主机名解析,工作机制如下所示。(请参考附带的 tcpdump NIS.cap 文件,以获取更多详细信息)
- NFS 客户端尝试在 Unity 上装载 NFS 共享时,Unity 将获取 NFS 客户端的 IP 地址。
- Unity 将“YP Match call”发送到具有 NFS 客户端 IP 地址的 NIS 服务器,NIS 服务器使用主机名回复“YP Match reply”。
- NIS 服务器没有正确的主机名 条目(在步骤 2 中),Unity 会向 DNS 服务器发送 DNS PTR 查询,查询主机名的 PTR 记录。
- Unity 将“YP Match call”发送到具有 NFS 客户端主机名的 NIS 服务器,NIS 服务器使用网络组名称回复“YP Match call”。
Unity 中的本地/网络组:
- NFS 客户端尝试在 Unity 上装载 NFS 共享时,Unity 将获取 NFS 客户端的 IP 地址。
- Unity 尝试将 IP 地址与 NAS 服务器中本地主机中的主机名匹配。
- 本地主机文件 没有正确的主机名 条目(在步骤 2 中),Unity 会向 DNS 服务器发送 DNS PTR 查询,查询主机名的 PTR 记录。
- Unity 尝试将主机名 与 NAS 服务器内本地网络组中的主机名匹配。
说明:从 Unity OE 4.1.x 版本开始,Unity 支持在本地 netgroup 文件中定义
netgroup。在 Unity OE 4.1.x 版本之前,Unity 不支持本地 netgroup 文件。
过程(在 NIS 服务器中定义网络组):
步骤 1 — 在 Unity 上配置
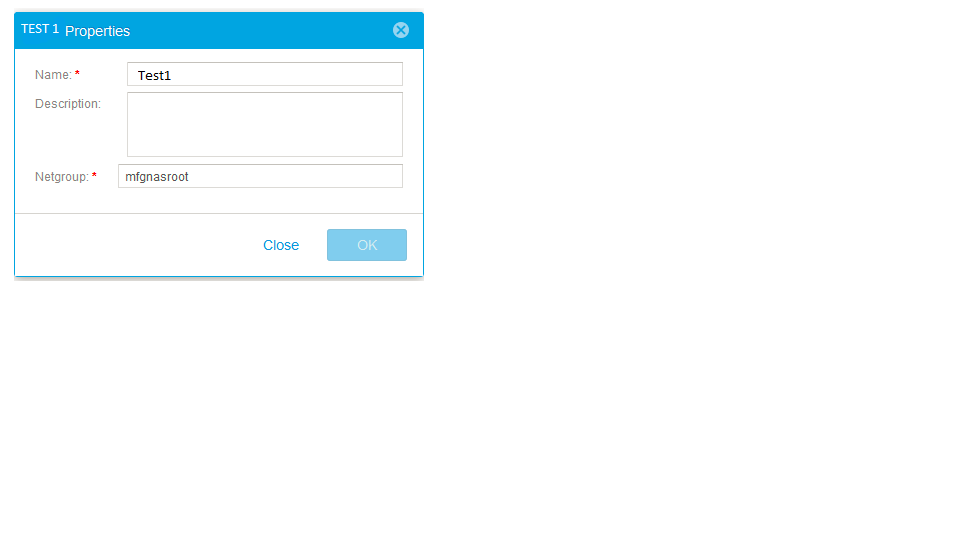
- 在 Hosts 菜单中,使用 netgroup mfgnasroot 添加 Netgroup Test1
注释
- 定义 “Netgroup” 名称 mfgnasroot 必须与 NIS 服务器中的网络组名称匹配。
- Netgroup 名称中请勿使用 _,因为 网络组名称中包含 _ 可能会导致一些问题。
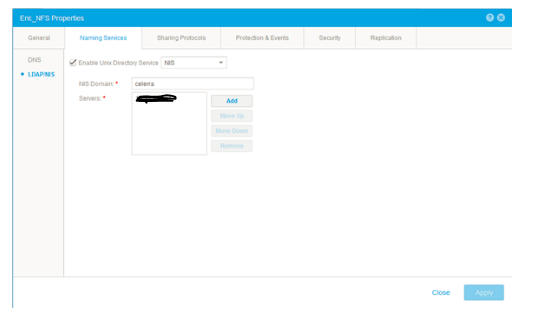
- 导航到 “File-> NAS Servers-NAS server> Properties-NAS server Naming> Services-LDAP/NIS” ,然后添加 NIS 服务器,其中 “Celerra” 定义为 “NIS Domain”,如下面的屏幕截图所示。
- 在 “File-> NFS Shares-> Share Properties-> Host Access”中,添加具有 root 权限的 netgroup Test
步骤 2 — 在 NIS 服务器上配置(我使用 CentOS6.2 及其本机 NIS 软件作为 NIS 服务器)
- 请确认是否已安装以下数据包。
# rpm -qa|egrep -i "^yp|^rpc"
ypserv-2.19-22.el6.x86_64
ypbind-1.20.4-29.el6.x86_64
yp-tools-2.9-12.el6.x86_64
rpcbind-0.2.0-8.el6.x86_64
ypserv-2.19-22.el6.x86_64
ypbind-1.20.4-29.el6.x86_64
yp-tools-2.9-12.el6.x86_64
rpcbind-0.2.0-8.el6.x86_64
- 定义 NIS 域名
# cat /etc/sysconfig/network
NETWORKING=yes
HOSTNAME=nis.example.com
GATEWAY=xxx.xxx.xxx.xxx
NISDOMAIN=celerra
NETWORKING=yes
HOSTNAME=nis.example.com
GATEWAY=xxx.xxx.xxx.xxx
NISDOMAIN=celerra
- 在 “/etc/hosts”(蓝色)中添加主机名及其 IP 地址,ypinit 使用 “/etc/hosts” 文件构建 YP 数据库。
# cat /etc/hosts
127.0.0.1localhost localhost.localdomain localhost4 localhost4.localdomain4
::1localhost localhost.localdomain localhost6 localhost6.localdomain6
xxx.xxx.xxx.xxx 5700CS139.example.com
xxx.xxx.xxx.xxx VNX5400_107.example.com
xxx.xxx.xxx.xxx nis.example.com nis
127.0.0.1localhost localhost.localdomain localhost4 localhost4.localdomain4
::1localhost localhost.localdomain localhost6 localhost6.localdomain6
xxx.xxx.xxx.xxx 5700CS139.example.com
xxx.xxx.xxx.xxx VNX5400_107.example.com
xxx.xxx.xxx.xxx nis.example.com nis
- 在 “/etc/netgroup” 文件中添加主机名并添加 NIS 域名,如下所示(如果 NIS 域字段留空,则 NFS 装载将失败)
# cat /etc/netgroup
mfgnasroot (5700CS139.example.com,,celerra) (VNX5400_107.example.com,,celerra)
mfgnasroot (5700CS139.example.com,,celerra) (VNX5400_107.example.com,,celerra)
- 确认 ypbind、ypserver 和 rpcbind 服务正在运行。
# service ypbind status
ypbind (pid16711) is running...
# service ypserv status
ypserv (pid16758) is running...
# service rpcbind status
rpcbind (pid1274) is running...
ypbind (pid16711) is running...
# service ypserv status
ypserv (pid16758) is running...
# service rpcbind status
rpcbind (pid1274) is running...
- 初始化 YP 数据库。
# /usr/lib64/yp/ypinit -m
此时,我们需要构建一个列表,列出将运行 NIS 服务器的主机。nis.example.com 位于 NIS 服务器主机的列表中。继续为其他主机添加主机名,每行一个主机名条目,并在完成列表后按 <control D>。
next host to add:nis.example.com
next host to add:
NIS 服务器的当前列表如下所示:
nis.example.com
Is this correct?[y/n: y]y
We need a few minutes to build the databases...
Building /var/yp/celerra/ypservers...
Running /var/yp/Makefile...
gmake[1]: Entering directory `/var/yp/celerra'
Updating passwd.byname...
Updating passwd.byuid...
Updating group.byname...
Updating group.bygid...
Updating hosts.byname...
Updating hosts.byaddr...
Updating rpc.byname...
Updating rpc.bynumber...
Updating services.byname...
Updating services.byservicename...
Updating netid.byname...
Updating protocols.bynumber...
Updating protocols.byname...
Updating mail.aliases...
Updating netgroup...
Updating netgroup.byhost...
Updating netgroup.byuser...
gmake[1]: Leaving directory `/var/yp/celerra'
nis.example.com 已设置为 NIS 主服务器。
现在,您可以在所有从属服务器上运行 ypinit-s nis.example.com。
从不属于 netgroup mfgnasroot 的主机测试装载 NFS 共享,访问拒绝。
[root@nis ~]# mount xxx.xxx.xxx.xxx:/Test /mnt
mount.nfs: access denied by server while mounting xxx.xxx.xxx.xxx:/Test
mount.nfs: access denied by server while mounting xxx.xxx.xxx.xxx:/Test
从属于 netgroup mfgnasroot 的主机装载 NFS 共享,访问成功。
[root@5700CS139 nasadmin]# mount xxx.xxx.xxx.xxx:/Test /mnt
[root@5700CS139 nasadmin]# cd /mnt
[root@5700CS139 mnt]# touch 139
[root@VNX5400_107 nasadmin]# mount xxx.xxx.xxx.xxx:/Test /mnt
[root@VNX5400_107 nasadmin]# cd /mnt
[root@VNX5400_107 mnt]# touch 107
[root@5700CS139 nasadmin]# cd /mnt
[root@5700CS139 mnt]# touch 139
[root@VNX5400_107 nasadmin]# mount xxx.xxx.xxx.xxx:/Test /mnt
[root@VNX5400_107 nasadmin]# cd /mnt
[root@VNX5400_107 mnt]# touch 107
过程(在本地文件中定义网络组):
步骤 1 — 在 Unity 上配置

注释

主机文件示例:
# The hosts file contains a list of IP addresses with their corresponding hostnames.
#
# hosts 文件的每一行定义主机,格式为:
# IP_address hostname aliases
# where:
# -ip_address 是主机的 IP 地址。
#主机名是主机的正式名称。
# - aliases provides for name changes, alternate spellings, shorter hostnames, or generic hostnames (for example, localhost).
#
# Fields are separated by any number of blanks or tab characters or both.
#
xxx.xxx.xxx.xxx opennms.example.com opennms
xxx.xxx.xxx.xxx vnx5400-1cs0.example.com vnx5400-1cs0
xxx.xxx.xxx.xxx vnx5400-1cs1.example.com vnx5400-1cs1
网络组文件示例:
#网络组文件包含网络组名称列表以及属于该组的主机的主机名列表。
# In addition to mapping hosts to network groups, it also maps users to network groups.
#
# netgroup 文件的每一行定义一个组,格式为:
# groupname member1 member2 ...
#
# Each member is either the name of another group or indicates specific hosts, users, and domains, referred to as a triple, as follows:
# (hostname,username,domainname)
#
# Any of the triple's three fields can be blank, meaning all the values in that field are included.
# A dash (-) in any of the fieldsmeans there are no valid values.
# For example, the following line defines a group called ouruniverse that consists of all hosts and users in the NIS domain ourdomain.
# ouruniverse (,,ourdomain)
#
# The following lines define a group called ourhosts that includes all of the hosts but none of the users in the domain,
# and a group called ourusers that includes all users but no hosts.
# ourhosts (,-,ourdomain)
# ourusers (-,,ourdomain)
#
# The following line defines a group called ouruniverse that consists of two hosts hostatlanta and hostboston.
# ouruniverse (hostatlanta,,),(hostboston,,)
#
# Note: IP addresses are not allowed.
#
# 网络组文件可以根据需要包含任意数量的行;但是,每行长度必须小于 1 KB。
# If necessary, a line can be continued on another line by using the backslash (\) as a continuation character.
# A triple, however, cannot be split across two lines.
#
# 提醒:使用反斜杠 (\) 作为续行字符,则它必须是行中的最后一个字符。 It cannot be followed by spaces.
mfgnasroot (opennms,,example.com),(vnx5400-1cs1,,example.com),(vnx5400-1cs0,,example.com)

从不属于 netgroup mfgnasroot 的主机测试装载 NFS 共享,访问拒绝。
步骤 1 — 在 Unity 上配置
- 在 Hosts 菜单中,添加具有网络组 mfgnasroot 的 Netgroup Eric1
注释
- 定义 “Netgroup” 名称 mfgnasroot 必须与本地文件网络组中的网络组名称匹配。
- Netgroup 名称中请勿使用 _,因为 网络组名称中包含 _ 可能会导致一些问题。
- 请导航至“文件-> NAS 服务器-NAS 服务器> 属性-命名服务-> 本地文件”。检索当前主机文件和网络组文件; 使用 Notepad++更新它们; 以 Unix 格式保存它们;最后将其上传。
主机文件示例:
# The hosts file contains a list of IP addresses with their corresponding hostnames.
#
# hosts 文件的每一行定义主机,格式为:
# IP_address hostname aliases
# where:
# -ip_address 是主机的 IP 地址。
#主机名是主机的正式名称。
# - aliases provides for name changes, alternate spellings, shorter hostnames, or generic hostnames (for example, localhost).
#
# Fields are separated by any number of blanks or tab characters or both.
#
xxx.xxx.xxx.xxx opennms.example.com opennms
xxx.xxx.xxx.xxx vnx5400-1cs0.example.com vnx5400-1cs0
xxx.xxx.xxx.xxx vnx5400-1cs1.example.com vnx5400-1cs1
网络组文件示例:
#网络组文件包含网络组名称列表以及属于该组的主机的主机名列表。
# In addition to mapping hosts to network groups, it also maps users to network groups.
#
# netgroup 文件的每一行定义一个组,格式为:
# groupname member1 member2 ...
#
# Each member is either the name of another group or indicates specific hosts, users, and domains, referred to as a triple, as follows:
# (hostname,username,domainname)
#
# Any of the triple's three fields can be blank, meaning all the values in that field are included.
# A dash (-) in any of the fieldsmeans there are no valid values.
# For example, the following line defines a group called ouruniverse that consists of all hosts and users in the NIS domain ourdomain.
# ouruniverse (,,ourdomain)
#
# The following lines define a group called ourhosts that includes all of the hosts but none of the users in the domain,
# and a group called ourusers that includes all users but no hosts.
# ourhosts (,-,ourdomain)
# ourusers (-,,ourdomain)
#
# The following line defines a group called ouruniverse that consists of two hosts hostatlanta and hostboston.
# ouruniverse (hostatlanta,,),(hostboston,,)
#
# Note: IP addresses are not allowed.
#
# 网络组文件可以根据需要包含任意数量的行;但是,每行长度必须小于 1 KB。
# If necessary, a line can be continued on another line by using the backslash (\) as a continuation character.
# A triple, however, cannot be split across two lines.
#
# 提醒:使用反斜杠 (\) 作为续行字符,则它必须是行中的最后一个字符。 It cannot be followed by spaces.
mfgnasroot (opennms,,example.com),(vnx5400-1cs1,,example.com),(vnx5400-1cs0,,example.com)
- 在 “File-> NFS Shares-> Share Properties-> Host Access”中,添加具有 root 权限的 netgroup Eric1
从不属于 netgroup mfgnasroot 的主机测试装载 NFS 共享,访问拒绝。
[root@VNX5400-1CS0 ~]# mount xxx.xxx.xxx.xxx:/unity_nfs /mnt
mount: xxx.xxx.xxx.xxx: /unity_nfs 失败,服务器给出的原因:权限被拒绝
mount: xxx.xxx.xxx.xxx: /unity_nfs 失败,服务器给出的原因:权限被拒绝
从属于 netgroup mfgnasroot 的主机装载 NFS 共享,访问成功。
[root@opennms ~]# mount xxx.xxx.xxx.xxx:/unity_nfs /mnt
[root@opennms ~]# umount /mnt
[root@opennms ~]# mount xxx.xxx.xxx.xxx:/unity_nfs /mnt
[root@opennms ~]# cd /mnt
[root@opennms mnt]# touch opennms
[root@opennms mnt]# ll
total 102528
-rw-r--r-- 1 root root 104857600 Jun 12 23:51 emctest
drwxr-xr-x 6 root root 8192 Jun 13 02:42 eric
drwxr-xr-x 2 root root 8192 Jun 5 06:11 lost+found
-rw-r--r-- 1 root root 0 Jul 13 2017 opennms
Additional Information
- 在 UnityGUI 上添加网络组时,请勿在网络组名称中使用 “_”。否则,将返回错误消息“failed invalid DNS name...”。
- 对于 netgroup 中的多个 IP 地址,如果需要定义 NFS 共享的 IP 地址/范围,请在主机菜单中创建主机/子网条目。
Affected Products
Dell EMC Unity FamilyProducts
Dell EMC Unity Family, Dell EMC Unity HybridArticle Properties
Article Number: 000022455
Article Type: How To
Last Modified: 16 Jun 2025
Version: 3
Find answers to your questions from other Dell users
Support Services
Check if your device is covered by Support Services.