How to Stack Dell Networking PowerConnect 3500 model switches
Summary: How to stack Dell Networking PowerConnect 3500 model switches
This article applies to
This article does not apply to
This article is not tied to any specific product.
Not all product versions are identified in this article.
Instructions
Objectives
1. Overview2. Cabling the Stack
3. Unit ID Selection Process
Overview
Each device can operate as a stand-alone device or can be a member in a stack. Up to eight devices are supported per stack.
All stacks must have a Primary unit, and may have a Primary Backup unit, with any other devices connected to the stack as Members.
All stacks must have a Primary unit, and may have a Primary Backup unit, with any other devices connected to the stack as Members.
Cabling the Stack
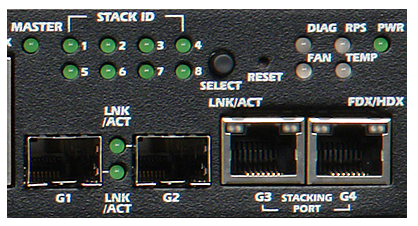
PowerConnect 3500 series switches use the RJ-45 Gigabit Ethernet ports (G3 and G4) for stacking. This enables added stacking capabilities to the devices without adding additional
device accessories.
device accessories.
- To stack the devices together, insert a standard Category 5 cable into port G3 in the device at the top of the stack and into port G4 of the device immediately below it.
- Repeat this process until all devices are connected.
- Connect port G3 of the device at the bottom of stack to the port G4 of the device at the top of the stack.
Unit ID Selection Process
1. Power up the device -- When power up, the configured LED number (corresponding to the previously saved unit ID) begins to flash. The LED flashes for 15 seconds. During this period, you can select a specific Stack ID by pressing the Stack ID button until the appropriate Stack ID LED is illuminated.
2. Selection process -- To advance the stacking ID LED number, continue pressing the Stack ID button. When LED 8 is flashing, pressing the Stack ID button results in the device being configured as a standalone. Pressing the Stack ID button again advances the Stack ID to 1. Unit 1 and Unit 2 are primary-enabled units.
3. End selection process -- The unit ID selection process is completed when the 15-second selection period expires. The Stack ID button becomes unresponsive and the unit ID is set to the LED ID flashing at the end of the period.
NOTE: Unit ID 1 and 2 are reserved for the Primary and Backup Primary unit, and unit ID 3 to 8 are for Member units.
Affected Products
PowerConnect 3524, PowerConnect 3524P, PowerConnect 3548, PowerConnect 3548PArticle Properties
Article Number: 000120176
Article Type: How To
Last Modified: 05 Jun 2025
Version: 6
Find answers to your questions from other Dell users
Support Services
Check if your device is covered by Support Services.