How to Set a Hard-Drive or HDD/SSD BIOS Password to Lock Your Drive
Summary: Protect your data even if your drive is removed—learn how to set a hard drive password in the BIOS on your Dell computer.
This article applies to
This article does not apply to
This article is not tied to any specific product.
Not all product versions are identified in this article.
Instructions
Want to protect your valuable data even if someone removes your hard drive? Setting up a Hard Drive Password (HDD Password) in the BIOS or UEFI creates a security barrier that locks your data at the hardware level. This guide walks you through the entire process, step by step.
What Is a Hard Drive Password and Why Do You Need One?
Think of the Hard Drive Password as a vault lock for your data storage. When you enable this feature in the BIOS or UEFI, your hard drive becomes completely inaccessible until you enter the correct password. This means even if someone physically removes your hard drive and connects it to another computer, they still can't access your data without knowing your password.
Forgot your HDD password? Learn next steps: How to Reset or Recover BIOS and Hard Drive Passwords
Key Benefits of Hard Drive Password Protection
- Hardware-level protection: Your data stays protected even if the drive is removed from your computer
- Data security: Works independently of operating system passwords
- Theft protection: Makes stolen hard drives completely useless to thieves
Important: Hard Drive vs Other Password Types
- Hard Drive Password: Protects data on the storage device itself (hardware level)
- System Password: Prevents computer from booting entirely
- Admin Password: Protects BIOS settings modification only
Before You Begin: Important Things to Know
Password Requirements
Latest Dell computers support strong passwords for hard drive protection. Here's what you need to know:
- Minimum length: At least 4 characters (varies by model)
- Case sensitivity: Passwords are case-sensitive
- Special characters: Modern Dell computers support special characters
Hard Drive Compatibility
- SATA drives: Fully supported on all Dell computers
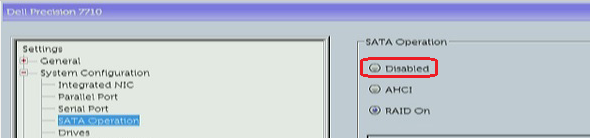
- M.2 SATA or PCIe SSDs: Supported when SATA Operation is enabled (Set to AHCI or RAID On mode) in BIOS
- NVMe SSDs: Limited support - newer models only (2022 and later)
- Multiple drives: You can set individual passwords for each drive
Critical Warnings
- Store your password securely using a password manager
- If you forget your HDD password, your data may be permanently lost
- Dell can provide password reset codes (except NVMe SSDs), but this requires contacting technical support with proof of ownership
- Never attempt to bypass HDD passwords with third-party tools - this may permanently damage your drive
How to Set Up Your Hard Drive Password in the BIOS or UEFI
Your Dell computer might use a different menu layout for BIOS/UEFI settings. We'll show you the most common methods so you can follow the one that matches your computer.
Need help to remove your HDD password? Learn next steps: How to Reset or Recover BIOS and Hard Drive Passwords
Access the BIOS setup
- Turn off your Dell computer completely
- Turn it back on and immediately press F12 repeatedly until you see the boot menu
- Select "BIOS Setup" or "System Setup" from the menu options
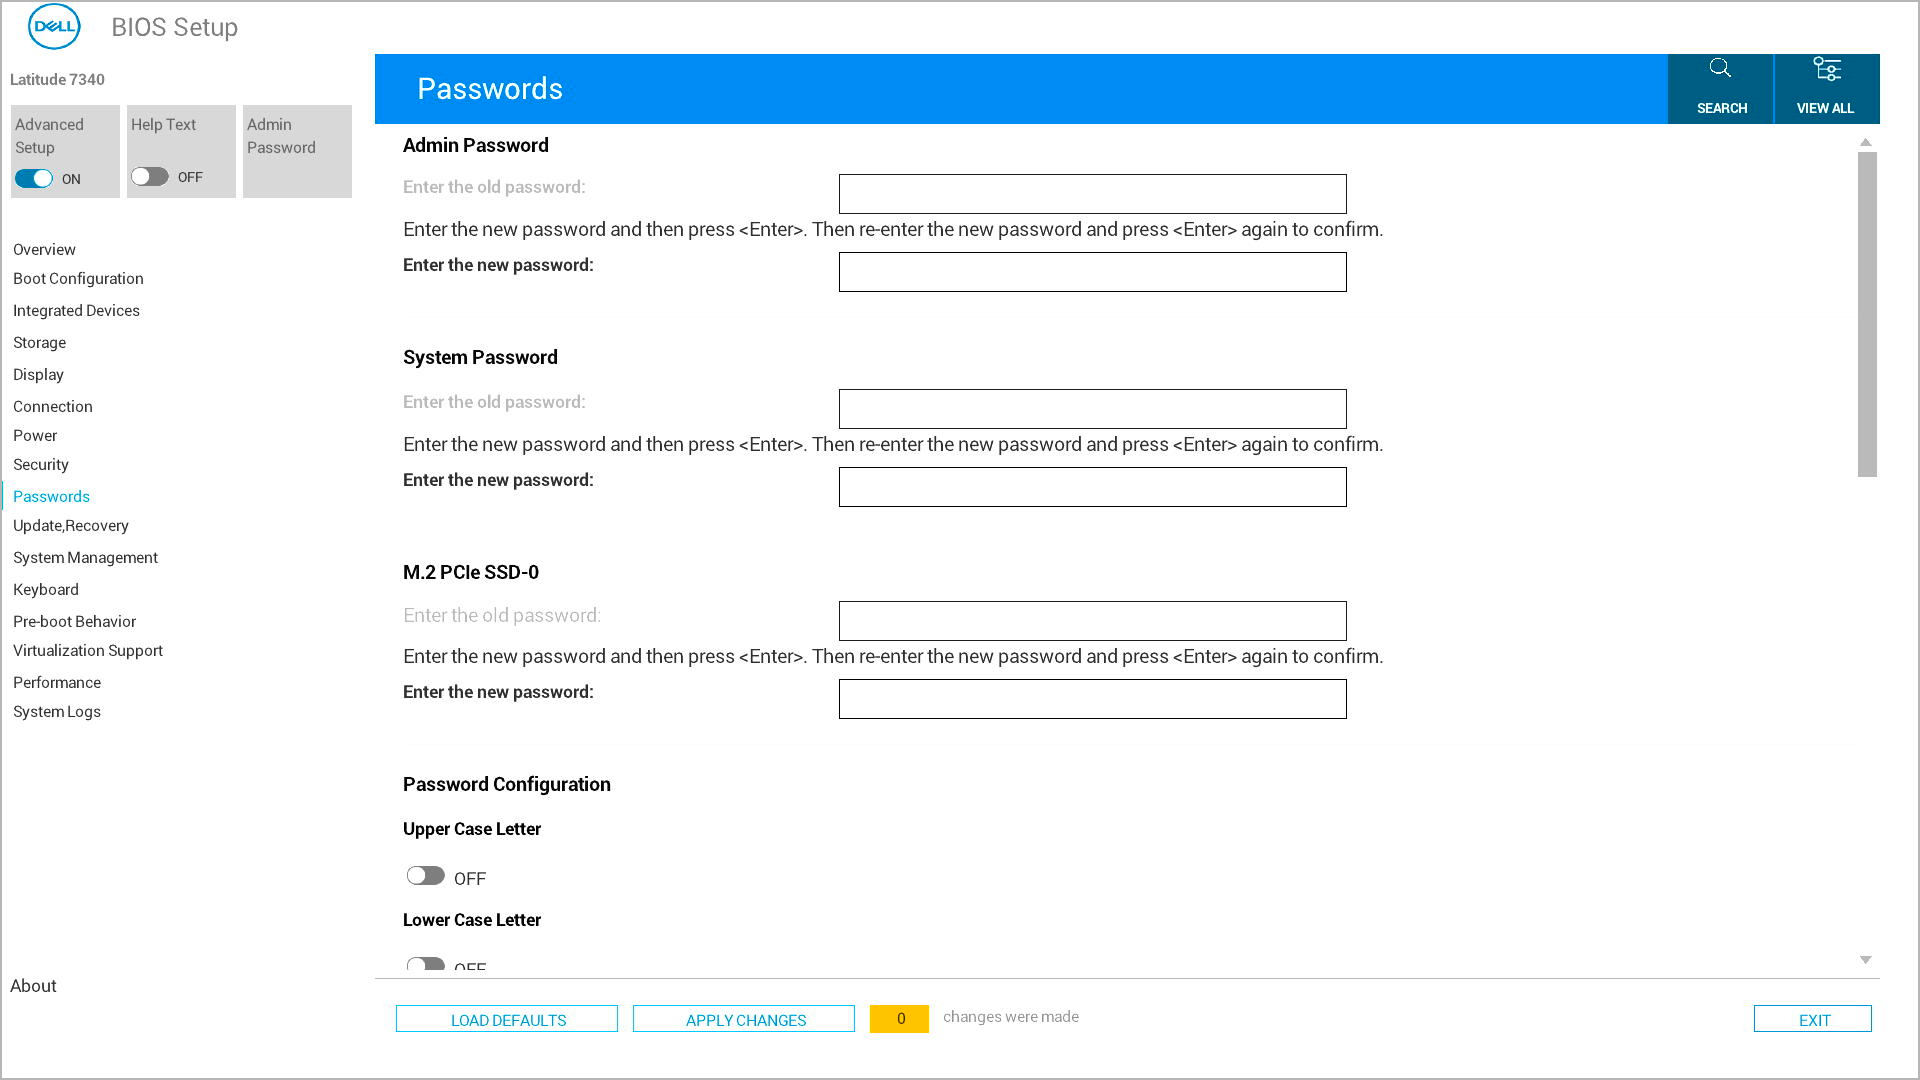
Find the password settings
- Look for either "Security" or "Passwords" in the main menu (this varies by Dell model)
- Use your arrow keys to highlight the option and press Enter
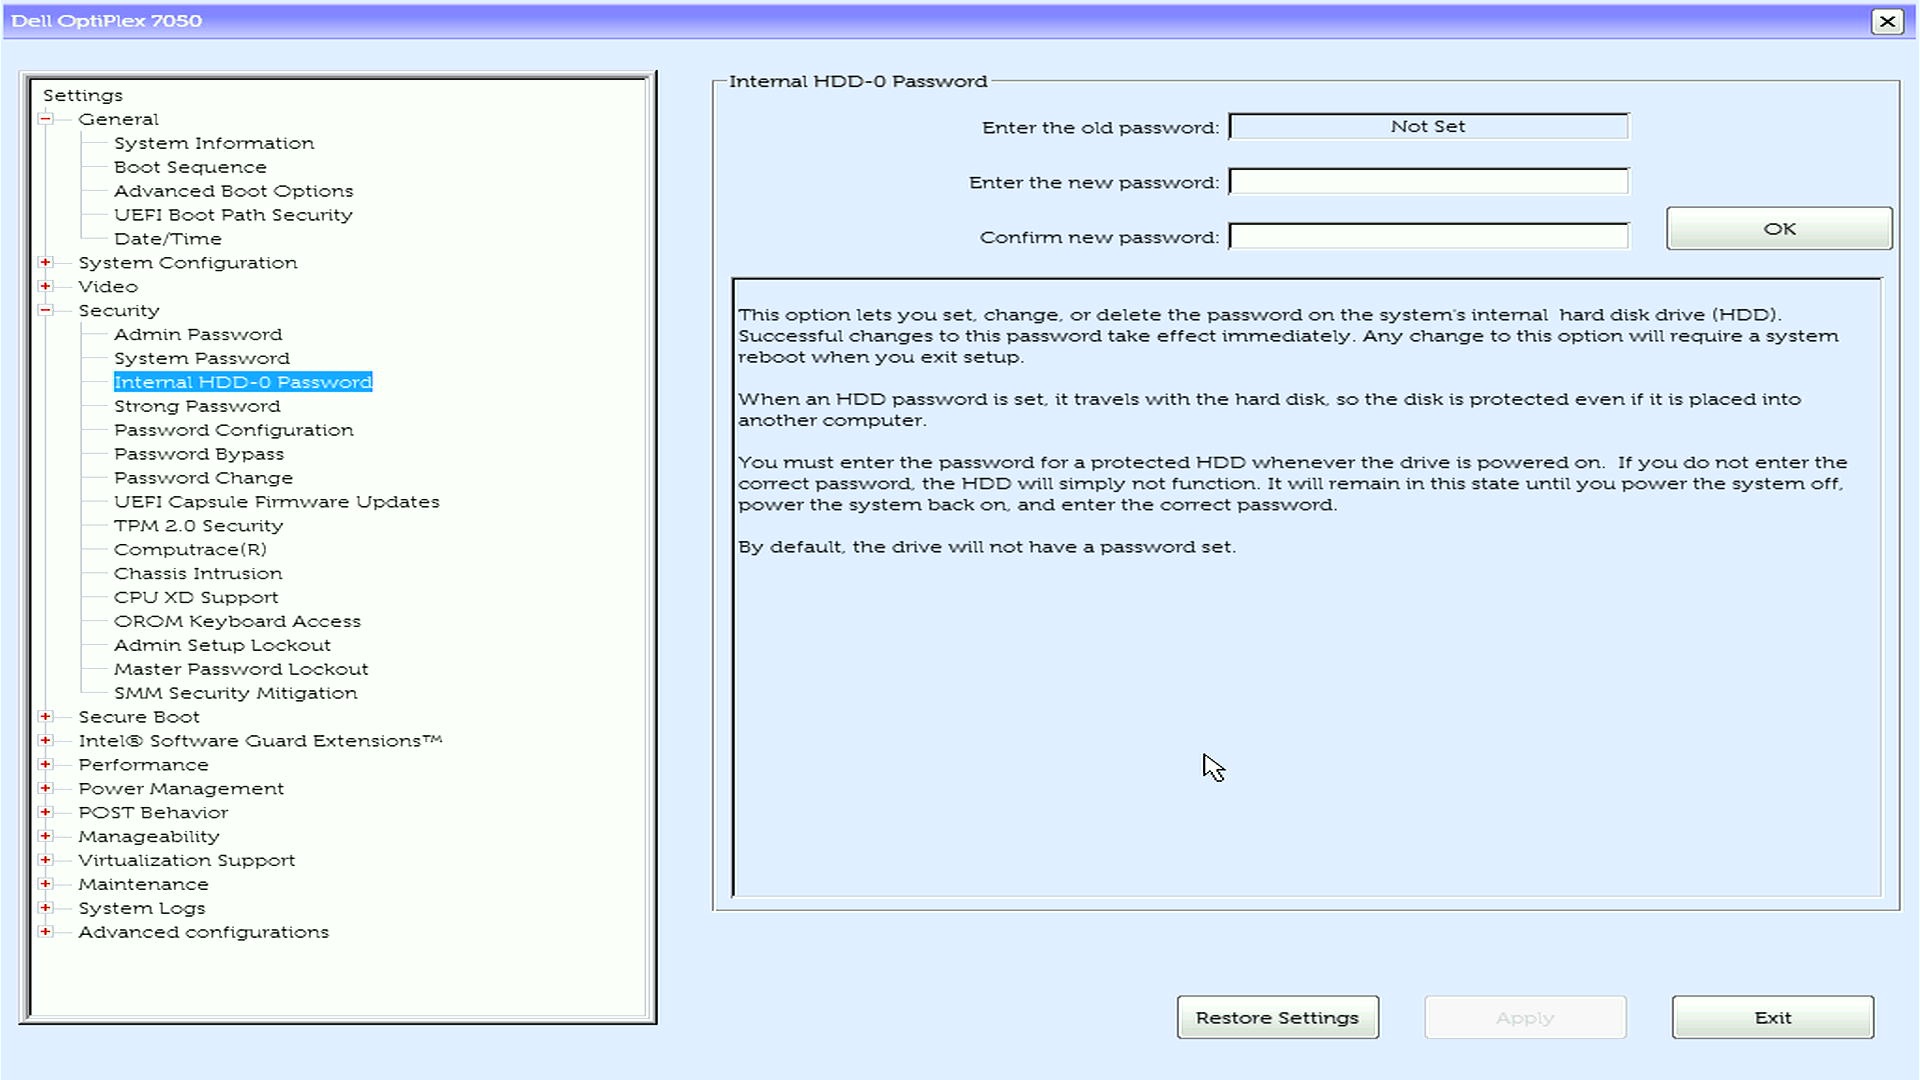
Create your System Password
- Find and select System Password from the list
- In the Enter the New Password field, type your chosen password and press Enter
- Move to the Confirm New Password field, type the same password and press Enter
Save and exit
- Save your changes using one of these methods:
- Option 1: Look for "Apply" or "Apply Changes" button, click it, then click Exit
- Option 2: Press Esc to go back to the main menu, then press Y when prompted to save changes
- Your computer will restart automatically
For Multiple Hard Drives
If your Dell computer has multiple hard drives or SSDs:
- Access each drive individually
- You'll see separate entries for each installed drive
- Set individual passwords
- Option A: Use the same password for all drives (easier to remember)
- Option B: Use different passwords for each drive (maximum security)
- Configure each drive
- Select each drive one by one
- Set the password for each individual drive
- Confirm all passwords before saving
What Happens After You Set the Hard Drive Password
Once you've successfully set up your hard drive password, here's what to expect:
During Every Startup
- Your computer will display a hard drive password prompt during boot
- You must enter the correct password for each protected drive
- After entering the password(s), your computer will boot normally into your operating system
Different Password Prompts You Might See
- "Enter HDD Password" on a blue background
- "Hard Drive Password" with gray bars
- "Harddisk Security SATA Port 0 Lock" message
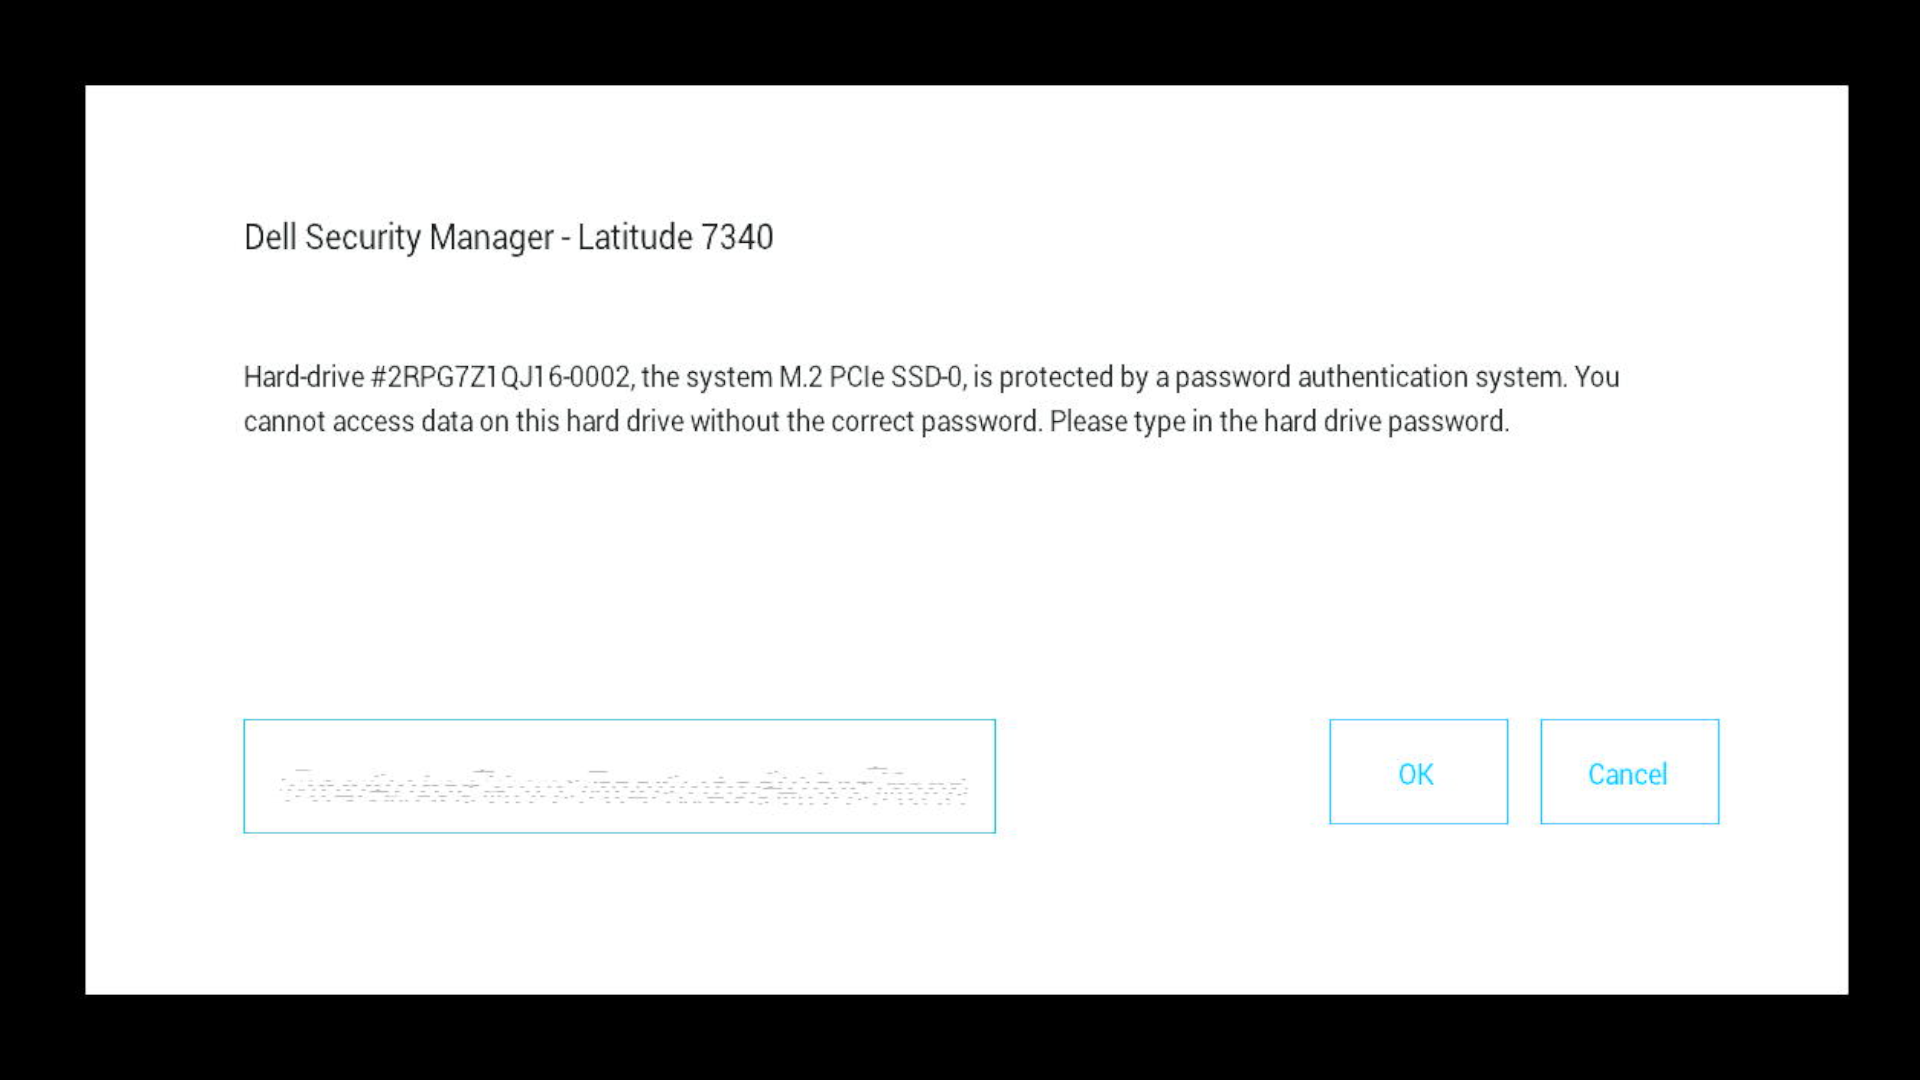
- "Hard-drive #XXXXXXXXXXX-XXXX, the system M.2 PCIe SSD-0, is protected by a password authentication system" message
- Drive-specific prompts for multiple drives
If You Enter the Wrong Password
- You'll see an "Invalid Password" or similar error message
- You can try again immediately
- After multiple failed attempts, you may need to restart your computer
- Important: Too many failed attempts won't permanently lock your drive, but you'll need the correct password to proceed
Can't remember your HDD password? Learn next steps: How to Reset or Recover BIOS and Hard Drive Passwords
Troubleshooting Common Issues
Can't Find Hard Drive Password Option?
- Check SATA Operation setting: For M.2 SSDs, ensure SATA Operation is Enabled in BIOS. If the SATA Operating is Disabled, you will be unable to set a hard drive password.
- Update BIOS: Older BIOS versions may not support HDD passwords on newer drive types
- Drive compatibility: Verify your drive type supports hardware passwords
- Look in different menus: Try Advanced, Drives, or Storage sections
External USB Keyboard Not Working at Password Prompt?
This is common on Latitude laptops:
- Solution: Change Fastboot setting from Minimal to Thorough in BIOS
- Alternative: Use the laptop's built-in keyboard for password entry
"BIOS Information Not Available" Error?
- Update BIOS: Download and install the latest BIOS version from Dell Support
- Check Dell Command version: Update to the latest Dell Command Configure
- Use manual BIOS setup: Set password directly through F2 BIOS interface
Multiple Password Prompts Appearing?
- This is normal if you have multiple drives with individual passwords
- Enter each password in the order they appear
- Consider using the same password for all drives to simplify the process
Computer Won't Boot After Setting HDD Password?
- Don't panic: This is usually just the password prompt appearing
- Look carefully: The prompt may appear differently than expected
- Try different keyboards: External keyboards sometimes don't work at this stage
- Check screen brightness: Some prompts appear very dim
Advanced Features and Considerations
Dell Command PowerShell Provider
For IT administrators managing multiple computers:
- Use Dell Command PowerShell Provider for automated HDD password management
- Check password status across multiple machines
- Implement enterprise-wide password policies
NVMe Drive Limitations
- 2022 and later models: Support NVMe BIOS passwords
- Important: Dell cannot unlock forgotten NVMe SSD passwords
Need More Help?
- Ready to protect your computer? Learn: Understanding BIOS Password Types
- To create new passwords: see guides for Admin Password or System Password setup
Frequently Asked Questions (FAQs)
1. Does this protect external drives too?
Answer: No, it applies only to internal drives.
2. Can Dell recover a forgotten HDD or SSD password?
Answer: Only for some drives with proof of ownership. NVMe passwords cannot be reset. Forgot Your NVMe SSD Password - Your Recovery Options Explained
3. Do I need to enter this password every time I start my computer?
Answer: Yes, once per boot.
4. Will this work on all Dell models?
Answer: Yes, HDD password is available on all Dell computers.
5. Can I set one password for multiple drives?
Answer: Yes, but unique passwords provide more protection.
Affected Products
Alienware, Dell All-in-One, Dell Pro All-in-One, Dell Pro Max Micro, Dell Pro Max Slim, Dell Pro Max Tower, Dell Pro Micro, Dell Pro Slim, Dell Pro Tower, Dell Slim, Dell Tower, Inspiron, Legacy Desktop Models, Vostro, XPS, G Series, G Series
, Alienware, Dell Laptops, Dell Plus, Dell Pro, Dell Pro Max, Dell Pro Plus, Dell Pro Premium, Inspiron, Latitude, Dell Pro Rugged, Vostro, XPS, Legacy Laptop Models, Fixed Workstations, Mobile Workstations, Dell Pro Max Micro XE FCM2250, Dell Pro Max Slim XE FCS1250, Dell Pro Max Tower T2 XE FCT2250, Dell Pro Max 14 Premium MA14250, Dell Pro Max 16 Premium MA16250, Dell Pro Max 16 Plus MB16250, Dell Pro Max 18 Plus MB18250, Dell Pro Max 16 XE MC16250, Dell Pro Micro Plus XE QBM1250, Dell Pro Slim Plus XE5 QBS1250, Dell Pro Tower Plus XE5 QBT1250
...
Article Properties
Article Number: 000144307
Article Type: How To
Last Modified: 05 Sept 2025
Version: 22
Find answers to your questions from other Dell users
Support Services
Check if your device is covered by Support Services.