Using and Troubleshooting Dell S3423DWC Monitor
Summary: Learn how to setup and troubleshoot Dell monitors. Find information about how to setup, run diagnostics, troubleshoot common issues with Dell S3423DWC.
This article applies to
This article does not apply to
This article is not tied to any specific product.
Not all product versions are identified in this article.
Instructions
For help with video or display issues such as: no video or no display, blank or black screen, flickering, resolution or color issues, horizontal or vertical lines, etc. refer to an expanding section below.
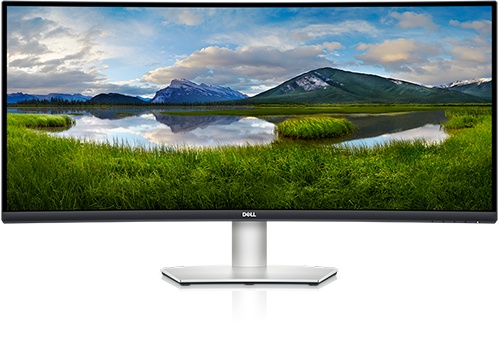
The key features of Dell S3423DWC monitor are:
- 86.42 cm (34.0 in.) viewable area display (measured diagonally).
- 3440 x 1440 resolution, with full-screen support for lower resolutions.
- Compatible with (AMD FreeSync), high refresh rates, and a rapid response time of 4 ms
- Supports 48 Hz to 100 Hz (HDMI) and 48 Hz to 100 Hz (USB-C Alternate mode with DisplayPort 1.4) in Freesync Mode.
- Built-in Speaker (5 W) x 2.
- Color gamut of 99% sRGB.
- Supports both Picture by Picture (PBP) / Picture in Picture (PIP) Select Mode.
- Digital connectivity with USB-C and HDMI.
- Single USB-C to supply power (PD 65W) to a compatible notebook while receiving video and data signal.
- Equipped with 1 USB-C upstream port, 1 Type B upstream port, 1 super speed USB 5 Gbps (USB 3.2 Gen 1) Type-A downstream port, and 1 super speed USB 5 Gbps (USB 3.2 Gen 1 with BC1.2) Type-A downstream port.
- The built-in KVM switch allows you to control up to 2 computers from a single set of keyboard and mouse connected to the monitor.
- Supports Auto KVM for multiple input setup.
- On-Screen Display (OSD) adjustments for ease of setup and screen optimization.
- Optimize eye comfort with a flicker-free screen
Warning: The possible long-term effects of blue light emission from the monitor may damage your eyes, including eye fatigue or digital eye strain. ComfortView feature is designed to reduce the amount of blue light that is emitted from the monitor to optimize eye comfort.
Warning: Do not mount this monitor in vertical orientation due to the risk of damaging the monitor.
This section provides some specifications of the Dell S3423DWC monitor. To learn more about the specifications of Dell S3423DWC monitor, refer to the User's Guide at the Dell Manuals website.
| Panel type |
|
|---|---|
| Maximum resolution |
|
| Viewing angle |
|
| Contrast ratio |
|
| Response time |
|
| Color gamut |
|
| Color depth |
|
| Ports and connectors |
|
Ensuring that your Dell monitor is set up properly. Assembling the monitor stand and setting up the monitor ergonomically. Connecting the cables and organizing them. These will only help make the viewing experience the best it possibly can be.
Attaching the stand
The standard monitor stand is detached when the monitor is shipped from the factory. To learn more about attaching the standard monitor stand. Refer to the Setting Up the Monitor section in the User's Guide of your Dell S3423DWC monitor.
To learn how to set up any other stand with a monitor, refer to the respective stand setup guide for setup instructions.
Caution: Do not remove the monitor from the packaging box before attaching the stand.
Note: The Dell S3423DWC monitor is very heavy; handle with extreme care. It is recommended to have two people to lift or move this monitor.
Ergonomics
Where you put your monitor is almost as important as what model you buy. The monitor should be directly in front of you, at an arm’s length away (between 20-40 inches from your eyes). The top edge of the screen at eye level when you are sitting comfortably. You may need to adjust your chair height or the height of the monitor to achieve this.
Connecting your monitor to the PC
To connect your Dell S3423DWC monitor to your PC:
- Turn off your PC and disconnect the power cable.
- Connect the HDMI, or USB Type-C cable to the corresponding video or display port on the back of your PC.
To learn more about connecting your monitor to the PC, refer to the Dell knowledge-base article: How to Connect a Monitor to a Dell Computer
- Connect the USB upstream cable to the monitor and PC.
Dell S3423DWC monitor orientation must always be in landscape mode. This includes any wall-mounted monitors and monitors on a stand. In a multiple monitor setup, Dell S3423DWC should not be rotated either to 180° (landscape) or 90° (portrait).
Caution: Dell S3423DWC setup must comply to the recommended panel orientation and working angle only. Setting up the monitor in an orientation that is not recommended may damage the monitor and/or cause a safety hazard.
When setting up your Dell S3423DWC monitor, ensure that the monitor front panel buttons is on the bottom right.
Using the Tilt, Swivel, and Vertical Extension
Note: This is applicable for a monitor with a stand. When any other stand is bought, please refer to the respective stand setup guide for set-up instructions.
With the stand attached to the monitor, you can tilt and swivel the monitor for the most comfortable viewing angle.
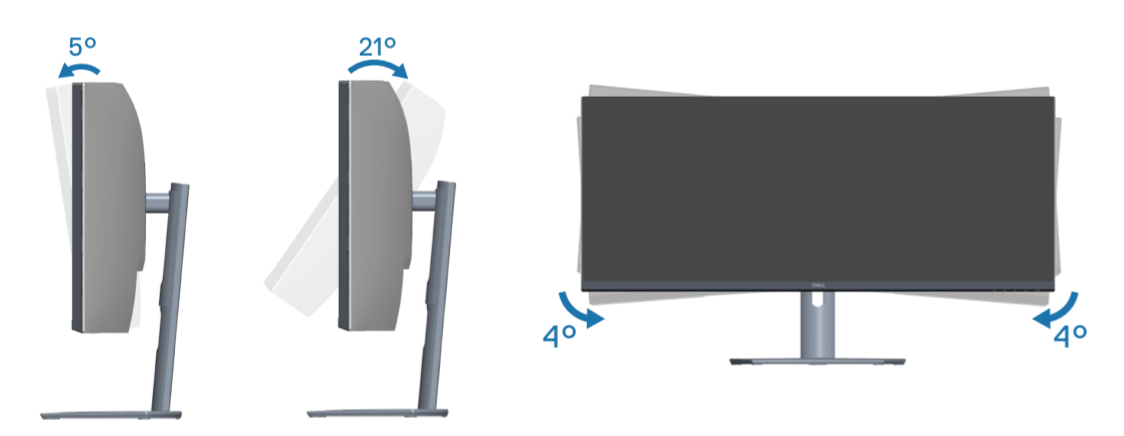
Figure 5: Using Tilt and Swivel on Dell S3423DWC monitor
When mounted on the wall or on a monitor arm, the set-up must comply to the recommended panel orientation and working angle.
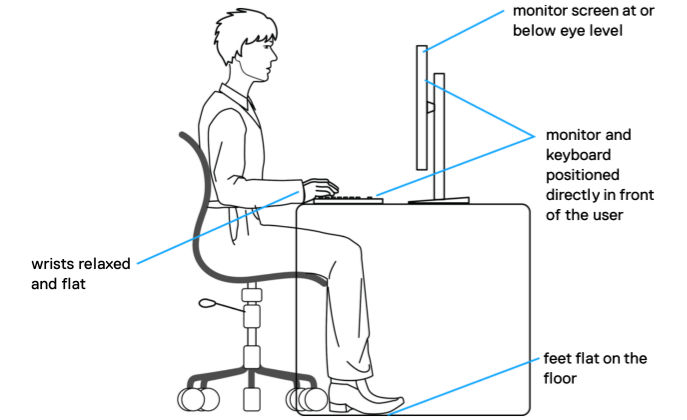
Figure 6: Orientation of Dell S3423DWC
Warning: The monitor should not be rotated 180° (landscape). The monitor should not be orientated at 90° (portrait).
Use the buttons at the bottom of the monitor to access the On-Screen Display (OSD) menu of the monitor. To access the On-Screen Display (OSD) menu, press Button 3 (Figure 1) at the bottom of the monitor.
Learn more about using the On-Screen Display (OSD) menu. Refer to the Operating Your Monitor section in the User's Guide of Dell S3423DWC monitor.
Note: Any changes that you make are automatically saved. Whenever you move to another menu item, exit the OSD menu, or wait for the OSD menu to automatically close.
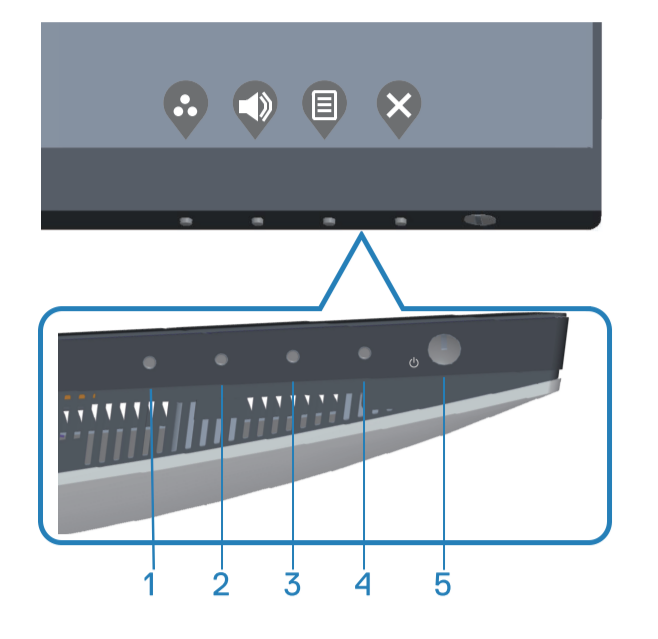
Figure 1: Dell S3423DWC Panel Buttons
| Button | Function | Description |
|---|---|---|
| Button 1 | Shortcut key/Preset Modes | Use this button for choose from a list of preset modes |
| Button 2 | Shortcut key/Input Source | Use the button to adjust the volume. Minimum is ‘0’ (-). Maximum is ‘100’ (+). |
| Button 3 | Menu | Use the Menu button at launch your on-screen display (OSD) and select the OSD menu. |
| Button 4 | Exit | Use the button to go back to the main menu or exit the OSD main menu. |
| Button 5 | Power On/Off button (with LED indicator) | Use the power button to turn the monitor on or off. Solid white light indicates the monitor is turned on. Blinking white light indicates it is in Standby mode. |
Resetting a monitor to factory defaults can help resolve many video or display issues. To reset your Dell S3423DWC monitor to factory default settings, follow these instructions:
- Press Button 3 (Figure 2) on the monitor to enter the On-Screen Display (OSD) Menu.
- Press Button 1 or Button 2 to highlight Others option in the menu and press Button 3 to select.
- Press Button 1 or Button 2 to highlight Factory Reset option in the menu and press Button 3 to select.
- Press Button 3 to confirm the reset action.
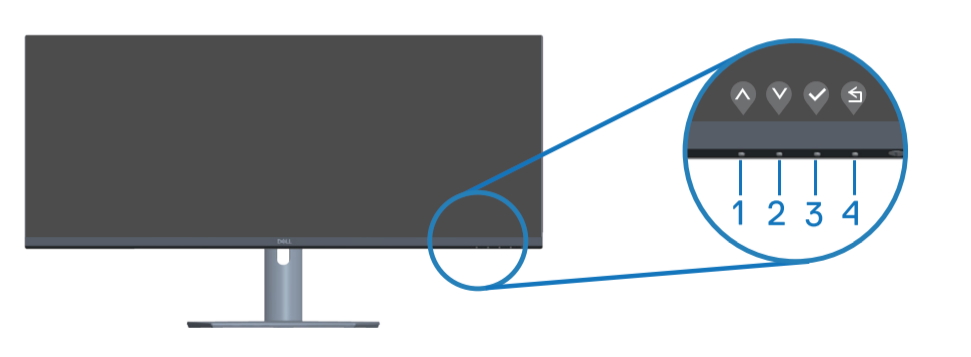
Figure 2: Dell S3423DWC Front Panel Buttons
If your Dell monitor has a blank or black screen, fuzzy or blurry image, flickering, distorted or any other screen abnormalities, running a diagnostic test will help determine if the Dell monitor is functioning normally. To learn more about diagnostic options on a Dell monitor, refer to the Dell knowledge-base article: How to Run a Diagnostic Test on a Dell Monitor
It is always essential to isolate the monitor while troubleshooting your computer for the following scenarios:
- No Power - Your computer is not powering ON or showing any signs of power.
- No POST - Your computer is not showing any indication of activity, the screen might be blank and will not display the Dell logo during start-up.
- No Video - You are unable to see any display on the screen, able to hear the windows chime but no display is seen.
Your Dell S3423DWC Monitor provides a self-test feature check that allows you to check whether the monitor is functioning properly. If the monitor and computer are properly connected but the monitor screen remains dark, run the monitor self-test by performing the following steps:
- Turn off both your computer and the monitor.
- Unplug the video cable from the back of the computer. To ensure proper Self-Test operation, remove the video cables (HDMI, or USB Type-C) from the back of the computer.
- Turn on the monitor.
- Turn off your monitor and reconnect the video cable: then turn on both your computer and the monitor.
- If your monitor screen remains blank after you use the previous procedure, check your video card (GPU) and computer, because your monitor is functioning properly.
Your Dell S3423DWC monitor has a built-in diagnostic tool. It helps to determine if the screen abnormality you are experiencing is a problem with the monitor or with the video card on your computer.
When you notice screen abnormalities like distortion, clarity, horizontal or vertical lines, color fade, it is always a good practice to isolate the monitor by running the Built-In Diagnostics.
- Ensure that the screen is clean (no dust particles on the surface of the screen).
- Press the button 3 to launch the OSD menu.
- Using the front-panel buttons, select Others > Self-Diagnostic to initiate the self-diagnostic process.
- When initiated, a gray screen appears. Inspect the screen for abnormalities.
- Press button 1 on the front-panel. The color of the screen changes to red. Inspect the screen for abnormalities.
- Repeat step 5 and inspect the screen when it displays the green, blue, black, and white colors, followed by onscreen text.
- The test is complete when the onscreen text appears. To exit, press the frontpanel buttons again.
Note: If you do not detect any screen abnormalities upon using the built-in diagnostic tool, the monitor is functioning properly. Check the video card (GPU) and the computer.
If you notice any abnormalities during Built-In Diagnostics, you may get the monitor repaired or replaced if it is under warranty by contacting Dell Technical Support.
If you notice any abnormalities during Built-In Diagnostics, you may get the monitor repaired or replaced if it is under warranty by contacting Dell Technical Support.
During the LCD Monitor manufacturing process, it is not uncommon for one or more pixels to become fixed in an unchanging state. Which is hard to see and do not affect the display quality or usability. For more information, refer to the Dell knowledge-base article Dell Display Pixel Guidelines .
This section provides information about troubleshooting steps that can help resolve the most common issues with the Dell S3423DWC monitor. Alternatively, to learn more about troubleshooting common issues on Dell monitors, refer to the Dell knowledge-base article How to Troubleshoot Display or Video Issues on a Dell Monitor .
| Common Problem | What User Experiences | Possible Solution |
|---|---|---|
| No Video - Power LED Off | No picture |
|
| No Video - Power LED On | No picture or no brightness. |
|
| Poor Focus | Picture is fuzzy, blurry, or ghosting. |
|
| Shaky or Jittery Video | Wavy picture or fine movement. |
|
| Missing Pixels | LCD screen has spots. |
|
| Stuck-On/Off Pixels | LCD screen has bright spot. |
|
| Brightness Problems | Picture too dim or too bright. |
|
| Geometric Distortion | Screen not centered correctly. |
Note: When using DisplayPort input, the positioning adjustments are not available.
|
| Horizontal or Vertical Lines | Screen has one or more lines. |
Note: When using DisplayPort input, the positioning adjustments are not available.
|
| Synchronization Problems | Screen is scrambled or appears torn. |
|
| Safety-Related Issues | Visible signs of smoke or sparks. |
|
| Intermittent Problems | Monitor malfunctions on and off. |
|
| Missing Color | Picture does not have color. |
|
| Wrong Color | Picture color is not good. |
|
| Image Retention from a Static Image Left on the Monitor for a Long Period | Faint shadow from the static image appears on the screen. |
|
| Screen image is too small. | Image is centered on screen, but does not fill entire viewing area. |
|
| Image Ghosting | Fast moving images leave a trail of shadow images. |
On certain video and applications with fast moving images, imaging ghosting, which appears as a trailing shadow, may occur. Change the Response Time to Fast in the Display menu. |
| No Input Signal when user controls are pressed. | No picture, the power LED light is white. |
|
| The picture does not fill the entire screen. | The picture cannot fill the height or width of the screen. |
|
| No Video, No Display | No video when connecting docking, dongle, or Blu-ray DVD players | Due to legacy platform cannot recognize or output 5120 x 1440, we suggest changing EDID to lower resolution to cover this compatibility problem.
|
| Monitor will not display Blu-Ray video after the monitor is powered-off and powered on. | If the monitor is powered-off and powered-on when displaying the Blu-Ray video, the Blu-ray player may lose the data signal from the system to the monitor. |
|
| Cannot enable YCbCr color mode on the monitor. | When monitor is connect to the PC via HDMI, the video or graphics card (GPU) controls the YCbCr setting | Disable the YCbCr setting from the video or graphics utility like Intel HD Graphics Control Panel. |
| Monitor will not support the YCbCr color format when a USB Type-C to HDMI dongle is connected from the monitor to the PC. | Some combinations of USB Type-C to HDMI dongle and video or graphics card (GPU) are not compatible to support the YCbCr color format. |
|
| When changing the monitor’s resolution from Windows Display Settings, the image quality may not be good. | Windows Display Settings and the resolution settings on the laptop's video or graphics utility may not be compatible. | Change the resolution using the video or graphics card (GPU) utility like Intel HD Graphics Control Panel. |
| Light leak from the monitor | The monitor appears to have light leak from the edges in a dark room | This is normal behavior of the monitor. Dell consumer monitors are inspected at 150-lux ambient lighting (similar to typical office lighting). Dell UltraSharp and Gaming monitors are inspected with a tighter criteria of 70-lux ambient lighting (dimly lit room but not dark). |
| Color variation on the corners of the monitor | The monitor appears to have color variation on the corners of the screen |
The optimal viewing position for the monitor is from the center of the screen. Dell S3423DWC monitor uses a curved IPS panel, the corners of the screen may appear slight yellowish or pinkish, especially when viewing in dark room. This is normal IPS panel behavior and typically does not affect the overall viewing performance.
|
| Horizontal stripes when watching online videos using Microsoft Movies and TV app, Microsoft Internet Explorer or Microsoft Edge. | Unwanted horizontal stripes appear on the video playback window when viewing online videos on YouTube using Microsoft Internet Explorer or Microsoft Edge browser. They are also seen while watching online videos using the Movies and TV app. |
|
| Troubleshooting USB Issues | ||
|---|---|---|
| Specific Symptoms | What User Experiences | Possible Solution |
| USB interface is not working. | USB peripherals are not working. |
|
| Wireless USB peripherals stop working when a USB 3.2 device is plugged in. | Wireless USB peripherals responding slowly or only working as the distance between itself and its receiver decreases. |
|
| USB ports on the monitor do not work when the monitor is connected to a PC using USB Type-C. | If the monitor is powered-off and powered-on too quickly, the laptop will not recognize the system change. |
|
To learn more about how to view or download the User Guides and Manuals for your Dell product. Refer to the Dell knowledge-base article Manuals and Documentation for your Dell Product .
- Dell S3423DWC – User’s Guide
- Dell S3423DWC – Quick Setup Guide
- Dell S3423DWC – Dell Display Manager User’s Guide
Frequently asked questions
To reset the Dell S3423DWC Monitor to factory defaults, refer to the Reset to Factory Settings section of this article.
The Dell S3423DWC monitor has two built-in diagnostics that are available:
- Self-Test Feature Check - The self-test feature check on the Dell S3423DWC monitor allows you to check whether the monitor is functioning properly.
- Built-In Self-Test - The Dell S3423DWC monitor has a built-in self-test that helps you identify if the screen abnormality is with the monitor or the video card (GPU) on your computer. When you notice screen abnormalities like distortion, clarity, horizontal or vertical lines, color fade. It is always a good practice to isolate the monitor by running the Built-In Diagnostics.
To learn how to run a diagnostic test, refer to the Running Diagnostics on Dell S3423DWC Monitor section of this Dell knowledge-base article.
The Troubleshooting section of this Dell knowledge-base article provides information about troubleshooting common issues with the Dell S3423DWC monitor. The section has troubleshooting steps on how to resolve power issues, video issues, color or clarity issues, distortion issues, horizontal or vertical lines, brightness issues or pixel issues and so on.
To navigate the On-Screen Display (OSD) menu, use the buttons on the monitor. The monitor control buttons are usually on the right side, either on the side, front, or bottom of the monitor. To access the On-Screen Display (OSD) menu, press Button 5 on the monitor.
For more information about using the On-Screen Display (OSD) menu and different menu options. Refer to the Operating Your Monitor section in the User's Guide of your Dell S3423DWC monitor.
.Additional monitor information like the model number, firmware version and Service Tag can be accessed from the monitor's OSD (On-Screen Display).
- Press Button 3 (Figure 2) on the monitor to enter the On-Screen Display (OSD) Menu.
- Press Button 1 or Button 2 to highlight Others option in the menu and press Button 3 to select.
- Press Button 1 or Button 2 to highlight Model Number or Service Tag option in the menu.
USB Type-C port on your Dell S3423DWC supports USB Power Delivery, Data, and DisplayPort video signal. The USB Type-C port can be used for video and data signal, and supply power (90 W) to a compatible laptop PC using a single USB Type-C cable that is provided with the monitor.
Note: Dell S3423DWC can supply power via the USB Type-C cable only to a compatible laptop PC that supports Power Delivery (PD) over USB Type-C. Not all laptop PCs with USB Type-C support Power Delivery, for more information refer to the User Manual or contact your laptop manufacturer.
Note: USB Type-C power delivery-compliant port (PD version 2.0) delivers up to 90 W of power. If your laptop PC requires more than 90 W to operate and the battery is drained. It is recommended you use the standard AC adapter of the laptop PC to power on and charge the laptop battery.
If you are using a Dell laptop PC that supports charging via USB Type-C. It is recommended to update the BIOS and Video or Graphics card (GPU) driver. To learn how to download and update a device driver, refer to the Dell knowledge-base article: How to Download and Install Dell Drivers?
Dell S3423DWC monitor orientation must always be in landscape mode. This includes any wall-mounted monitors and monitors on a stand. In a multiple monitor setup, Dell S3423DWC should not be rotated either to 180° (landscape) or 90° (portrait).
Caution: Dell S3423DWC setup must comply to the recommended panel orientation and working angle only. Setting up the monitor in an orientation that is not recommended may cause.
When setting up your Dell S3423DWC monitor, ensure that the monitor front panel buttons is on the bottom right.
Using the Tilt, Swivel, and Vertical Extension
Note: This is applicable for a monitor with a stand. When any other stand is bought, please refer to the respective stand setup guide for set-up instructions.
With the stand attached to the monitor, you can tilt and swivel the monitor for the most comfortable viewing angle.

Figure 5: Using Tilt and Swivel on Dell S3423DWC monitor
When mounted on the wall or on a monitor arm, the set-up must comply to the recommended panel orientation and working angle.

Figure 6: Orientation of Dell S3423DWC
Warning: The monitor should not be rotated 180° (landscape). The monitor should not be orientated at 90° (portrait).
Affected Products
Dell S3423DWCArticle Properties
Article Number: 000200616
Article Type: How To
Last Modified: 04 Jul 2025
Version: 6
Find answers to your questions from other Dell users
Support Services
Check if your device is covered by Support Services.