How to restore SAP HANA Database from Clone
Summary: This article deals with the procedure of restoration of SAP HANA Database from Clone.
This article applies to
This article does not apply to
This article is not tied to any specific product.
Not all product versions are identified in this article.
Instructions
Example details:
Client Hana has a backup on Data Domain A and Clone on Data Domain B.
Client Hana Database TDB1 is restored to the same client from Clone.
Clone Pool/Volume that includes Clone of Database and all its logs are Hana_Clone_Pool/HanaClonePool.001
Client Hana has a backup on Data Domain A and Clone on Data Domain B.
Client Hana Database TDB1 is restored to the same client from Clone.
Clone Pool/Volume that includes Clone of Database and all its logs are Hana_Clone_Pool/HanaClonePool.001
1. Verify and note the parameter file name and location on client using SAP HANA Studio.

1.2 Log on to the SYSTEMDB Database.


1.4 Expand "Backint Settings" under Configuration tab.

1.5 Note Backint Parameter File name and its location on client.

2. Edit Parameter file and add parameter NSR_RECOVER_POOL with value of Clone pool name which includes the Clone copy of Database and logs.

3. Perform the Database restoration.
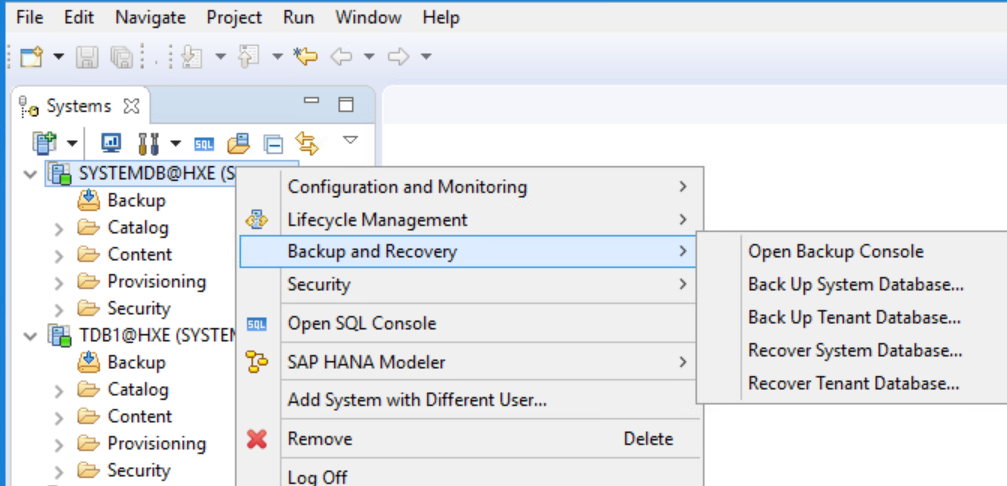
3.1 In SAP HANA Studio, highlight the SYSTEMDB@HXE (SYSTEM) database, right-click, and choose Backup and Recovery > Recover Tenant Database.
3.6 Allow a few moments for the recorded backups to appear. On the Select a Backup page, select an SAP HANA database backup from the Backups list.
Click Next.
Tip: There is an optional step on this screen to choose the button Check Availability. The backup changes from grey to green or red depending on the physical availability of the backup.
3.7 On the Locate Log Backups page, accept the default location:

Click Next.
3.8 On the Other Settings page, specify the following options:
File System: disable
Third-party Backup Tool (Backint): enable

Click Next.
3.9 On the Review Recovery Settings page, review all your recovery settings.

Click Finish to start the recovery.
3.10 The Recovery Execution Summary page displays the progress of the recovery.

Verify that the database was recovered.

Click Close.
3.11 Verify the recovered database has come back online. Right-click TDB1@HXE (SYSTEM) and choose Configuration and Monitoring > Open Administration.

After a few moments, the Operation Status shows green and all services started. Click Refresh if necessary.

Close SAP HANA Studio.
4. Verify recovery used Clone pool.
4.3 Render hdbbackinitHXE.log.raw file to text file allowing only today's details by using below command.

4.4 Verify the rendered text file contents and the use of clone pool.


1.1 Open SAP HANA Studio which has the client added.
1.2 Log on to the SYSTEMDB Database.
1.3 Open Backup Console
1.4 Expand "Backint Settings" under Configuration tab.
1.5 Note Backint Parameter File name and its location on client.
2. Edit Parameter file and add parameter NSR_RECOVER_POOL with value of Clone pool name which includes the Clone copy of Database and logs.
3. Perform the Database restoration.
3.1 In SAP HANA Studio, highlight the SYSTEMDB@HXE (SYSTEM) database, right-click, and choose Backup and Recovery > Recover Tenant Database.
- 3.2 On the Specify tenant database page, select the TDB1 tenant database to recover.

- Click Next.

- Click Next.
- Recover using the backup catalog: enable
Backup Catalog Location: /usr/sap/HXE/HDB00/backup/log/DB_TDB1 - Search for the backup catalog in the Backint only: enable

Click Next.
3.6 Allow a few moments for the recorded backups to appear. On the Select a Backup page, select an SAP HANA database backup from the Backups list.
Click Next.
Tip: There is an optional step on this screen to choose the button Check Availability. The backup changes from grey to green or red depending on the physical availability of the backup.
3.7 On the Locate Log Backups page, accept the default location:
/usr/sap/HXE/HDB00/backup/log/DB_TDB1
Click Next.
3.8 On the Other Settings page, specify the following options:
File System: disable
Third-party Backup Tool (Backint): enable
Click Next.
3.9 On the Review Recovery Settings page, review all your recovery settings.
Click Finish to start the recovery.
3.10 The Recovery Execution Summary page displays the progress of the recovery.
Verify that the database was recovered.
Click Close.
3.11 Verify the recovered database has come back online. Right-click TDB1@HXE (SYSTEM) and choose Configuration and Monitoring > Open Administration.
After a few moments, the Operation Status shows green and all services started. Click Refresh if necessary.
Close SAP HANA Studio.
4.1 Log in to the SAP HANA Client through PuTTY.
4.2 Change directory to /nsr/applogs
4.2 Change directory to /nsr/applogs
cd /nsr/applogs
4.3 Render hdbbackinitHXE.log.raw file to text file allowing only today's details by using below command.
Example: nsr_render_log -S "Jan 30 11:00" -E "Jan 30 12:00" hdbbackinitHXE.log.raw > /tmp/renderedfile.txt
4.4 Verify the rendered text file contents and the use of clone pool.
cat /tmp/renderedfile.txt | grep -i clonepoolname
cat /tmp/renderedfile.txt | grep -i clonevolumename
Article Properties
Article Number: 000214279
Article Type: How To
Last Modified: 15 Sept 2023
Version: 2
Find answers to your questions from other Dell users
Support Services
Check if your device is covered by Support Services.