Microsoft Windows:Microsoftの入れ子になったHyper-V Serverを作成する方法
Summary: この記事では、Windows Hyper-V仮想マシンのネストされた仮想化を有効にする方法について説明します。仮想マシンは、ネストされた仮想化とMacAddressSpoofingを有効にした後、Windows仮想マシンを実行できるHyper-V Serverに変換できます。
This article applies to
This article does not apply to
This article is not tied to any specific product.
Not all product versions are identified in this article.
Instructions
この例では、"Nest-HV" がサンプルの仮想マシン (VM) であり、入れ子になった VM に変換される VM の名前が PowerShell コマンドに挿入され、入れ子になった仮想化と MAC スプーフィングが有効になります。システム要件の詳細については、次のMicrosoftの記事を参照してください。ネストされた仮想化とは
- ホストHyper-V Serverにログインします。
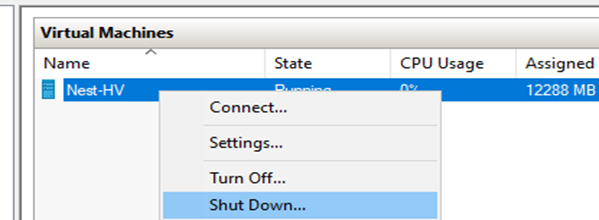
- Hyper-V マネージャーを開き 、入れ子になった Hyper-V サーバーとして使用する VM を見つけます。
- VMを右クリックして 、シャットダウンを選択します。
- Hyper-Vホストで管理用のISE PowerShellウィンドウを開きます。
- 次のPowerShellコマンドをコピーします。次のPowerShellコマンドを実行して、Hyper-V VMの名前を挿入します。
Set-VMProcessor -VMName Nest-HV -ExposeVirtualizationExtensions $true

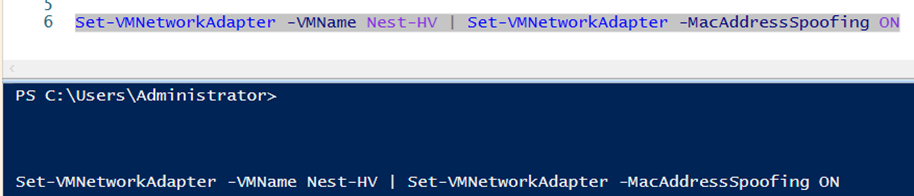
- 次のコマンドを実行して、 MacAddressSpoofingを有効にします。
Set-VMNetworkAdapter -VMName Nest-HV | Set-VMNetworkAdapter -MacAddressSpoofing On
- 入れ子になった Hyper-V VMを起動する
- 入れ子になったVMにログインします
- [スクリプト ビュー(Script View)] ウィンドウを追加して、管理者 ISE PowerShell セッションを開きます
- 以下のPowerShellコマンドを貼り付けて実行し、VMにHyper-Vロールをインストールします。
Install-WindowsFeature -Name Hyper-V -IncludeManagementTools -Restart

- VMが再起動したら 、[Server Manager]を開きます。
- 左側のウィンドウ ペインで、[ Hyper-V]を選択します。
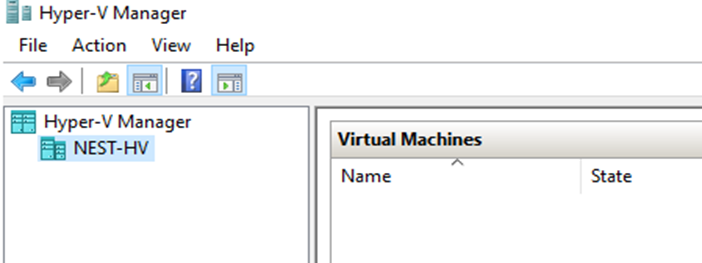
- 中央のウィンドウで、[ Nest-HV] を右クリックし 、[Hyper-Vマネージャー]をクリックします。
- 「NEST-HV」がHyper-V Serverとして表示されることを確認します。
- 新しいVMは、VMで使用するために、新しいネストされたHyper-V Serverに作成またはインポートできます。
Additional Information
入れ子になったHyper-V Serverを作成する方法。
再生時間:00:03:54 (hh:mm:ss)
利用可能な場合、このビデオ プレーヤーのCCアイコンを使用してクローズド キャプション(字幕)の言語設定を選択できます。
Affected Products
Dell Solutions Guides for Microsoft Hyper-V, Microsoft Windows Server 2016, Microsoft Windows Server 2019, Microsoft Windows Server 2022Article Properties
Article Number: 000219458
Article Type: How To
Last Modified: 05 Sept 2025
Version: 6
Find answers to your questions from other Dell users
Support Services
Check if your device is covered by Support Services.