PowerFlex 4.X - How To Apply LDAP Group Search Filter In PFxM Keycloak Admin Console
Summary: This article explains how to create an LDAP group search filter in the PFxM Keycloak Admin Console.
This article applies to
This article does not apply to
This article is not tied to any specific product.
Not all product versions are identified in this article.
Symptoms
PFxM UI login timeout when a user attempts to log in with LDAP credentials.
Cause
In AD environments with a large number of groups (20,000+), login attempts to the PFxM UI may timeout because Keycloak will enumerate through every group in the environment. The search filter limits the groups that Keycloak process during user authentication and authorization to those groups listed in the filter.
Note: Keycloak will authenticate any user with an active account in the AD domain by default. If a user is not part of the groups in the filter, they will not be authorized and will not have access to the PFxM UI.
Note: Keycloak will authenticate any user with an active account in the AD domain by default. If a user is not part of the groups in the filter, they will not be authorized and will not have access to the PFxM UI.
Resolution
- Obtain the Keycloak user's secret/password by running the following command from any PFxM MVM node.
kubectl get secret -n powerflex keycloak-admin-credentials -o jsonpath="{.data.password}" | base64 --decode; echo
2. Go to the Keycloak admin UI console using the following URL.
https://pfmp.company.org/auth
3. Click on 'Administration Console' and log in with the username keycloak and the secret listed in the output from the command in step 1
4. Change from 'master' to the 'Powerflex' realm in the drop-down
5. Click 'User federation', then click the configured LDAP provider.
6. Click the 'Mappers' tab, then click 'LdapGroupMapping'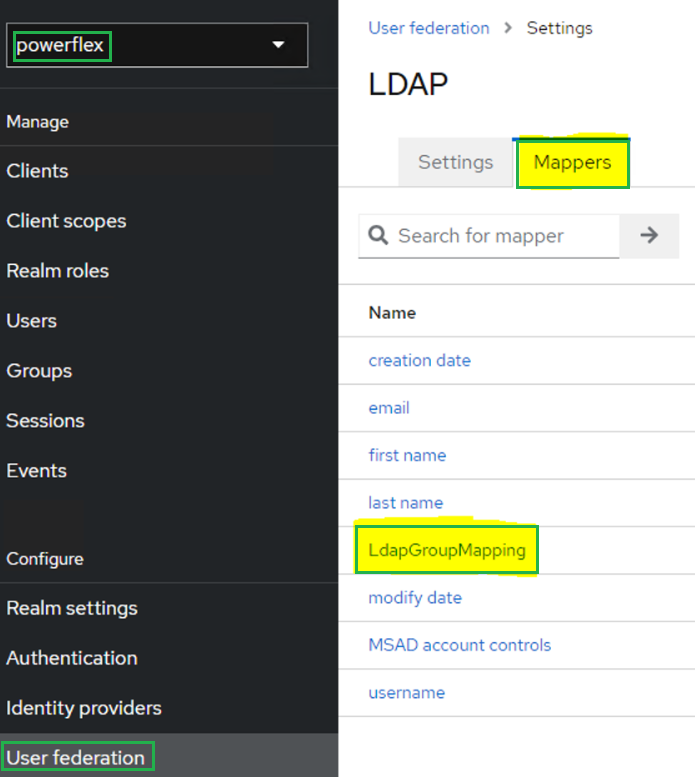
7. Scroll down and look for the 'LDAP Filter' object. Add the specific groups you are interested in using the syntax below (this creates an 'OR' filter). The (etc) value in the syntax is a place holder for adding additional groups if needed. Each group you add needs () around the "cn=" value.
(|(cn=group_name_1)(cn=group_name_2)(cn=group_name_3)(etc))
Ex.
(|(cn=Monitoring_Group)(cn=Admin_Group)(cn=Deployment_Group))

8. Click 'Save'.
9. Sync PFxM with the LDAP provider by running the following commands from any PFxM MVM node.
Set system variables for SSO IP, platform manager token, ingress IP, and LDAP ID
NOTE: For the PM_TOKEN variable command, Replace the following value "Scaleio123!" with the admin password you use to log in to the PFxM UI.
SSO_IP=`kubectl get svc -A | grep "sso " | awk '{print $4}'`

PM_TOKEN=`curl -k --location --request POST "https://${SSO_IP}:8080/rest/auth/login" --header 'Accept: application/json' --header 'Content-Type: application/json' --data '{"username": "admin","password": "Scaleio123!" }' | jq -r .access_token`

INGRESS_IP=$(kubectl get svc -A | grep -i rke2-ingress-nginx-controller | awk 'NR==1{print $5}')

LDAP_ID=$(curl -k https://${INGRESS_IP}/rest/v1/directory-services --header 'Accept: application/json' --header 'Content-Type: application/json' --header "Authorization: Bearer ${PM_TOKEN}" | jq -r '.[0].id')
10 Run the following command to initiate a sync from PFxM to the LDAP provider.
curl -k -X POST https://${INGRESS_IP}/rest/v1/directory-services/${LDAP_ID}/sync --header "Authorization: Bearer ${PM_TOKEN}" --header 'Accept: application/json' --header 'Content-Type: application/json'
NOTE: The command above should return nothing to the screen if it is successful. Wait up to 15 minutes and try the add user or group from the PFxM UI.
Article Properties
Article Number: 000224858
Article Type: Solution
Last Modified: 26 Feb 2025
Version: 4
Find answers to your questions from other Dell users
Support Services
Check if your device is covered by Support Services.