OptiPlex Micro Form Factor Mounting Options and Installation Methods
Summary: This article provides information about the current mounting options available for the OptiPlex Micro Form Factor chassis.
This article applies to
This article does not apply to
This article is not tied to any specific product.
Not all product versions are identified in this article.
Instructions
The Dell OptiPlex Micro is a desktop form factor in the Dell commercial desktop portfolio.
OptiPlex Micro Mounting Options
The Dell OptiPlex Micro form Factor provides flexible computer deployment through various mounting options.
NOTE: This article does not deal with the sale of these mounts. It only shows what is available for these computers and how to fit them. These mounts are usually bought at the point of purchase when buying your Micro computer. If you are looking to purchase one, then look on the Dell Sales site instead.
See the sections below for the current options available and the installation method involved. The Features of the Dell Micro Form Factor All-in-One Stand MFS22.
Perform the following steps before working inside or on your computer.
- Save and close all open files and exit all open applications.
- Shut down your computer.
- Click Start.
- Click the Power icon.
- Click Shut down.
NOTE: If you are using a different operating system other than Windows 11, see the documentation of your operating system for shut-down instructions. - Disconnect all attached electrical devices from your computer and unplug the computer from its electrical outlet.
- Disconnect all attached network devices and devices, such as keyboard, mouse, and monitor, from your computer.
- Remove any media card and optical disk from your computer, if applicable.
- After the computer is unplugged, press and hold the power button for 5 seconds to ground the system board.
- Place the computer face down.
CAUTION: Place the computer on a flat, soft, and clean surface to avoid scratches on the chassis or monitor screen.
- Follow the instructions in the Perform the following steps before working inside or on your computer. section first.
- Align the slot on the chassis with the tab on the vertical stand and place the computer on the vertical stand (Figure 1).
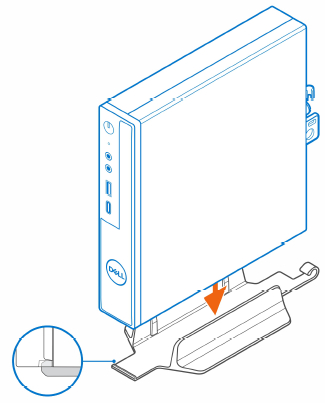
Figure 1: Aligning the chassis with the vertical standNOTE: Ensure to align the slot on the chassis with the tab on the vertical stand to prevent the computer from sliding out of the vertical stand (Figure 2).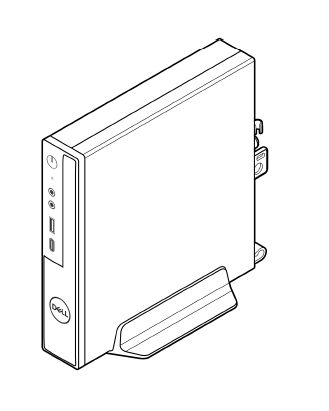
Figure 2: Ensuring the align slot is aligned with the tab - Route the power cable through the hook on the vertical stand to prevent accidental disconnection of the power cable (Figure 3).
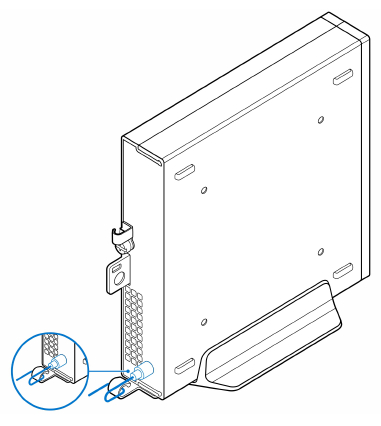
Figure 3: Routing the power cable
- Follow the instructions in the Perform the following steps before working inside or on your computer. section first.
- Place the VESA mount on the wall.
- Install the four self-tapping screws (M4x13) to secure the VESA mount to the wall (Figure 4).
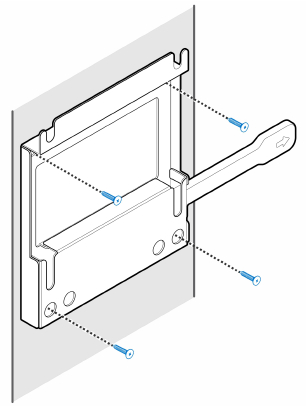
Figure 4: Installing screws into the VESA mount onto the wall - Install the two screws (M3x6) to secure the AC adapter sleeve to the VESA mount (Figure 5).
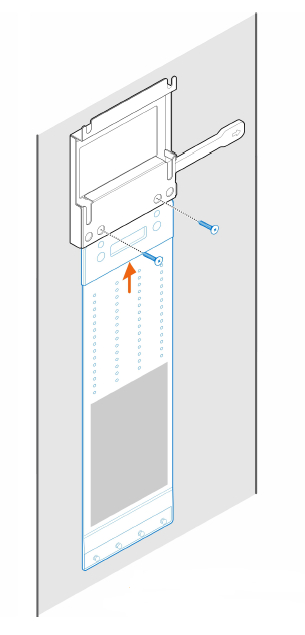
Figure 5: Securing the AC adapter - Install the four step screws (M4x4) on the chassis (Figure 6).
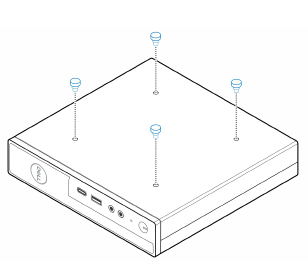
Figure 6: Installing step screws on the chassis - Align the step screw (M4x4) with the notches on the wall mount and mount the computer on the wall mount (Figure 7).
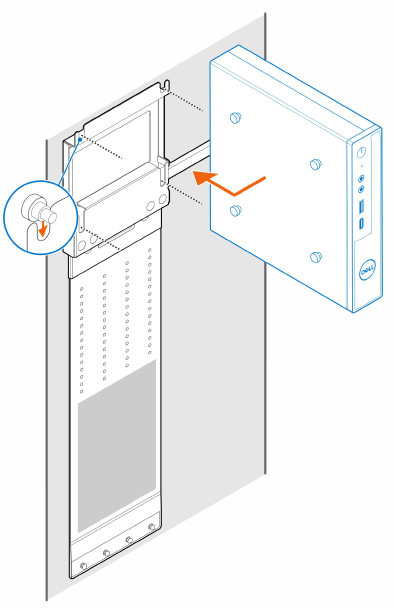
Figure 7: Mounting the computer on the wall mount - Place the AC adapter on the AC adapter sleeve (Figure 8).
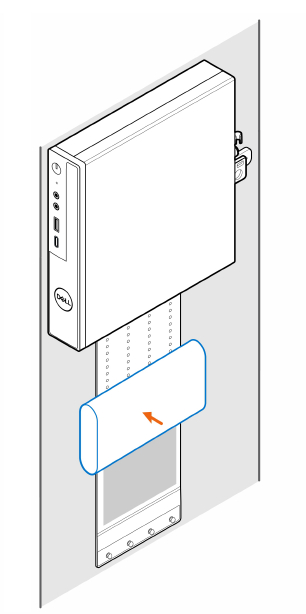
Figure 8: Placing the AC adapter on the AC adapter sleeve - Wrap the sleeve around the AC adapter and insert the retaining tabs into the holes on the AC adapter sleeve at an appropriate level. (Figure 9)
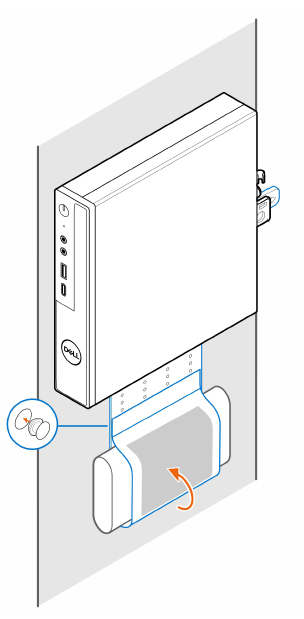
Figure 9: Wrapping the AC adapter
- Follow the instructions in the Perform the following steps before working inside or on your computer. section first.
- Place the VESA mount under the desk.
- Install the four self-tapping screws (M4x13) to secure the VESA mount under the desk (Figure 10).
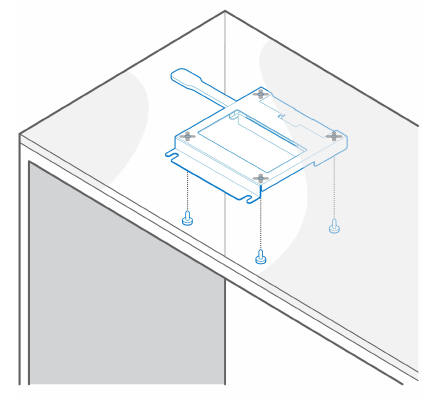
Figure 10: Installing self-tapping screws to secure the VESA mount under the desk. - Install the four step screws (M4x4) on the chassis (Figure 11).
.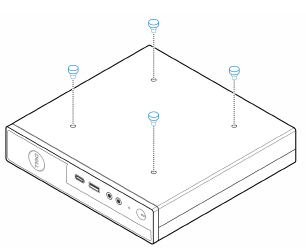
Figure 11: Installing step screws onto the chassis - Align the step screws (M4x4) with the notches on the desk mount and mount the computer on the desk mount (Figure 12).
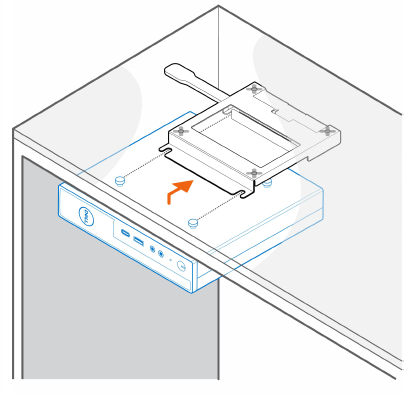
Figure 12: Mounting the computer onto the desk mount - Install the two screws (M3x6) to secure the AC adapter sleeve under the desk (Figure 13).
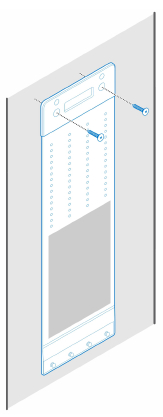
Figure 13: Installing the screws to secure the AC adapter sleeve to the desk - Place the AC adapter on the AC adapter sleeve (Figure 14).
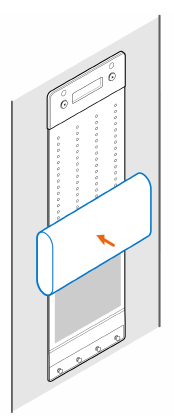
Figure 14: Placing the AC adapter into the AC adapter sleeve - Wrap the sleeve around the AC adapter and insert the retaining tabs into the holes on the AC adapter sleeve at an appropriate level (Figure 15).
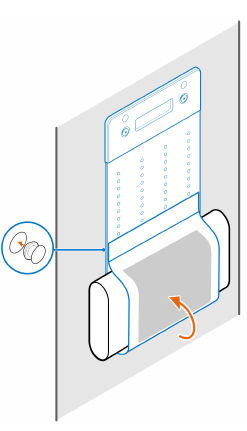
Figure 15: Wrapping the sleeve around the AC adapter
- Follow the instructions in the Perform the following steps before working inside or on your computer. section first.
- Place the monitor on a soft cloth or cushion (Figure 16).
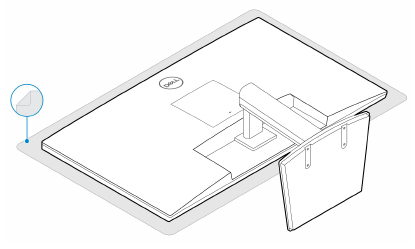
Figure 16: Placing the monitor on a soft cloth - Install the four screws (M2.5x7) to secure the extender to the monitor stand (Figure 17).
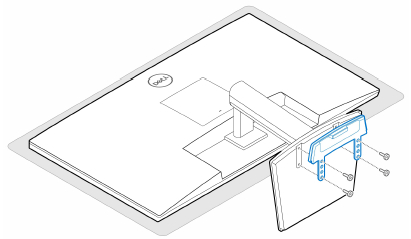
Figure 17: Installing the screws to secure the extender to the monitor stand - Install the two screws (M3x6) to secure the AC adapter sleeve (upsell) to the all-in-one stand (Figure 18).
NOTE: The AC adapter sleeve is an optional component that needs to be purchased separately.
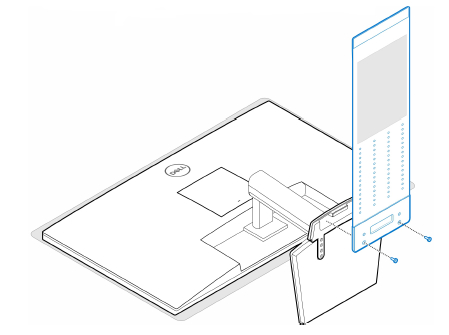
Figure 18: Securing the AC adapter sleeve - Remove the monitor back cover (Figure 19).
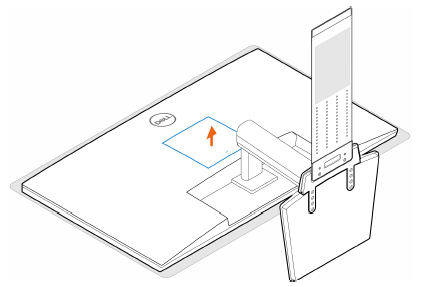
Figure 19: Removing the back cover - Install the four screws (M4x10) to secure the VESA mount to the monitor (Figure 20).

Figure 20: Installing the screws to secure the VESA mount to the monitor - Install the four step (M4x4) screws on the chassis (Figure 21).
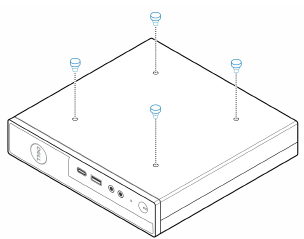
Figure 21: Installing step screws on to the chassis - Align the step screws (M4x4) with the notches on the VESA mount and mount the computer on the VESA mount.(Figure 22)
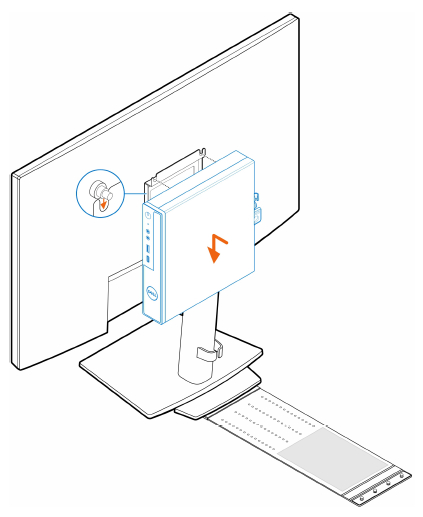
Figure 22: Mounting the computer on the VESA mount - Place the AC adapter on the AC adapter sleeve (Figure 23).
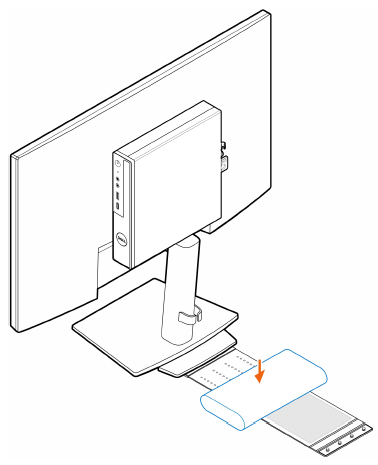
Figure 23: Placing the AC adapter on the AC adapter sleeve - Wrap the sleeve around the AC adapter and insert the retaining tabs into the holes on the AC adapter sleeve at an appropriate level (Figure 24).
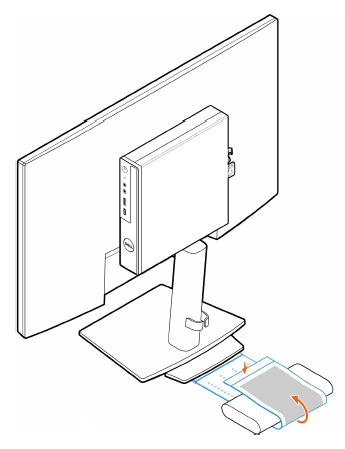
Figure 24: Wrapping the AC adapter - Place the AC adapter sleeve behind the desk (Figure 25).
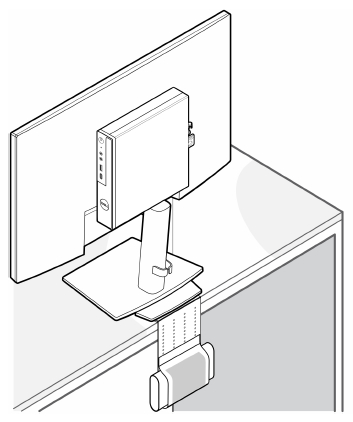
Figure 25: Place the AC adapter sleeve behind the desk
- Follow the instructions in the Perform the following steps before working inside or on your computer. section first.
- Place the monitor on a soft cloth or cushion.
- Remove the monitor back cover.
- Install the four screws (M4x10) to secure the VESA mount on the monitor (Figure 26).
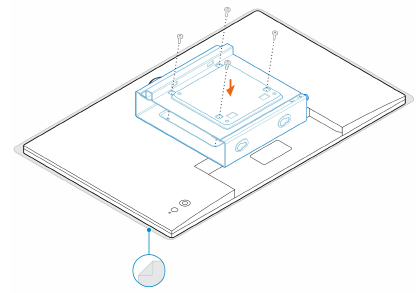
Figure 26: Installing the screws to secure the VESA mount on the monitor - Slide the computer into the VESA mount.
- Tighten the thumbscrew to secure the computer to the VESA mount (Figure 27).
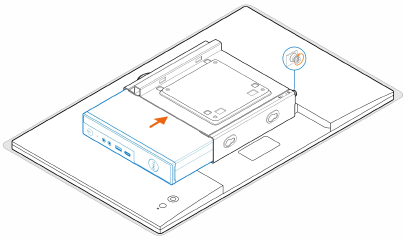
Figure 27:Tightening the thumbscrew to the VESA mount - Align the screws on the power adapter enclosure with the screw holes on the VESA mount and side the power adapter enclosure to lock it in place (Figure 28).
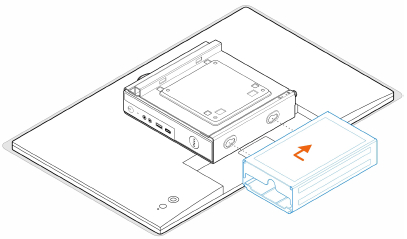
Figure 28: Aligning the screws on the power adapter enclosure and VESA mount
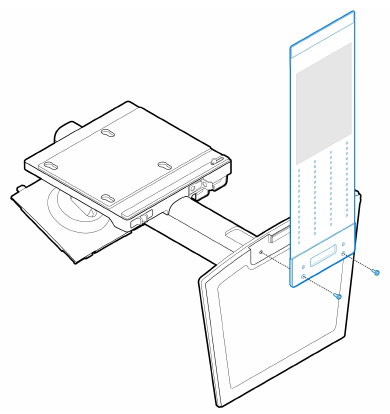
Table 1: Compatible AC adaptersCompatible AC adapters 65 W AC adapter 90 W AC adapter 130 W AC adapter 180 W AC adapter - Lift the monitor and insert the slots on the VESA mount into the hooks on the monitor arm until it clicks in place.
- Tighten the screw (M4x12) on the monitor arm to secure the monitor to the monitor arm (Figure 29).

Figure 29: Tightening the screws on the monitor arm to the monitor
- Follow the instructions in the Perform the following steps before working inside or on your computer. section first.
- Install the two screws (M3x6) to secure the AC adapter sleeve (upsell) to the all-in-one stand. (Figure 30)
 NOTE: The AC adapter sleeve is an optional component that needs to be purchased separately.Figure 30: Securing the AC adapter sleeve to the all-in-one stand
 - Install the four step (M4x4) screws on the chassis (Figure 31).
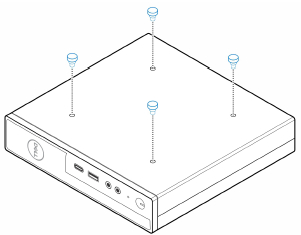
Figure 31: Installing step screws on to the chassis - Align the step screws (M4x4) with the notches on the all-in-one stand and mount the computer on the all-in-one stand (Figure 32).
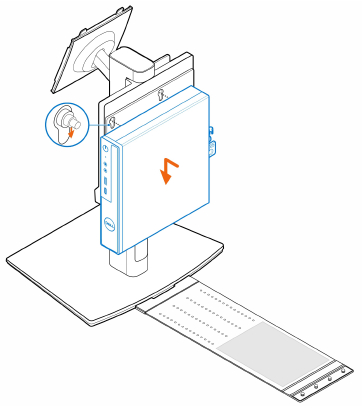
Figure 32: Mounting the computer to the all-in-one stand - Align the tabs on the cable cover with the slots on the computer and slide the cable cover to lock it in place (Figure 33).
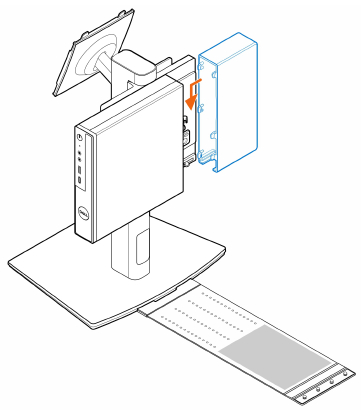
Figure 33: Installing the cable cover - Place the AC adapter on the AC adapter sleeve (Figure 34).
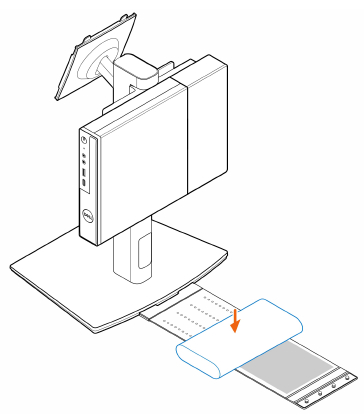
Figure 34: Placing the AC adapter on the AC adapter sleeve - Wrap the sleeve around the AC adapter and insert the retaining tabs into the holes on the AC adapter sleeve at an appropriate level (Figure 35).
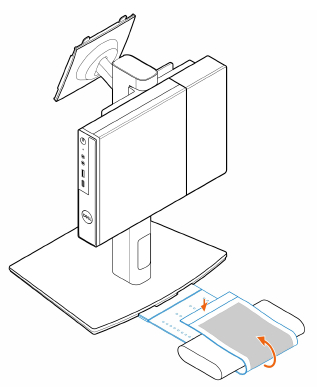
Figure 35: Wrapping the AC adapter - Place the AC adapter sleeve behind the desk (Figure 36).
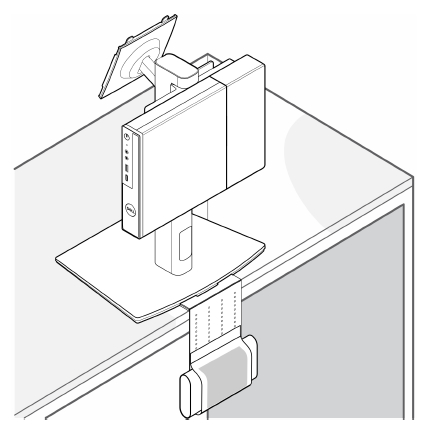
Figure 36: Place the AC adapter sleeve behind the desk
Affected Products
OptiPlex MicroArticle Properties
Article Number: 000136893
Article Type: How To
Last Modified: 30 Apr 2026
Version: 12
Find answers to your questions from other Dell users
Support Services
Check if your device is covered by Support Services.