PowerEdge: How to Create a Virtual Disk Using iDRAC9
Summary: This article explains how to create a virtual disk using the iDRAC9 web management interface with PERC 10,11,12 series.
This article applies to
This article does not apply to
This article is not tied to any specific product.
Not all product versions are identified in this article.
Instructions
Create a Virtual Disk Using iDRAC9.
Duration: 00:00:53
Closed caption (subtitles) language settings can be chosen using the CC icon on this video player.
Connection to the iDRAC web interface
To start, connect to the iDRAC web interface using the defined IP Address with the admin credentials.
Note: If the iDRAC is not yet configured, reference. How to configure the Integrated Dell Remote Access Controller 9 (iDRAC9) with Lifecycle Controller network settings? For information about how to proceed.
Virtual disk creation:
- In the iDRAC Web Interface, go to Configuration and then click Storage Configuration.

Figure 1: Storage Configuration
The Storage Configuration tab is no longer available from iDRAC firmware version 5.10.00.00 and later versions, use the Storage menu to perform configuration actions.
Go to Storage and then click Physical Disks.
Go to Storage and then click Physical Disks.

Figure 2: Physical Disks
- Select the RAID controller for which you want to create the virtual disk from the Controller drop-down menu (Only for versions before 5.10.00.00).
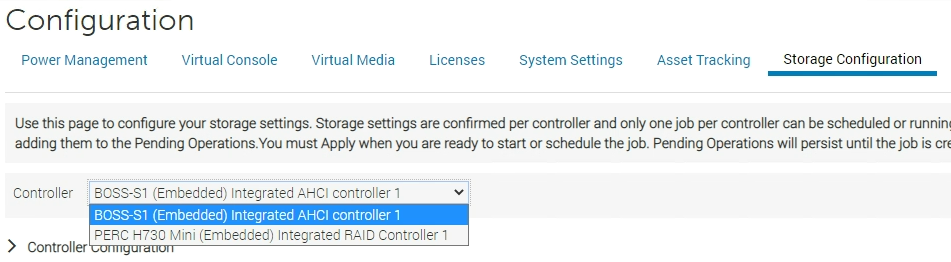
Figure 3: Selecting a RAID controller
- Check that available disks are listed in the Physical Disk Configuration section.

Figure 4: Before 5.10.00.00 Physical Disk Configuration

Figure 5: 5.10.00.00 and later Physical Disk Selection
- Open the Virtual Disk Configuration menu and click the button Create Virtual Disk.

Figure 6: Before 5.10.00.00 Create Virtual Disk button.
For version 5.10.00.00 and later only, click the Create Virtual Disk button from the Physical Disks menu.

Figure 7: 5.10.00.00 and later Create Virtual Disk button.
- The creator wizard appears to configure the Virtual Disk properties.
In the Capacity field, enter the size of the virtual disk. The maximum size is displayed and then updated as disks are selected. Click Add to Pending Operations when ready.
You can use alphanumeric characters, spaces, dashes, and underscores in the disk name. Any other special characters that you enter are removed while creating the virtual disk.
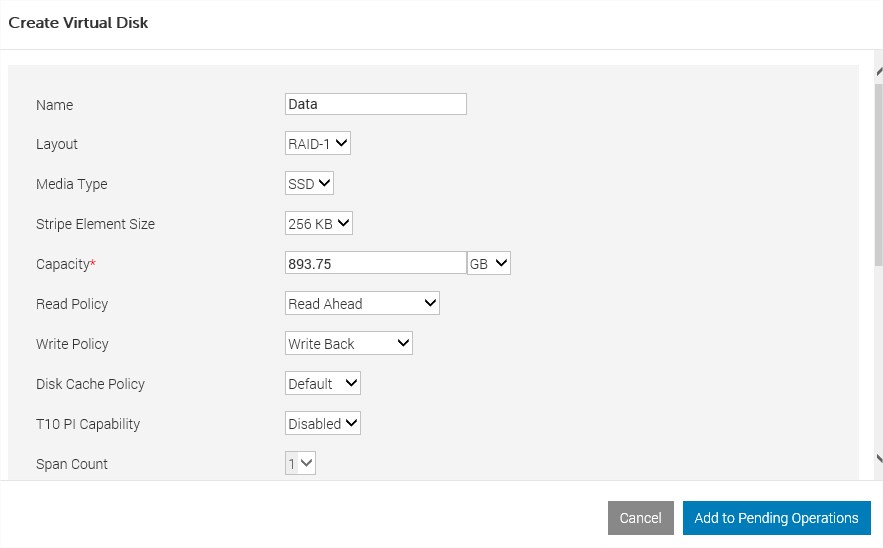
Figure 8: Before 5.10.00.00 Create Virtual Disk Properties.
For version 5.10.00.00 and later only, if there are multiple controllers, select the controller where the disk to be added resides. Select the physical disk to be added with Next and complete the four steps.
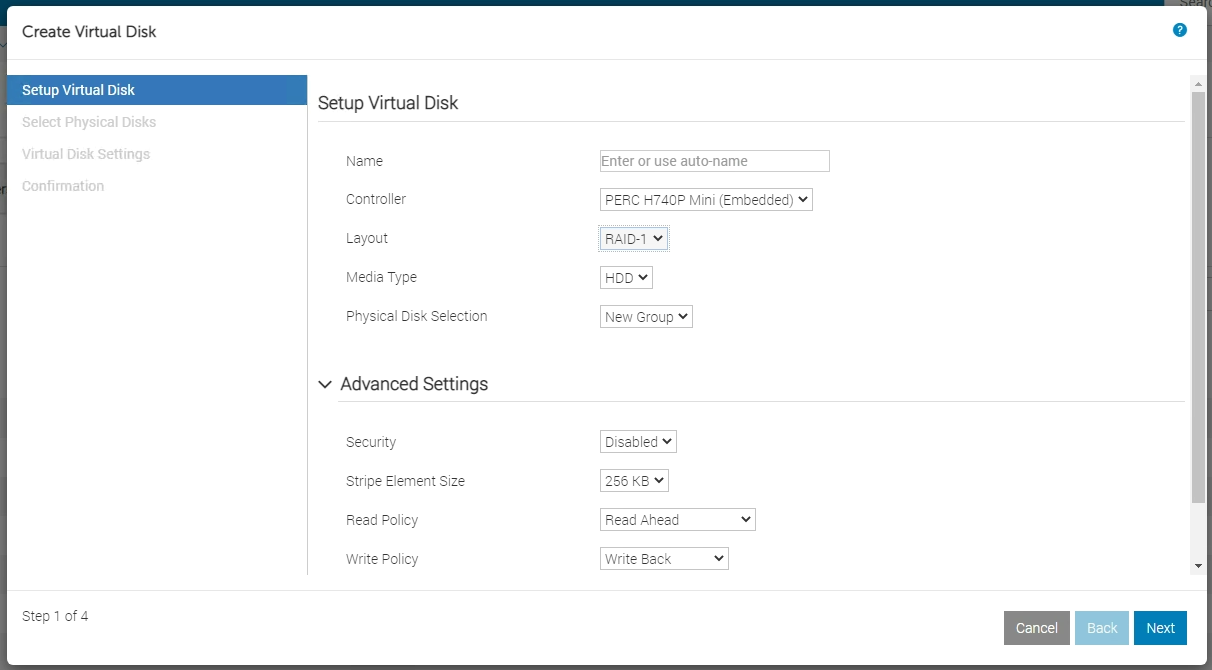
Figure 9: 5.10.00.00 and later Create Virtual Disk Properties.
- The message "RAC0685: A pending operation has been created for this Create Virtual Disk operation" appears to confirm the task creation.
- To perform this creation task, go to the bottom of the page and select Apply Now. If needed, the task can be scheduled.

Figure 10: Before 5.10.00.00 Apply Now button.

Figure 11: 5.10.00.00 and later Apply Now button.
- The raid configuration task starts. It is possible to monitor the status by selecting the menu Maintenance and then clicking Job Queue.
- When the task is completed, the Virtual Disk is listed by selecting the menu Storage and then clicking Virtual Disks.

Figure 12: Storage Virtual Disks
The virtual disk is now ready for use and formatting from the operating system.
For older legacy systems with iDRAC6, iDRAC7, and iDRAC8, this option is not available. Create a virtual disk in the RAID BIOS or using Dell Open Manage Server Administrator.
Note: If your system is in the BIOS or pre-POST state, your system must be restated. It must pass the BIOS screen in order for the LifeCycle Controller to complete the task.
Additional Information
Alternatively, the Virtual Disk can also be created from the System Settings menu. For more information, reference How to Create a Virtual Disk on a Dell RAID Controller Series 10 and 11.
Refer to this video:
Create or Delete a Virtual Disk in iDRAC 9
Duration: 00:02:08 (hh:mm:ss)
When available, closed caption (subtitles) language settings can be chosen using the CC icon on this video player.
You can also view this video on YouTube.
Affected Products
PowerEdge R350, PowerEdge R440, PowerEdge R450, PowerEdge R540, PowerEdge R550, PowerEdge R570, PowerEdge R640, PowerEdge R6415, PowerEdge R650, PowerEdge R650xs, PowerEdge R6515, PowerEdge R6525, PowerEdge R660, PowerEdge R660xs, PowerEdge R6615
, PowerEdge R6625, PowerEdge R670, PowerEdge R6715, PowerEdge R6725, PowerEdge R740, PowerEdge R740XD, PowerEdge R740XD2, PowerEdge R7415, PowerEdge R7425, PowerEdge R750, PowerEdge R750XA, PowerEdge R750xs, PowerEdge R7515, PowerEdge R7525, PowerEdge R760, PowerEdge R760XA, PowerEdge R760xd2, PowerEdge R760xs, PowerEdge R7615, PowerEdge R7625, PowerEdge R770, PowerEdge R770AP, PowerEdge R7715, PowerEdge R7725, PowerEdge R7725xd, PowerEdge R840, PowerEdge R860, PowerEdge R940, PowerEdge R940xa, PowerEdge R960, PowerEdge T340, PowerEdge T350, PowerEdge T360, PowerEdge T440, PowerEdge T550, PowerEdge T560, PowerEdge T640, PowerFlex appliance R650, PowerFlex appliance R6525, PowerFlex appliance R660, PowerFlex appliance R6625, Powerflex appliance R750, PowerFlex appliance R760, PowerFlex appliance R7625, PowerFlex appliance R860, PowerFlex custom node R650, PowerFlex custom node R6525, PowerFlex custom node R660, PowerFlex custom node R6625, PowerFlex custom node R750, PowerFlex custom node R760, PowerFlex custom node R7625, PowerFlex custom node R860, PowerFlex appliance R640, PowerFlex appliance R740XD, PowerFlex appliance R7525, PowerFlex appliance R840
...
Article Properties
Article Number: 000129249
Article Type: How To
Last Modified: 23 Oct 2025
Version: 18
Find answers to your questions from other Dell users
Support Services
Check if your device is covered by Support Services.