Dell Unity: Unisphere Overview
Executive summary
Overview
Audience
Revisions
We value your feedback
Introduction
Introduction
Terminology
Simplified Management with Unisphere
Simplified Management with Unisphere
For most technology products available today, simplicity and ease of use are some of the top priorities for customers considering purchasing the product. For Dell Unity storage systems, Unisphere management addresses these priorities by providing an easy to use and simplified management interface for IT generalists, while at the same time providing advanced features for more adept storage administrators. Unisphere allows administrators to easily configure storage resources from their Dell Unity systems to meet the needs of their applications, hosts, and users, as shown in Figure 1.
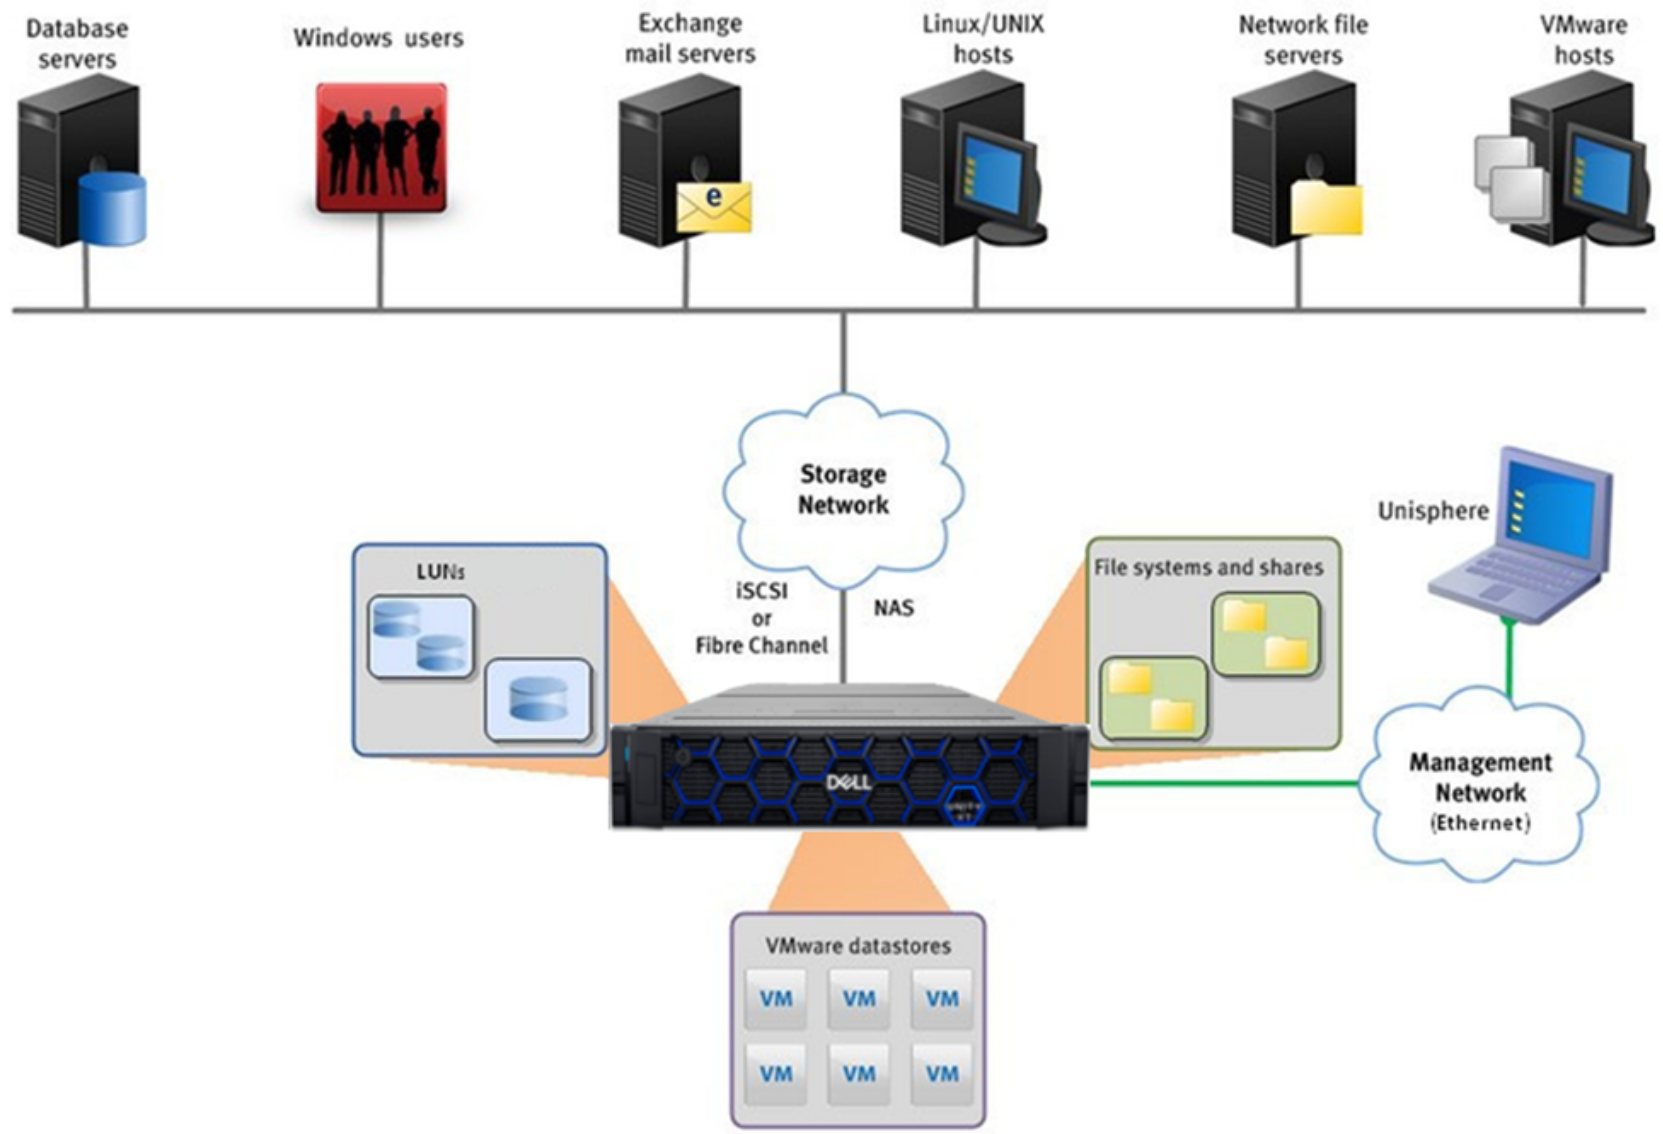
Figure 1. Dell Unity in Diverse Storage Environments
The Unisphere provisioning workflows simplify management by using best practices and recommended default values, which help to optimize system performance and minimize the overall costs of using and maintaining the system. Unisphere can easily identify failed/faulted components through graphical representations of the system and offers a wide range of Dell support options directly from the user interface, to assist troubleshooting.
For information about other management interfaces, such as the Unisphere CLI and REST API, see the corresponding sections later in this paper.
Getting started
Getting started
Using the Connection Utility to set a Management IP
After installing the Connection Utility application on a Windows host, the user needs to open the application and choose one of the available methods to configure the system as shown in Figure 2:
Auto Discover: Users can use this method when their management host is on the same subnet as the Dell Unity system. This method allows the utility to automatically discover any Dell Unity systems on the network that are either unconfigured (have no management IP) or configured but have not yet run through the Initial Configuration Wizard in Unisphere. This means that users can choose to reconfigure network settings through the Connection Utility before logging in through Unisphere.
Manual Configuration: Users can use this method when their system is not on the same network as their management host. This method allows saving a network configuration file to a USB drive and transferring it to a system, which will subsequently process the file and configure the saved network settings.
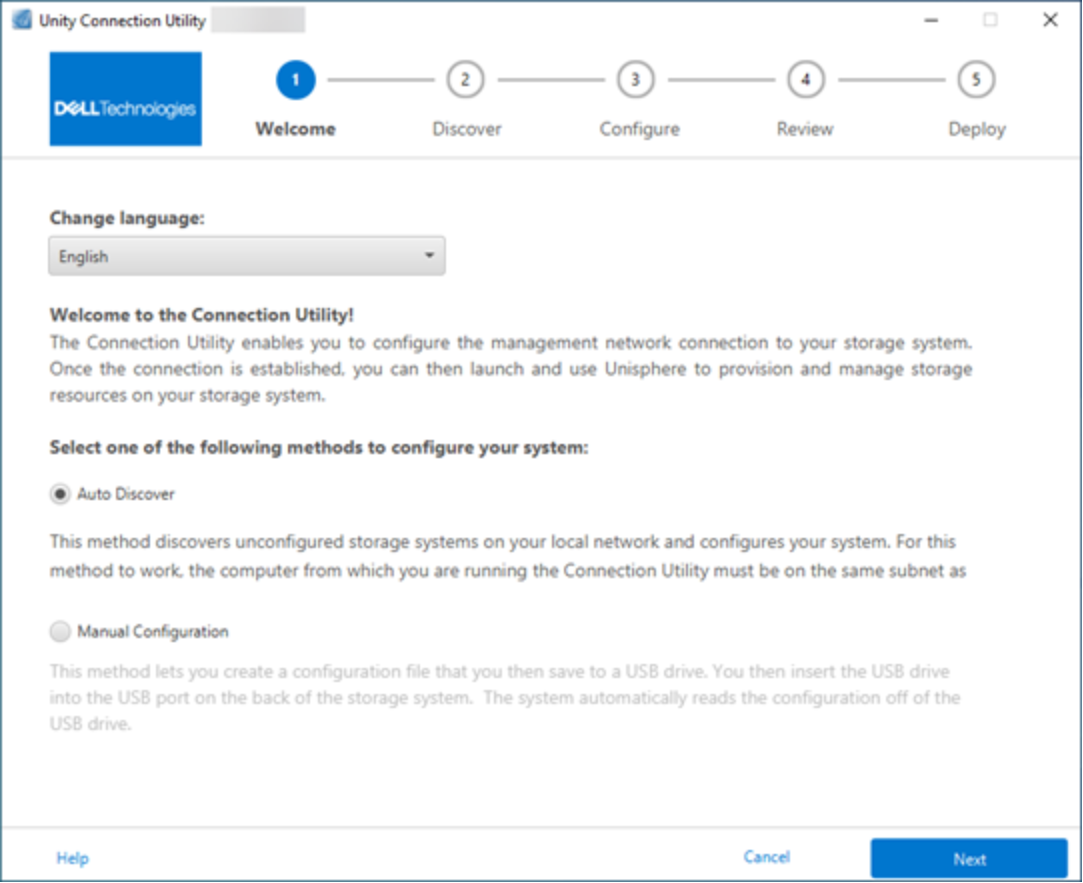
Figure 2. Unity Connection Utility Welcome page
The Connection Utility allows users to configure the following Dell Unity management network settings, as shown in Figure 3:
System Name: User-defined name of the system, which can be used for easy system identification.
Management Address: Network IP address (IPv4 and/or IPv6) that is assigned to the system and used to access Unisphere.
Subnet Mask/Prefix Length: Network mask used to configure to which subnet the management IP address belongs.
Gateway Address: Router interface on the network used for sending IP packets outside of the local network.
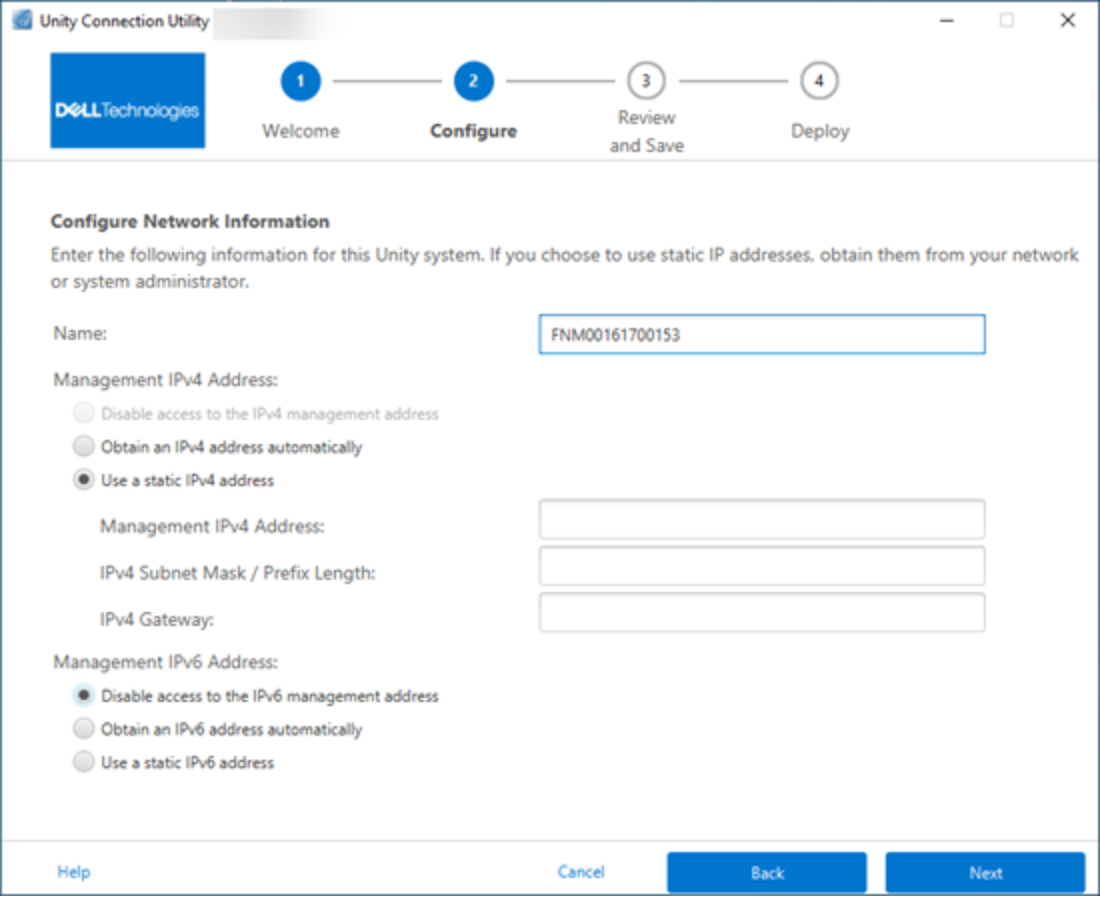
Initial Configuration Wizard
After the management IP of the Dell Unity system is configured, the user can log in to Unisphere. After launching Unisphere and logging in, the Unisphere Initial Configuration Wizard appears, as shown in Figure 4. This wizard allows users to configure the most important and commonly required settings of the system, streamlining the system preparation to expedite provisioning and sharing of resources. The Initial Configuration Wizard includes the following settings:
Copyright: To continue in the Initial Configuration Wizard and to be able to use Unisphere, a user needs to accept the End User License Agreement.
Admin and Service Password: Passwords used to access Unisphere and the service CLI of Unisphere, respectively.
DNS Server: Domain Name Server, which is the network service that resolves domain names to their corresponding IP addresses.
Proxy Server: The user can supply Proxy Server information to receive information for storage systems that cannot connect to the Internet directly.
NTP Server: Network Time Protocol server, which is the time server used to synchronize computer systems to the same clock, which usually maps back to UTC or Coordinated Universal Time. Ensuring accurate system time is important for configuring Active Directory for SMB configurations and for configuring multiprotocol configuration. If the system time is more than 5 minutes different than the configured NTP server, the user will be asked to configure NTP later because this requires a system reboot. Dell UnityOS 5.4 allows a user to use the CLI to configure the NTP stratum level of the NTP server post deployment.
Unisphere License: License from Dell that enables different features/services of the Dell Unity storage system based on purchase orders through Dell Services. If the user entered the DNS Server information about the DNS Servers step, the License file is automatically installed from Dell. For the license to be automatically installed successfully, the system needs to have Internet access.
Pools: Pools are required for configuring any storage resource on the system. This setting might also include the FAST Cache option when the system is a Hybrid system. FAST Cache is widely used in many environments to provide a secondary cache for the system and to optimize overall Flash usage efficiency.
Alert Settings: Alerts provide information to the user about the source of an event. They also tell the user the symptoms, the cause, and what actions that needed to be taken to resolve the issues noted in the alerts. This alert setting is to configure the system to send alert notifications in email or Simple Network Management Protocol (SNMP) messages.
Dell Support Credentials: Username and password for the registered Dell Support account. This is a prerequisite for using Secure Remote Services (formerly ESRS) and is used for quickly accessing the various Dell Support options in the Support section of Unisphere. With the release of Dell UnityOS 5.3, SupportAssist replaces Secure Remote Services for physical Unity systems. Secure Remote Services remains the connect home technology used by UnityVSA. Both Secure Remote Services and SupportAssist enable Dell Support personnel to provide remote troubleshooting support to help accelerate the diagnosis of issues, resulting in faster resolution times. Enabling Secure Remote Services or SupportAssist, depending on the system type, is also a prerequisite for using CloudIQ, which is discussed later in this paper.
iSCSI Interfaces: Allows users to configure iSCSI interfaces for environments that use the iSCSI protocol. iSCSI is an IP-based storage protocol used for accessing Block resources (that is, LUNs, Consistency Groups, and VMware vStorage VMFS Datastores).
NAS Servers: Allows users to configure NAS Servers, which is a prerequisite for creating and accessing File storage resources on the system. NAS Servers require a separate IP to be configured for network access.
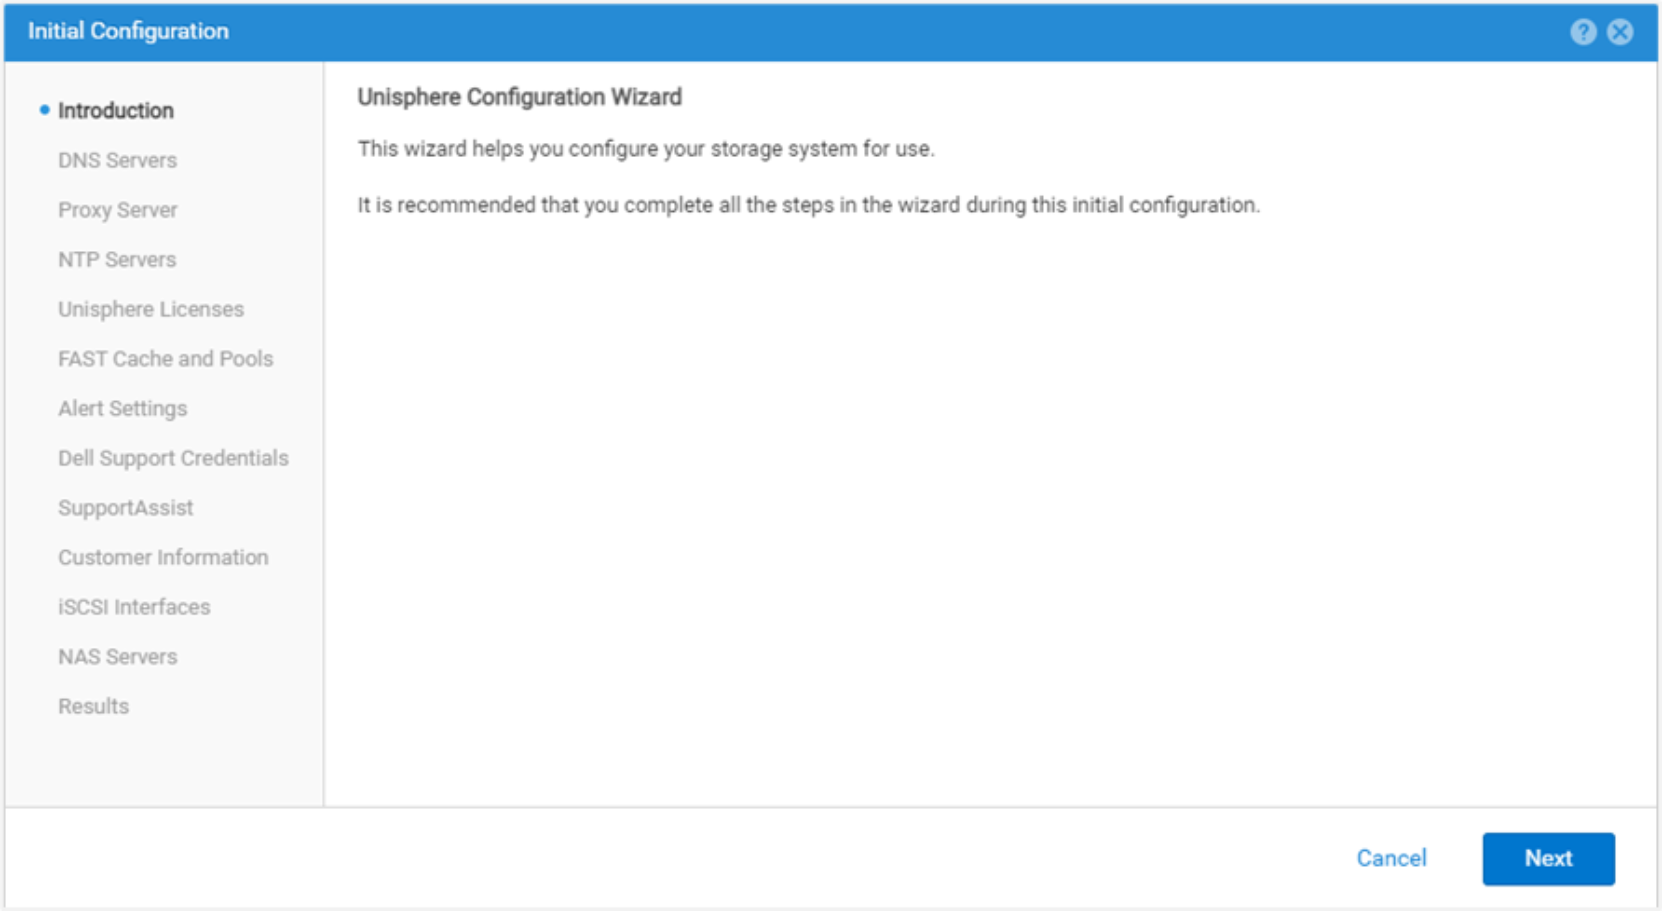
Figure 4. Initial Configuration Wizard
Unisphere Graphical Interface
Unisphere Graphical Interface
The Unisphere web interface is based on HTML5. This modern interface has been designed with simplicity and ease of use in mind for all storage management needs. The user can collapse the navigation bar on the left side of the user interface for a wider view. This menu includes the resources and system settings that are used on a frequent basis by administrators. The following table describes the pages available through the main menu:
Table 2. Navigation Menu Details
|
Categories |
Sub-Categories |
Description |
|
Dashboard |
None |
View a comprehensive summary of system status |
|
System |
System View, Performance, Service |
Configure and view system information and activity, and run service tasks |
|
Storage |
Pools, Block, File, VMware |
Configure and view storage resources |
|
Access |
Hosts, VMware, Initiators |
View and configure hosts for access to the storage system |
|
Protection & Mobility |
Snapshot Schedule, Replication, Interfaces, Import |
View and configure snapshot schedules and manage replication and import operations |
|
Events |
Alerts, Jobs, Logs |
View alert messages, jobs status and logs |
|
Support |
None |
Access help resources and support options |
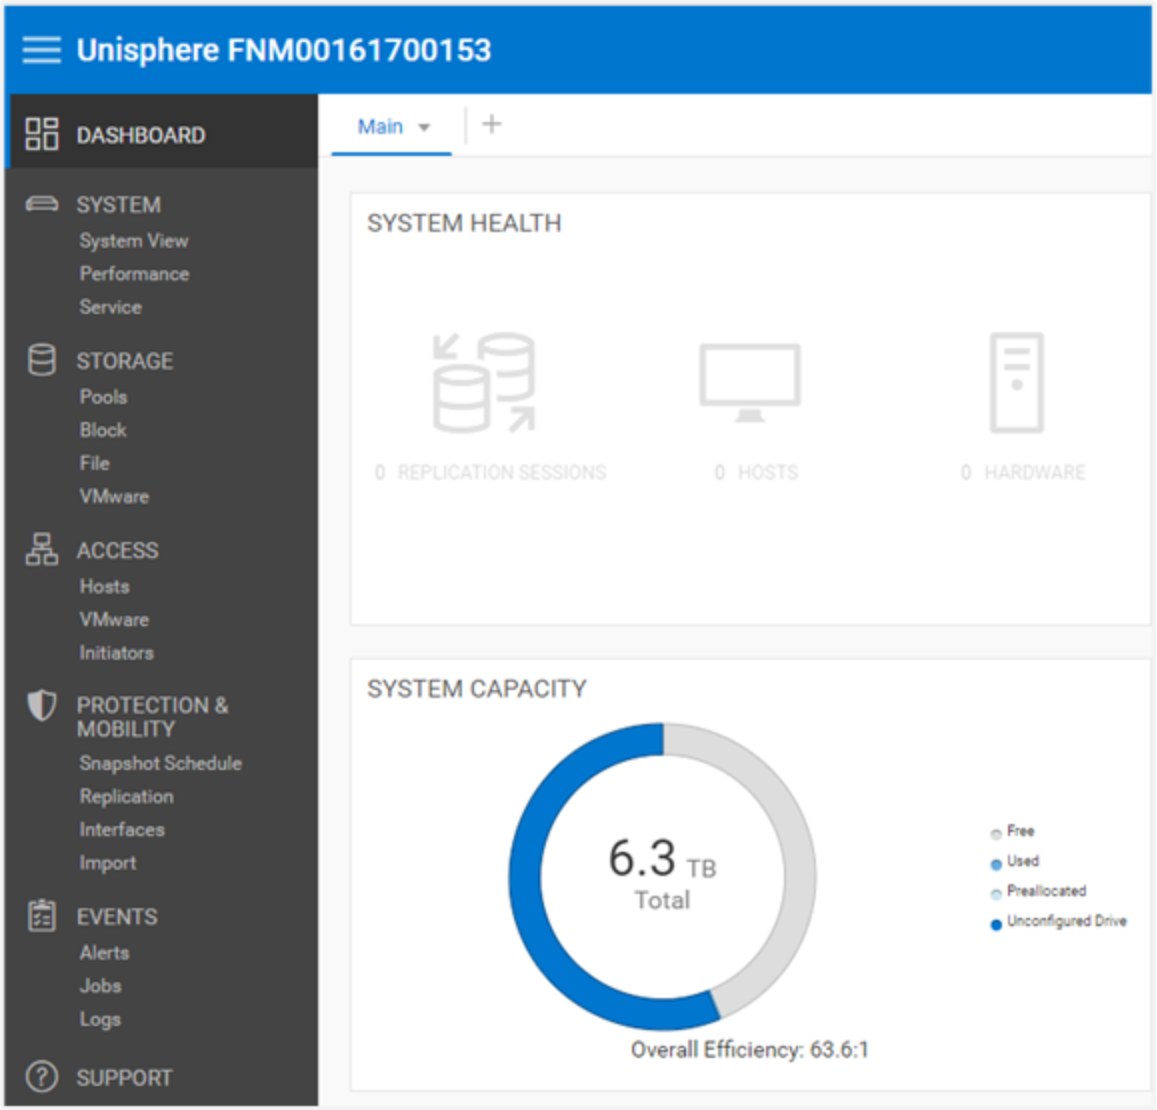
Figure 5. Navigation Menu
The following sections describe the content accessed through the left-side navigation menu.
Dashboard
The Dashboard page is the first page the user will see when logging into Unisphere, as shown in Figure 6. The page is a customizable view of status of various system details, including system capacity, system health, storage health, and high-level system performance. Each status is displayed using “view blocks,” which users can add, modify, and delete as needed.
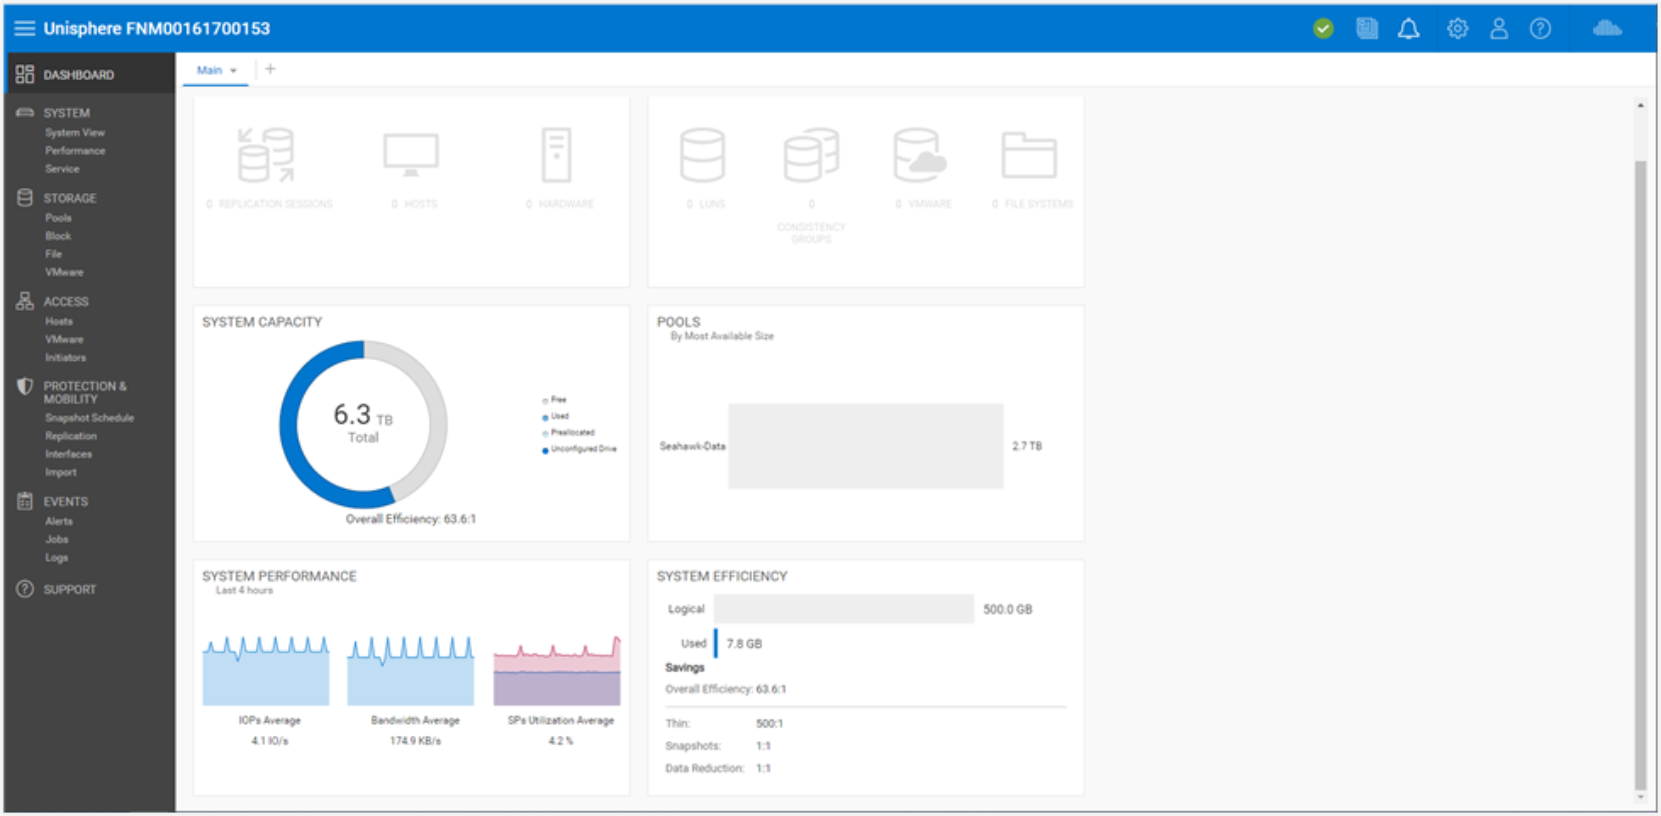
Figure 6. Dashboard Page
Users can also add or remove dashboards to save customized views for different purposes. At least one dashboard must be available on the page. The following table shows the available view blocks for the dashboard.
Table 3. Available View Blocks for the Dashboard
|
View Block |
Description |
|
System Health |
Shows health status for system objects (for example, Replication Sessions, Hosts) |
|
Storage Health |
Shows health status for storage objects (for example, LUNs, File Systems, Datastores) |
|
System Capacity |
Shows total capacity, free, used, preallocated, and unconfigured drive space. Also shows the overall efficiency of the system. |
|
Tier Capacity |
Shows the used and free space for each storage tier |
|
Pools |
Shows free and used pool capacity in each pool |
|
System Alerts |
Shows all alerts for the system (categorized by severity) |
|
System Performance |
At a glance view of key performance indicators |
|
System Efficiency |
Displays savings information from thin, snapshots, and data reduction |
System View
On the System View page, as shown in Figure 7, the Summary tab displays several important system details, like serial number, system model, Software Version, System time, and average Power consumption. This information can be found in the top section. The second section, SYSTEM HEALTH ISSUES, displays any health-related issues including storage resource, port connectivity, and hardware issues that are in a non-ideal state (for example, faulted). The bottom section, FRONT END PORT displays information about the ports that have been configured on the system and their status.
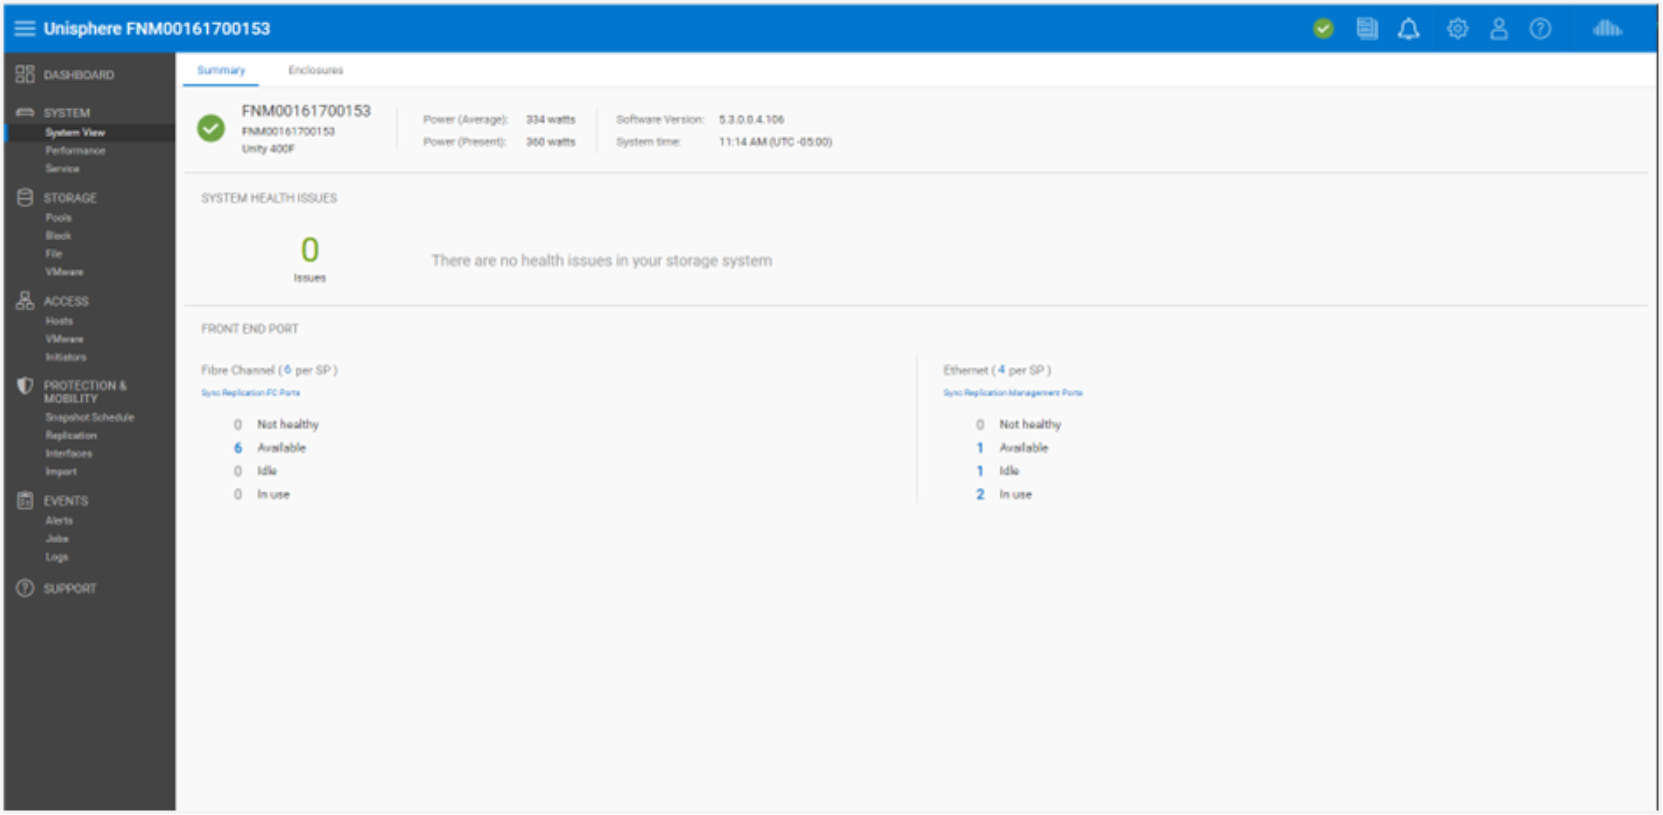
Figure 7. System View Page: Summary Tab
On the Enclosures tab of the System View page, the system shows various views of the physical system in graphical representations. As shown in Figure 8, the rear of the system is the default view when going to the page. Users can see that some ports are highlighted green, signifying that a connection for those ports is present and is in a good state. The graphical models are clickable, allowing users to see more information about specific components, which can be helpful in identifying part numbers when trying to order or replace different system parts. When components are faulted, they are highlighted with an amber color to signify that the component needs to be fixed or replaced.
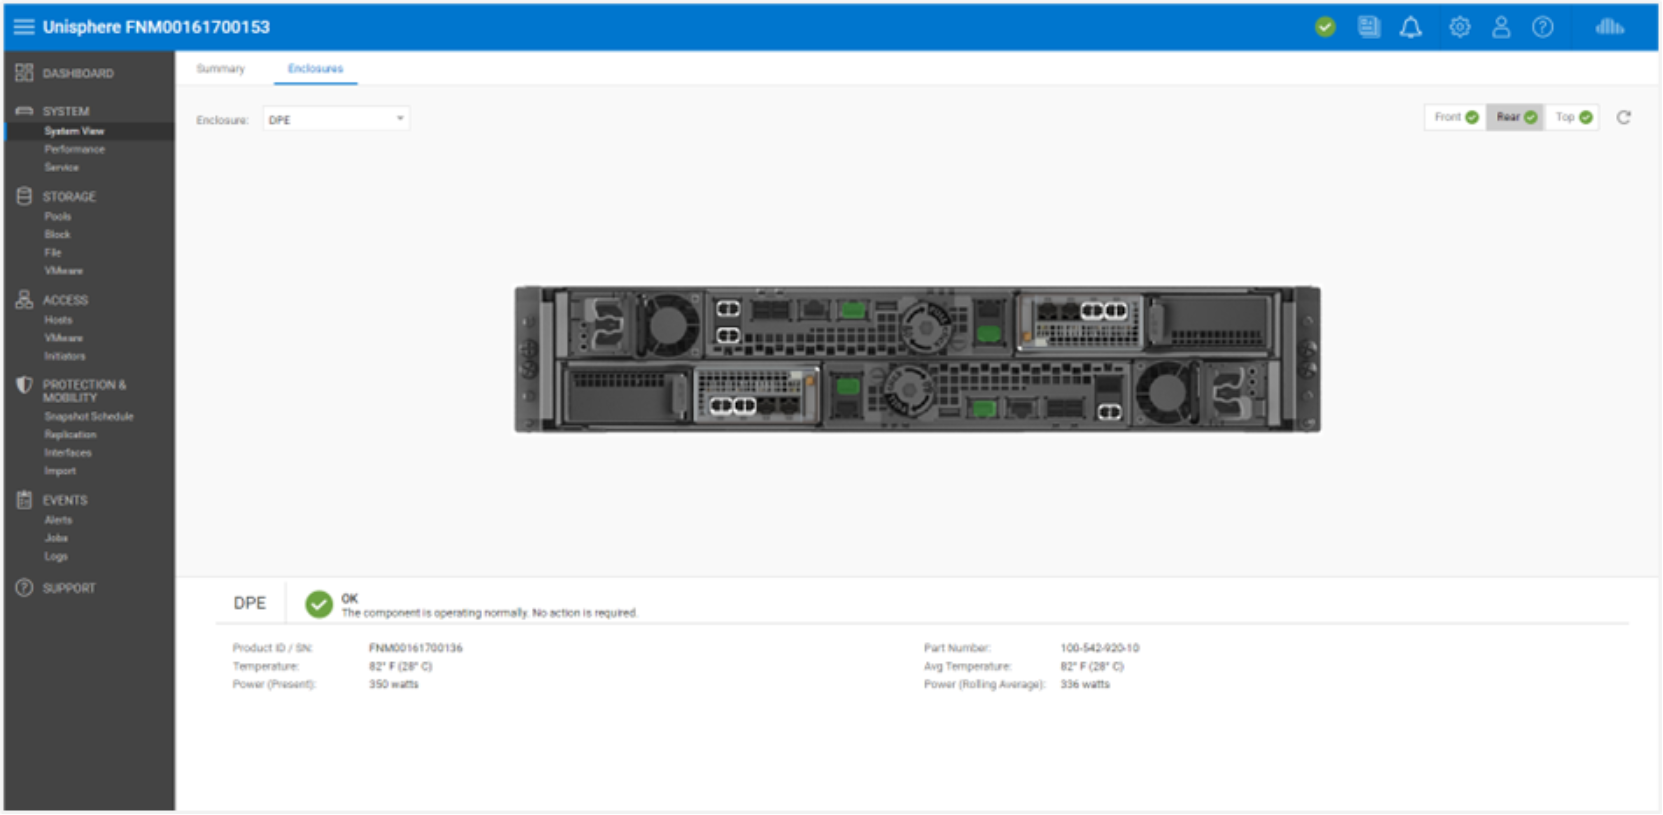
Figure 8. System View: Enclosures Tab
For a Dell UnityVSA system, the System View page also includes both Summary and Enclosures tabs. The Summary tab shows similar information as a physical system, while the Enclosures tab shows only network components, since Dell UnityVSA is a virtual system. Dell UnityVSA includes an additional Virtual tab, which displays the virtual drives on the Dell UnityVSA VM. For more information about Dell UnityVSA, see the Dell UnityVSA white paper.
As a system provisions and shares out storage resources, the system collects performance statistics about the system, its resources, and network I/O from external hosts. These performance statistics can be viewed from the Performance page on the Performance Dashboard tab by adding and customizing available performance dashboard and metrics charts, as shown in Figure 9. Users have the option to create Historical and Real-time dashboards.
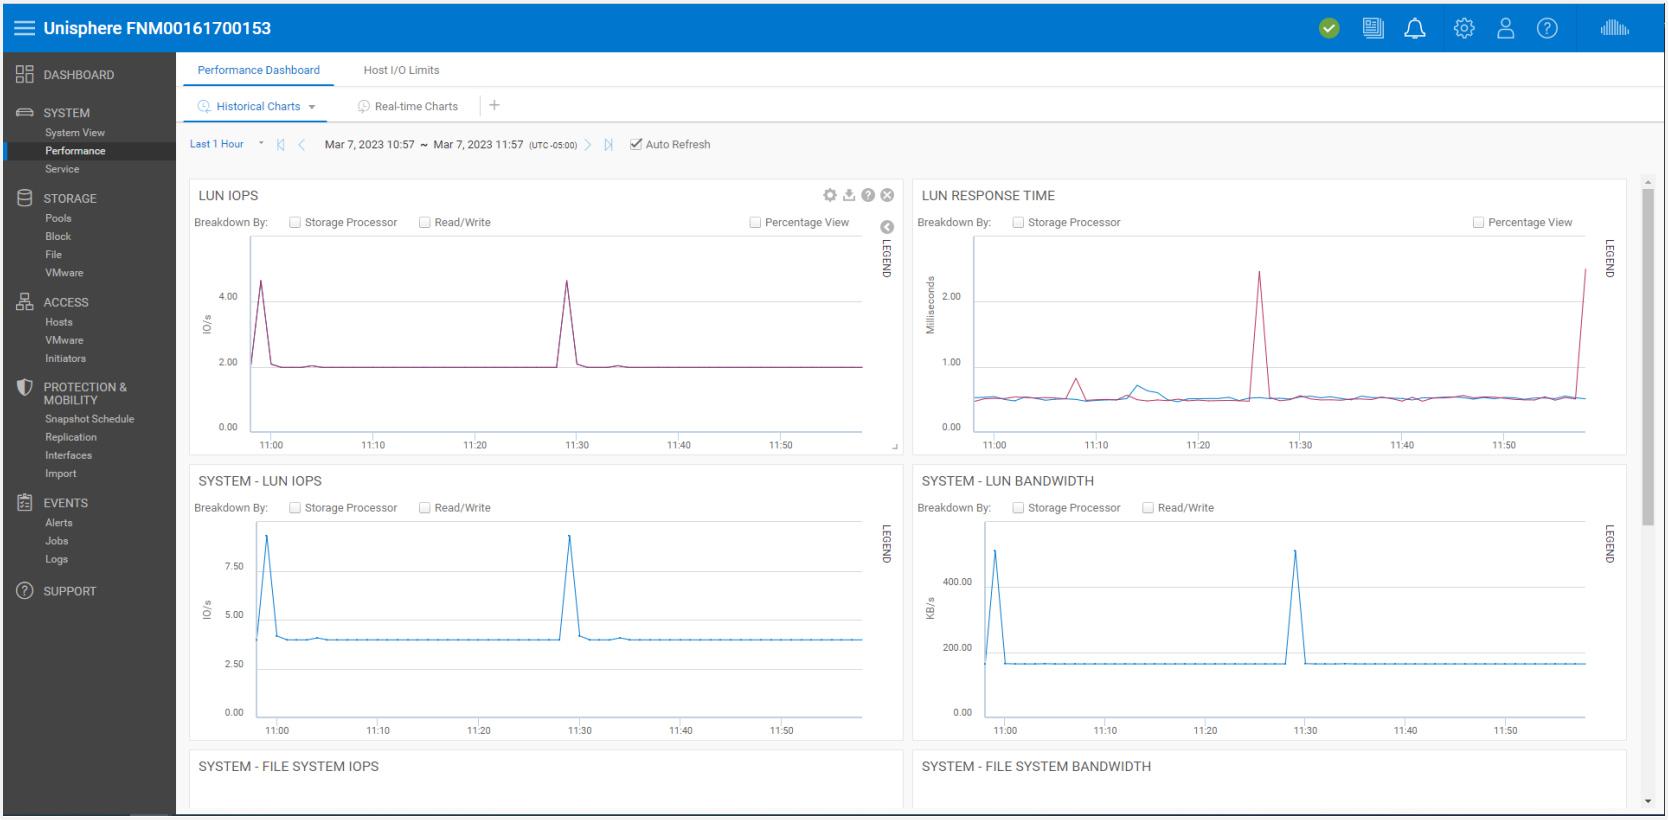
Figure 9. Performance Dashboard – Historical Charts
In terms of chart viewing options, the preset time ranges at the top of the page allow users to focus on a certain time range by selecting a time range or going backward or forward in time for troubleshooting potential issues. All charts on the same dashboard display the same time range, as specified by the time range bar. This ensures quick and easy comparisons between different charts. Next to the time range bar are selectable default time ranges and a custom option for specific time range viewing.
As metrics data ages, the data gets aggregated into longer sampling intervals for historical referencing up to 90 days. The following table shows the metric retention periods and associated sampling intervals:
Table 4. Sampling intervals and retention periods
|
Time Range Setting |
Sampling Interval |
|
Last 1 Hour |
1 Minute |
|
Last 4 Hours |
1 Minute |
|
Last 12 Hours |
5 Minutes |
|
Last 24 Hours |
5 Minutes |
|
Last 7 Days |
1 Hour |
|
Last 30 Days |
4 Hours |
|
Last 90 Days |
4 Hours |
|
Custom |
Varies based on the length of the range. if the range is more than one week, the sampling interval is 4 hours. |
The second dashboard on the Performance Dashboard page is the Real-time Charts dashboard. Real-time metrics display data collected during the current session, over a maximum time range of 15 minutes. The session ends when the user navigates away from the current tab and restarts when the user navigates back to the tab. The Real-time Charts dashboard can display up to four real-time metrics charts at a time on a dashboard. The sampling interval for real-time metrics is every 5 seconds.
For more information about Performance Metrics, see the Dell Unity: Performance Metrics white paper.
The second tab available on the Performance page is the Host I/O Limits tab, as shown in Figure 10. This tab allows users to configure, modify, delete, and view I/O limits on block resources provisioned on this system. Setting a Host I/O Limit limits the amount of IOPS and/or bandwidth between a given block storage resource and connected hosts/applications. A user might want to use this feature to control the amount of I/O requests from nonessential workloads so that these workloads do not impact other valuable storage resources and affect critical workloads. Another use case might be a service provider wanting to set a maximum level of service based on a customer’s subscription. An I/O limit policy can be applied to an individual LUN/VMFS Datastore or to a group of LUNs. The user can also apply a shared policy among multiple resources. A shared policy limits the combined activities of all the resources in the group.

Figure 10. Host I/O Limits
Service
The Service page, as shown in Figure 11, can be used to troubleshoot and initiate different service tasks to repair the storage system and associated Storage Processors. It contains quick links for setting up and viewing support services like Dell SupportAssist for physical systems or Secure Remote Services for UnityVSA. Configuring SupportAssist or Secure Remote Services is generally recommended because it allows Dell authorized support personnel to quickly resolve any issues. A user must first establish an online Dell Support account to set up Secure Remote Services on the storage system, proceed to register a storage system, download system licenses, or obtain updated software. This process automatically retrieves a user’s support contract information. An online Dell Support account is not a prerequisite for configuring SupportAssist.
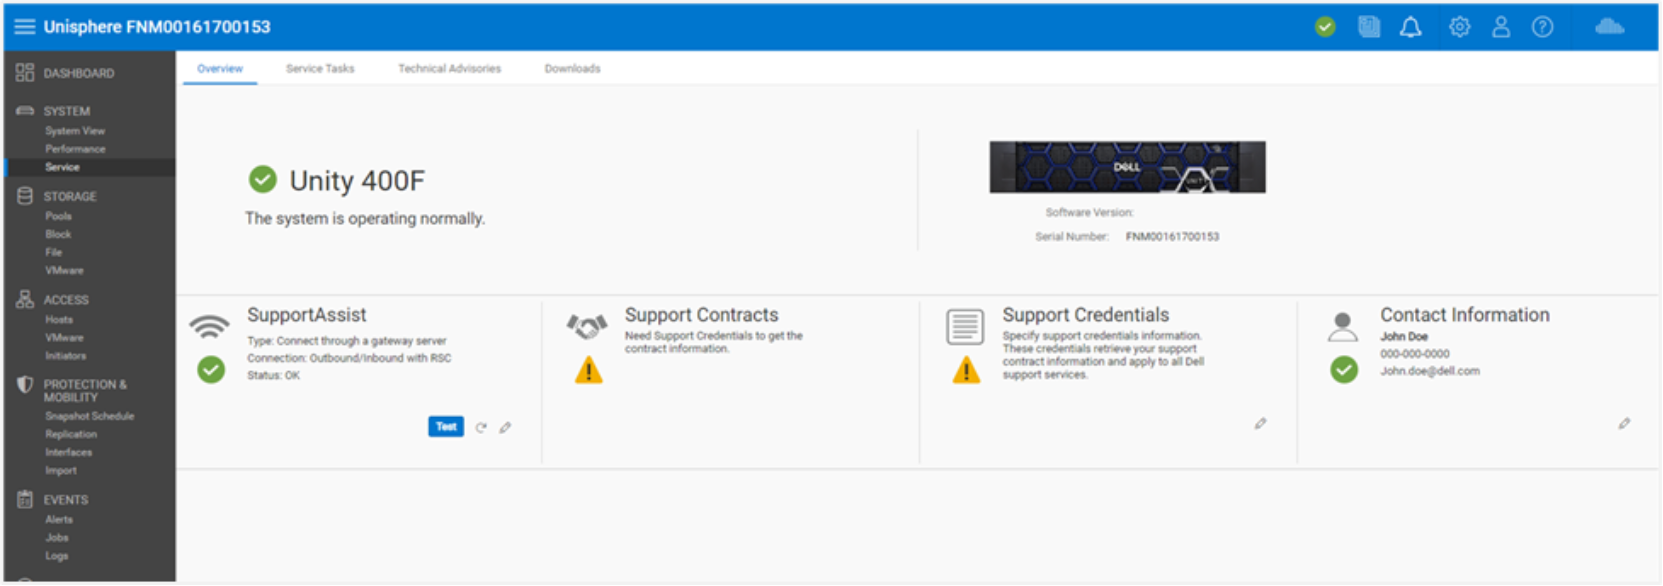
Figure 11. Service Page
The Service Tasks tab provides tools to service the storage system, including repair and troubleshooting. A user can use this page to collect system and configuration information to provide it to Technical Support and troubleshoot issues. The service password is required to access the various service task operations.
The Technical Advisories tab displays up-to-date information about advisories specific to the system by referencing knowledge base articles.
The Downloads tab was added with Dell UnityOS 4.2. There are two sections:
- Performance Archive File: Users can download performance archive files to send to Technical Support for troubleshooting purposes. Users can download individual archive files or select a specific interval of time for which multiple files will be downloaded.
- Core Dump: Users can download the Core Dump files to send to support for troubleshooting and issue resolution. Users will need to enter their service credentials to download these files.
Pools
The Pools page is the first storage resource page listed on the left-side main navigation menu. A pool is a set of drives that provide specific storage characteristics for the resources that use them. Creating a pool is a prerequisite for provisioning storage resources. The page, as shown in Figure 12, allows users to create, modify, view, expand, and delete pools. If there are multiple drive types on the system, users can configure multiple tiers for the pool. In physical systems (for Hybrid systems only), each tier can be associated with a different RAID type. If FAST Cache is configured on the system prior to running the pool configuration wizard, a user can configure the pool to use FAST Cache to ensure the most active data is served from Flash media.
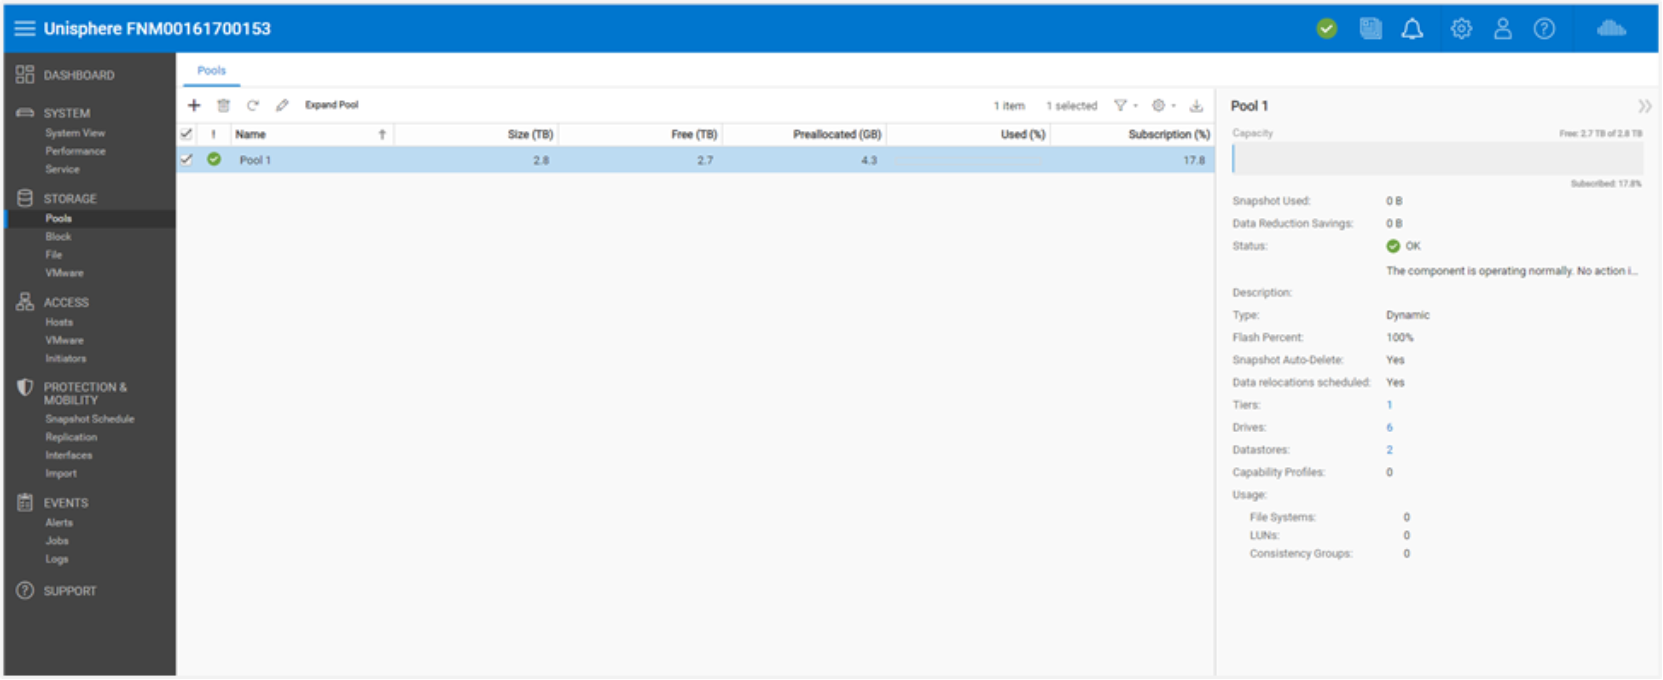
Figure 12. Pools Page
For more information about pools, see the Dell Unity: Dynamic Pools white paper. For more information about FAST VP and FAST Cache, see the Dell Unity: FAST Technology Overview white paper.
Block
After a pool is created on the storage system, users can start to create storage resources. On the Block page, as shown in Figure 13, users can create block storage resources such as LUNs, Consistency Groups, and Thin Clones. Users can also configure iSCSI Interfaces, for accessing block resources. Alternatively, block resources can be accessed through Fibre Channel by configuring zones on the connected FC switch.
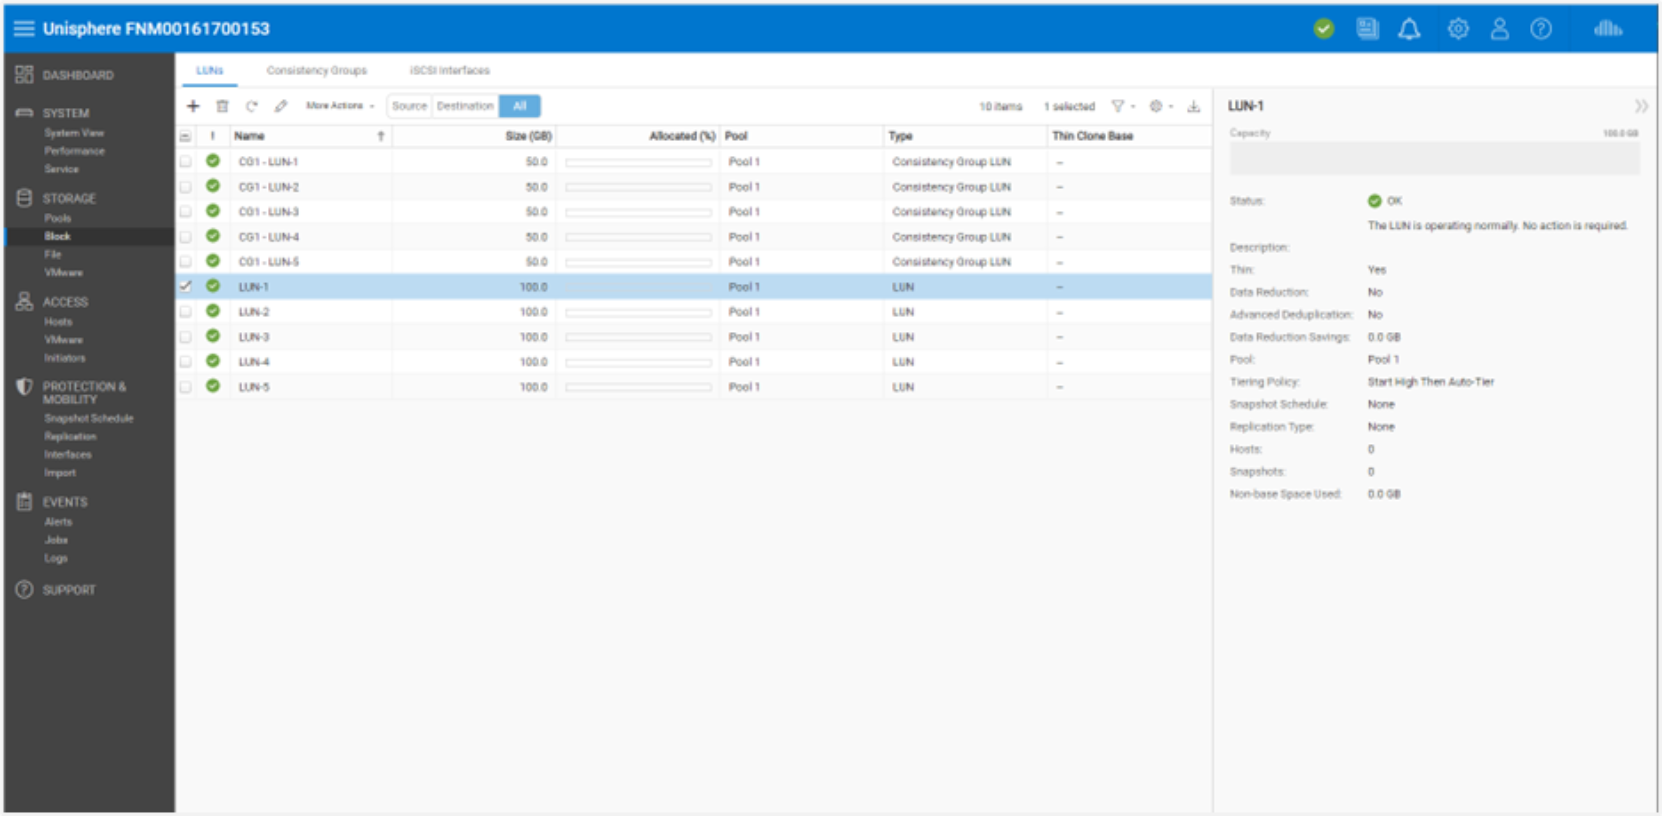
Figure 13. Block Page
A LUN can be configured to give host access to one or multiple hosts. Types of host access include LUN, Snapshot, or LUN and Snapshot access. Consistency groups can be used for application crash consistency among related LUNs (up to 75) when using data protection features like Snapshots and Replication.
Standalone Thin and Thick LUNs are created using the Create LUNs Wizard. Figure 14 shows the Create LUNs Wizard. Multiple LUNs can be created at the same time, and Data Reduction can be enabled on the LUNs. To create a LUN or multiple LUNs with Data Reduction enabled, the user needs to check the Data Reduction checkbox on the Configure step.
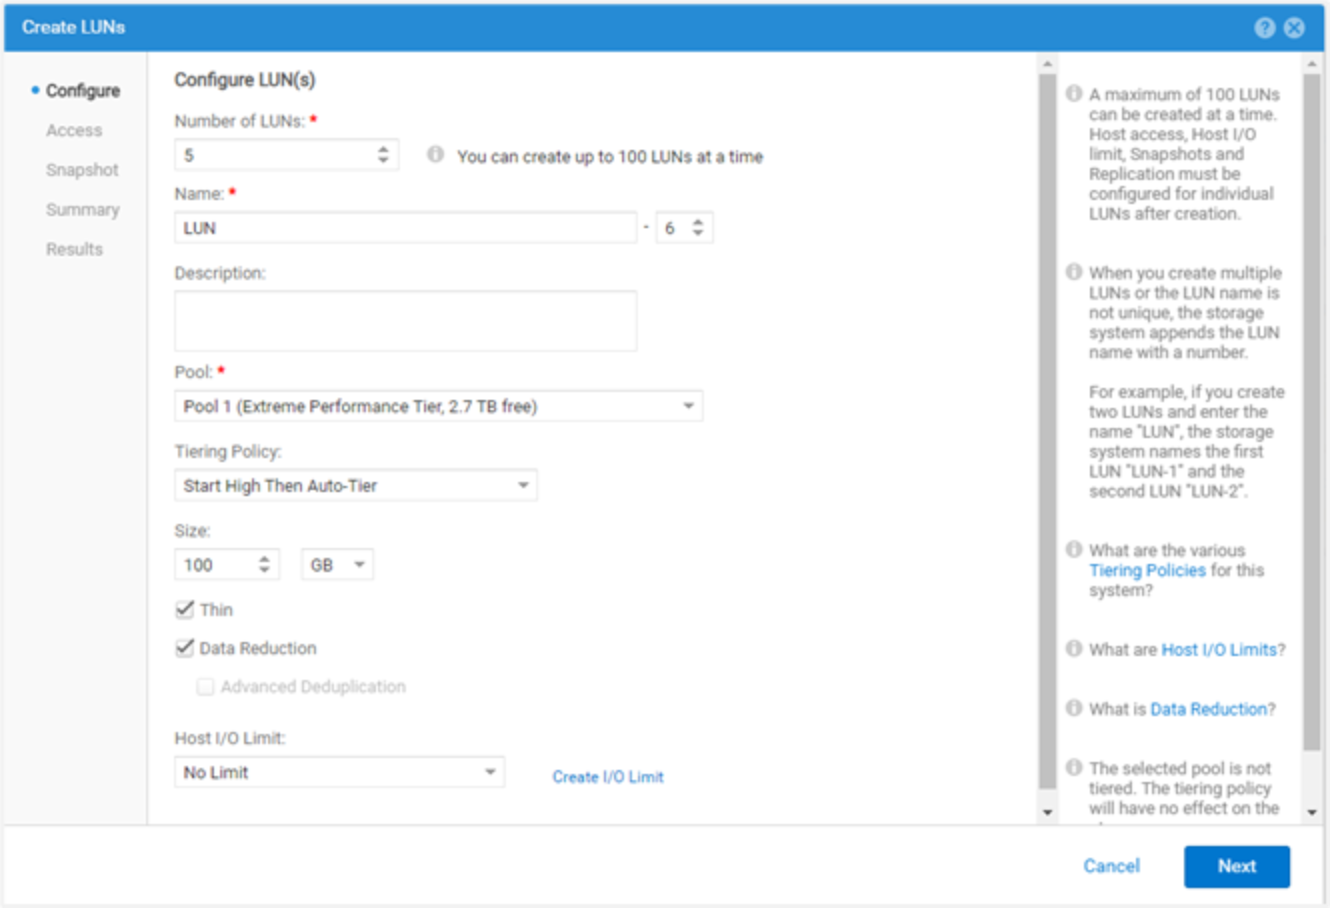
Figure 14. Create LUNs Wizard – Configure Step
Dell UnityOS 4.2 and later allows users to create Thick LUNs from Unisphere. Users tend to create a Thick LUN for space reservation and when they do not need to enable Data Reduction or use other advanced software features. The Thin checkbox is selected by default. To create a Thick LUN, the user needs to clear the Thin checkbox. Clearing the checkbox also disables the Data Reduction option. For more information about Data Reduction, see the Dell Unity: Data Reduction white paper.
Additionally, with Dell UnityOS 4.4 and later, Unisphere allows the user to set a custom Host LUN ID during creation of LUNs and VMware vStorage VMFS Datastores, as shown in Figure 15. The valid range for the Host LUN ID is from 0 to 16381. Keep in mind that some Operating Systems do not recognize Host LUN IDs higher than 255. When the resource is created, the user can modify the Host LUN IDs from the block resource’s properties page under the Access tab or on the host’s properties page.
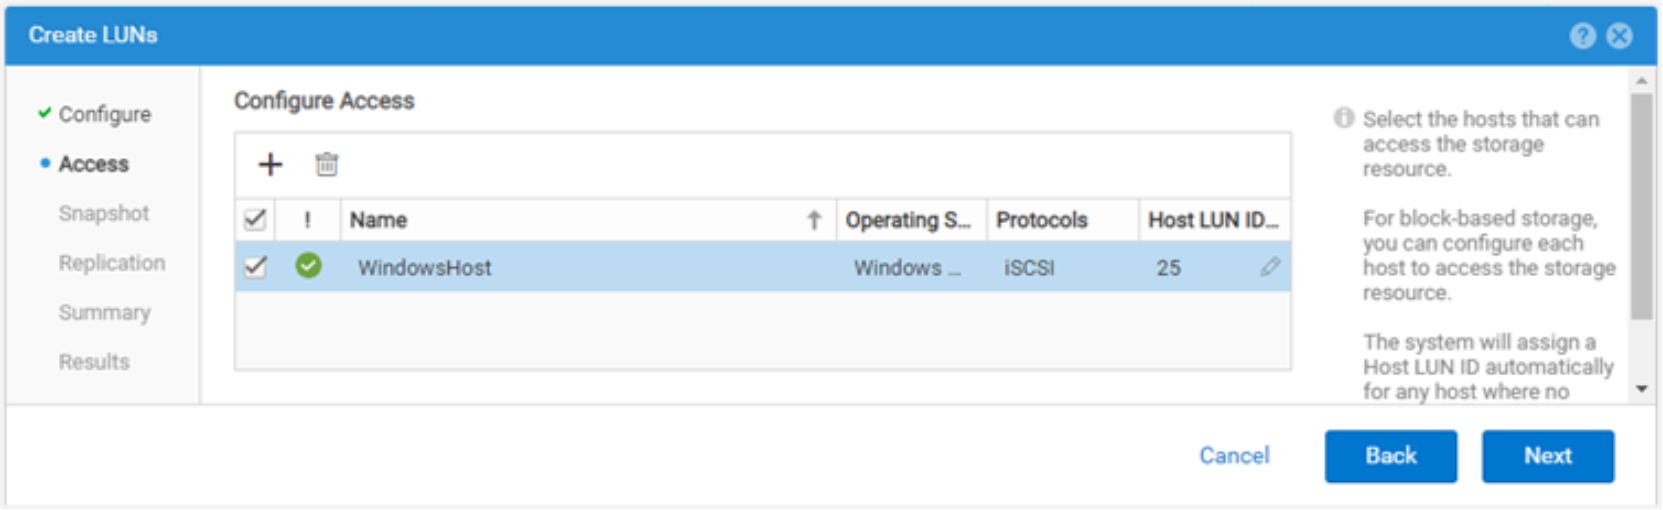
Figure 15. Create LUNs Wizard – Access Step
File
File storage resources can be created on the File page, as shown in Figure 16. File systems can be accessed through network protocols, such as SMB and NFS. NAS Servers must be configured before creating file systems. NAS Servers are configured with network interfaces, which allow an access point to file systems configured on that server. After a file system is provisioned, users can access the resource through configured file shares, which are mountable access points. Multiple shares can be configured for a single file system, but all shares will draw from the same total quantity of storage allocated for the storage resource. Users can also create Tenants from the File page if needed. File storage resources can be a thin or thick resource just like block storage resources.
For more information about file systems and associated file features, see the Dell Unity: NAS Capabilities white paper.
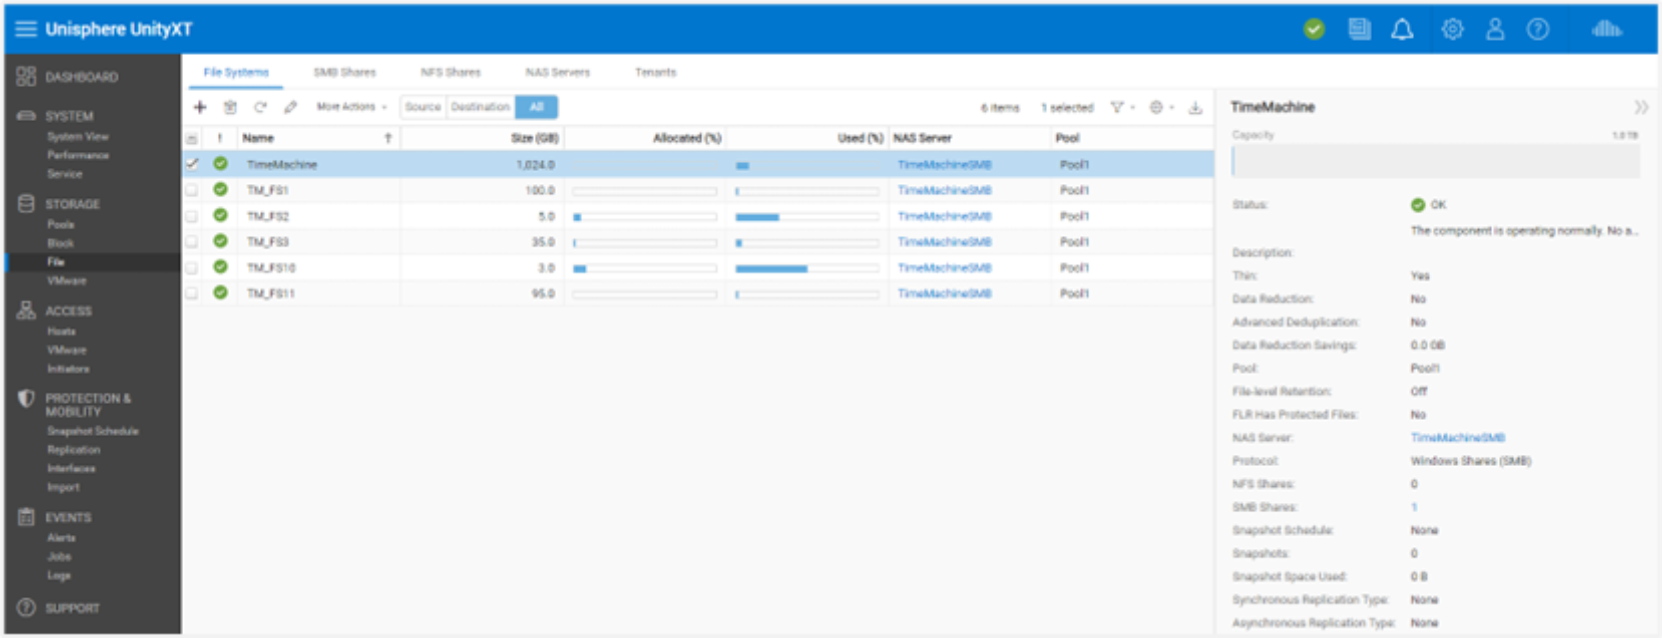
Figure 16. File Systems Page
VMware (Storage)
The VMware page under the Storage category in the navigation menu on the left, which is shown in Figure 17, provides the ability to create and manage VMware-related resources such as NFS, VMFS, and vVol Datastores. A VMware Datastore is a storage resource that provides storage for one or more VMware hosts. For the Dell Unity platform, four types of VMware Datastores are available: File (NFS), Block (VMFS), vVol (File), and vVol (Block) Datastores. Unisphere allows users to provision storage for a VMware traditional Datastore and configure access to a relevant ESXi host, which results in the automatic configuration of Datastores on the ESXi host. Modifying or deleting the Datastore in Unisphere automatically updates the ESXi host as well.
A NAS Server with NFS enabled is a prerequisite to creating VMware NFS Datastores and a NAS Server with NFS and vVols enabled is a prerequisite for accessing vVol (File) Datastores. For vVol-specific operations, users can use the VMware page to configure Capability Profiles, view Protocol Endpoints, and view Virtual Volumes. The Datastore Shares tab includes NFS shares that VMware NFS Datastores and their associated hosts have access to. Also, in Dell UnityOS 4.5 and later, VMFS 6 Datastores can be created in the GUI. For more information about vVol technology and other virtualization technologies, see the Dell Unity: Virtualization Integration white paper.
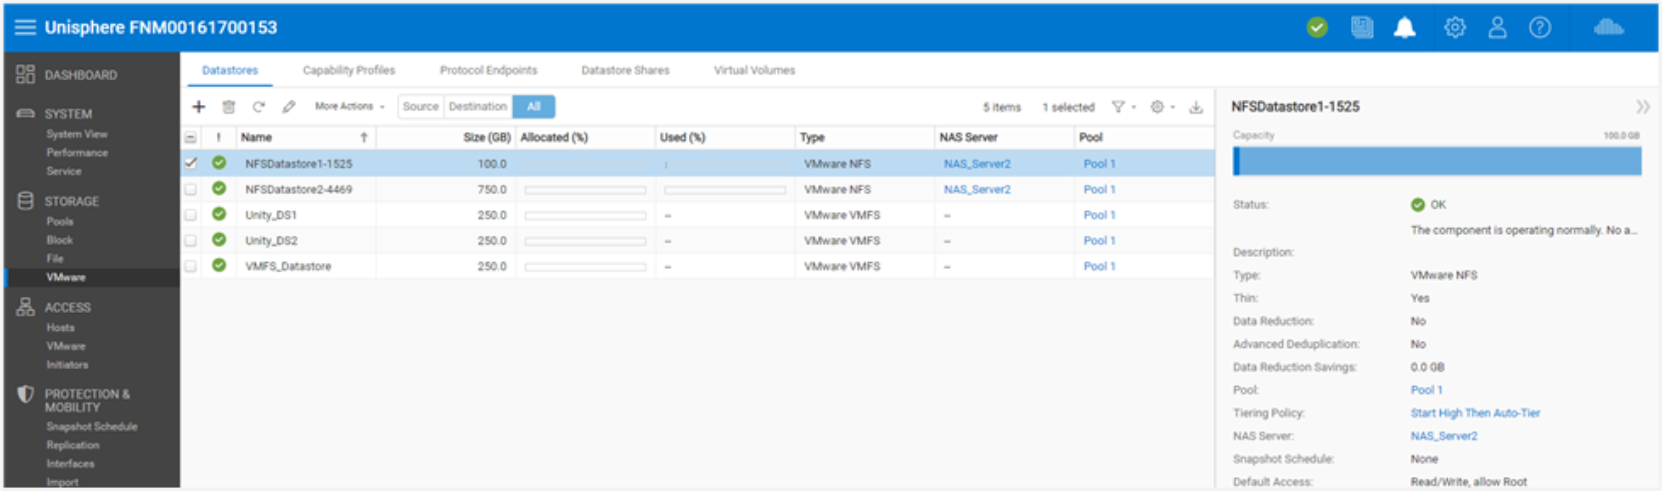
Figure 17. VMware (Storage) Page
Hosts
Under the Access category in the main navigation menu, users can configure hosts (Windows, Linux, or UNIX) for storage access. VMware hosts can be configured on the VMware (Hosts) page. Before a network host can access block storage, the user must define a configuration for the host and associate it with a storage resource. Access to NFS Shares can be restricted to certain hosts. When configured, SMB file systems can automatically be accessed by authorized users. Users can use the Hosts page, as shown in Figure 18, to configure host configurations. This can be done on an individual host-by-host basis or through subnet and netgroup configurations that allow access to multiple hosts or network segments. For block resources, before the user starts to configure a host, the user should ensure that initiator interfaces are configured, and initiator registration is completed. After a host configuration is completed, users can go to the properties of a storage resource and specify the hosts from which they want the resource to be accessed.
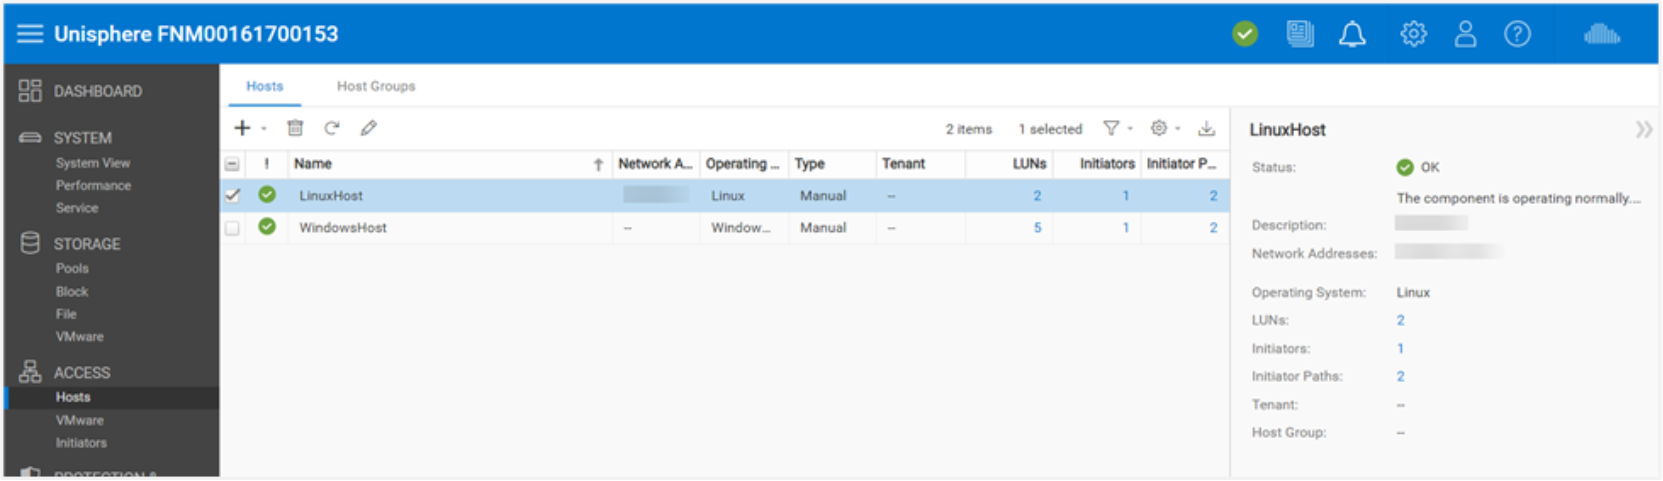
Figure 18. Hosts Page
In Dell UnityOS 4.4 and later, Unisphere prevents the user from deleting a block resource that has host access assigned to it. To delete the host-accessible block resource, the user first needs to remove host access before the block resource can be deleted.
To remove host access from multiple resources, the user can select the multiple resources and click the More Actions > Modify Host Access action, as shown in Figure 19.
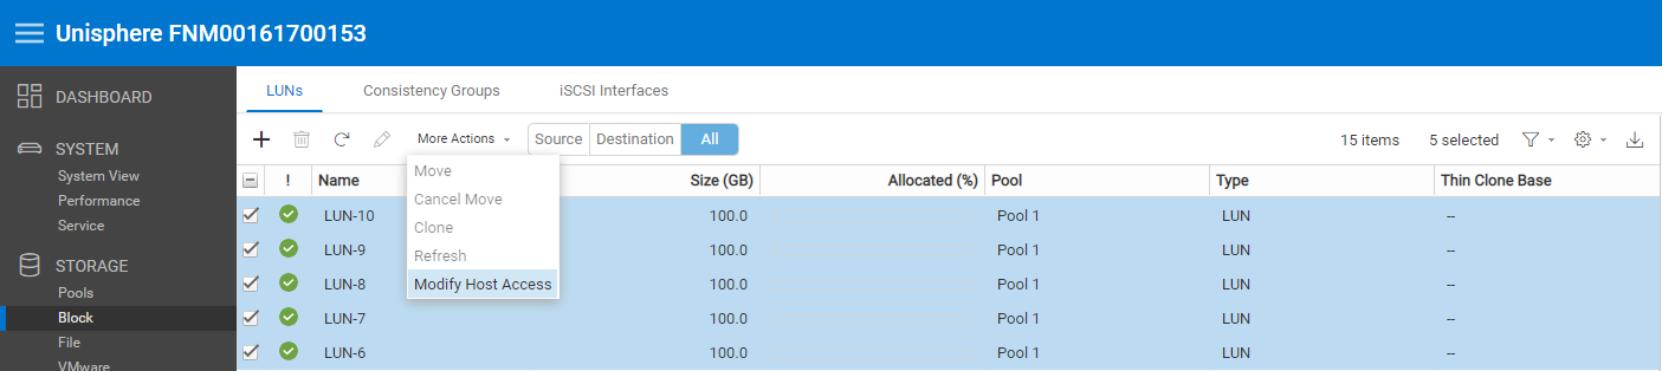
Figure 19. Modify Host Access Action
In Dell UnityOS 5.0, the user can assign multiple LUNs to multiple Hosts at the same time. In addition, a Merge operation is also available. Merge provides access to the list of hosts to the selected LUNs. For example, if some LUNs use Host1 and Host2, and others use Host5 and Host6, the Modify Host Access window will list all the hosts (Host1, Host2, Host5, and Host6) after the merge operation completes.
In Dell UnityOS 5.1 and later, users can logically group hosts and block resources within a host group. Host groups can be created and managed from the Host Groups tab, as shown in Figure 20, and help to streamline host/resource access operations. A host group can be one of two types, General and ESX, which is persistent for the life of the group. A General type host group allows one or more non ESXi hosts and LUNs to be grouped. ESX host groups allow VMware ESXi hosts to be grouped with LUNs and/or VMFS datastores.
When a host is added to a host group, the host is automatically mapped to all resources assigned to the group. When adding a host to the group a merge option is also available, which maps all block resources assigned to the host to the host group and all hosts in it. If merge is not used, the resource attached to the host will be displayed within the host group, but access is restricted and remains unchanged. When a resource is added to the group, it is automatically mapped to all hosts within the group. Configuring host access using the resource creation wizard or on an existing resource remains unchanged.
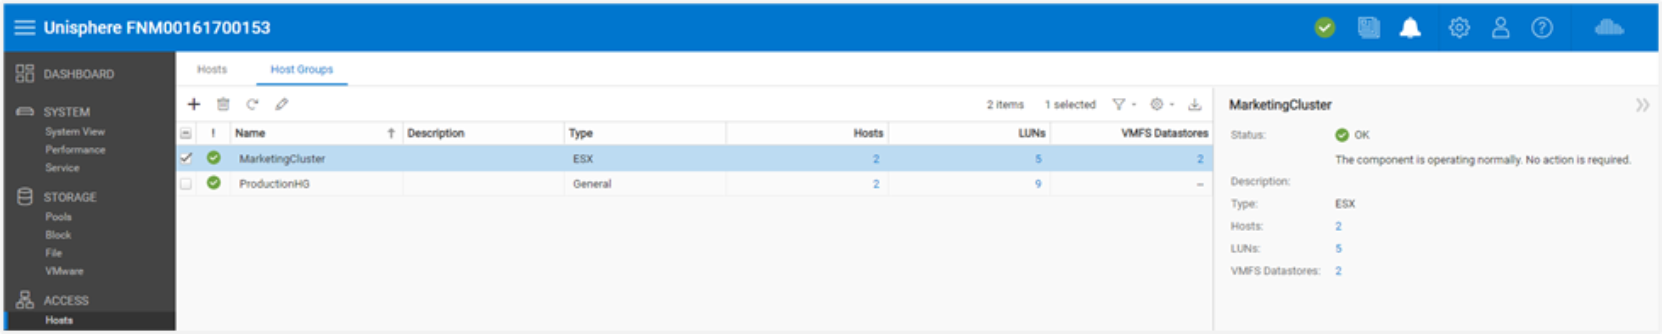
Figure 20. Host Groups
VMware (Access)
The VMware host access page is for VMware ESXi hosts and their associated vCenter servers. Unisphere provides VMware discovery capabilities through the VMware page, as shown in Figure 21. These discovery capabilities collect virtual machine and datastore storage details from vSphere and display them in the context of the storage system. The vCenters tab allows users to add a vCenter and associated ESXi hosts in a single workflow, while the ESXi hosts tab allows users to add stand-alone ESXi hosts as needed. The Virtual Machines tab and Virtual Drives tab display imported information about virtual machines and their VMDKs from any added ESXi host.
For more information about VMware access and integration capabilities, see the Dell Unity: Virtualization Integration white paper.
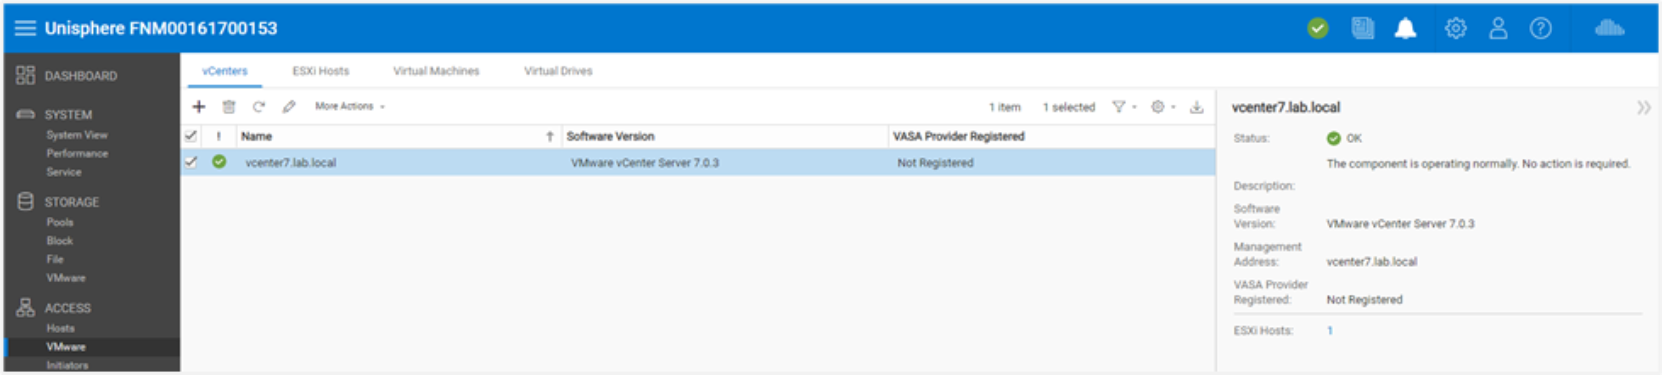
Figure 21. VMware (Access) Page
Initiators
To ensure that hosts can access block storage resources, the user must register initiators between the storage system and configured hosts. On the Initiators page, as shown in Figure 22, users can manually register one or more Fibre Channel or iSCSI initiators. Initiators are endpoints from which Fibre Channel and iSCSI sessions originate, where each initiator is uniquely identified by its World-Wide Name (WWN) or iSCSI Qualified Name (IQN). The link between a host initiator and a target port on the storage system is called the initiator path. Each initiator can be associated with multiple initiator paths. The Initiator Paths tab shows all data paths that are currently available to the initiators connected to the system either by FC or iSCSI. For iSCSI paths to show up, iSCSI interfaces must be configured on the Block Page. These initiators can then be discovered and registered by hosts using the iSCSI initiator tool. For Fibre Channel paths, FC zoning on the appropriate switch is needed for the initiator paths to be seen as available by the system. When the paths are available, users can configure their connected hosts on the Hosts Page.

Figure 22. Initiators Page
With the release of Dell UnityOS 4.3, Initiators can now have advanced settings customized through Unisphere. To access these settings, select an Initiator and then click the pencil icon to bring up the Edit Initiator window. Clicking Advanced at the bottom to reveal the Initiator Source Type, Fail-over Mode, Unit Serial Number, and LunZ Enabled settings, as shown in Figure 23. For more information about configuring Host Initiator Parameters, see the Unisphere Online Help.
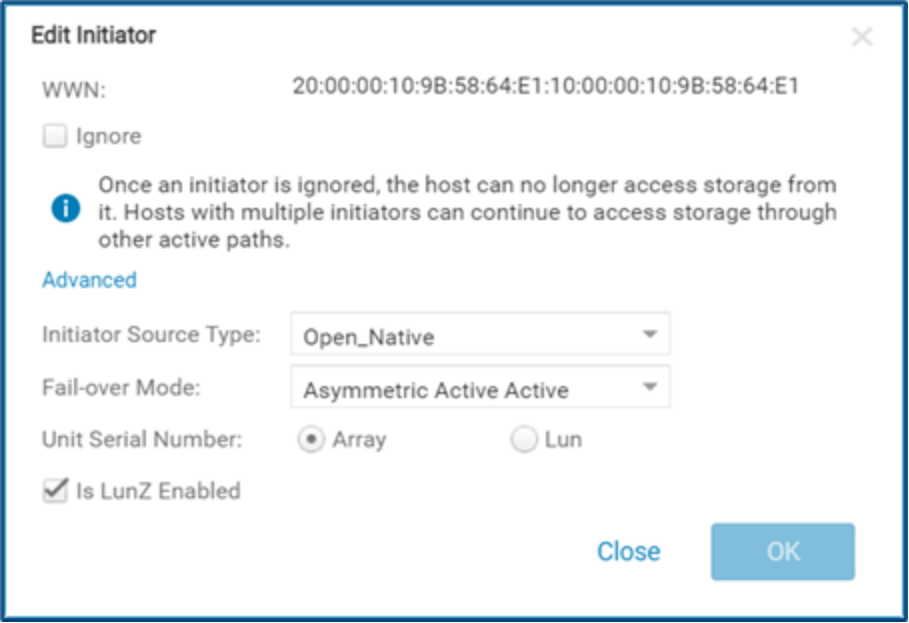
Figure 23. Edit Initiator – Advanced
Snapshot Schedule
Dell Unity provides the ability to take point-in-time snapshots for all storage resources (block or file) to meet protection and recovery requirements in the event of corruption or accidental deletion. The Snapshot Schedule page, as shown in Figure 24, enables users to set the system to periodically take snapshots of storage resources automatically. Automating these administrative tasks takes away some of the management aspects of data protection. After enabling a snapshot schedule for a resource, each snapshot taken is timestamped with the date and time when it was created, and it contains a point-in-time image of the data in the storage resource. The default snapshot schedules available on the system are:
Default protection: A snapshot is taken at 08:00 (UTC) every day, and the snapshot is retained for 2 days.
Protection with shorter retention: A snapshot is taken at 08:00 (UTC) every day, and the snapshot is retained for 1 day.
Protection with longer retention: A snapshot is taken at 08:00 (UTC) every day, and the snapshot is retained for 7 days.
Times are displayed in a user’s local time in a 12-hour format. Default snapshot schedules cannot be modified, but custom snapshot schedules can be configured by selecting the intervals, times, and days for the system to take snapshots regularly.
With the Dell UnityOS 4.4 and later, user-defined Snapshot Schedules can be replicated using the Synchronous Replication connection established between two physical systems. Reference the new Sync Replicated column in the Snapshot Schedule page, as shown in Figure 24. Applying a replicated Snapshot Schedule is only allowed in synchronously replicated file resources.
In Dell UnityOS 5.1 and later, the Schedule Time Zone option can be set to correct snapshot schedule timing issues due to seasonal time changes in certain regions of the world. This feature automatically adjusts the timing of snapshot schedules as seasonal time changes occur to ensure that snapshots are created at the correct time. The Schedule Time Zone option applies to system-defined and user-created snapshot schedules. This option can be found in Settings > Management > Schedule Time Zone. A link to this page is also available within the Create Schedule page.
For more information about the snapshot technology available on Dell Unity systems and the Schedule Time Zone option, see the following white papers:

Figure 24. Snapshot Schedule Page
Replication
Another data protection feature available on the Dell Unity platform is data replication. Data replication enables the user’s data center to avoid disruptions in business operations by duplicating storage data to a remote or local system resource. It provides an enhanced level of redundancy in case the main storage system fails, and minimizes the downtime-associated costs of a system failure. The Replication page, as shown in Figure 25, displays all configured replication sessions available on the system where users can run replication tasks like failover, failback, pause, resume, and delete, as needed. Synchronous block and file replication to other physical Dell Unity systems is also supported for physical deployments of Dell Unity. Under the Protection & Mobility category on the Interfaces page, users can configure replication interfaces for replication data paths. After the replication interfaces are configured, users can go to the Connections tab on the Replication page to configure a system-to-system replication connection, which is required to configure replication sessions for storage resources.
Dell UnityOS 5.1 and later provide Source, Destination, and All filtering buttons on the replication sessions page and various storage resource pages. They help the user easily identify replication source and destination resources/sessions without adding columns to the view. When All is selected, all resources/sessions on the current page are displayed. When Source is selected on a resource page, all resources that are the source of a replication session are displayed. Resources that are not replicated are also shown when Source is selected. When Source is selected on the replication sessions page, only replication session originating on the system are shown. When Destination is selected on a resource page, only resources that are the destination images of a replication session are shown. While on the sessions page, Destination will only show the sessions replicating to the current system. Also, sessions that are part of local replication are displayed regardless of which view is selected. Figure 25 shows the Source, Destination, and All filtering buttons.
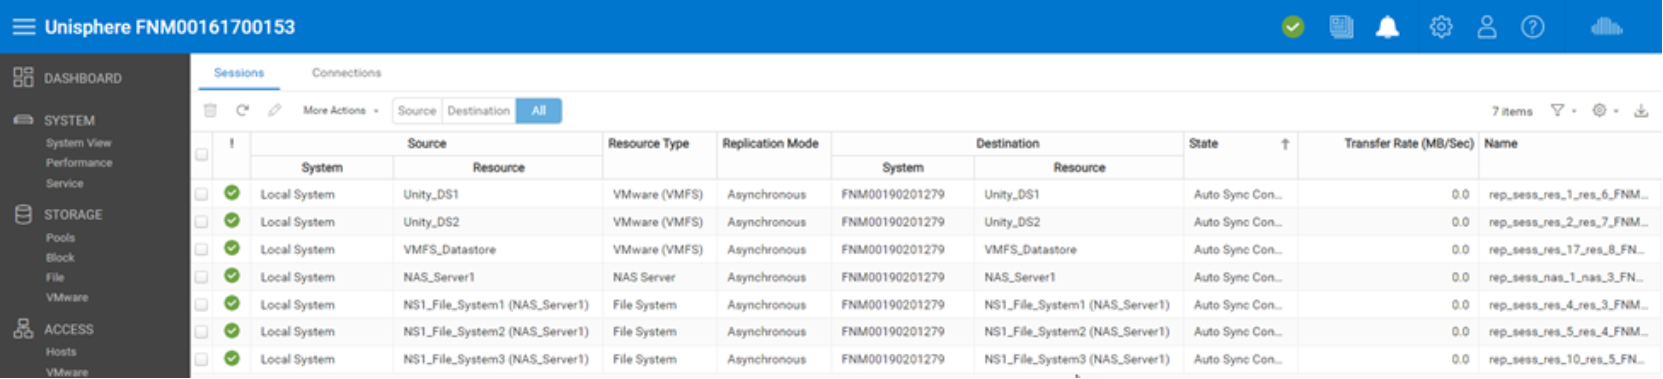
Figure 25. Replication Page
In Dell UnityOS 5.1 and later versions, asynchronous replication traffic can be throttled to reduce the rate at which data is replicated to a destination system. Asynchronous replication throttling is configured at the replication connection level, which allows each remote system connection to be controlled independently of each other. Also, only outbound replication traffic to a remote system is throttled. This not only allows different throttles to and from a remote system over the replication connections but also allows replication traffic to be throttled from a system running UnityOS 5.1 or later to a system running an earlier release. The Schedule Time Zone option can also be set to correct asynchronous replication bandwidth throttling timing issues due to seasonal time changes in certain regions of the world.
For non-native replication technologies (that is, replication services from stand-alone devices), RecoverPoint is supported on Dell Unity systems for block resources. For more information about available replication technologies and replication operations, see the Dell Unity: Replication Technologies white paper on the Dell Technologies Info Hub.
With the Dell UnityOS 4.4 and later versions, the Dell Unity NAS Servers and their file resources can be synchronously replicated between two physical Dell Unity systems, as shown in the properties page for a NAS Server in Figure 26. Synchronously replicated file resources can also be asynchronously replicated to a 3rd-site for backup purposes. For more details for native Synchronous file replication, also known as MetroSync, see the Dell Unity: MetroSync white paper.
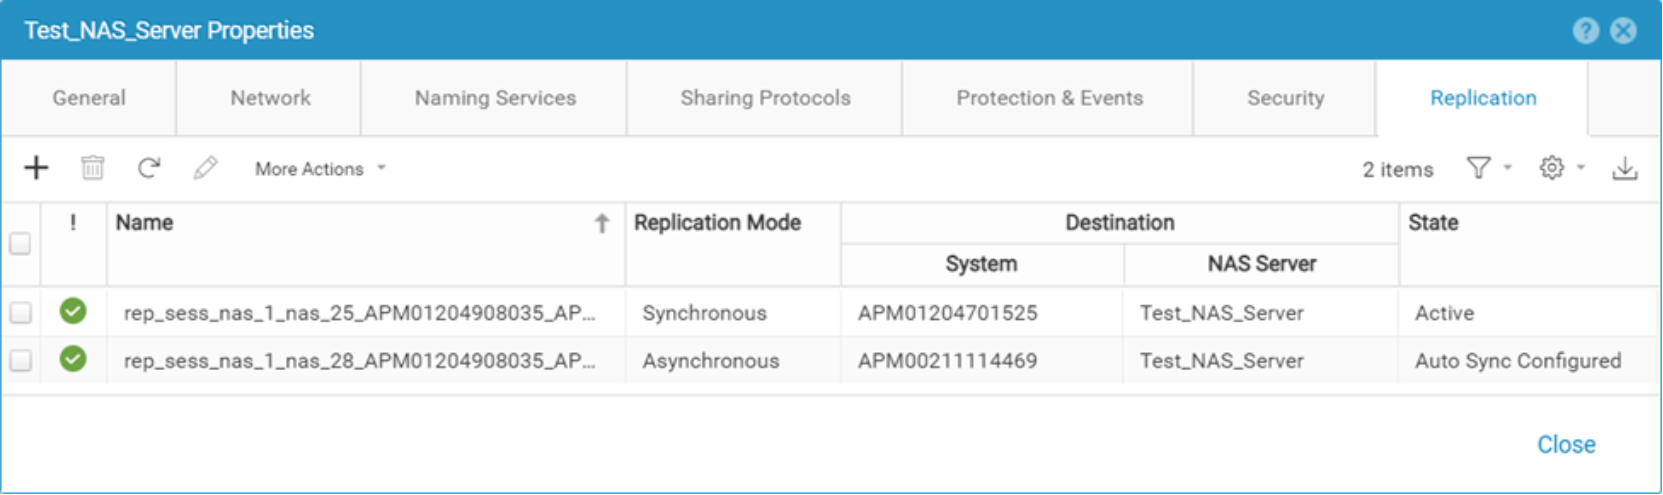
Figure 26. NAS Server Properties – Replication tab
Protection and Mobility Interfaces
Users can create interfaces that can be used for Import and Replication sessions from the Interfaces page. Protection and Mobility interfaces can be shared between replication and import sessions. If an interface is shared between replication and import, the user must pause the replication session and then remove all import sessions to change the interface and remove both replication and import sessions before deleting all interfaces. A user can create, edit, and delete interfaces from the Interfaces page in Unisphere as shown in Figure 27.

Figure 27. Create Interfaces Page
Import
The Import page allows the user to import VNX1/VNX2 Block and File resources to Dell Unity. The Import page, as shown in Figure 28, gives the user the workflow needed to setup an import session including setting up interfaces, system connections, and finally configuring import sessions. With existing import sessions, the user can apply different actions including Pause, Resume, Cutover, Cancel, Commit, and Download a Summary Report. In the Connections tab, the user can setup a system connection, Discover Import Objects, and Verify and Update a system connection as needed. After the prerequisites are met, the Create Import Session Wizard guides the user through the configuration needed to start importing storage resources to Dell Unity. For more information, review the Dell Unity: Migration Technologies white paper.
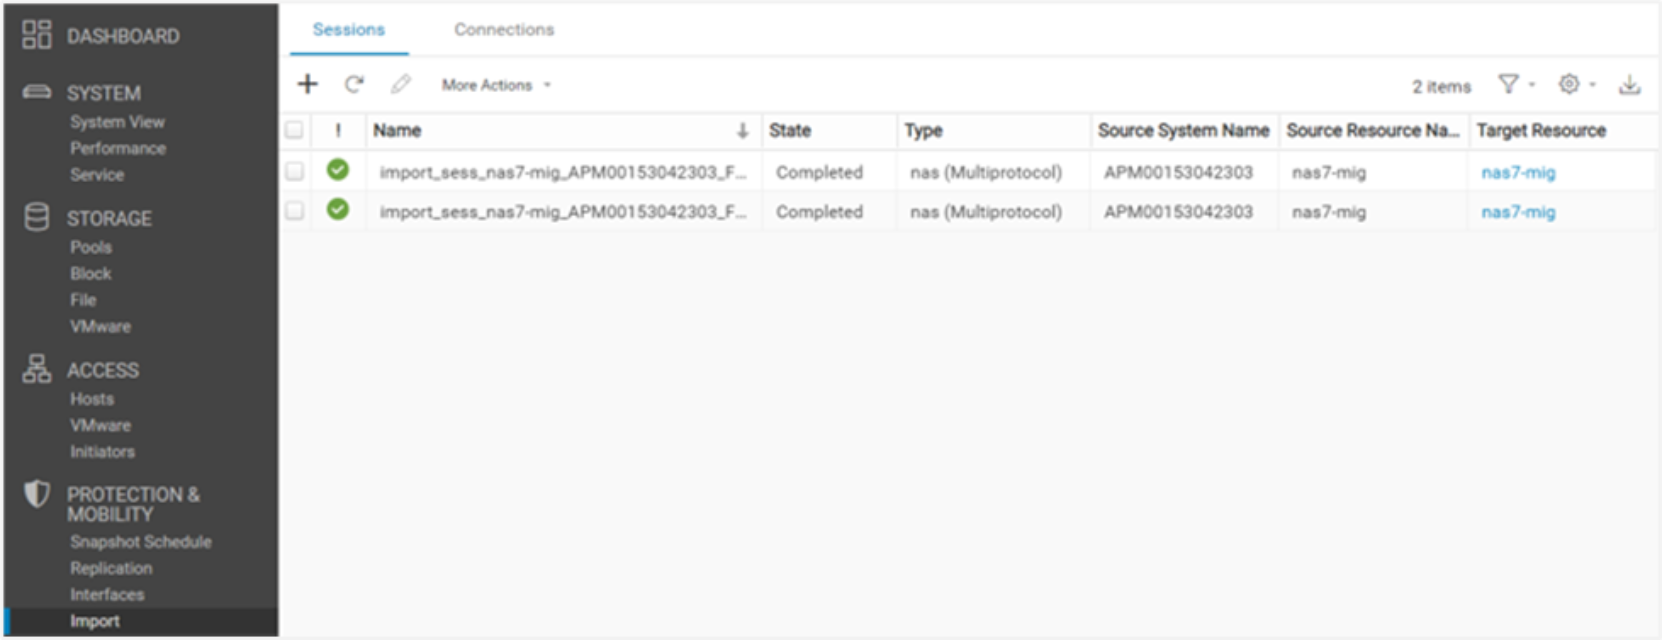
Figure 28. Import Page
Dell UnityOS 4.4 and later includes SAN Copy Pull as a part of the code. SAN Copy Pull is a migration tool which migrates data from block storage resources, either stand-alone LUNs/Volume or VMFS Datastores, found on supported systems to Dell Unity. All the configuration, creation, and management of SAN Copy Pull sessions is only available through ULI or REST API. For more information, review the Dell Unity: Migration Technologies white paper.
Alerts
The Alerts page, as shown in Figure 29, displays all system-generated alerts along with associated message information. Alerts are usually events that require attention from the user in some manner. Some alerts indicate that there is a problem or issue with the system, while others provide specific information, depending on the system status. For example, an alert might indicate that a drive has faulted, or a specific pool is out of space, which means some type of action would be needed to remedy the event. Alerts provide the user with information about the source of an event, the symptoms and cause, and actions to resolve it. Sometimes they include a Knowledge Base (KB) article link. If an alert is known or no longer relevant to the environment, the Alerts page provides a way to acknowledge alerts for book-keeping purposes as well as the ability to delete alerts as needed. Users can also configure Unisphere to send alert notifications to a specified email or SNMP trap using the Settings menu.
With Dell UnityOS 5.0 and later, all Alerts are assigned an alert State. The alert State can be used to determine which alerts are current, and which have been resolved. There are four States for alerts:
Updating: The current State of the alert is being updated (this State can only be seen when upgrading to UnityOS 5.0 or later).
Inactive: The alert condition has been resolved.
Active_Auto: The alert is still Active and will be marked Inactive automatically when the condition is cleared.
Active_Manual: The alert is still Active, and a user will need to deactivate the alert to mark the alert Inactive when the condition is investigated or cleared.

Figure 29. Alerts Page
Each alert is associated with a severity level, as defined in the following table:
Table 5. Alert Severity Levels
|
Icon |
Label |
Indicates |
|
|
Information |
An event has occurred that does not impact system functions. No action is required. |
|
|
Warning |
An error has occurred that you should be aware of, but it does not have a significant impact on the system. For example, a component is working, but its performance may not be optimal. |
|
|
Error |
An error has occurred that has a minor impact on the system and should be remedied, but it does not have to be fixed immediately. For example, a component is failing and some or all its functions may be degraded or not working. |
|
|
Critical |
An error has occurred that has a significant impact on the system, and it should be remedied immediately. For example, a component is missing or has failed, and recovery may not be possible. |


Jobs
As task operations are run on the system, the system records the operations through the Jobs page in Unisphere, Figure 30 shows the Jobs page in Unisphere with all the entries. Most operations for storage systems are automatically run as background jobs, allowing users to start other tasks without waiting for a certain job to complete first. At any given point, users can view the full list of running, queued, completed, or failed jobs from the Jobs page. To get more information about a job, users can select the job and click the details icon to see related tasks/descriptions for the specific job. Unisphere also provides users the ability to cancel running jobs as needed. This action only stops subsequent related job tasks from running and does not revert the jobs that have already completed. Job listings can be deleted from the list, so they are no longer shown. Deleting a job from the list does not revert the actions that were completed.
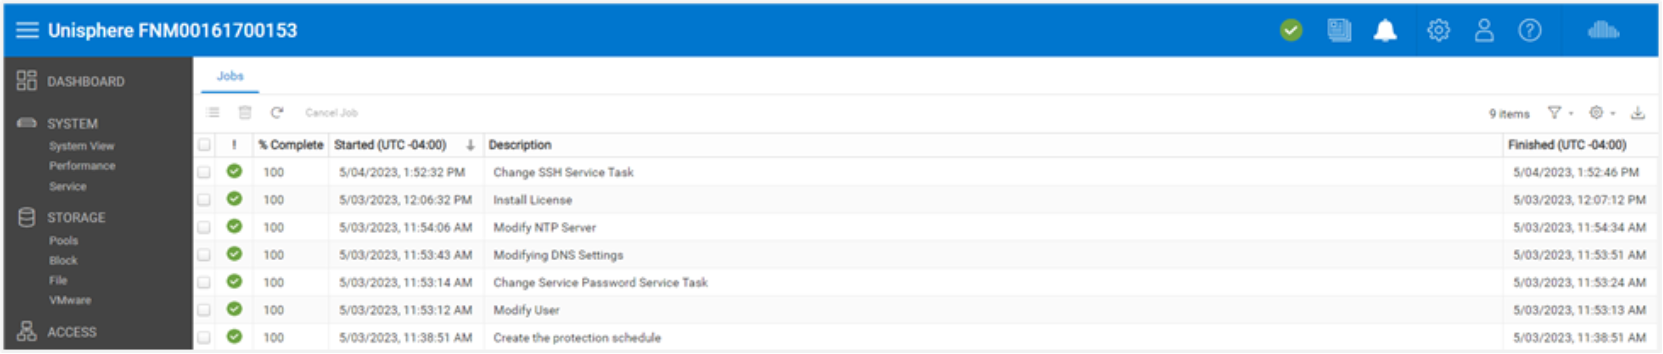
Figure 30. Jobs Page
Logs
The Logs page, as displayed in Figure 31, has an aggregated listing of all the logs of the system since it has been powered on. Logs report and monitor on different system events. All the events are collected and written to the log. Also, a user can configure the system to send log information to a remote host. A user must specify the network address of a host that will receive the log information. The remote host must be accessible from the storage system, and security for the log information must be provided through network access controls or the system security at the remote host. A port protocol must be specified to transfer log information. Dell Unity supports both UDP and TCP remote logging protocols. UnityOS 5.5 adds additional support for TLS encrypted remote logging as a protocol option. In the Logs page, there is information provided for each event:
- Severity level indicated by an icon
- Date and time the event occurred
- Source of the event software component that recorded the event
- User who created the event
- Event ID that is a unique identifier for each type of event
- Source Storage Processor
- Log category
- Message text that describes the event

Figure 31. Logs
Support
The Support page, as shown in Figure 32, provides links to resources for learning about and getting assistance with the user’s storage system. Options include watching how-to videos, accessing online training modules, downloading the latest product software, searching and participating in the online community, and more. If a Dell support account is configured on the system, the links automatically advance users to the corresponding page, instead of having to input support credentials each time. Users can also use the Support page to open service requests, start a chat session with live Dell Support personnel, or even go to an ordering page to order replacement parts through the Dell store for faulted components.
In addition, the Dell Community Network website includes product-specific communities that include relevant discussions, links to documentation and videos, events, and more. The community not only provides the user more information about the products, but also guides users through specific issues they might be experiencing.
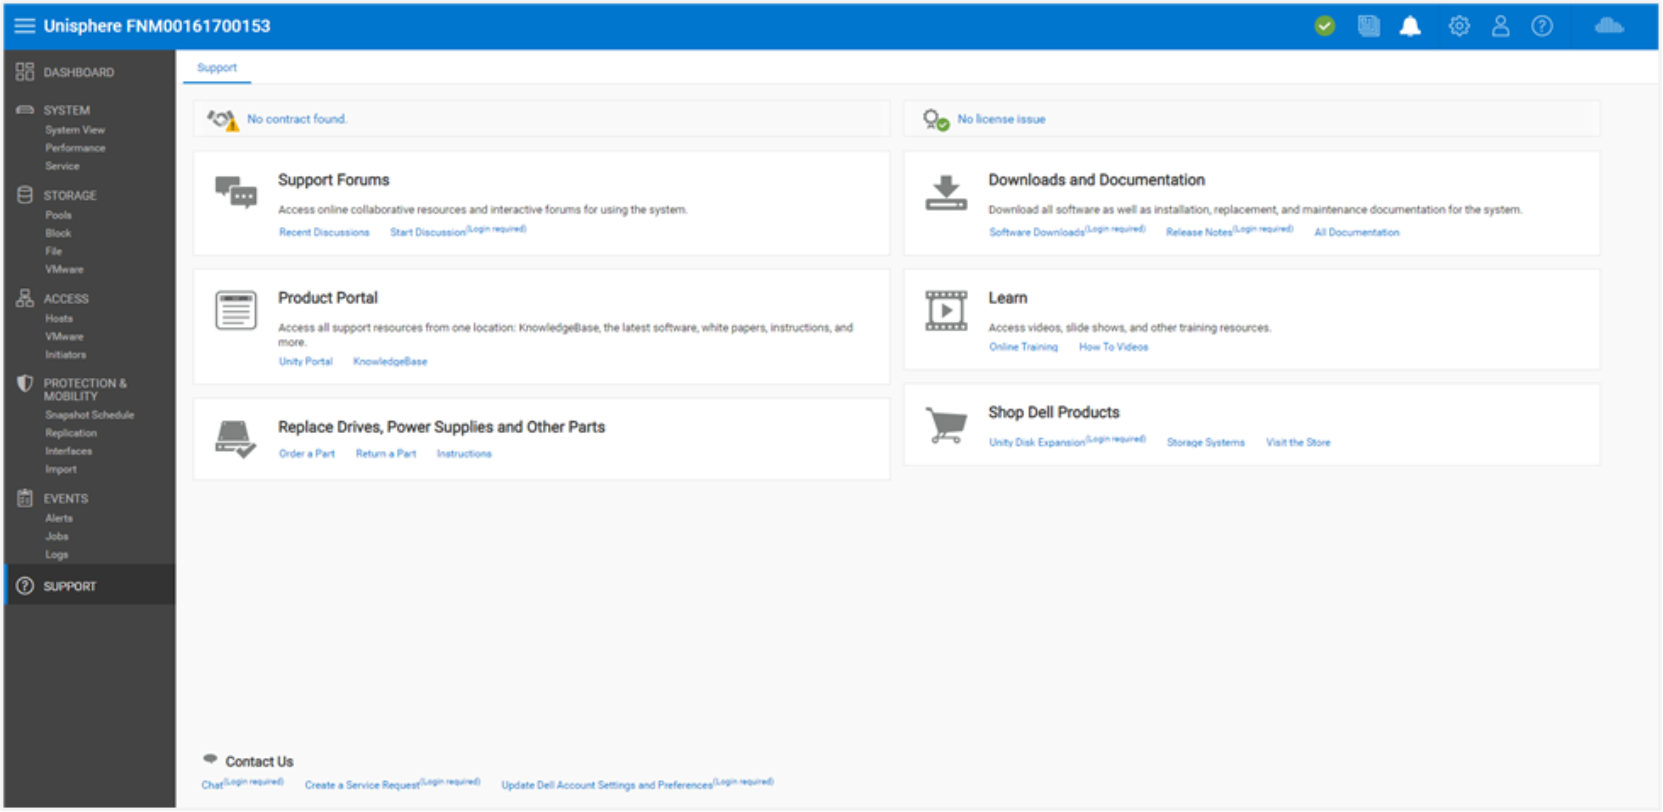
Figure 32. Support Page
Additional System Status Messages/Settings
With the Dell UnityOS 4.3 and later, the system displays the current system name in the top menu bar and in the browser tab as the page name, as shown in Figure 33. This helps to easily identify at a quick glance the system that is being managed.
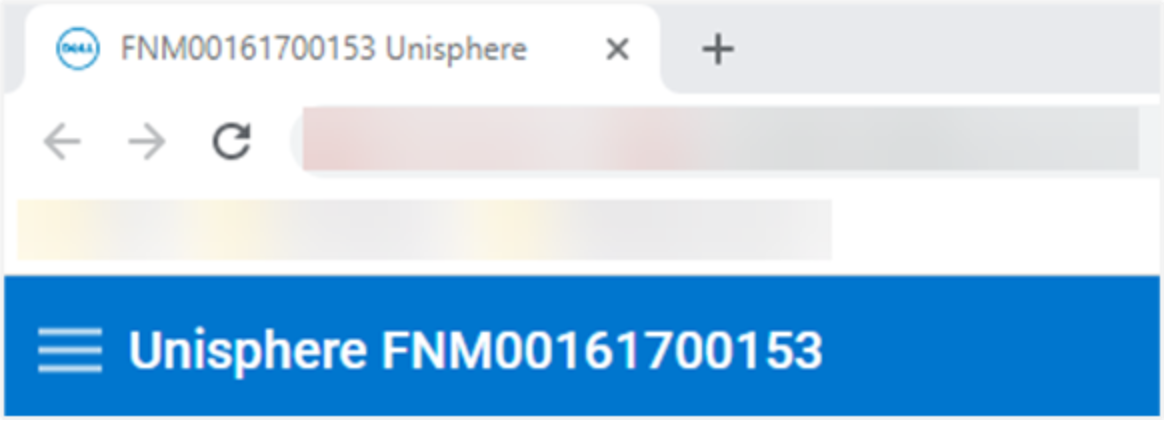
Figure 33. System Name
There are additional status messages and settings in the upper right of the GUI, as shown in Figure 34.

Figure 34. Additional System Statuses/Settings
The following sections provide more information about each icon.
System State
The first icon available in the top menu bar, as shown in Figure 35, shows the overall state of the system (OK, Warning, Error, or Critical). When clicked, the icon shows some high-level important system information like the current software version and system time. A link to view system details is also available in the window, which leads to the System View page when clicked.
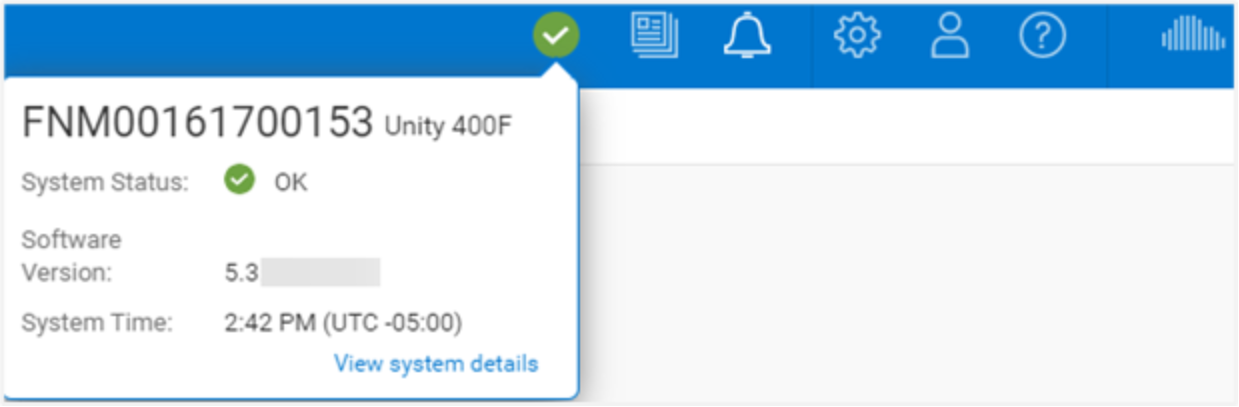
Figure 35. System Status
Running Jobs
As jobs are started on the system, users might want to check the status of their running jobs without having to go to the Jobs page. They can do this by clicking the Jobs icon, as shown in Figure 36, which shows all active jobs and their current percentage completed.
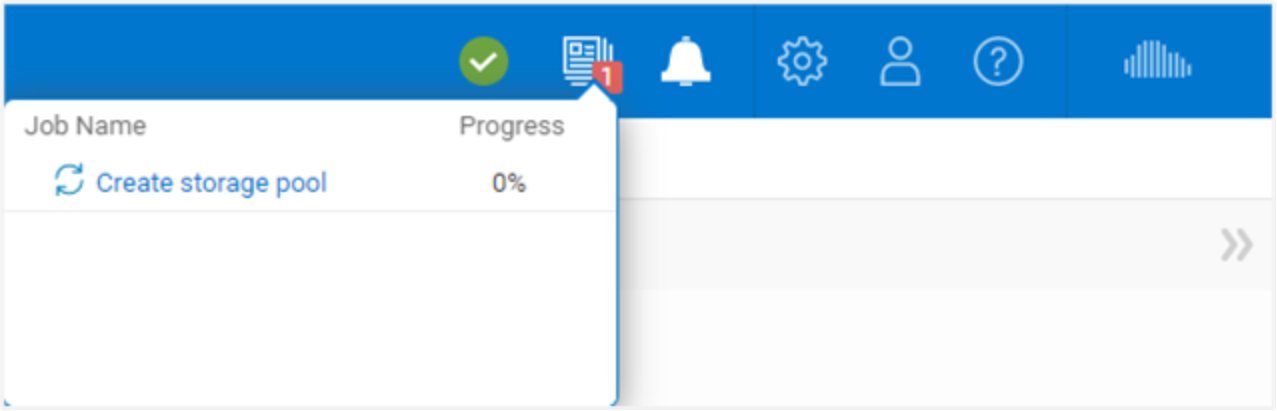
Figure 36. Active Jobs
Quick Access Alerts
Unisphere provides users a way to quickly see recent alerts on the system through the Alerts icon in the top menu bar, as shown in Figure 37. A link in the dialog leads to the Alerts page, which lists all alerts associated with the storage system. Here, users can get additional details about the alerts and information about how to remedy the associated issues.
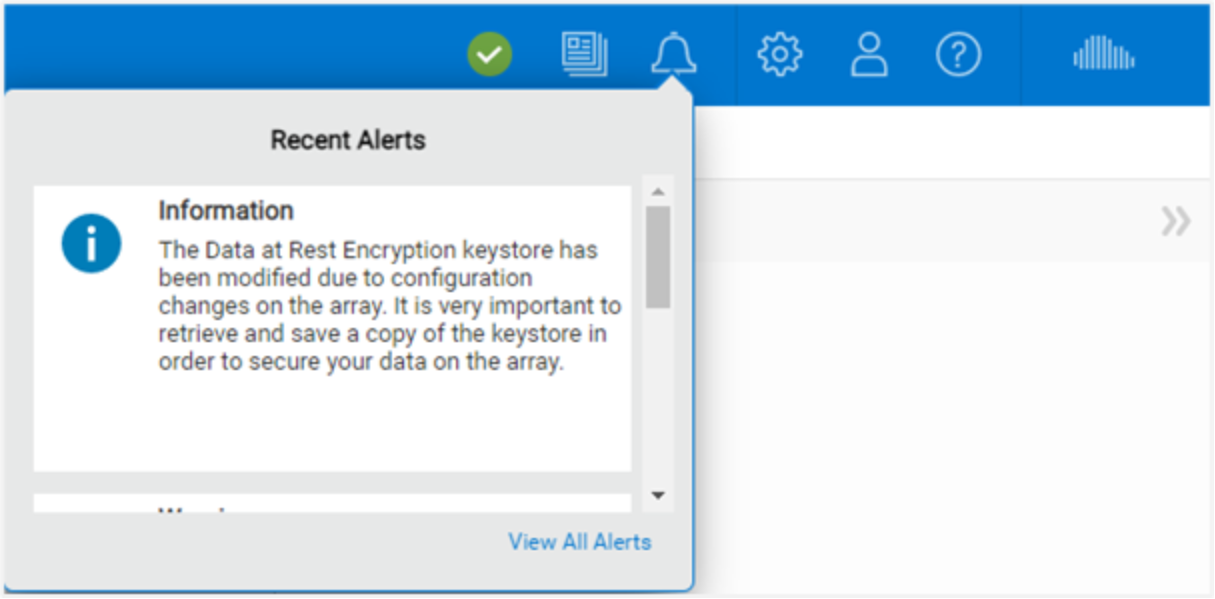
Figure 37. Recent Alerts
System Settings
The gear icon in the top menu bar leads to the Settings menu. The Settings menu, as shown in Figure 38, allows administrators to set/configure many settings that are important to the system, but are less frequently used. The menu includes the ability to upgrade system software, configure support credentials, configure user directory services for Unisphere management, and install system licenses. Table 6 shows all available settings in the Settings menu. There is a link at the bottom of the menu that reopens the Initial Configuration Wizard if a user had accidentally closed the wizard during initial deployment or wants to run through the wizard again.
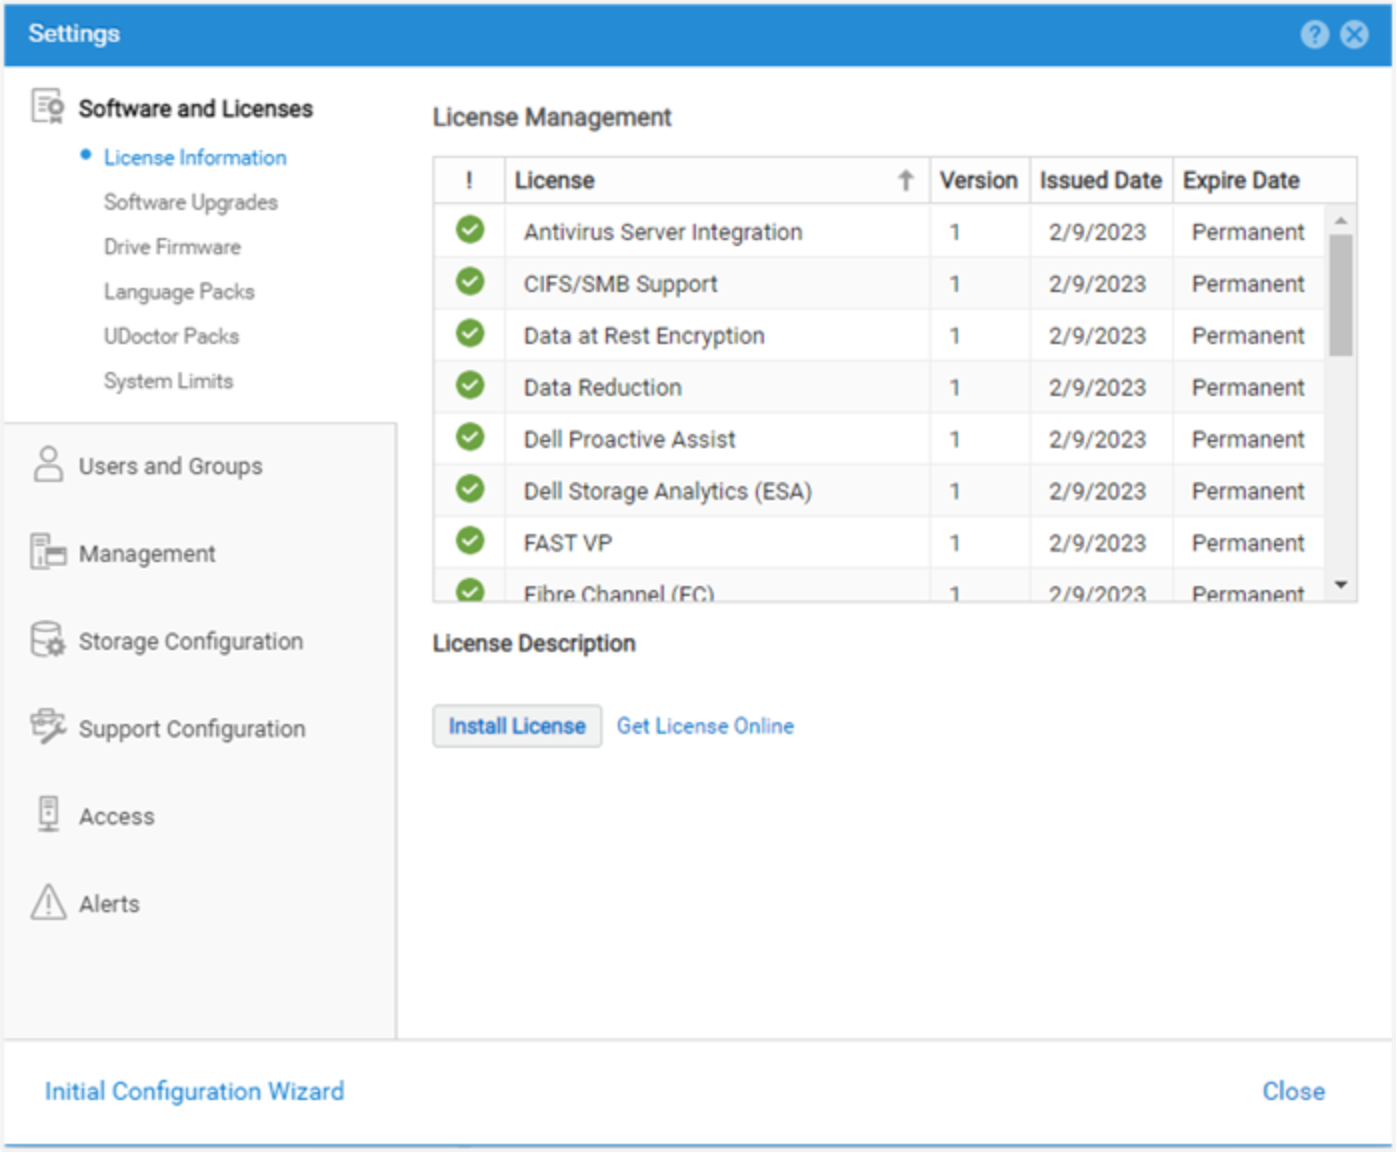
Figure 38. Settings Menu
Table 6. Settings Menu Options
|
Categories |
Settings |
General Description |
|
Software and Licenses |
License Information, Software Updates, Drive Firmware, Language Packs, UDoctor Packs, System Limits |
Update system software/firmware, install licenses, install language packs and view system limits |
|
Users and Groups |
User Management, Directory Services |
Create, modify, delete user accounts for system management access, and configure LDAP server(s) |
|
Management |
System Time and NTP, Schedule Time Zone, DNS Server, Unisphere Central, Unisphere IPs, Remote Logging, Failback Policy, Performance, Encryption |
Configure various system-related settings |
|
Storage Configuration |
For Hybrid Systems: FAST Cache, FAST Cache Drives, FAST VP, Drives For All Flash Systems: Drives |
Configure FAST technology-related settings and view unconfigured drives |
|
Support Configuration |
Proxy Server, Dell Support Credentials, Contact Information, SupportAssist[1], CloudIQ |
Add Dell Support account information, add contact information, and configure SupportAssist/CloudIQ |
|
Access |
CHAP, Ethernet, High Availability, Fibre Channel, Routing, VLANS, iSNS Configuration |
Configure additional security for login (iSCSI), view IO port status/information, view MTU and speed, configure link aggregation, view/edit configured network routes, view Fibre Channel ports, and enable iSNS |
|
Alerts |
General, Email and SMTP, SNMP |
Add email or SNMP trap destinations to send system alerts to, change language preferences, and enable threshold alerts |
Dynamic Pre-Upgrade Health Check (PUHC)
Starting in Dell UnityOS 4.0 and later, you can manually download the latest Pre-Upgrade Health Check (PUHC) file from the Dell Support site and install it locally on the system. This ensures that the system can detect any recent issues that would prevent a successful OE upgrade. In Dell UnityOS 5.3 and later, a PUHC file can be dynamically pushed and automatically installed on the system. To support this feature, SupportAssist for physical Unity systems or Secure Remote Services for UnityVSA systems must be configured. The purpose of dynamically pushing the PUHC files is to ensure that Unity systems are always running the latest health checks. The Unity system will typically poll the backend once a day for new files actively waiting to be transferred. Figure 39 shows an example of the Alert indicating that a new PUHC was installed successfully.
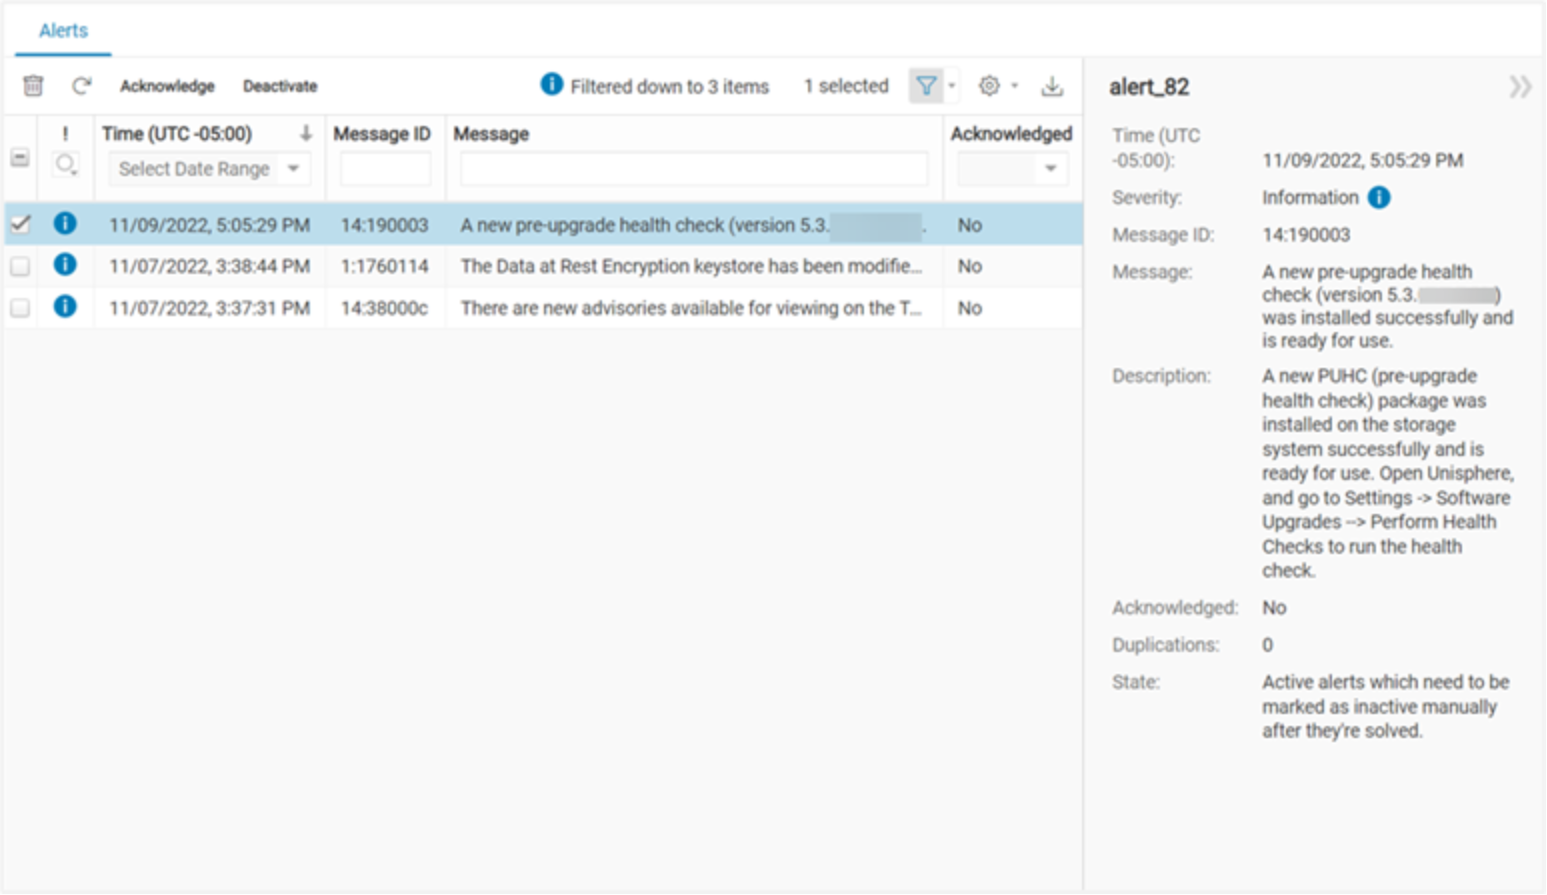
Figure 39. Dynamic Pre-Upgrade Health Check
Dell SupportAssist
In Dell UnityOS 5.2 and earlier, physical systems leveraged Secure Remote Services (formerly ESRS) as its remote support and call home service. In Dell UnityOS 5.3 and later, Dell SupportAssist replaces Secure Remote Services for physical systems. SupportAssist can be configured in two different modes, Connect directly or Connect through a gateway server. These modes are synonymous with Integrated and Centralized Secure Remote Services. Secure Connect Gateway (SCG) version 5.12 or later is required when configuring SupportAssist through a gateway server. No changes have been made to UnityVSA systems, which continue to support Centralized Secure Remote Services. With the release of UnityOS 5.5, Proxy Server configurations for SupportAssist are no longer supported.
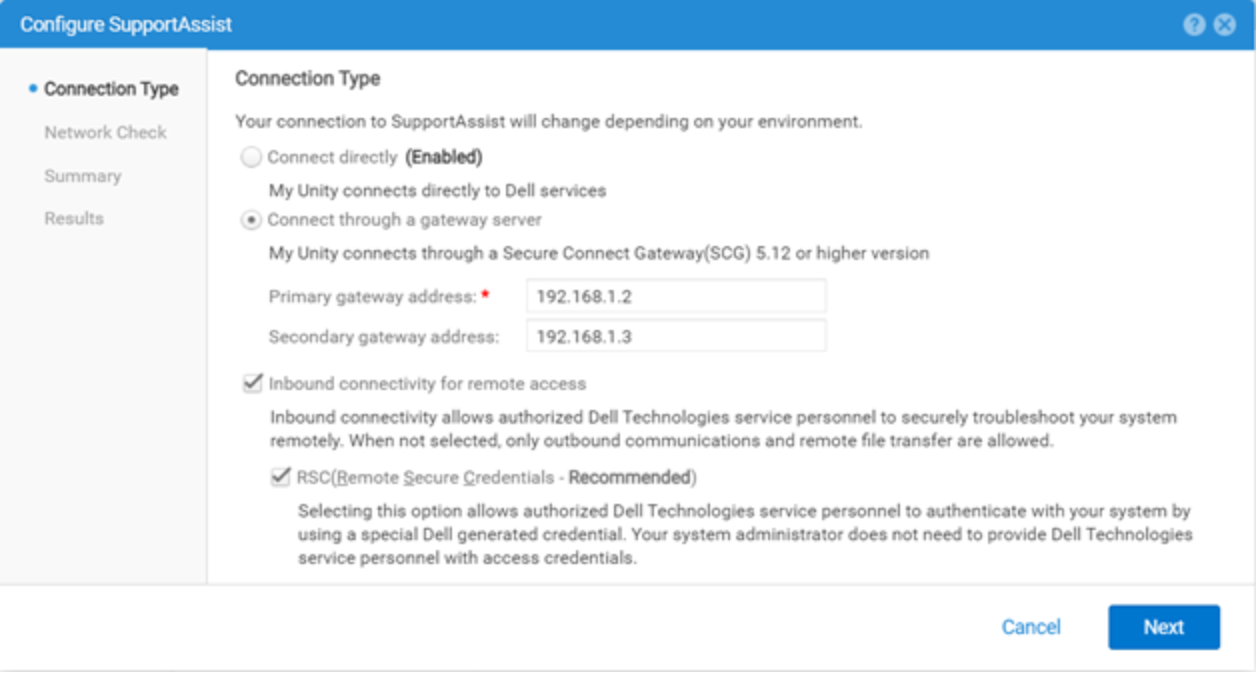
Figure 40. Configure SupportAssist example
Remote Secure Credentials (RSC)
Beginning in UnityOS 5.3, the Remote Secure Credentials (RSC) option can be enabled on a physical system. This option allows authorized Dell Support personnel to remotely access a system without requiring a system’s service password. Instead of the service user’s credentials, Dell Technologies service personnel authenticate the system by using a special Dell generated credential. This credential expires when the service technician terminates the remote access session. Inbound connectivity for remote access must be enabled to configure RSC. Enabling RSC avoids the need for a user to provide their credentials through unsecure methods. It also results in faster time to resolution on service requests because Dell Support personnel can quickly access the system to troubleshoot issues and gather diagnostics. With the release of UnityOS 5.5 and later, RSC is enabled by default and can only be disabled from UEMCLI.
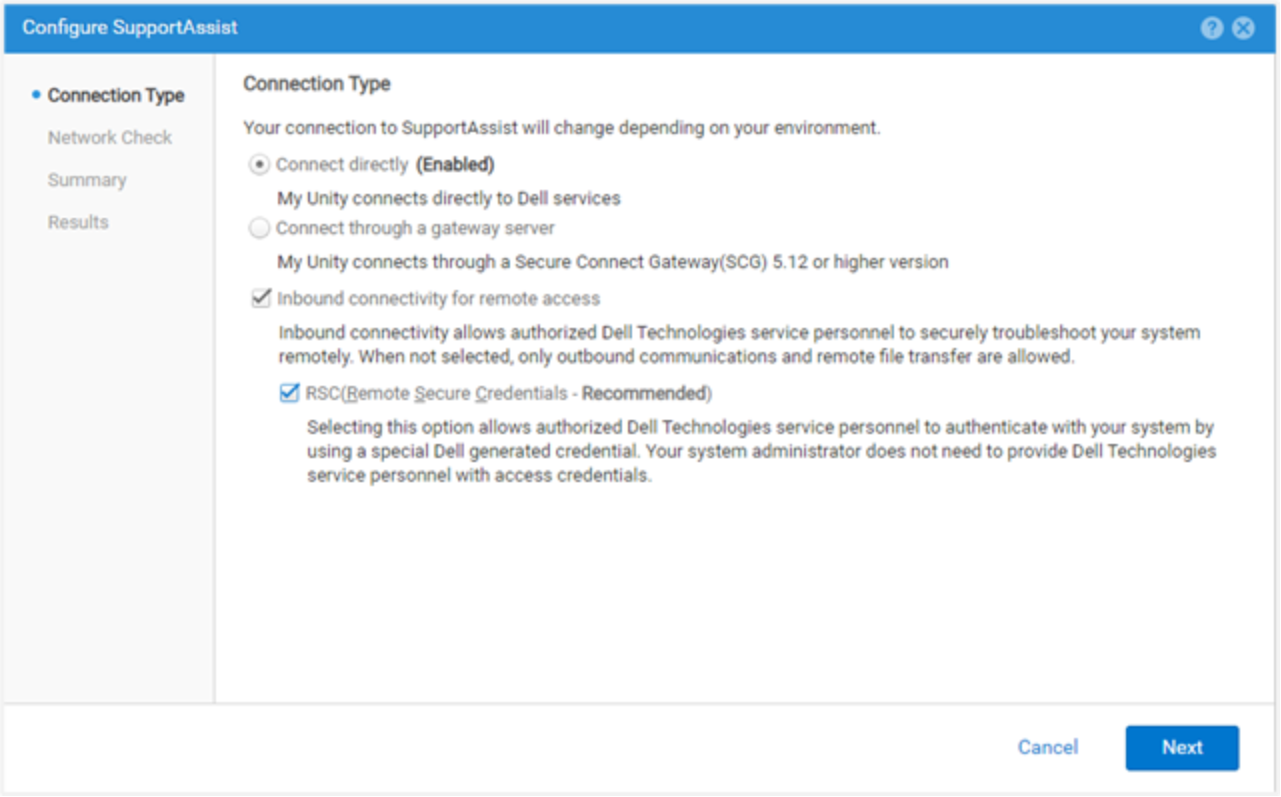
Figure 41. Configure Remote Secure Credentials
LDAP Enhancements
With Dell UnityOS 4.4 and later, when configuring the Directory Services under Users and Groups, as shown in the following figure, the user can select the Auto Discover checkbox to automatically look up the LDAP servers through the DNS.
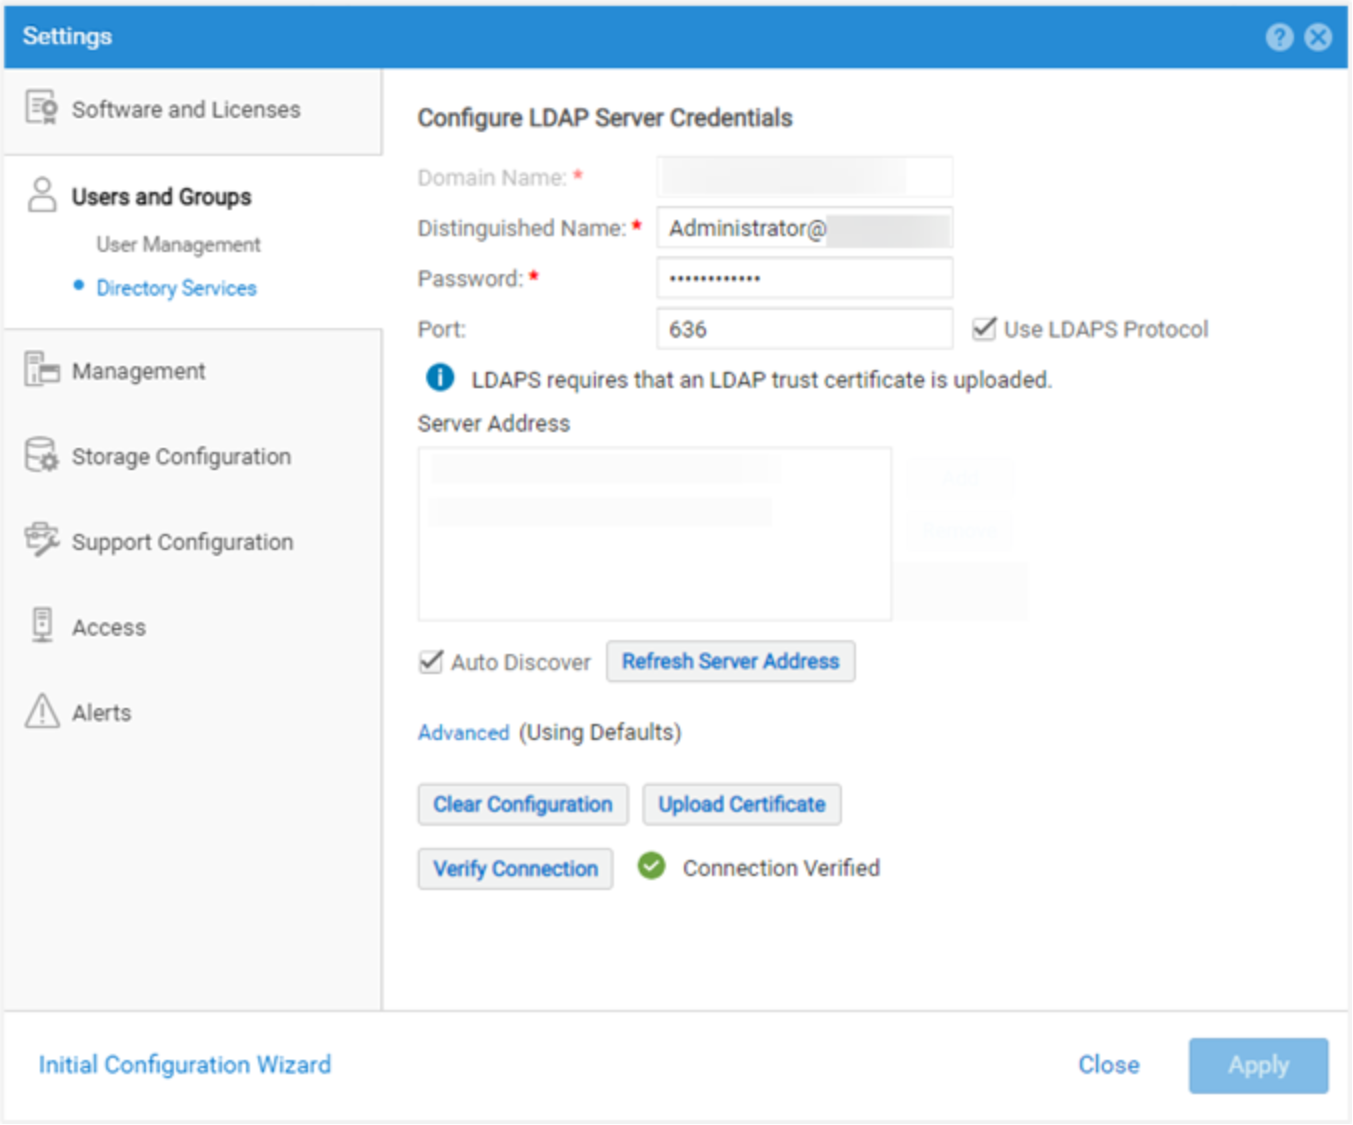
Figure 42. Directory Services – LDAP configuration
Additionally, the system can have multiple LDAP servers configured and supports Forest Level Authentication. With Forest Level Authentication, the system can authenticate LDAP users at the forest level of the domain. For example, if a domain has finance.dell.com and eng.dell.com as trees, by providing in the Domain Name dell.com and specifying port 3268 for LDAP or port 3269 for LDAP Secure (LDAPS) the users under both trees can be authenticated. For more information about how to configure LDAP and LDAPS, see the Dell Unity Security Configuration Guide on Dell Support.
Logged in User Options
The user icon next to the Settings menu, as shown in Figure 43, includes various options, including changing user language preferences, changing the password of the logged in user, and a log out option.
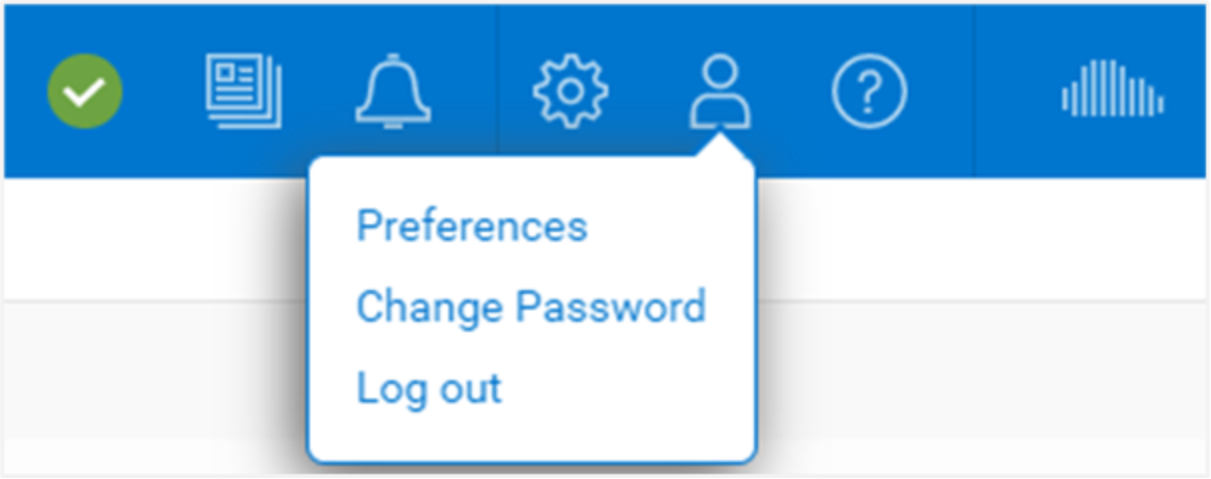
Figure 43. Additional User Options
Unisphere Online Help
The next icon available in the top menu bar is the Unisphere provides context-sensitive help, as shown in Figure 44. The options for the corresponding dialog dynamically change based on the current page/wizard in Unisphere. For example, if the user is on the Dashboard page, the online help icon displays an option to go directly to Online Help for the Dashboard page, as shown in Figure 45. This helps users find the exact information they need when trying to learn more about the system, instead of having to search through the various pages in the Online Help.
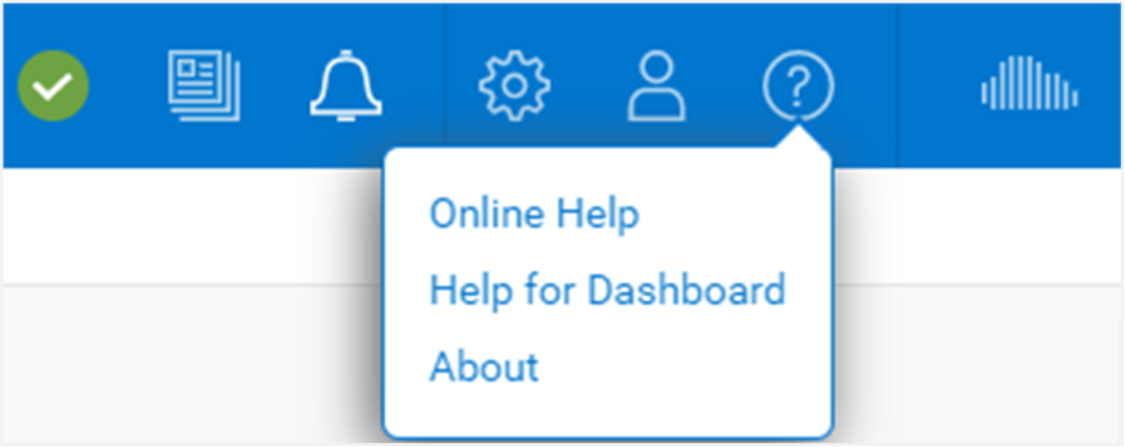
Figure 44. Unisphere Online Help Options
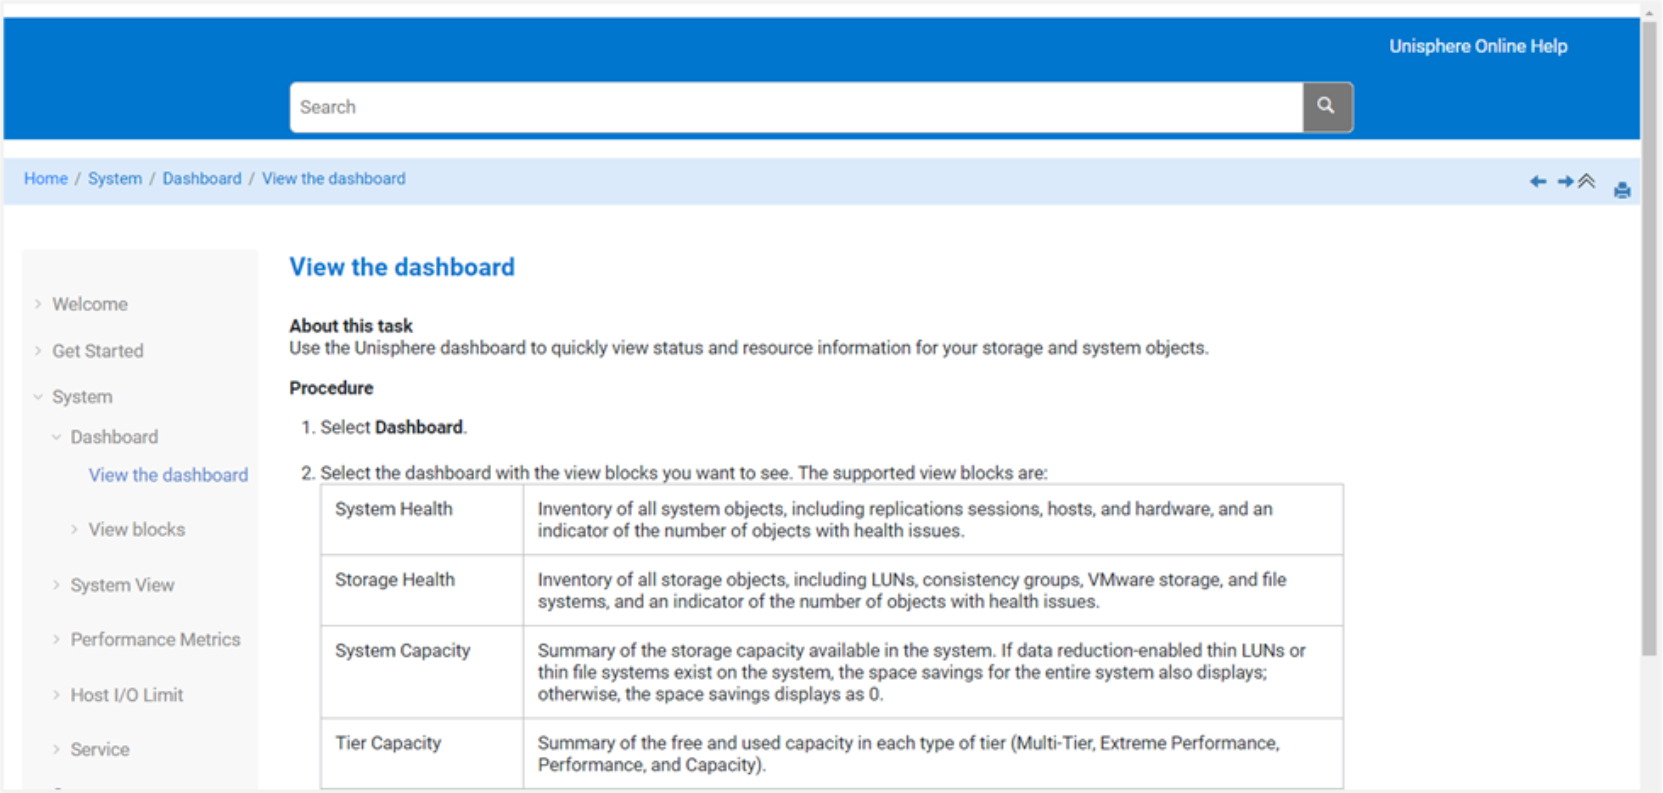
Figure 45. Unisphere Online Help
Launch APEX AIOps Observability
Starting with UnityOS 5.5, CloudIQ has been renamed APEX AIOps Infrastructure Observability. CloudIQ was initially introduced with Dell UnityOS 4.1 and the CloudIQ icon, now APEX AIOps icon, was added in the top-right corner of Unisphere. Clicking this icon launches the APEX AIOps GUI (https://aiops.apex.dell.com). To see the system in APEX AIOps, a user must set up Secure Remote Services or SupportAssist and allow data to be sent to APEX AIOps from the Settings page, as shown in Figure 46.
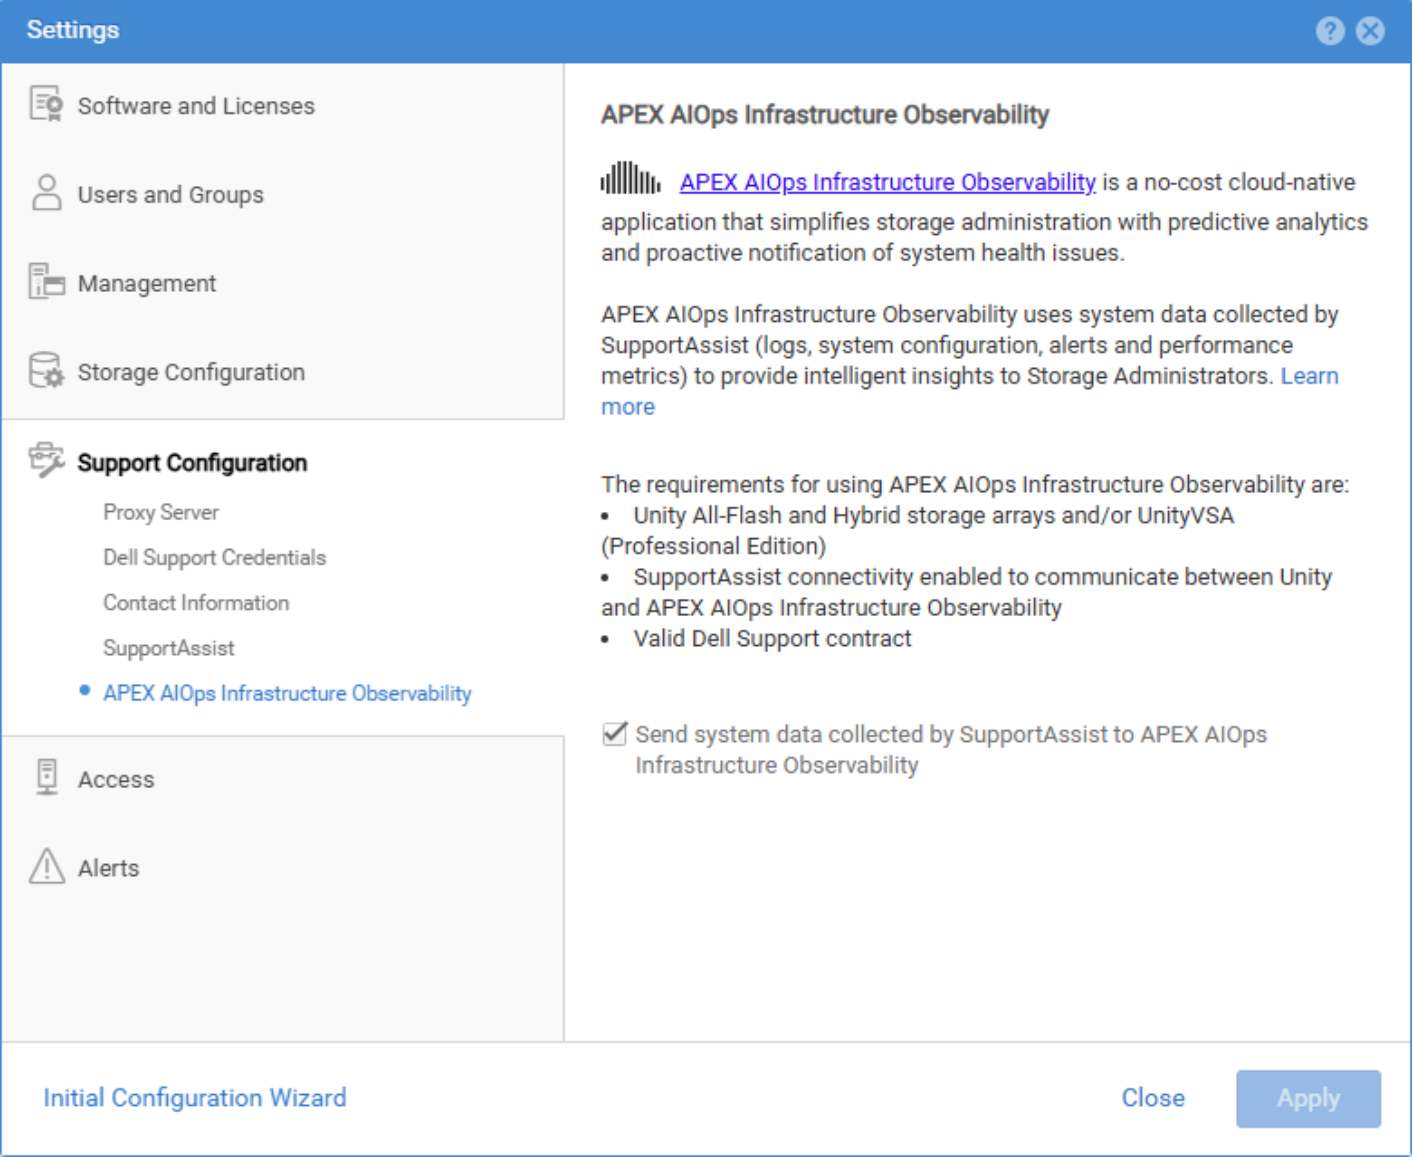
Figure 46. CloudIQ Configuration